These LIGHTROOM SETTINGS will make Your Photos POP!
Summary
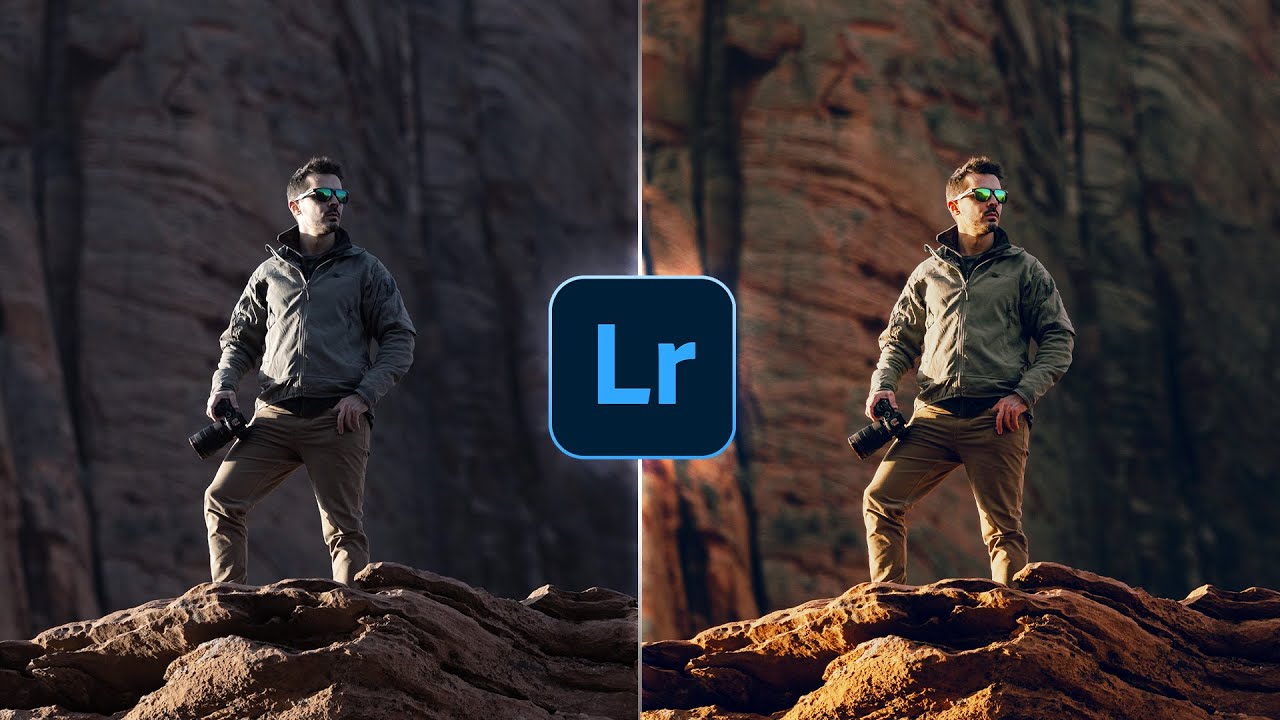
TLDRThis Lightroom tutorial demonstrates how to transform a raw image into a dramatic golden hour scene through a series of tonal adjustments. The instructor guides viewers on how to enhance contrast, manage exposure, and utilize basic and local adjustments to emphasize specific areas like the mountain peak and clouds. Techniques such as color range masks, gradients, and color grading are employed to create depth and warmth, concluding with sharpening and spot removal to finalize the image.
Takeaways
- 📷 Start with a base crop adjustment to enhance composition, making the mountain peak more prominent.
- 🔧 Use the basic panel in Lightroom to adjust contrast, exposure, and shadows to create a dramatic and darker image.
- ⚪ Hold the ALT key while adjusting sliders to check for underexposure and avoid losing important details.
- 🌄 Increase whites and contrast to further enhance the image, but be mindful not to overexpose snow patches.
- 🌅 Adjust white balance to introduce a golden hour effect, raising temperature and tint for a warmer look.
- 🔍 Reduce clarity and dehaze to add a dreamy effect and prevent the image from appearing too sharp or bright.
- 🖼️ Utilize local adjustments with masks to selectively darken the sky and foreground, enhancing contrast and focus.
- ✨ Introduce radial gradients to simulate light sources and create a vignette effect, drawing attention to the center.
- 🌈 Use color range and luminance range masks for precise selection and adjustment of specific areas like clouds.
- 🎨 Adjust hue, saturation, and luminance in the color mixer to achieve a golden hour color grading.
- 🔧 Apply sharpening and remove sensor spots in the details tab for final image refinement.
Q & A
What is the starting point for the Lightroom tutorial described in the script?
-The starting point is a raw file that has already had some cropping applied to make the mountain peak appear larger.
Why does the instructor change the profile from Adobe color to Adobe standard in the basic panel?
-The instructor changes the profile to lessen the overall contrast, allowing for more control over the exposure adjustments.
What is the purpose of bringing down the exposure in the basic panel of Lightroom?
-The purpose is to make the image darker and more dramatic without losing details, which helps in creating a more striking visual effect.
How can underexposure be identified when adjusting the Shadows and Blacks sliders in Lightroom?
-Underexposure can be identified by the appearance of tiny blue areas in the image, which indicate loss of detail in the shadows.
What is the effect of bringing up the Highlights and Whites sliders in Lightroom?
-Bringing up the Highlights and Whites increases the contrast and brightness in the brighter areas of the image, but care must be taken to avoid overexposing certain areas like snow patches.
Why does the instructor want to adjust the white balance for a golden hour light effect?
-Adjusting the white balance helps to mimic the warm tones often associated with golden hour lighting, enhancing the mood and atmosphere of the image.
What is the purpose of adding texture and reducing clarity in the basic adjustments?
-Adding texture makes the image look sharper, while reducing clarity adds a dreamy effect, contributing to the overall desired aesthetic of the image.
How does the instructor use color range masks in the masking panel of Lightroom?
-The instructor uses color range masks to select and adjust specific areas of the image, such as the sky, to make it darker and introduce more saturation for contrast.
What is the effect of using a linear gradient mask on the top of the image?
-A linear gradient mask on the top of the image is used to bring down the blacks, making the sky darker and creating a vignetting effect that leads the viewer's eye towards the center of the image.
How does the instructor use radial gradients to introduce light from the right side of the image?
-The instructor creates a large radial gradient, placing its center outside the image, and adjusts the exposure, whites, and blacks to introduce light and create a glow effect.
What adjustments does the instructor make to the cloud using a luminance range mask?
-The instructor uses a luminance range mask to selectively brighten the cloud, increase its contrast with the blue sky, and add warmth by adjusting the temperature and tint.
How does the instructor approach color grading to achieve a golden hour scene?
-The instructor works on the Hue, Saturation, and Luminance tabs in the Color Mixer to adjust the color tones of the mountain and sky, and uses split toning in the Color Grading panel to add warmth to the highlights and midtones.
What final adjustments does the instructor make to the image in the Details tab?
-The instructor reduces the radius, increases the details, and adds masking to apply sharpening primarily to the mountain, and also cleans up sensor spots using the spot removal tool.
Outlines
📸 Lightroom Editing Basics: Enhancing Contrast and Drama
This paragraph introduces a Lightroom tutorial focused on transforming an image through basic adjustments. The process begins with a raw file, where the instructor applies a crop to emphasize the mountain peak. The main goal is to increase contrast, particularly on the mountain and clouds. The instructor suggests changing the profile to Adobe Standard to gain more control over contrast and exposure. The exposure is reduced to darken the image, while carefully monitoring the histogram to avoid underexposure. Shadows and blacks are also adjusted to increase contrast without losing important details. The instructor emphasizes the importance of avoiding overexposure on the snow patches and suggests using the Whites and Contrast sliders to achieve the desired effect. Finally, the instructor introduces the idea of adding a golden hour light effect by adjusting the white balance and adding texture and clarity for a dreamy effect.
🌄 Advanced Masking Techniques for Local Adjustments
The second paragraph delves into advanced masking techniques in Lightroom to make local tonal adjustments. The instructor starts by using a color range mask to select the sky and darken it further, adding saturation for blue tones. The aim is to make the mountain peak stand out against the darker sky. A linear gradient is applied to the top right of the image to create a vignette effect, drawing the viewer's eye towards the center. Another linear gradient is used on the foreground to darken it without underexposing the area by adjusting the Whites. The instructor also discusses the use of radial gradients to introduce light from the right side and to enhance the visibility of the highlights on the mountain. The paragraph concludes with the use of a luminance range mask to selectively brighten a cloud, adjusting its clarity, temperature, and tint to create separation from the blue sky.
🎨 Color Grading and Sharpening for a Golden Hour Effect
In the final paragraph, the focus shifts to color grading and sharpening to achieve a golden hour look. The instructor adjusts the Hue and Saturation in the Color Mixer to give the mountain a reddish tone and the sky an aqua hue. Orange saturation is increased to make the peak glow, while yellow is reduced to keep the snow white. The instructor also lowers the blue saturation and luminance for a darker sky. Split toning is used to warm the highlights and midtones, enhancing the golden hour effect with high saturation. Calibration adjustments are made to the blue, green, and red hues and saturation to fine-tune the color grading. The sharpening process involves reducing the radius, increasing details, and applying masking to sharpen the mountain while avoiding over-sharpening other areas. Sensor spots are removed to complete the polished image. The instructor wraps up the tutorial, inviting feedback and questions from viewers.
Mindmap
Keywords
💡Lightroom
💡Tonal Adjustments
💡Contrast
💡Histogram
💡White Balance
💡Texture
💡Clarity
💡Dehaze
💡Masks
💡Color Grading
💡Sharpening
Highlights
Introduction to using Lightroom for enhancing an image with specific adjustments.
Cropping the image to emphasize the mountain peak.
Changing the profile from Adobe color to Adobe standard to control contrast.
Reducing exposure to create a darker, dramatic look while avoiding underexposure.
Adjusting Shadows and Blacks to add contrast without losing important details.
Demonstration of the difference in image tone after basic adjustments.
Working on highlights and whites to increase contrast while avoiding overexposure.
Adjusting white balance to mimic golden hour lighting.
Adding texture and clarity for a sharper image while maintaining a dreamy effect.
Using color range masks to selectively adjust the sky's exposure and saturation.
Creating a vignette effect with a linear gradient to draw attention to the mountain peak.
Using radial gradients to introduce light and create a glow effect on the mountain.
Adjusting a specific cloud's brightness and warmth to stand out against the sky.
Using luminance range masks for precise selection and adjustment of elements in the image.
Color grading to achieve a golden hour scene through hue and saturation adjustments.
Split toning in the color grading panel to add warmth to highlights and midtones.
Final sharpening of the image with selective application on the mountain.
Cleaning up sensor spots in the image for a polished finish.
Completion of the image enhancement tutorial showcasing the final result.
Transcripts
how can we make use of simple tone
adjustments and turn this image into
this let me show you with this Lightroom
tutorial as always if you want to follow
along you can find a link to download
this raw file in the description of the
video and now let's start so this will
be our starting raw file I already have
applied a little bit of cropping just to
make the mountain peak look a little
bigger what we want to do in here is to
add more contrast on very specific areas
to make the mountain peak and the clouds
stand out first off we want to open up
the basic panel I'm going to change the
profile from Adobe color to Adobe
standard this lessens the overall
contrast just a little bit because I
want to have some more control over it
exposure wise looking at this room this
might look fine but we want to make it
dark and dramatic so the first thing I
want to start with is to bring down the
exposure quite a lot as IW Dr the
exposure I'm always paying close
attention to the histogram because we
don't want to introduce under exposure
we just want to make it darker without
losing details another way we can make
this image darker is by bringing down
the Shadows you can see I can bring them
down all the way and still not end up
with underexposure so that is a great
way to add more contest in fact we can
even bring down the blacks just a little
bit let's see so right at this point we
would would end up with a little bit of
underexposure I can hold on the ALT key
while I drag this slider down you can
see this tiny blue areas these are the
areas that are underexposed these areas
are not really that important so I am
okay with having a bit of an exposure
there so right away I want to show you
the difference we started with the image
on the left and you can see it looks
much much different almost like an
underexposed image thanks to just a
bunch of tonal adjustments we did in the
basic panel of course we don't want this
image to be too dark so we have brought
down the Shadows next we want to work on
the highlights and the brighter areas so
let me pull up the highlights all the
way this helps tremendously with the
contrast however we really need to be
careful with the highlights because we
can quickly overexpose these snow
patches on the mountain and this is
something I try to avoid most of the
times so for more contrast let's bring
up the whites again I'm paying very very
close attention to these problem areas
but right around here looks quite good
to me I do think I also want to push and
the overall contrast just a little bit
this will further make the underexposure
worse but as I said these areas are not
that important so that's okay now this
looks much better than the ra five
before I do think I want to introduce
some more golden hour light so I also
want to adjust the white balance for the
golden hour light I'm going to bring up
the
temperature so let's raise it quite a
bit here and I do think I want to bring
up the tint as well just a little bit
and I do want to add a bit of texture
which will make the image look sharper
at the same time I want to bring down
the clarity to kind of add some dreamy
effect on top and let's make maybe also
bring down the
dehaze in this case Bringing Down the
dehaze it makes the whole image brighter
if you plan on doing that always keep
that in mind all right so I'm not going
to touch the Vibrance or saturation so
we're pretty much done with the basic
adjustments and again let's take a look
at before we quick with just a bunch of
total adjustments we can make the whole
image look a lot more different and
dramatic and of course we can continue
using stuff like highlights Shadow those
whites and blacks more locally with the
help of masks and that's exactly what we
want to do let's go ahead open up the
masking panel the first thing with
masking I usually like to do is to work
on the sky because these areas usually
are quite easy to Target in this case we
have a blue sky with a bunch of clouds
so we can use a color range mask and we
can click somewhere here and we get a
very very good selection what I want to
do with this selection is to bring down
the exposure even further making the sky
even darker and thus we're adding more
contrast and make this bright Mountain
beak stand out a little more so I'm
going to drop it quite a bit and I do
want to introduce more saturation to
this area so we get some blue tones in
here let's go with something like this
for the
moment okay now these color range masks
can introduce some fine white light
around around edges like in this case if
you see an edge like this you might want
to tone down the adjustments a little
bit I think for the purpose of this
video I'm just going with it for now the
sky is looking pretty good but I also
want to add a linear gradient on the
very top of it just covering pretty much
the right side like this and here I want
to bring down the blacks this will
further make the sky darker and it will
also create some kind of vignetting
effect leading the viewers eye more
towards the peak in the center which is
exactly what we want but we can also use
a linear gradient covering the
foreground or let's say the Shadows of
the foreground and what I want to do in
here is I also want to make it darker
but I don't want to use exposure or
Shadows of blacks because then we would
end up with underexposure instead I want
to drop the whites this will make the
area darker without heavily
underexposing the area
so that's looking pretty good so far I
do think I also want to introduce some
light coming in from the right side so
let me create one big fat radial
gradient like this I'm going to slightly
tilt it and I'm going to place the
center of this radial gradient outside
of the image with this radial gradient I
want to introduce light by bringing up
the
exposure I also want to bring up the
whites and for some extra glow I always
like to bring up the blacks and let's
carefully drop the
dehaze all right that looks great we can
work on the glow some more using another
second radial gradient however this time
I'm making it a little smaller and I'm
just covering this bright spot right
here on the mountain again let's tilt it
a bit actually I don't want to add glow
but I want to make the highlights more
visible in here so what I'm going to do
is to bring up the whites and this will
just add more corn contr to this spot
which I think looks great I can also
bring up the
highlights okay now there's one more
thing I want to change and that's the
brightness of this Cloud right here I
want to make it brighter to make it
stand out a little more and add more
contrast to this image separating the
cloud a little more from the Blue Sky in
the back so we're going to use a new
mask and we're going to use a luminance
range mask with the luminance rench mask
active and this eye dropper hovering
over the cloud I'm just clicking right
in here this is selecting way too much
as you can see so I want to adjust the
luminance range a bit I want to filter
out more of the darker parts so I'm
going to bring up this point a
bit just like that and I'm going to make
the edge a little softer so I'm going to
bring this point up as
well okay this is looking like a pretty
good selection still we need to adjust
it some more I'm going to say subtract
and I'm choosing a linear gradient
taking away a part from here from the
right side and we want to subtract
another linear gradient coming up from
the top like this now we have pretty
much only the cloud selected that's
exactly what we want now to make it pop
a little more I'm going to bring up the
whites and I also want to bring up the
clarity and at this point I do want to
introduce some more extra warmth to This
Cloud so I'm going to introduce some
temperature just a little bit and I'm
also going to decrease the tint to
prevent any weird magenta color cast to
kick in in this area wonderful that
looks great now that's it for the
masking let me show you what a
difference this makes this was our image
after just a bunch of Base adjustments
and here we have it with the masking
stuff applied on top again we pretty
much only made use of local tonal
adjustments working on the brightness
and darkness of areas so now that we're
done with the masking let's also do some
color grading because we want to turn
this more into a golden hour scene so
let's go down into the color mixer and I
want to work on the Hue first here I
want to slightly bring down the orange
Hue giving the mountain face more of a
redish color tone I also want to
slightly bring down the blue hue
bringing the sky a bit more into the
aqua color range but just a bit and I
want to head into the saturation tab I
want to bring up the orange saturation
to make that mountain peak glow a little
more and I want to bring down yellow
because yellow will affect the snow the
most and I want to keep the snow pretty
much white so that looks good to me I'm
also going to bring down the blue
saturation just a little bit all right
then let's head into the luminance T and
just bring down the blue luminance a
little more to make the sky a bit
darker wonderful the image still lacks a
little bit of warmth and we can change
that in the color grading panel with
some split toning so here we want to
Target the highlights first and of
course we want to make the highlights
warmer so we're going to set up the Hue
in such way let's see this is looking
like a pretty good color tone and now
let's bring up the saturation and I'm
going to use a lot of saturation to give
it this heavily color graded look wow
wonderful let's also use the midtones
I'm again using a warm color tone for
the midtones somewhere around here and
I'm going to slightly bring up the
saturation here I don't want to overdo
it just want to introduce a little bit
more here perfect and of course we can
also head down into the calibration tab
for some more color grading here I want
to start with the blue brary H bringing
it down very
slightly this helps making the mountain
peak look a little more redish which I
think looks great and I am going to
bring up the saturation
here let's also bring up the saturation
of green and
red perfect this looks great now the
only thing left to do is the sharpening
so let's head into the details Tab and
bring down the radius increase the
details add masking while holding not Al
key so we can see where the sharpening
is applied and we only want to have it
on the mount like this and then bring up
the amount of
sharpening wonderful now there are a few
sensor spots throughout the image which
we can clean up in Lightroom as well so
let's click on remove and I already
clicked on visualize spots which should
make it easier to see those sensor spots
and I'm just going to brush over
them okay and that's it here we have the
finished image I hope this little itro
tutorial was helpful and interesting as
always if you have questions or have
anything to add to this video let me
know in the comments and thank you so
much for watching this video
Browse More Related Video
![](https://i.ytimg.com/vi/gS97PUNe2j0/hqdefault.jpg?sqp=-oaymwEXCJADEOABSFryq4qpAwkIARUAAIhCGAE=&rs=AOn4CLAW73fTn_k9YW7PBFQQZoKcFsUSqQ)
Come controllare il colore con Darktable
![](https://i.ytimg.com/vi/LahtwPn6cxc/hq720.jpg)
Adjust Photo Brightness and Contrast | Adobe Photoshop
![](https://i.ytimg.com/vi/LrGu-LoghT4/hq720.jpg)
Creating Illustrated 1980s Vintage Tees in Photoshop
![](https://i.ytimg.com/vi/Yf9xo4g3bBc/hq720.jpg)
How Easy Can Sketching Be? The Answer Might SURPRISE you!
![](https://i.ytimg.com/vi/OGf2BqcBJAo/hq720.jpg)
CapCut Tutorial: How to Create EPIC FILM with Ai
![](https://i.ytimg.com/vi/P76Waq23X-w/hq720.jpg)
Create a Nature Environment using Geometry Nodes | Blender Beginner Tutorial
5.0 / 5 (0 votes)