Uji coba UKI LSP LMI (bubut)
Summary
TLDRThis video focuses on lathe machining techniques, guiding viewers through a detailed, step-by-step process based on working drawings. It covers everything from gripping the workpiece to various turning, drilling, and threading steps, ensuring precision in each stage. The tutorial emphasizes tool usage, measurement techniques (like vernier calipers and micrometers), and crucial tips to avoid mistakes, such as using retaining plates for protection. It provides insights into machining tolerance, tool settings, and ensures a smooth workflow, ultimately leading to the successful completion of the workpiece with a clear explanation of each step.
Takeaways
- 😀 The focus of the lesson is on lathe machining techniques and step-by-step processes for working on a workpiece according to working drawings.
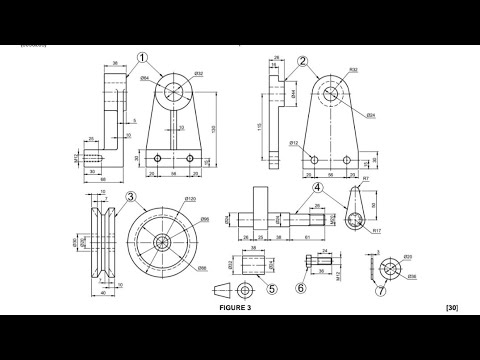
- 😀 The workpiece starts with pre-machined parts, including an existing hole and multi-level turning, which is further worked on as per the working drawing.
- 😀 The first step in the process is to grip the part with a thread at one end, aligning it with the lathe axis using a loose headlight to ensure precision.
- 😀 To prevent wobbling and ensure stability, the workpiece is supported with a loose headlight during the turning process.
- 😀 The process involves turning diameters to specific measurements, such as 24mm and 18mm, using tools like a vernier caliper and an inside micrometer for accuracy.
- 😀 Drilling and boring processes are applied to the workpiece, including a 10mm diameter hole and a 12h7 bore to ensure proper dimensions.
- 😀 After turning and drilling, the workpiece is processed for threading, with a focus on precision measurements for different diameters and depths.
- 😀 It's essential to ensure that the workpiece doesn't get scratched during the lathe process, so a retaining plate is often used to protect the surface.
- 😀 The lathe work includes several steps of turning, including specific diameters and threads (e.g., M12 x 1.75) and special features like grooves and chamfers.
- 😀 The use of measuring tools like vernier calipers, micrometers, and inside micrometers ensures that all dimensions and tolerances are met precisely for each step.
- 😀 At the end of the machining process, a final thread measurement is performed using a ring gauge to confirm the accuracy of the threaded parts.
Q & A
What is the main subject of the script?
-The main subject of the script is lathe machining techniques, specifically the step-by-step process of machining a workpiece based on a working drawing.
Why is the workpiece first gripped by the part that will have a thread?
-The workpiece is first gripped by the part that will have a thread to ensure that the workpiece is aligned on one axis with the lathe axis during the machining process.
What tool is used to measure the diameter of 24 mm in the machining process?
-A Vernier caliper is used to measure the diameter of 24 mm.
Why must the workpiece be supported with a loose headlight during the turning process?
-The workpiece must be supported with a loose headlight to ensure that it remains stable and aligned while turning, preventing any wobbling or misalignment.
What is the importance of the step where a diameter of 12h-7 is made?
-The creation of the 12h-7 diameter is crucial for ensuring precise fitment with other components and for maintaining the proper tolerance in the workpiece.
What tool is used for drilling the diameter of 10 along 27 mm?
-A Vernier caliper is used to measure the depth of the drilled diameter, while the actual drilling tool is used for creating the 10 mm diameter.
What happens if the depth of the drilled hole in step 5 is incorrect?
-If the depth is incorrect, the next cutting tool may break because it will be subjected to improper conditions, affecting the machining process.
What is the significance of the 1.5 x 3 mm ER groove in the machining process?
-The 1.5 x 3 mm ER groove is an important feature that needs to be created carefully, as it contributes to the proper functioning and fitment of the machined parts.
How is the final thread measured for accuracy?
-The final thread is measured using a ring gauge, which helps ensure that the thread meets the specified dimensions, ensuring accuracy in the threading process.
Why is deburring mentioned in the script, and why is it important?
-Deburring is an essential process that removes sharp edges and imperfections after machining, ensuring the safety and quality of the final product. It is considered a mandatory part of the machining process.
Outlines

This section is available to paid users only. Please upgrade to access this part.
Upgrade NowMindmap

This section is available to paid users only. Please upgrade to access this part.
Upgrade NowKeywords

This section is available to paid users only. Please upgrade to access this part.
Upgrade NowHighlights

This section is available to paid users only. Please upgrade to access this part.
Upgrade NowTranscripts

This section is available to paid users only. Please upgrade to access this part.
Upgrade NowBrowse More Related Video

Latihan Soal Teknik Mesin/Pemesinan #mesin bubut

Metal Lathe Tutorial 21 : Speeds & Feeds

Assembly Drawing N3/7 August 2024/Part 1️⃣

crochet riley mesh shrug tutorial | beginner friendly - for any sizes | moon and baileys

Chamfering on the Lathe

Design for Manufacturing Course 8 Part 1: CNC - DragonInnovation.com
5.0 / 5 (0 votes)