Design for Manufacturing Course 8 Part 1: CNC - DragonInnovation.com
Summary
TLDRThe video script delves into the intricacies of machining and stamping, highlighting the four-step process: part overview, technique pros and cons, process workings, and material considerations. It underscores the versatility of machining, with its wide material range and ability to create complex geometries without tooling. The discussion contrasts machining's precision and repeatability with its potential for long cycle times and waste from the subtractive process. Design guidelines are provided to optimize machining, emphasizing ease of production and material selection. The script also touches on various machining operations like lathe, milling, drilling, and grinding, and the importance of considering machine capabilities in part design.
Takeaways
- 😀 Machining, often referred to as CNC (Computer Numerical Control), is a process where a computer controls the cutting tool, while manual machining on a Bridgeport is more suitable for prototyping and not high-volume production.
- 🔩 Machining is ideal for creating precision parts like gears and fittings that require metal for strength, corrosion resistance, or other environmental factors.
- ✅ Advantages of machining include a wide range of machinable materials, no requirement for uniform wall thickness, the ability to create complex geometries, and no need for expensive tooling as in injection molding.
- ⏱️ Machining offers shorter lead times from design to finished part and allows for quicker design iterations and validations compared to processes that require tooling.
- 💰 The cost of machining is influenced by machine overhead and labor, with longer cycle times generally resulting in higher costs.
- ❌ Limitations of machining include long cycle times for complex geometries, difficulty in machining hollow vessels, and the subtractive nature leading to material waste.
- 🛠️ There are four main types of machines in machining: lathes (horizontal or vertical), mills (vertical or horizontal), drills, and grinders, each serving different part-making functions.
- 🔧 Design guidelines for machining include minimizing material removal, using standard components, choosing easy-to-machine materials, and considering the machine's capabilities and limitations in part design.
- 🧠 Machining requires consideration of factors like clamping and tool geometry to ensure parts are held securely and machined accurately without interference.
- 🛑 Material selection for machining spans a wide range including steel, stainless steel, aluminum, titanium, copper, and plastics, though plastics are less common due to more cost-effective production alternatives.
Q & A
What are the four different steps typically involved in machining and stamping processes?
-The four different steps typically involved are: 1) Overview of typical parts, 2) Pros and cons of each technique, 3) How the process works and design guidelines, and 4) Common materials used.
What is CNC and how does it differ from manual machining?
-CNC stands for Computer Numerical Control, where a computer drives the cutting tool. This is different from manual machining, which is done on a Bridgeport and is better for prototyping but not for high-volume production.
What are some examples of machine parts that might be produced through machining?
-Examples include precision gears, different fittings like flanges for connecting parts, and drive components to transfer power.
What are the advantages of using machining over other techniques?
-Advantages include a wide range of material options, no requirement for uniform wall thickness, ability to create complex geometries, no need for tooling like in injection molding, and the capacity for quick design changes and validation.
How does machining compare to injection molding in terms of tooling and design flexibility?
-Machining does not require tooling like injection molding, which can take six to eight weeks to build and is expensive. Machining allows for quicker design changes and validation without the need for extensive tooling.
What are some downsides to machining?
-Downsides include potentially long cycle times, limitations on certain geometries, and the subtractive process leading to material waste which adds to cost.
What are the four main types of machines used in machining?
-The four main machines are lathes (horizontal or vertical), mills (horizontal or vertical), drills, and grinding machines.
How does the cycle time for machining compare to that of injection molding?
-The cycle time for machining can be longer compared to injection molding, which is usually between 25 to 45 seconds.
What are some design guidelines to consider when creating parts for machining?
-Design guidelines include minimizing material removal to save time and cost, using commercially available components when possible, choosing easy-to-machine materials, and designing parts that are easy to grip and machine without interference from the chuck or cutting head.
What materials are commonly used in machining and why might plastic not be a common choice?
-Common materials include steel, stainless steel, aluminum, titanium, copper, and plastic. Plastic is not commonly machined because it can often be produced more cheaply through other methods like injection molding.
How does the aspect ratio of tools affect the machining process?
-The aspect ratio of tools is critical; a depth equal to three times the diameter is a good rule of thumb. Beyond five times the diameter, the risk of tool breakage increases.
Outlines

This section is available to paid users only. Please upgrade to access this part.
Upgrade NowMindmap

This section is available to paid users only. Please upgrade to access this part.
Upgrade NowKeywords

This section is available to paid users only. Please upgrade to access this part.
Upgrade NowHighlights

This section is available to paid users only. Please upgrade to access this part.
Upgrade NowTranscripts

This section is available to paid users only. Please upgrade to access this part.
Upgrade NowBrowse More Related Video

PROCESSO DE FABRICAÇÃO - ESTAMPAGEM (TELECURSO 2000)
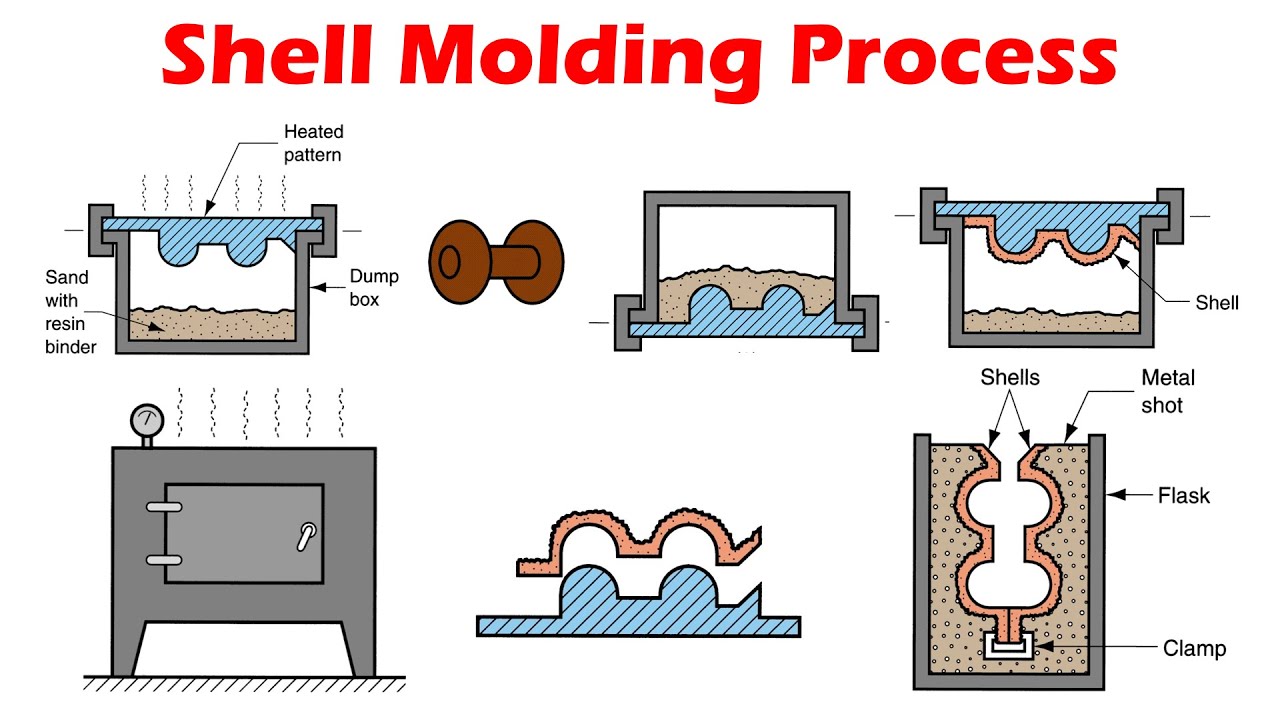
Shell Molding - Expandable Mold Casting Processes

¿Estructuras de hormigón o estructuras de acero? Podcast
How to Build a CNC Machine Shop - Part 2 (Quoting - Learn the Secret)
Сборка ПК 2024. Как собрать компьютер 2024. Всё что нужно знать о сборке ПК. Гайд на сборку ПК 2024!

WATER JET MACHINE PROCESS : Working of abrasive water Jet machining process (animation).
5.0 / 5 (0 votes)