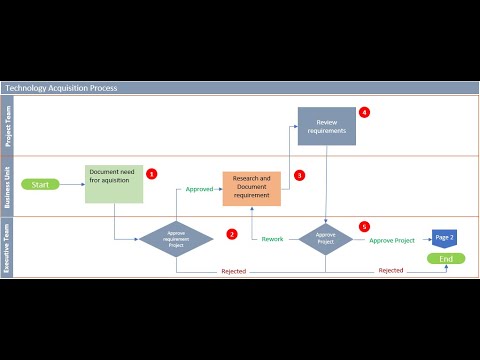
Cara Membuat Flowchart di Word (Diagram Alir atau Bagan Alur)
Summary
TLDRIn this tutorial, Asep Asafah demonstrates how to create a neat and professional flowchart using Microsoft Word. He walks viewers through essential steps, such as setting up gridlines, adjusting layout settings, and inserting shapes to form the flowchart. With clear instructions on adding and connecting shapes, labeling the flowchart, and refining the design, Asep ensures that the process is simple and efficient. The video also includes helpful tips for organizing and aligning the elements properly, making the flowchart both functional and visually appealing. A perfect guide for beginners and anyone wanting to enhance their document presentations.
Takeaways
- 😀 Ensure your Microsoft Word page is blank before starting the flowchart creation process.
- 😀 Use the 'View' tab to enable Gridlines for better alignment during the creation of the flowchart.
- 😀 Adjust the grid size using the 'Grid Settings' option to make it more suitable for your flowchart design.
- 😀 Always check the 'Snap Object' option in 'Grid Settings' to help with alignment when moving shapes.
- 😀 Insert a 'Drawing Canvas' from the 'Insert' tab to keep all flowchart elements within a defined area.
- 😀 Utilize various shapes from the 'Shapes' menu to create the necessary elements for the flowchart (rectangles, circles, etc.).
- 😀 Use the 'Copy-Paste' function to duplicate shapes and streamline the process of adding multiple elements.
- 😀 Draw arrows between the shapes to create connections and define the flow of the process.
- 😀 Adjust the arrow size and color (black with a width of 1.2) for clarity and consistency in the design.
- 😀 Use the 'Elbow Connector' for more complex arrow paths between shapes for a smoother flowchart layout.
- 😀 Right-click on shapes to add text, and ensure the text is properly centered within the shape for a cleaner look.
Q & A
What is the first step in creating a flowchart in Microsoft Word?
-The first step is to enable the 'Gridlines' under the 'View' tab, which will provide reference lines to help in drawing the flowchart.
Why is it important to adjust the grid size in Microsoft Word when creating a flowchart?
-Adjusting the grid size allows for more precise placement of shapes and objects in the flowchart, ensuring better alignment and organization.
How do you increase the grid size in Microsoft Word?
-To increase the grid size, go to the 'Layout' tab, click on 'Grid Settings,' and then adjust the grid spacing to your preferred size.
What is the purpose of selecting the 'Snap objects' option in Microsoft Word's grid settings?
-The 'Snap objects' option ensures that objects automatically align with the grid lines, making it easier to position and organize shapes within the flowchart.
What is a new drawing canvas, and how is it used in creating a flowchart?
-A new drawing canvas is a blank space where you can draw and arrange shapes for the flowchart. It helps separate the flowchart elements from the rest of the document.
What shapes are used to create a flowchart in Microsoft Word?
-Microsoft Word provides several shapes specifically for flowcharts, such as rectangles, diamonds, and circles, which can be found under the 'Shapes' menu.
How do you create arrows between the shapes in a flowchart?
-To create arrows, select the 'Line' tool under 'Shapes,' then choose an arrow style. Click and drag between the shapes to create connecting arrows.
How can you customize the appearance of arrows in a flowchart?
-You can change the color and size of the arrows by selecting them, then using the 'Format' options to adjust the line color, thickness, and style.
How do you add text labels to the shapes in a flowchart?
-To add text to a shape, right-click on the shape, select 'Add Text,' and then type the desired label or description. You can format the text to center it within the shape.
What is the 'Text Box' feature, and how is it used in a flowchart?
-The 'Text Box' feature allows you to add additional text outside of the shapes. It's used to insert supplementary information or labels that are not directly tied to the shapes.
Outlines

This section is available to paid users only. Please upgrade to access this part.
Upgrade NowMindmap

This section is available to paid users only. Please upgrade to access this part.
Upgrade NowKeywords

This section is available to paid users only. Please upgrade to access this part.
Upgrade NowHighlights

This section is available to paid users only. Please upgrade to access this part.
Upgrade NowTranscripts

This section is available to paid users only. Please upgrade to access this part.
Upgrade NowBrowse More Related Video
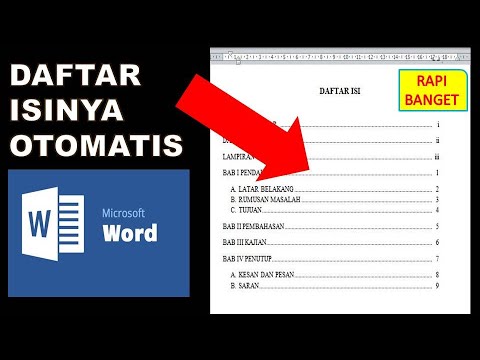
cara membuat daftar isi otomatis word 2010

Cara Menggunakan Microsoft Office Word, Excel, PowerPoint, Tanpa Install Aplikasinya

Format Penulisan Laporan PKL, Skripsi, Makalah Agar Lebih Mudah Menggunakan MS.Word
Process Flow Chart with Microsoft Excel

Cara Mengubah Video Youtube Menjadi Teks Word Dengan Mudah dan Cepat

TIK APLIKASI PERKANTORAN (Ms. Word)
5.0 / 5 (0 votes)