Sistem Penyiraman Tanaman Otomatis dengan Arduino Uno & Sensor Kelembapan Tanah | Easy Solution !!!
Summary
TLDRThis video tutorial demonstrates how to build an automated irrigation system using an Arduino Uno. The components used include a soil moisture sensor to detect soil humidity, a water pump to irrigate the plants, a relay module to manage power, and a 9V battery for power supply. The tutorial guides users step-by-step in connecting the components, uploading the program to the Arduino, and testing the system. The irrigation system automatically controls the water pump based on the soil's moisture level, ensuring plants receive water only when needed. The video concludes with a live demonstration of the system in action.
Takeaways
- 😀 The project aims to create an automated irrigation system using an Arduino Uno microcontroller.
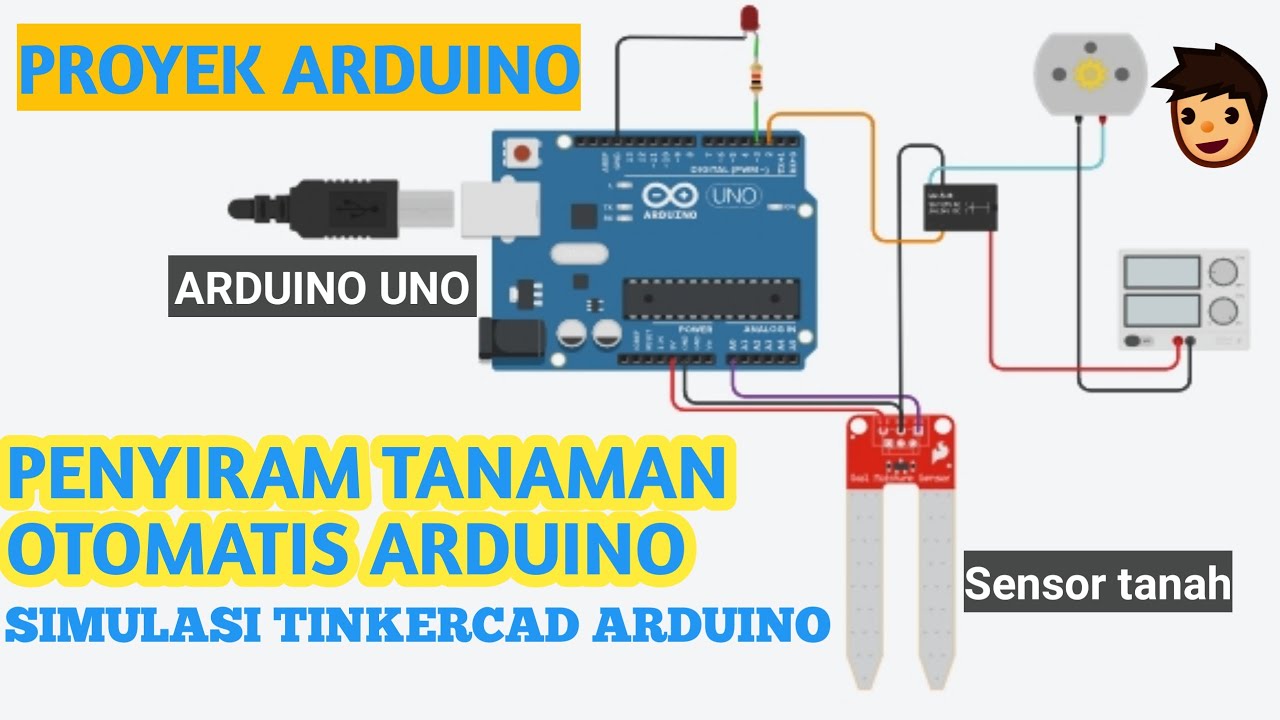
- 😀 Components needed for the project include Arduino Uno, soil moisture sensor, PAM mini water pump, mini DC motor, 9V battery, relay module, and jumper wires.
- 😀 The soil moisture sensor detects the moisture level in the soil to decide when to activate the water pump.
- 😀 The Arduino Uno serves as the main controller for the project, connecting the components and executing the code.
- 😀 The water pump is powered by a 9V battery and controlled by a relay module to regulate the power flow.
- 😀 Jumper wires are used to connect the components to the Arduino Uno and ensure the system functions correctly.
- 😀 The soil sensor's brown cable connects to the A0 pin on the Arduino, the white cable to GND, and the red cable to the 3.3V pin.
- 😀 For the water pump, the negative (black) cable connects to the battery, the positive (red) cable to the relay, and the battery’s positive cable connects to the relay’s center terminal.
- 😀 The code for the system is uploaded via Arduino IDE, allowing the Arduino to control the components based on sensor input.
- 😀 The system works by activating the water pump when the soil is dry, and deactivating it when the soil moisture is sufficient, indicated by a green or red light.
Q & A
What is the main purpose of the project described in the script?
-The main purpose of the project is to create a smart irrigation system using various components like an Arduino Uno, soil sensor, water pump, and relay to automate the watering of plants based on soil moisture.
What role does the Arduino Uno play in the project?
-The Arduino Uno serves as the microcontroller that controls the various components in the project, such as the soil sensor, water pump, and relay, based on the data received from the sensors.
How does the soil sensor contribute to the smart irrigation system?
-The soil sensor detects the moisture level of the soil. If the soil is dry, it triggers the water pump to irrigate the soil, and if the soil is moist enough, it prevents the pump from activating.
Why is a relay module used in this project?
-The relay module is used to increase the voltage and control the flow of electricity to the water pump. It acts as a switch to turn the pump on and off based on the Arduino's instructions.
What is the function of the water pump in the system?
-The water pump's role is to move water into the soil when the sensor detects that the soil is dry, ensuring that the plants receive water as needed.
How is the water pump connected to the system?
-The water pump is connected to a 9V battery, with the negative cable connected to the battery and the positive cable connected to the relay. The relay then controls the flow of power to the pump.
What are the steps to connect the soil sensor to the Arduino Uno?
-To connect the soil sensor to the Arduino Uno, you plug the sensor's brown wire into the ground (GND), the red wire into 3.3V, and the white wire into the A0 port on the Arduino.
What kind of power supply is used for the system?
-The system uses a power bank or a phone charger as the power supply, providing the necessary electrical power for the Arduino Uno and other components.
How does the system know when to activate the water pump?
-The system activates the water pump when the soil sensor detects dry soil. When the soil is adequately moist, the sensor prevents the pump from running.
What happens during the demonstration when the sensor detects enough moisture in the soil?
-During the demonstration, when the sensor detects that the soil has enough moisture, the water pump does not activate. However, when the sensor is lifted or the soil becomes dry, the pump starts working to irrigate the soil.
Outlines

This section is available to paid users only. Please upgrade to access this part.
Upgrade NowMindmap

This section is available to paid users only. Please upgrade to access this part.
Upgrade NowKeywords

This section is available to paid users only. Please upgrade to access this part.
Upgrade NowHighlights

This section is available to paid users only. Please upgrade to access this part.
Upgrade NowTranscripts

This section is available to paid users only. Please upgrade to access this part.
Upgrade NowBrowse More Related Video
Sistema de Irrigação Automática com Arduino e Sensor de Umidade do Solo

DIY Pakan Kucing Otomatis sederhana dengan Arduino dan servo (Auto Feeder Sederhana)

HOW TO MAKE A OBJECT DETECTING SPECTACLES WITH ARDUINO FOR BLIND PERSONS 🔥💛 |

Cara Mudah Membuat Pakan Ikan Otomatis Dengan Arduino | Part 1

PROJECT ARDUINO PENYIRAM TANAMAN OTOMATIS /SMARTGARDEN BERBASIS ARDUINO NANO DAN SENSOR SOILMOISTURE
PROYEK ARDUINO PENYIRAM TANAMAN OTOMATIS DENGAN SENSOR KELEMBABAN TANAH SIMULASI TINKERCAD ARDUINO
5.0 / 5 (0 votes)