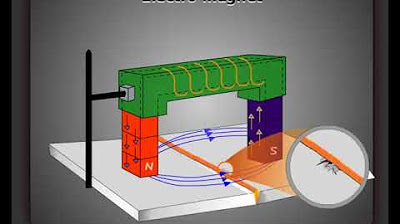
CVM - Y-2 AC Yoke | MT-Magnetic Particle Testing | การตรวจสอบรอยแตกร้าวด้วยอนุภาคแม่เหล็ก
Summary
TLDRThis video demonstrates the basic usage and operation of magnetic particle inspection equipment, designed to detect surface and subsurface flaws in ferromagnetic materials. The process involves cleaning the workpiece, applying magnetic powder, and using a magnetizing device to create a magnetic field. The inspection identifies cracks or defects by observing the magnetic powder's movement. The equipment includes various tools, such as cleaners, magnets, and UV lights for visualizing defects in low-light conditions. The demonstration highlights the importance of careful setup and technique to ensure accurate results.
Takeaways
- 😀 Introduction to Magnetic Particle Testing (MPT) for surface and subsurface defect detection.
- 😀 MPT is effective for detecting cracks, defects, or discontinuities below the surface of ferromagnetic materials.
- 😀 MPT can detect flaws up to 2-3 meters below the surface, depending on the material and testing conditions.
- 😀 The equipment used for MPT includes a magnetizing device, magnetic powder, and UV light for detecting subsurface defects.
- 😀 Only ferromagnetic materials (like steel) can be tested using MPT; non-ferrous metals like aluminum cannot be tested.
- 😀 The inspection process involves cleaning the test surface and applying magnetic powder for better visibility of defects.
- 😀 An important step is verifying the magnetizing device's ability to lift a certain weight to ensure it is functioning correctly.
- 😀 The magnetizing device can either be AC or DC-powered, with different weight lifting capacities depending on the type.
- 😀 During testing, it is essential to hold the magnetizing device at a certain distance (about 1 inch) from the workpiece.
- 😀 After applying the magnetic field, inspect the surface for black or dark marks, which indicate defects.
- 😀 A thorough inspection of all joints and areas of the material is necessary, especially for welded seams, to detect potential cracks.
Q & A
What is magnetic particle inspection (MPI) and what is it used for?
-Magnetic Particle Inspection (MPI) is a non-destructive testing (NDT) method used to detect surface and subsurface defects in ferromagnetic materials, such as steel. It reveals cracks, pores, or other flaws that are not visible to the naked eye, by using magnetic particles that accumulate at the location of defects.
What types of defects can magnetic particle inspection detect?
-MPI can detect surface and near-surface defects, including cracks, pores, and other irregularities in ferromagnetic materials. These defects can compromise the material's integrity, especially in critical applications like welds and pressure vessels.
What is the role of the magnetic particles in MPI?
-Magnetic particles are applied to the surface of the material being tested. When a magnetic field is applied, these particles accumulate at the site of a defect, making it visible. This pattern helps the inspector to identify and locate flaws in the material.
Why is it important to clean the workpiece before conducting MPI?
-Cleaning the workpiece is crucial because any dirt, oil, or other contaminants can interfere with the inspection process. Contaminants can prevent the magnetic particles from adhering properly to the surface and may obscure defects, leading to inaccurate results.
What is the difference between AC and DC yokes in magnetic particle inspection?
-AC yokes are used for detecting surface defects, while DC yokes are more suitable for detecting subsurface or deeper flaws. DC yokes create a more concentrated and stable magnetic field that can penetrate deeper into the material, allowing for the detection of defects beneath the surface.
What is the purpose of using UV light in MPI?
-UV light is used when fluorescent magnetic particles are applied. The UV light causes the particles to fluoresce, making defects easier to see, especially in low-light conditions. This helps to improve the visibility of the flaws during the inspection process.
What should be the distance between the yoke and the workpiece during inspection?
-The yoke should be kept about one inch away from the workpiece. This distance ensures that the magnetic field is applied properly, allowing for accurate detection of surface or subsurface defects without distortion of the magnetic field.
What happens if defects are present during the inspection?
-If defects are present, the magnetic particles will accumulate along the lines of the defect, making the flaw visible. The inspector can then identify the size, location, and nature of the defect, which helps in making decisions about the material’s usability or need for repair.
Can magnetic particle inspection be used on all materials?
-No, MPI is only suitable for ferromagnetic materials like iron, steel, and other metals that are attracted to magnets. It cannot be used on non-ferromagnetic materials such as aluminum, copper, or plastic.
What is the recommended inspection technique for weld seams in MPI?
-When inspecting weld seams, it is important to apply the magnetic particles evenly and check the welds from multiple angles. This ensures that the magnetic particles can flow into all areas of the seam, helping to detect any cracks or other defects that might be present.
Outlines

This section is available to paid users only. Please upgrade to access this part.
Upgrade NowMindmap

This section is available to paid users only. Please upgrade to access this part.
Upgrade NowKeywords

This section is available to paid users only. Please upgrade to access this part.
Upgrade NowHighlights

This section is available to paid users only. Please upgrade to access this part.
Upgrade NowTranscripts

This section is available to paid users only. Please upgrade to access this part.
Upgrade NowBrowse More Related Video

magnetic particle testing

Magnetic Particle Inspection

PENETRANT TESTING & MAGNETIC PARTICE LINSPECTION | POLITEKNIK NEGERI BATAM

In The Materials Lab Non Destructive Testing Network Rail engineering education 15 of 15

Macam-macam NDT (Non Destructive Test)

Magnetism and matter revision in 20 minute || Class 12 Chapter 5 Physics Abhishek sahu sir
5.0 / 5 (0 votes)