Numbered Headings and Subheadings | Microsoft Word Tutorial
Summary
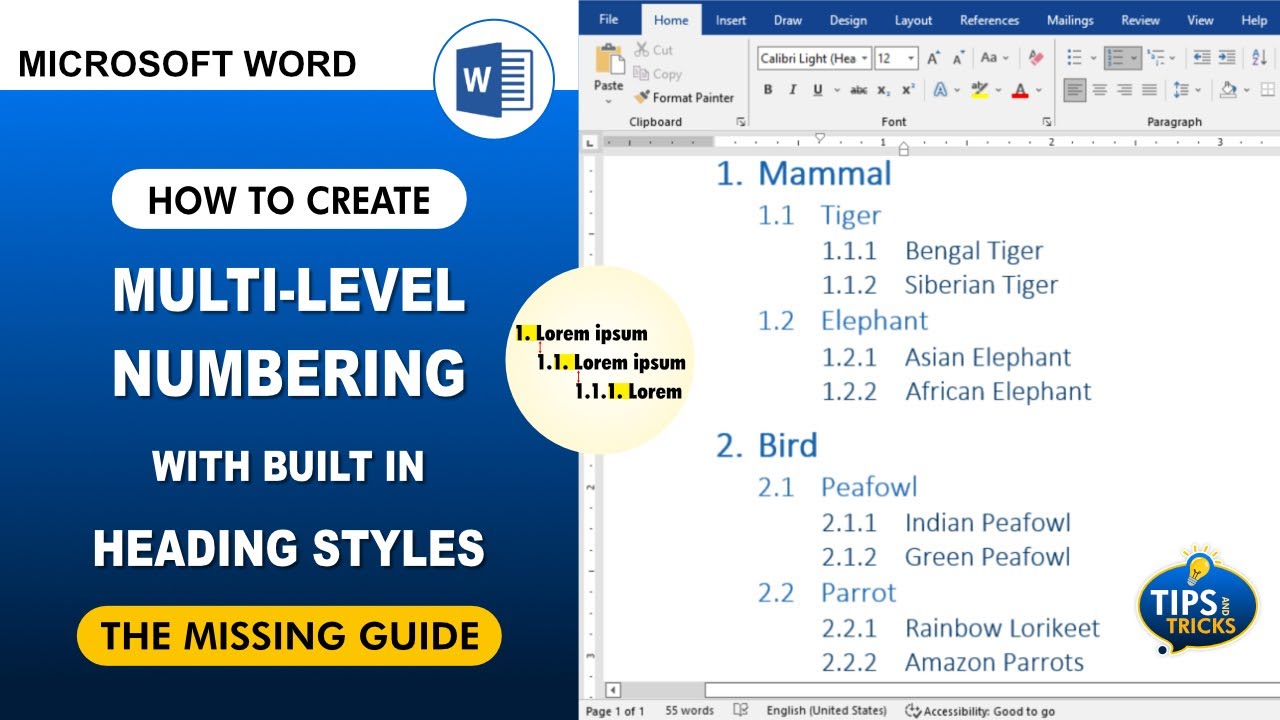
TLDRThis informative video tutorial guides viewers on how to create numbered headings using a Multilevel List. It begins by defining a new Multilevel List and customizing the advanced settings to link Level 1 with Heading 1, replacing the default round bracket with a full stop and adjusting the text indentation to 1cm. The process then moves on to Level 2, where it is linked to Heading 2 and styled with 'Numbers', removing the round bracket and incorporating the number from Level 1. The alignment and indentation are set to 0cm and 1cm respectively. The video emphasizes the importance of using the preview window to ensure correct formatting before saving the new Multilevel List. Finally, it demonstrates how to apply the numbered formatting to headings using the styled Headings feature from the ribbon, and suggests creating additional levels as needed during the initial list definition. The tutorial is a valuable resource for those looking to enhance their document organization and presentation skills.
Takeaways
- 📝 Define a new Multilevel List to create numbered headings.
- 🔗 Link Level 1 of the list to Heading 1 in the advanced settings.
- ➡️ Replace the default round bracket with a full stop for Level 1.
- 📏 Adjust the text indentation for Level 1 to 1cm.
- 🔄 For Level 2, use the 'Numbers' style and customize it as needed.
- 🚫 Remove the round bracket from Level 2 and add a full stop in front.
- 🔢 Include the number from Level 1 to show hierarchy in the numbering.
- ➡️ Align Level 2 at 0cm and indent it to 1cm for proper formatting.
- 🖥️ Use the preview window to ensure the formatting looks as expected.
- 💾 Save the new Multilevel List with 'OK' once satisfied with the formatting.
- 📑 Apply the numbered formatting using the styled Headings from the ribbon.
- 🔽 If additional levels are needed, create them during the initial Multilevel List setup.
Q & A
What is the first step in creating numbered headings?
-The first step is to define a new Multilevel List.
How do you access the advanced settings for the Multilevel List?
-You open the advanced settings to customize the list further.
What should you link Level 1 to in the Multilevel List settings?
-You should link Level 1 to Heading 1.
How can you change the symbol used for the list item?
-You replace the round bracket with a full stop.
What is the text indentation setting for Level 1?
-The text indentation for Level 1 is set to 1cm.
For Level 2, what style should you change it to?
-For Level 2, you should change the style to 'Numbers'.
How do you include the number from Level 1 in Level 2?
-You delete the round bracket and place a full stop in front, then include the number from Level 1.
What alignment and indentation settings are used for Level 2?
-For Level 2, the alignment is set to 0cm and the indentation is set to 1cm.
How can you preview the formatting of your Multilevel List?
-You can use the preview window to check your formatting before saving.
What is the final step to save your new Multilevel List?
-Press OK to save the new Multilevel List.
How do you apply the numbered formatting to your headings?
-Use the styled Headings from the ribbon to apply the numbered formatting.
If you need more levels in your list, when should you create them?
-You should create additional levels at the time of defining the new Multilevel List.
Why is it important to check the preview window before saving the list?
-Checking the preview window ensures that the formatting appears as intended before finalizing the list, which can save time and prevent errors.
Outlines

This section is available to paid users only. Please upgrade to access this part.
Upgrade NowMindmap

This section is available to paid users only. Please upgrade to access this part.
Upgrade NowKeywords

This section is available to paid users only. Please upgrade to access this part.
Upgrade NowHighlights

This section is available to paid users only. Please upgrade to access this part.
Upgrade NowTranscripts

This section is available to paid users only. Please upgrade to access this part.
Upgrade NowBrowse More Related Video

Curso HTML Completo: Aula 10 - Listas
How do I get 1.1 Numbering in Word | Create a multilevel list in Word.
Word: Lists
Using Bullets and Numbered Lists in Microsoft Word 2021/365
Membuat Daftar Isi Secara Otomatis di Ms Word, Daftar Tabel dan Gambar

How to Write a Procedure | What is a Procedure | Step-by-Step Guide | Learn with examples
5.0 / 5 (0 votes)