[Basic Design] Macam-macam Proyeksi [2/5]
Summary
TLDRThe video script discusses various types of projections used in technical drawings to convey a clear visual understanding of objects or systems. It emphasizes the importance of dimensions in creating a common understanding between designers, drafters, and operators. The script covers units of measurement such as millimeters, inches, and degrees for angles. It introduces the concept of auxiliary lines and their use in determining linear dimensions. The script also explains the placement of measurement numbers and letters on technical drawings. The video delves into different projection techniques including isometric, dimetric, and trimetric, each offering a unique perspective and level of detail. It contrasts these with oblique and cavalier projections, which provide a sense of depth with reduced scale on the z-axis. The script further explores perspective projections, which aim to mimic the human eye's view of objects from different angles. Lastly, it touches on orthogonal projections, which present a straightforward view of objects from multiple angles without distortion, and distinguishes between European and American projection placements.
Takeaways
- 📏 **Dimension Importance**: Dimensions are crucial in technical drawings to ensure a common understanding between designers, drafters, and operators, leading to consistent product outcomes.
- 📏 **Units of Measurement**: The three common units used in technical drawings are millimeters, inches, and degrees for measuring angles.
- 📏 **Dimension Lines and Auxiliary Lines**: Dimension lines are used to indicate the size of an object, while auxiliary lines help determine linear dimensions and are drawn slightly beyond the dimension lines without connecting to other lines in the drawing.
- 📏 **Dimension Text Placement**: The text for measurements is typically placed midway along and slightly above the dimension line, with horizontal measurements above the line and vertical measurements to the left.
- 📏 **Arrowheads**: Arrowheads are used to mark the ends of dimension lines and indicate the length-to-width ratio; they are usually colored black for clarity.
- 🎨 **Projection Basics**: Projections are illustrations used to depict how an object or system will look or function, commonly used in architecture, product design, and manufacturing.
- 🎨 **Types of Projections**: The script discusses various types of projections, including axonometric, oblique, cavalier, cabinet, and perspective, each with its unique characteristics and applications.
- 🎨 **Axonometric Projection**: In axonometric projection, parallel lines on the object remain parallel in the drawing, making it simpler and more uniform, suitable for technical and product design.
- 🎨 **Oblique Projection**: Oblique projection reduces the length of lines on the z-axis by a certain factor to give a sense of depth, with variations like cavalier and cabinet projections.
- 🎨 **Perspective Projection**: Perspective projection aims to provide a realistic depiction of how an object will look in three dimensions, simulating the human eye's changing perspective when viewing objects from different angles.
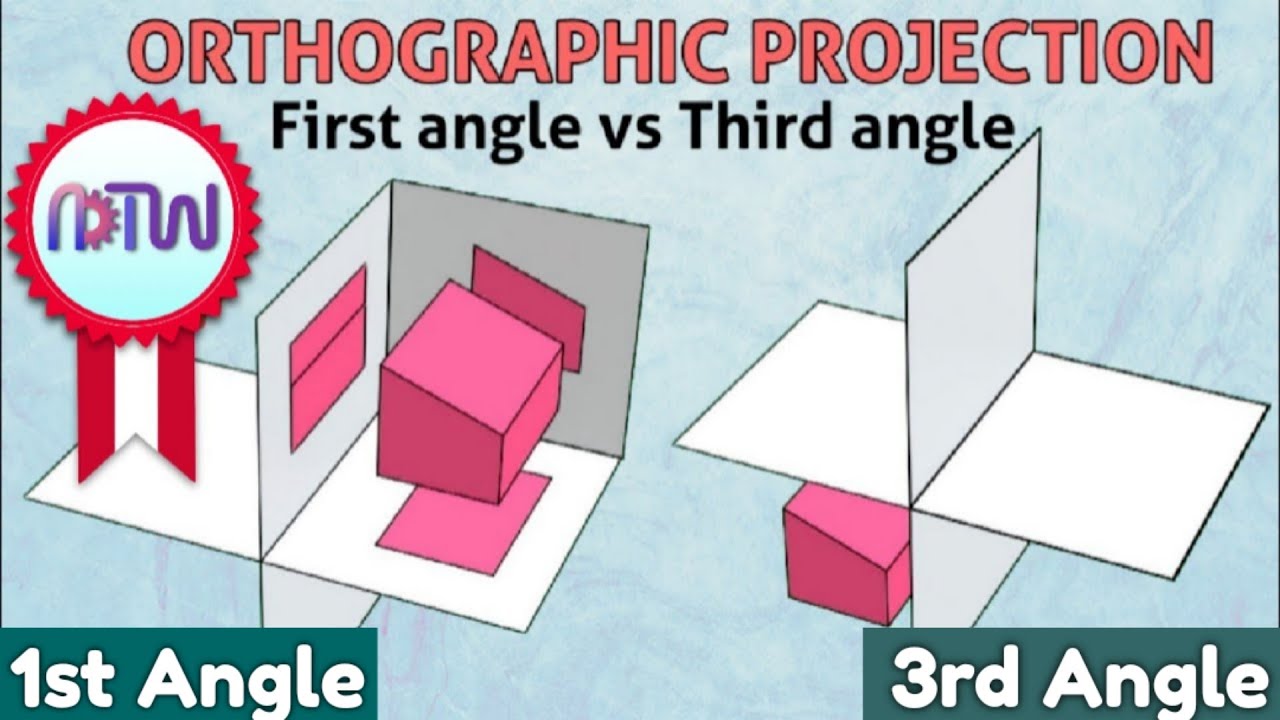
- 🎨 **Orthographic Projection**: Orthographic projection presents the views of an object from different angles, with the object projected straight onto three main planes: front, top, and side, providing a multi-angle view without distortion.
Q & A
Why is dimensioning important in technical drawings?
-Dimensioning is crucial in technical drawings to ensure a common understanding between the designer, drafter, and operator. This ensures that the final product matches the intended design with accurate size and measurements.
What are the three commonly used units of measurement in technical drawings?
-The three commonly used units of measurement in technical drawings are millimeters, inches, and degrees for measuring angles.
What is the purpose of auxiliary lines in a technical drawing?
-Auxiliary lines are used to determine the linear dimensions of objects within a technical drawing. They extend slightly beyond the dimension lines and are not connected to other lines in the drawing.
How should measurements be placed in relation to the dimension lines on a technical drawing?
-Measurements should be placed centrally above the horizontal dimension lines and to the left of the vertical dimension lines. There should be a small gap between the numbers and the dimension lines.
What is the role of arrowheads in a technical drawing?
-Arrowheads are used to mark the ends of dimension lines and to indicate the ratio of length to width. They should be colored in black for clarity.
What is a projection in the context of technical drawings?
-A projection is a drawing or illustration used to depict how an object or system will look or function from a particular viewpoint. It is commonly used in various fields such as architecture, product design, and manufacturing.
What are the three main types of projection methods used for single-view drawings?
-The three main types of projection methods used for single-view drawings are axonometric projection, oblique projection, and perspective projection.
How does isometric projection differ from perspective projection?
-Isometric projection maintains parallel lines from the object to the drawing, resulting in a simpler and more uniform appearance, making it suitable for technical and product design. Perspective projection, on the other hand, converges parallel lines to a vanishing point, creating a more realistic and depth-perception effect.
What are the characteristics of cavalier projection?
-In cavalier projection, lines parallel to the object on the x and y axes are represented at full scale, while lines on the z-axis are reduced by a certain factor, typically around 0.5 or 0.707, to give a sense of depth. It features a specific angle of the cavalier axis to the horizontal, usually around 30, 45, or 60 degrees.
What is the primary goal of perspective projection?
-The primary goal of perspective projection is to provide a realistic and accurate representation of how an object will appear in three dimensions, mimicking the human eye's changing perspective when viewing an object from different angles.
How does orthogonal projection differ from other types of projections?
-Orthogonal projection presents the object or building from different viewpoints in a straightforward manner, with the object projected perpendicularly onto three main projection planes: the front, top, and side. Each projection plane produces a view of the object from a direction perpendicular to the others.
What are the two types of orthogonal projection and how do they differ?
-The two types of orthogonal projection are European and American. European projection places the projections in a way that they are opposite to the viewing direction, while American projection aligns the projection sectors with the viewing direction, which can result in perspective distortion and scale changes to maintain a three-dimensional effect.
Outlines

This section is available to paid users only. Please upgrade to access this part.
Upgrade NowMindmap

This section is available to paid users only. Please upgrade to access this part.
Upgrade NowKeywords

This section is available to paid users only. Please upgrade to access this part.
Upgrade NowHighlights

This section is available to paid users only. Please upgrade to access this part.
Upgrade NowTranscripts

This section is available to paid users only. Please upgrade to access this part.
Upgrade Now5.0 / 5 (0 votes)


