Python Advanced AI Agent Tutorial - LlamaIndex, Ollama and Multi-LLM!
Summary
TLDR本视频教程向观众展示了如何构建一个先进的人工智能代理,该代理能够使用多个语言模型(LM)进行操作。视频首先概述了所需的工具和技术,包括Python、Llama Index和Ollama,后者允许在本地计算机上运行开源的LM。接着,视频通过一系列步骤引导观众创建了一个能够读取PDF文档和Python代码文件的代理,并通过这些文件生成代码。此外,还介绍了如何使用Llama Pass来提高复杂文档(如PDF)解析的准确性。最后,视频通过一个交互式循环,允许用户输入提示,代理会利用其工具生成响应,展示了代理的实际应用。整个项目的过程不仅展示了AI开发的潜力,也体现了如何将不同的工具和模型组合起来解决实际问题。
Takeaways
- 🚀 介绍了如何构建一个使用多个AI模型的高级AI代理,以及如何在本地运行这些代理。
- 📚 通过一系列步骤,包括连接代理、解析输出等,展示了AI开发的潜力。
- 🛠️ 使用了名为Oh Lama和Lama Index的工具,这些工具适合初学者和中级程序员学习和使用。
- 📈 通过VS Code演示了如何利用AI代理读取代码文件并生成基于现有代码的单元测试。
- 🔄 展示了AI代理如何使用不同的工具来获取正确的信息并生成代码。
- 📋 介绍了如何使用Lama Index框架来处理和传递数据给不同的AI模型。
- 🔧 讲解了如何使用Lama工具在本地计算机上运行开源的AI模型,无需依赖外部API。
- 🔍 通过Lama Pass工具,可以更好地解析和理解复杂文档,如包含表格和图表的PDF文件。
- 📝 展示了如何将AI生成的代码输出并保存到文件中,包括错误处理和文件保存逻辑。
- 🔄 通过多步骤流程,包括使用多个AI模型和工具,实现了从代码读取到生成和保存的完整过程。
- 🌐 强调了使用开源模型和框架的重要性,以及它们在AI开发中的实用性和可访问性。
- 📌 提供了关于如何构建和使用高级AI代理的完整教程,包括所需的技术和工具。
Q & A
视频中展示的AI代理是如何工作的?
-视频中的AI代理通过使用多个工具和模型来执行任务。首先,它通过Lama Index和Lama Pass等工具加载和解析数据,如PDF文件。然后,代理会利用这些数据生成代码或回答问题。AI代理可以根据给定的提示选择合适的工具来完成任务,并将结果传递给另一个模型进行进一步处理。
为什么视频中提到使用Lama Index和Lama Pass?
-Lama Index是一个开源框架,能够处理数据加载、索引、查询和评估,特别适合用于构建大型机器学习模型(LM)的应用程序。Lama Pass提供了生产级别的上下文增强功能,特别是对于包含嵌入式对象(如表格和图形)的复杂文档,如PDF文件,Lama Parse可以提供更好的解析效果。
视频中提到的“RAG”是什么意思?
-RAG代表检索增强生成(Retrieval-Augmented Generation)。这是一种结合了检索(从大量数据中检索信息)和增强生成(基于检索到的信息生成响应)的技术。在视频中,AI代理使用RAG能力来提高其生成代码和回答问题的准确性。
如何将AI代理生成的代码写入文件?
-视频中展示了一个多步骤的过程,首先使用一个模型生成代码,然后使用另一个模型来解析输出,并将解析后的数据格式化为一个Python字典。最后,使用Python的文件操作将代码写入到指定的文件中,确保不会覆盖已存在的文件,并在输出文件夹中创建新的文件。
视频中的AI代理在生成代码时使用了哪些技术?
-视频中的AI代理使用了多个技术来生成代码。首先,它使用Lama Index来加载和索引PDF文件中的数据。然后,使用Lama Pass中的Lama Parse来解析PDF文件。接着,使用一个专门的代码生成模型(如Code Llama)来生成代码。最后,使用一个通用模型来解析和格式化生成的代码,以便写入文件。
为什么视频中的AI代理在生成代码时可能会有错误?
-视频中的AI代理使用的是基于本地运行的开源模型,这些模型可能没有像ChatGPT那样的大型商业模型那样的计算能力和复杂性。因此,生成的代码可能需要一些调整和修正,比如添加缺失的括号或删除转义字符,才能成为一个完全功能的代码。
如何确保AI代理生成的代码是有效的?
-视频中提到了使用一个额外的模型来分析生成的代码结果,并确定它是否是有效的代码。此外,还使用了错误处理和重试逻辑来确保代码生成过程的稳定性。如果代码生成过程中出现错误,代理会重试最多三次。如果仍然失败,会提示用户重新输入提示。
视频中提到的“输出管道”是什么?
-输出管道(output pipeline)是Lama Index中的一个概念,它允许用户将多个查询处理步骤组合在一起,形成一个连贯的处理流程。在视频中,输出管道用于将生成的代码通过一系列的解析和格式化步骤,最终生成一个可以写入文件的格式。
如何使用视频中展示的AI代理来生成单元测试?
-视频中展示了如何通过给代理一个提示,比如“读取test.py文件的内容,并为我编写一个简单的Python单元测试”,来生成单元测试。代理会使用Code Reader工具读取文件内容,然后使用Code Llama模型生成代码,最后使用另一个模型来解析输出并保存到文件。
视频中的AI代理是如何决定使用哪些工具的?
-AI代理会根据给定的提示和上下文来决定使用哪些工具。它通过内置的逻辑和对工具描述的理解来选择最合适的工具来完成任务。例如,如果需要读取API文档,代理可能会选择使用API文档工具;如果需要读取代码文件,它可能会选择使用Code Reader工具。
视频中提到的GitHub仓库有什么作用?
-视频中提到的GitHub仓库用于存放示例项目的数据和代码。它包含了一个数据目录,里面有用于演示的PDF文件和Python文件,以及一个requirements.txt文件,列出了项目所需的所有Python库及其版本。GitHub仓库还提供了安装和设置代理的说明。
Outlines

This section is available to paid users only. Please upgrade to access this part.
Upgrade NowMindmap

This section is available to paid users only. Please upgrade to access this part.
Upgrade NowKeywords

This section is available to paid users only. Please upgrade to access this part.
Upgrade NowHighlights

This section is available to paid users only. Please upgrade to access this part.
Upgrade NowTranscripts

This section is available to paid users only. Please upgrade to access this part.
Upgrade NowBrowse More Related Video
How to build an IVR with Custom AI Voices (in Dialogflow)
Chatbots with RAG: LangChain Full Walkthrough
LangGraph: Creating A Multi-Agent LLM Coding Framework!
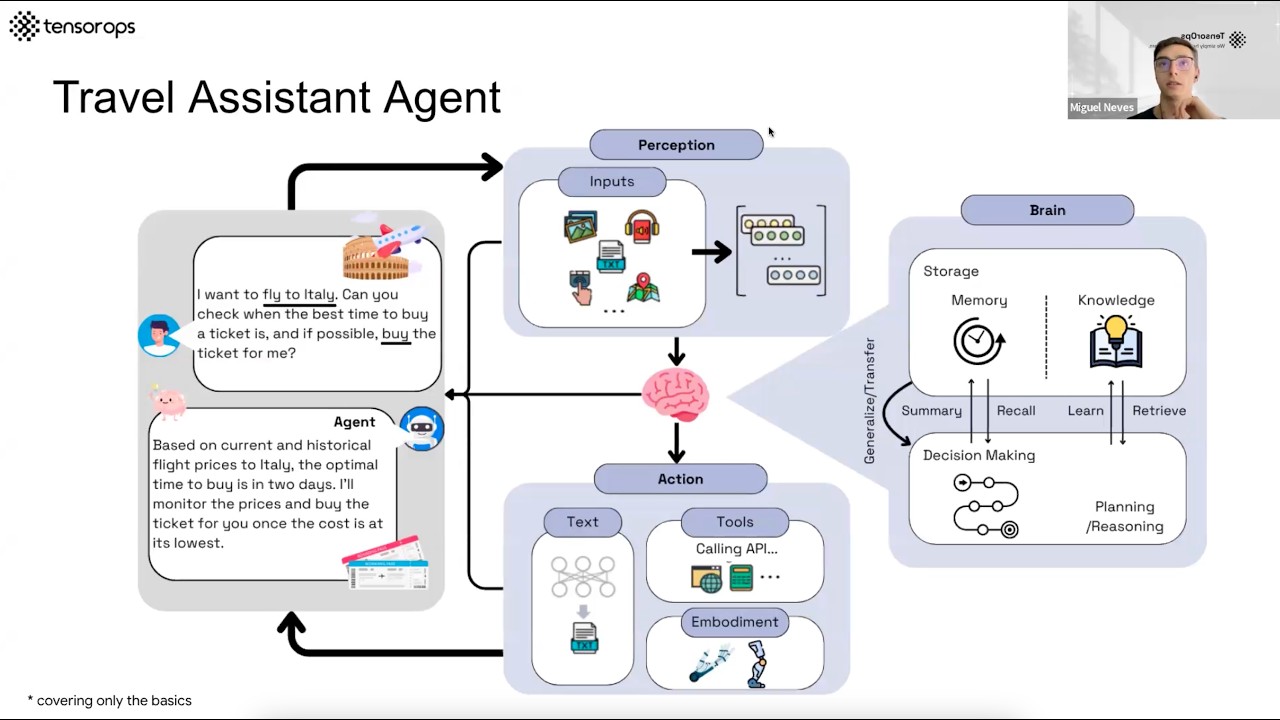
AI Agents– Simple Overview of Brain, Tools, Reasoning and Planning

Anthropic Tools: Say Goodbye to Traditional Function Calling
GPT-4o AI Agents: Easily Create Medical Research Agents (Praison AI)
5.0 / 5 (0 votes)
