Compose Options for Email - English

Spoken-Tutorial IIT Bombay
25 Apr 201515:25

Summary

TLDRThis tutorial covers essential Gmail features for composing emails. It explains the functions of 'To', 'Cc', and 'Bcc' fields, text formatting options, attaching files, sharing via Google Drive, and inserting photos or links. The tutorial demonstrates adding recipients, subject lines, and message content, with guidance on attaching and managing files. It also shows how to work with the 'Bcc' field and email recipient visibility. Additionally, it discusses options like formatting, checking spelling, and sending the email. The tutorial ends with information on workshops and certifications offered by the Spoken Tutorial project.

Takeaways

  • šŸ“§ Understanding 'To', 'Cc', and 'Bcc' in email composition: 'To' is for primary recipients, 'Cc' for copying others, and 'Bcc' for blind copying.
  • āœļø Formatting email text is possible with various options like fonts, sizes, bold, italic, and text alignment.
  • šŸ“Ž Files can be attached up to 25MB. For larger files, Gmail provides the option to share using Google Drive.
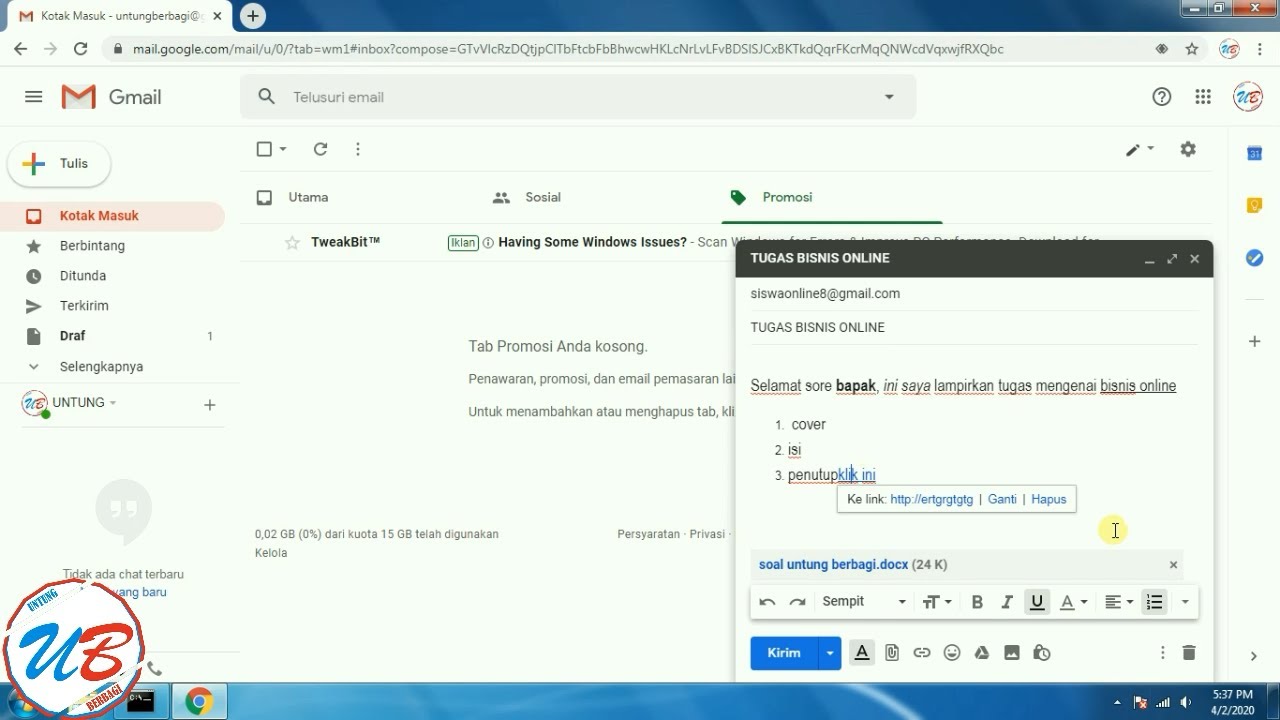
  • šŸ“· You can insert images into an email either by uploading from your computer or using a web link.
  • šŸ”— Hyperlinks can be added to text in the email by specifying a display text and URL link.
  • šŸ˜Š Emojis can be used in email communications for added expression.
  • šŸ’¾ Gmail auto-saves drafts, allowing you to retrieve the content in case of an unexpected disconnection or power loss.
  • šŸ—‘ļø Emails can be discarded by clicking the Trash icon, removing them from the Drafts folder.
  • šŸ–Øļø The 'Print' option allows sending the composed mail to a configured printer.
  • šŸš€ Files shared through Google Drive need to be shared with all recipients before sending the email.

Q & A

  • What are the three recipient options available in the Compose window of Gmail?

    -The three recipient options are 'To', 'Cc' (Carbon Copy), and 'Bcc' (Blind Carbon Copy).

  • What is the main difference between 'Cc' and 'Bcc' in email?

    -'Cc' allows all recipients to see who else received the email, while 'Bcc' hides the email addresses of recipients added in that field from other recipients.

  • How many recipients can be added to an email in Gmail per day?

    -Gmail allows up to 500 recipients per day across 'To', 'Cc', and 'Bcc' fields.

  • What is the maximum attachment size for files in Gmail, and how can larger files be sent?

    -The maximum attachment size in Gmail is 25 MB. For larger files, you can use the 'Insert files using Drive' option.

  • How can you format text in the body of an email in Gmail?

    -Text can be formatted using the formatting toolbar, where you can change font, size, apply bold, italic, underline, adjust text color, create lists, and align text.

  • What is the purpose of the 'Insert files using Drive' option in Gmail?

    -The 'Insert files using Drive' option is used to send files larger than 25 MB by uploading them to Google Drive and sharing them as a Drive link.

  • How does Gmail handle auto-saving of drafted emails?

    -Gmail automatically saves drafted emails in the 'Drafts' folder whenever content is added or removed, allowing retrieval in case of internet disconnection or power failure.

  • What does the 'Insert Link' option in the Compose window do?

    -The 'Insert Link' option allows you to hyperlink text in your email, enabling recipients to click on the link and be redirected to the specified URL.

  • How does the Bcc feature work from the recipient's perspective?

    -Recipients in 'Bcc' can see the 'To' and 'Cc' recipients but cannot see other 'Bcc' recipients. Those in 'To' and 'Cc' fields cannot see the 'Bcc' recipients at all.

  • What happens if a file shared via Google Drive is not shared with all email recipients?

    -If the file isn't shared with all recipients, Gmail prompts the sender to share the file by showing the message 'This Drive file isn't shared with all recipients,' and the sender can click 'Share & Send'.

Outlines

00:00

āœ‰ļø Introduction to Compose Options for Emails

This paragraph introduces the tutorial on 'Compose Options for Emails' in Gmail. It covers essential features like adding recipients (To, Cc, Bcc), formatting email text, attaching files, sharing via Google Drive, and inserting links or photos. The steps begin with logging into Gmail, navigating to the Compose window, and explaining the purpose of To, Cc, and Bcc fields, with details on how these recipients interact with each other. A limit of 500 recipients per day is mentioned, and the paragraph concludes with an example of filling in the To, Cc, and Bcc fields and formatting the email.

05:03

šŸ“Ž Attaching Files and Using Google Drive

This section explains how to attach files to emails, including the 25 MB attachment limit. Larger files can be shared via Google Drive. It walks through attaching a small PDF file and then attempts to attach a 30 MB zip file, showing the process of using Google Drive for larger files. The paragraph explains navigating Google Drive's 'My Drive,' 'Shared with Me,' and 'Upload' tabs, and highlights options for inserting files either as Drive links or attachments. It ends by showing how to upload and insert files as Drive links, providing step-by-step instructions.

10:08

šŸ”— Inserting Links, Emoticons, and Auto-Saving Emails

This paragraph discusses how to insert hyperlinks and emoticons in emails. It explains the process of creating a hyperlink, checking it by clicking, and editing or removing it. The tutorial then mentions the auto-save function in Gmail, which saves emails to Drafts whenever changes are made. It also touches on discarding drafts by using the Trash icon, expanding the compose window to full screen, switching to plain text mode, printing emails, and spell-checking. Finally, it describes sending the email and handling Google Drive sharing permissions.

15:11

šŸ“¬ Conclusion and Summary

The final paragraph summarizes the tutorial, recapping the features discussed, including email recipients (To, Cc, Bcc), text formatting, file attachments, sharing via Google Drive, and inserting links and photos. It also encourages watching a video about the Spoken Tutorial project, which offers workshops and certificates for those passing online tests. It provides contact information for more details and concludes with a message that the Spoken Tutorial project is funded by NMEICT, MHRD, Government of India.

šŸŽ¤ Closing Remarks

In this brief closing statement, the presenter, Srilakshmi Ramaswamy, signs off, thanking the viewers for watching the tutorial and attributing the content to the Spoken Tutorial Team from IIT Bombay.

Mindmap

Keywords

šŸ’”Compose Window

The Compose Window is the interface in Gmail where users can write and format emails. In the video, the compose window is demonstrated to show how to add recipients, format text, and attach files. Itā€™s the central tool for creating emails and sending them to the desired contacts.

šŸ’”To, Cc, Bcc

These are the fields for specifying recipients in an email. 'To' is for primary recipients, 'Cc' (Carbon Copy) sends copies to additional people, and 'Bcc' (Blind Carbon Copy) hides the addresses of additional recipients from others. The video illustrates how these options allow different levels of visibility for email recipients.

šŸ’”Attach Files

The feature that allows users to include documents, images, or other files in an email. In the video, the tutorial explains how to attach files up to 25MB or use Google Drive for larger attachments. This feature is essential for sharing content through email.

šŸ’”Google Drive

A cloud-based storage service integrated into Gmail, allowing users to send larger files by sharing links instead of attachments. In the tutorial, Google Drive is highlighted as a solution for sending files that exceed the Gmail attachment size limit.

šŸ’”Formatting Toolbar

The toolbar in Gmailā€™s compose window that offers text formatting options like font size, bold, italic, and lists. The video demonstrates how this toolbar is used to style email content, much like a word processor, making the message visually appealing.

šŸ’”Subject Line

The field where users provide a brief description of the emailā€™s purpose. In the tutorial, the presenter types 'Partner with us' as an example. The subject line is key for informing recipients about the emailā€™s content at a glance.

šŸ’”Insert Link

An option in Gmail that allows users to hyperlink text within the email. The video showcases how to create a link, for example, linking the text 'Spoken Tutorial' to the website URL 'http://spoken-tutorial.org'. This feature is useful for directing recipients to additional online resources.

šŸ’”Insert Photo

A feature that allows users to upload and embed images directly into the email body. In the tutorial, the presenter explains the option without using it, allowing viewers to explore the feature on their own. This can enhance the visual appeal of emails.

šŸ’”Send using Google Drive

A functionality that appears when trying to attach a file larger than 25MB. Instead of attaching the file, Gmail suggests sending it via Google Drive. The video walks through this process, showing how users can share large files efficiently.

šŸ’”Drafts Folder

The Gmail folder where unsent emails are automatically saved. The video explains how changes to the email, like adding text or attachments, are auto-saved in Drafts. This feature is critical for retrieving messages in case of interruptions like internet failure.

Highlights

Introduction to Compose Options for Emails tutorial

Explanation of email recipients: To, Cc, Bcc

How to format email text

Attaching files to emails

Sharing files via Google Drive

Inserting a photo or link into an email

Compose window options

Login process to Gmail

Opening the Compose window in Gmail

Adding recipients in the To field

Using Cc to send a copy to others

Using Bcc for blind carbon copy

Limit of 500 recipients per day

Entering recipient addresses with examples

Adding a subject line to an email

Basic formatting options in Gmail

Attaching files up to 25 MB

Sending files larger than 25 MB using Google Drive

Uploading a file to Google Drive from the Compose window

Inserting a photo into an email

Inserting a link into an email

Using emoticons in email communication

Auto-save feature of Gmail drafts

Options for discarding a draft email

More options in the Compose window

Sending the composed email

Viewing sent email and its recipients

Understanding the visibility of Bcc recipients

Summary of the tutorial's key points

Information about the Spoken Tutorial project and its funding

Details about workshops and certificates

Tutorial contribution by Spoken Tutorial Team, IIT Bombay

Transcripts

play00:01

Welcome to theĀ Spoken TutorialĀ onĀ Compose Options for Emails.

play00:07

"In this tutorial, we will learn

play00:10

about the email recipients, namely,Ā To, Cc, Bcc.

play00:16

Format the email text

play00:19

Attach files to emails

play00:22

Share files viaĀ Google Drive

play00:25

Insert a photo or link into an email

play00:29

and about theĀ ComposeĀ window options.

play00:33

"For this tutorial, you will need a workingĀ InternetĀ connection

play00:38

and aĀ Web browser

play00:40

For this demonstration, I will be usingĀ FirefoxĀ web browser

play00:45

Let's begin.

play00:46

Open your web browser and typeĀ "http://gmail.com

play00:55

TheĀ Login pageĀ opens.

play00:58

Enter yourĀ usernameĀ andĀ passwordĀ in the respective text boxes.

play01:04

If theĀ Login pageĀ opens with the username, this means that you have already accessed this account from your machine.

play01:12

Enter theĀ password

play01:15

and click on Sign in button.

play01:18

We are in ourĀ GmailĀ page.

play01:21

Now, let us look at the options available for writing an email.

play01:26

So, first let us click onĀ ComposeĀ button.

play01:31

TheĀ ComposeĀ window opens up.

play01:34

TheĀ ToĀ segment is where we specify the recipients.

play01:38

It has 3 options,Ā To, CcĀ andĀ Bcc.

play01:44

CcĀ stands forĀ Carbon CopyĀ andĀ BccĀ stands forĀ Blind Carbon Copy

play01:51

We have to add the email address of the person to whom we are sending the email in theĀ ToĀ field.

play01:58

Hereā€™s a screenshot.

play02:01

If we want to send the same email to more than 1 person, simply add the email ids in the fieldĀ To.

play02:09

Hereā€™s a screenshot.

play02:12

UseĀ Cc"Ā option to mark a copy of the email to others.

play02:18

All the recipients marked inĀ ToĀ andĀ CcĀ fields, can see all the other recipients.

play02:25

Hereā€™s a screenshot.

play02:28

We can also useĀ BccĀ option to mark a blind copy of the email to others.

play02:34

In this option, the recipients inĀ ToĀ andĀ CcĀ cannot see the recipients added inĀ Bcc.

play02:42

The recipient in theĀ BccĀ can see theĀ ToĀ andĀ CcĀ recipients,

play02:47

but not the otherĀ BccĀ recipients.

play02:51

The sender of the mail can see the complete recipients list.

play02:55

Hereā€™s a screenshot.

play02:58

Important NoteĀ :

play03:00

We can add any number of email ids in the recipients field -Ā To, CcĀ andĀ Bcc.

play03:08

But the maximum limit is 500 recipients per day.

play03:13

Each mail id has to be separated by aĀ spaceĀ orĀ commaĀ orĀ colon.

play03:20

Let us now switch back to ourĀ Gmail ComposeĀ window".

play03:25

By default, the cursor is in theĀ ToĀ field.

play03:29

Let's enter the recipient addresses as follows-

play03:33

InĀ ToĀ field, lets give the email id asĀ [email protected]

play03:46

InĀ CcĀ field,[email protected]

play03:55

InĀ BccĀ field,Ā [email protected]Ā andĀ [email protected]

play04:10

Click in theĀ SubjectĀ line and enter a short description for your email.

play04:15

I will type:Ā Partner with us".

play04:19

In the content area, let us type the message:

play04:24

Spoken Tutorial Project is helping to bridge the digital divide.

play04:29

GmailĀ allows us to do basic formatting to the text in the body of our email.

play04:35

It is displayed by default at the bottom of theĀ ComposeĀ window.

play04:41

"If not, to access the formatting toolbar, click theĀ Formatting optionsĀ button.

play04:47

Here we have options such as different fonts and sizes, bold, italic, underline, text color,align, numbered and bulleted lists and indentation.

play05:03

These options are exactly like the ones in any word processor application.

play05:08

You may explore these options by yourself.

play05:12

This is how I have formatted my text.

play05:16

To hide the formatting toolbar, click theĀ Formatting optionsĀ button.

play05:22

In theĀ ComposeĀ window, there are options for attaching files, photos, links andĀ emoticons.

play05:32

To share files or documents with others,

play05:35

we can useĀ Attach filesĀ orĀ Insert files using Drive"Ā options.

play05:41

AllĀ MailĀ providers allow to send files as attachment.

play05:46

You can attach up to 25 megabytes (MB) in size.

play05:51

To send files that are larger than this, you can useĀ Insert files using DriveĀ option.

play05:59

Let us first attach aĀ pdfĀ file which is less than 1Mb in size.

play06:04

Click on theĀ Attach fileĀ icon, which looks like a paper clip.

play06:09

This will open the file browser.

play06:12

Browse and select the file you want to send via mail.

play06:16

From theĀ Desktop, I will selectĀ myscript.pdfĀ and click onĀ Open.

play06:23

We can see that our file is getting attached to our mail.

play06:27

Multiple files can also be attached to the same mail by usingĀ Attach filesĀ option.

play06:34

To remove a file you've attached to a message, click on theĀ x markĀ to the right of the file name.

play06:41

Now let us attach a file which is around 30Mb.

play06:46

I have aĀ zipĀ file on myĀ DesktopĀ which is around 30Mb file size.

play06:52

Click theĀ Attach filesĀ icon once again.

play06:56

Browse and select the 30MbĀ zipĀ file and click onĀ Open.

play07:02

We will get the popup message:

play07:04

The file you are trying to send exceeds the 25mb attachment limit.

play07:09

And it gives us the option to Send using Google drive.

play07:14

Click onĀ Send using google driveĀ button.

play07:18

Let me close this for a moment.

play07:21

Clicking onĀ Insert files using DriveĀ option also gets us to the same window as before.

play07:28

Here, we can see 3 tabs:

play07:31

My Drive, Shared with meĀ andĀ Upload."

play07:36

By default, the files which are already uploaded, will be available underĀ My DriveĀ tab.

play07:43

You can see a file here.

play07:46

This was shared by Google Team at the time of account creation.

play07:51

Letā€™s click onĀ Shared with meĀ tab.

play07:55

Here we see the message, No one's shared any files with you yet!

play08:00

If anyone shares a file with you, it will be available underĀ Shared with MeĀ tab

play08:06

Now, click onĀ UploadĀ tab to upload a new file.

play08:12

Click onĀ Select files from your computerĀ button.

play08:16

Browse and select the file from your machine, that you want to upload and click onĀ OpenĀ .

play08:23

Click onĀ Add more filesĀ button, if you want to add any more files.

play08:27

I will skip this for now and proceed with the single file upload only.

play08:33

After the file has been added, we have to mention how it has to be inserted in our mail.

play08:40

Notice 2 buttons at the bottom right, which says,

play08:44

Insert as Drive linkĀ and

play08:46

Attachment

play08:48

By default,Ā Insert as Drive linkĀ is selected.

play08:52

If we selectĀ Attachment, then the file will be inserted as an attachment.

play08:57

We will leave it as it is.

play09:00

Click on theĀ UploadĀ button at the bottom left corner of the screen.

play09:05

It will start uploading but this may take some time depending on your internet speed.

play09:11

Once complete, here, in the content area, we can see a link to the uploaded file.

play09:17

Now letā€™s clickĀ Insert PhotoĀ option to insert images in the email.

play09:24

TheĀ Upload PhotosĀ window opens.

play09:27

We can upload photos from our computer or by giving the website address of the image.

play09:34

For now, I don't want to upload any images.

play09:38

So I will click on theĀ CancelĀ button.

play09:41

You may explore this option on your own.

play09:44

The next option isĀ Insert Link. Letā€™s click on it.

play09:49

TheĀ Edit LinkĀ dialog box opens.

play09:53

In theĀ Text to displayĀ field, type the text that you want as the link.

play09:58

I will typeĀ Spoken Tutorial

play10:02

In theĀ Link toĀ section, by default,Ā Web addressĀ option is selected.

play10:08

In the text field, type the url asĀ http://spoken-tutorial.org

play10:20

and click onĀ OKĀ button.

play10:23

Now, in the content area, you can see the textĀ Spoken TutorialĀ and it is hyperlinked.

play10:29

Let me click on the hyperlinked text.

play10:32

A small pop window opens below the text.

play10:35

It says-Ā Go to link:.

play10:38

Clicking on the URL displayed, will take you to theĀ Spoken TutorialĀ websiteā€™sĀ Homepage.

play10:45

To change theĀ URLĀ or remove the link, we can click onĀ ChangeĀ orĀ RemoveĀ options, respectively.

play10:53

We can also insert various pictorial representations with the help of thisĀ emoticonĀ icon.

play10:59

Use this feature in your email communication whenever required.

play11:04

Notice the textĀ Saved,Ā just before theĀ TrashĀ icon.

play11:08

Whenever we add or remove content, our email will be auto-saved in our defaultĀ DraftsĀ folder.

play11:16

This is very helpful to retrieve our typed message, in case of a power failure orĀ InternetĀ disconnection.

play11:24

If we want to discard this message, click on theĀ TrashĀ icon.

play11:28

This action will delete the email from theĀ DraftsĀ folder, as well.

play11:34

Click on theĀ More optionsĀ button, which is next to theĀ TrashĀ icon.

play11:39

Default to full-screenĀ option will make the compose window bigger.

play11:44

LabelĀ ā€“ We will learn about this feature in the future tutorials.

play11:49

Plain text modeĀ option will clear all the formatting we did before and convert the mail to plain text.

play11:57

PrintĀ option will send the composed mail to the default configured printer.

play12:03

Check SpellingĀ will do spell-check of the typed content.

play12:07

We are now ready to send our mail.

play12:09

Click onĀ SendĀ button.

play12:12

We get the following message on the screen-

play12:15

This Drive file isn't shared with all recipients.

play12:19

This is because we did not share the file with the people who are marked on this email."

play12:25

Click onĀ Share & SendĀ button.

play12:29

On the screen, we will see either of the two messages:

play12:32

Your message is sending

play12:34

or Your message has been sent.

play12:38

To view the sent mail, click onĀ View MessageĀ link.

play12:43

We can see the content of the email which we sent here.

play12:47

Let us cross-check one-by-one.

play12:50

Here are the attachments

play12:52

and here is the URL link.

play12:55

Below the mail address, there is an inverted triangle that shows the header details.

play13:00

Let me click on it.

play13:03

We can see the email ids of all the recipients inĀ To, CcĀ andĀ BccĀ fields.

play13:11

Let us see how the email will appear to the recipients.

play13:16

This is the mail id of the recipient marked inĀ Cc.

play13:21

You can see the message which is sent now. Let me open this to read.

play13:27

Click onĀ Show Details.

play13:29

It displaysĀ ToĀ andĀ CcĀ recipients, but not theĀ BccĀ recipients.

play13:35

This is the mail id of one of the recipient marked inĀ Bcc.

play13:41

You can see the message which is sent now.

play13:43

Let me open this to read.

play13:46

Click onĀ Show Details.

play13:49

You can seeĀ To, CcĀ andĀ BccĀ recipient details.

play13:55

Let me come back to the Senderā€™s gmail account.

play13:59

Look over here, we mentioned 2 recipients in theĀ Bcc.

play14:04

But here, we can see only one email id. The other one is not visible.

play14:10

This is how theĀ BccĀ feature works.

play14:13

Hope you are able to understand the differences clearly.

play14:17

This brings us to the end of this tutorial.

play14:20

Let us summarise.

play14:22

In this tutorial, we have learnt about

play14:25

The email recipients namely,Ā To, Cc Bcc

play14:30

Formatting the text of the emails

play14:33

Attach files to emails

play14:36

Share files viaĀ Google Drive

play14:39

Insert a photo or link into an email

play14:43

and about theĀ ComposeĀ window options.

play14:47

"he video at the given link summarizes theĀ Spoken Tutorial project.

play14:52

Please download and watch it.

play14:55

We conduct workshops and give certificates for those who pass our online tests.

play15:01

For more details, please write to us.

play15:04

Spoken Tutorial project is funded by NMEICT, MHRD, Government of India.

play15:11

More information on this mission is available at this link.

play15:16

"This tutorial has been contributed by the Spoken Tutorial Team, IIT Bombay.

play15:21

This is Srilakshmi Ramaswamy signing off. Thanks for watching."

Rate This
ā˜…
ā˜…
ā˜…
ā˜…
ā˜…

5.0 / 5 (0 votes)

Related Tags
Email GuideGmail FeaturesCompose OptionsEmail RecipientsFile AttachmentsEmail FormattingGoogle DriveBCC and CCWeb TutorialDigital Literacy