05 The Tensile Test

Scott Ramsay
17 Sept 201610:57

Summary

TLDR本视频展示了如何通过实验确定材料的应力-应变曲线,特别是在弹性区域。使用黄铜样品进行拉伸试验,样品呈特定的“狗骨”形状,中间部分较窄,两端较宽,以确保在拉伸过程中中间部分承受最大应力。实验中,通过在样品上安装应变片来测量应变,同时使用便携式拉伸试验机施加应力。视频详细记录了从弹性阶段到塑性变形的整个过程,并展示了材料在达到弹性极限后如何继续增强,直至最终断裂。

Takeaways

  • 📏 拉伸样品通常是狗骨头形状,中间较窄,末端较宽,以便于夹持。
  • 🔧 中间较窄的区域被称为“减小截面”,这是材料变形和失效的主要区域。
  • 🎯 应变计安装在减小截面区域,用于精确测量应变。
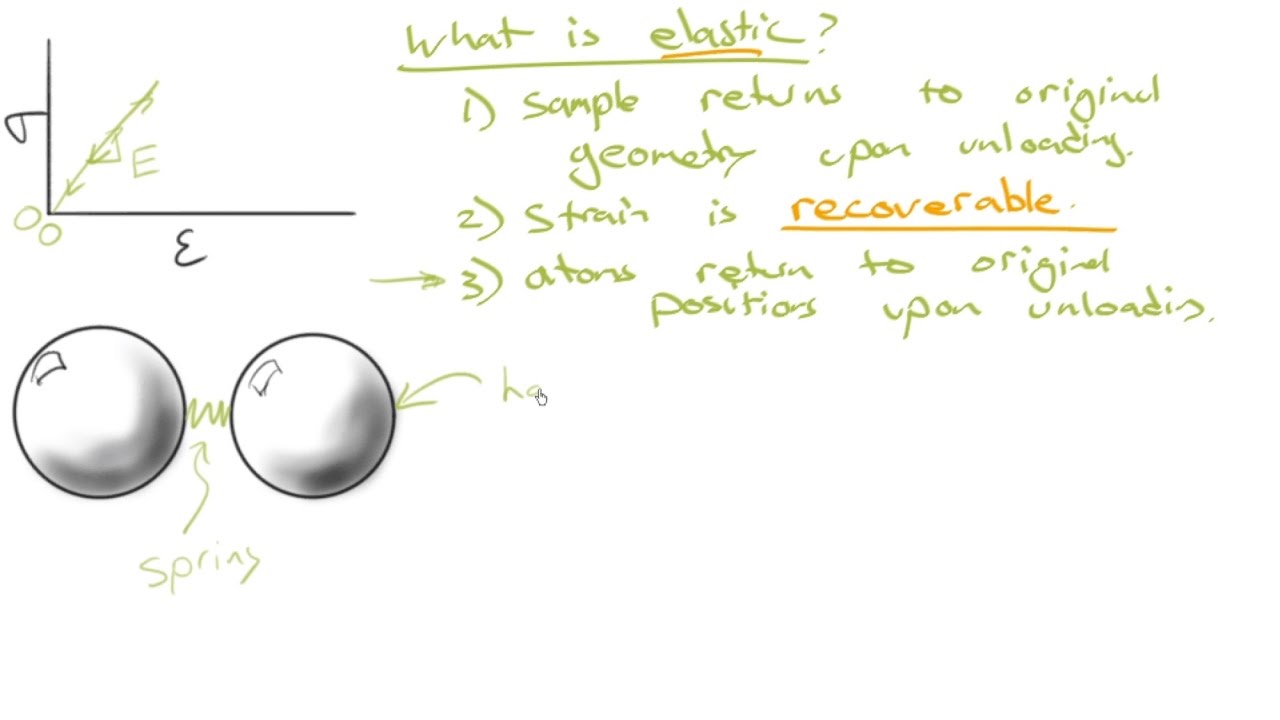
  • 📊 通过拉伸试验可以生成应力-应变曲线,其中弹性变形部分表现为直线。
  • ⚙️ 拉伸试验中,初始加载曲线可能有“曲线尾巴”,是由设备的机械特性引起的。
  • 🧠 在应力-应变曲线的弹性区域末端,材料开始发生塑性变形,通常在400兆帕附近。
  • 🔄 卸载时,材料会发生弹性恢复,曲线的斜率仍然等于杨氏模量。
  • 🏋️ 通过塑性变形,材料的强度增加,但杨氏模量保持不变。
  • 🔄 拉伸试验还展示了材料的滞后现象,这是一种实验伪影。
  • 💥 最终,在持续施加应力下,材料断裂,显示出延展性和弹性恢复。

Q & A

  • 什么是应力-应变曲线?

    -应力-应变曲线描述了材料在受到拉伸或压缩时的应力和应变之间的关系,特别是在弹性区和塑性区的表现。

  • 为什么样品的中间部分被设计成较窄的截面?

    -样品的中间部分被设计为较窄是为了集中应力,并确保材料的塑性变形和断裂发生在这一区域,从而便于研究和获取数据。

  • 什么是‘狗骨样品’?

    -‘狗骨样品’是一种用于拉伸测试的样品,它因形状类似于狗骨头而得名,通常在中间部分变窄,两端较宽,方便夹紧。
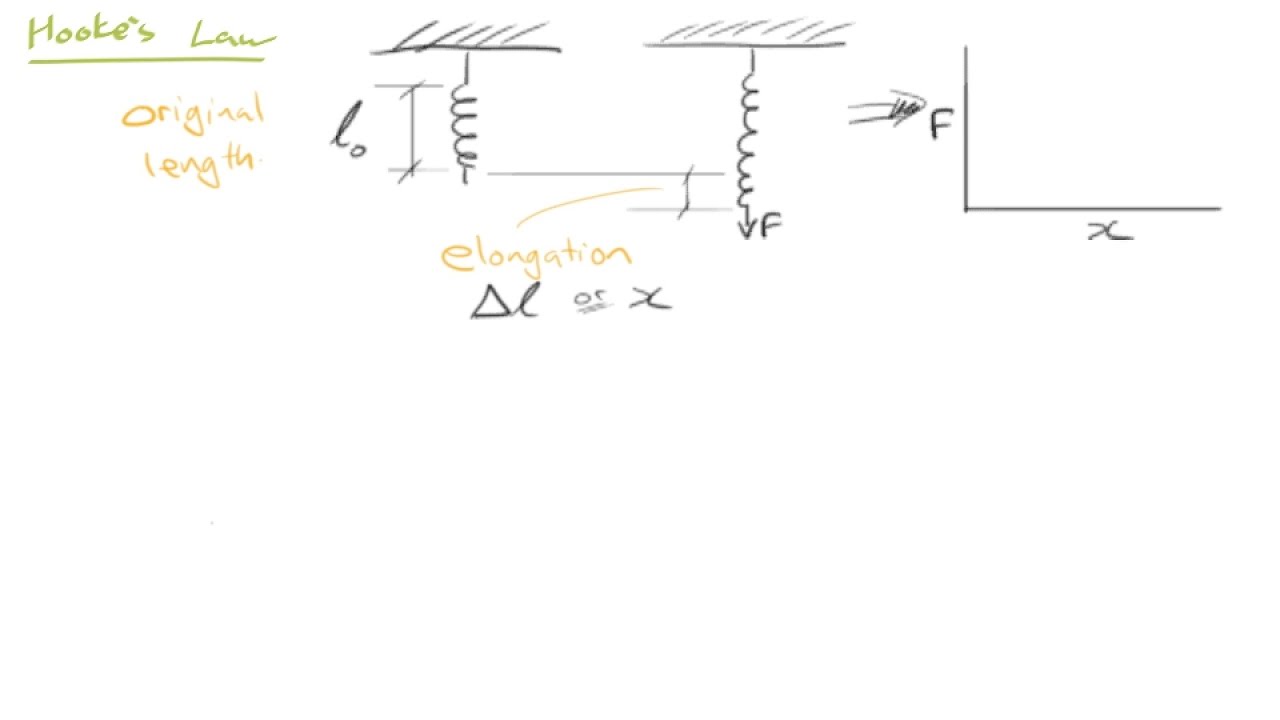
  • 应力和应变是如何被测量的?

    -应力是通过测量样品所承受的载荷来计算的,应变则通过附着在样品上的应变片精确测量。

  • 什么是弹性恢复?

    -弹性恢复指的是当材料在应力解除后恢复到原来形状的能力,通常发生在材料的弹性区域。

  • 拉伸测试中的‘塑性变形’是什么意思?

    -塑性变形是指材料在超出其弹性极限后发生的永久变形,即材料不会完全恢复到原来的形状。

  • ‘屈服点’是什么?

    -屈服点是指材料从弹性变形转变为塑性变形的应力水平,通常在应力-应变曲线上表现为曲线开始偏离线性部分的地方。

  • 拉伸测试中的‘断裂’意味着什么?

    -断裂是指材料在拉伸测试中承受的应力达到极限后发生的断裂或破坏,测试结束时材料通常会变得比原来更长。

  • 应力-应变曲线中出现的‘滞后现象’是什么?

    -滞后现象是指在加载和卸载过程中,材料应力-应变曲线之间形成的闭环,通常由于材料的内部摩擦或实验过程中的误差引起。

  • 如何通过塑性变形增强材料的强度?

    -通过对材料施加塑性变形,材料的强度会增加,这是由于材料内部结构发生了变化,如黑smith锻打金属时通过反复敲打增强强度的原理。

Outlines

00:00

🛠️ 如何制作拉伸应力-应变曲线

本段详细介绍了如何通过拉伸实验来制作应力-应变曲线,重点在于解释样本形状的设计以及测试的过程。样本是铜制拉伸试件,形状类似哑铃,被称为“狗骨试件”,用于确保应力集中在中间较窄的截面。中间部分是“减少截面”,在拉伸过程中发生的塑性变形和断裂将集中于此。文中还简要提及应变规的使用,该仪器用于精确测量中间截面的应变。

05:02

📊 通过实验获取应力-应变数据

这一段介绍了如何通过软件记录拉伸实验的应力和应变数据。应力和应变的计算基于样本的横截面积,实验结果显示了线性弹性阶段的应力-应变曲线。虽然在实验初期可能会有一些微小的偏差,但整体曲线表现良好。作者还解释了曲线的“脚趾”现象,这种现象与实验过程中设备的微小调整有关。

10:02

🔄 弹性恢复与材料强化

本段讨论了材料在加载和卸载过程中的弹性恢复现象。作者指出,当加载超过某一应力值时,材料会发生塑性变形,但当卸载时,材料会弹性恢复,曲线的斜率仍然等于杨氏模量。通过重复加载,材料逐渐变得更强,这是由于塑性变形引发的强化效果。作者将这种现象与锻造过程中的强化作用作了类比,强调了杨氏模量不会随塑性变形而改变。

💥 拉伸测试的最终断裂

这一段记录了实验的最后阶段,材料在经过多次加载后发生断裂。作者展示了试件在断裂后的伸长情况,并解释了“弹性回弹”现象,即试件在断裂前经历了弹性恢复,导致了可见的间隙。作者对此实验表现出极大的兴奋,并暗示将在后续视频中进一步讨论这个现象。

Mindmap

Keywords

💡应力-应变曲线

应力-应变曲线是描述材料在受力过程中应力与应变之间关系的图表。在视频中,通过拉伸试验来确定这种曲线,特别是在弹性区域。这个曲线对于理解材料的力学行为至关重要,因为它显示了材料在不同应力水平下的变形能力。例如,视频中提到了线性弹性区域,这是应力-应变曲线的初始直线部分,表明材料在去除应力后能够完全恢复原状。

💡拉伸试样

拉伸试样是指用于拉伸试验的样品,通常具有特定的形状和尺寸,以确保测试的准确性。视频中提到的拉伸试样是一块黄铜材料,其形状类似于“狗骨头”,中间部分较窄,两端较宽。这种设计有助于在中间较窄的区域(即减少截面)产生较大的应力,从而研究材料的力学性能。

💡弹性区域

弹性区域是指材料在受力后能够完全恢复原状的最大应力范围。在视频中,弹性区域通过应力-应变曲线的初始直线部分表示,其中材料的应力与应变成正比,且比例常数即为杨氏模量。视频中提到,通过观察应力-应变曲线的线性部分,可以计算出材料的杨氏模量。

💡杨氏模量

杨氏模量是材料的一种物理属性,表示材料在弹性区域内应力与应变之间的比例关系。在视频中,杨氏模量通过应力-应变曲线的初始斜率来确定。它是一个重要的参数,因为它反映了材料的刚度。视频中提到,即使材料在经历塑性变形后,其杨氏模量仍然保持不变。

💡塑性变形

塑性变形是指材料在超过弹性极限后发生的永久性变形,即使去除应力后也不能恢复原状。视频中通过应力-应变曲线的非线性部分来展示塑性变形的发生,这通常发生在曲线的线性部分结束之后。塑性变形是材料力学性能的一个重要方面,因为它关系到材料的强度和韧性。

💡减少截面

减少截面是指拉伸试样中故意设计成较窄的部分,以便在该区域产生更大的应力和应变。视频中提到,通过减小截面的面积,可以确保材料在该区域发生塑性变形,从而便于研究和测量。减少截面是拉伸试验中的关键设计,因为它是应力集中和变形发生的地方。

💡应变片

应变片是一种用于测量材料应变的电子设备,通常通过粘贴在试样表面来工作。视频中提到,在拉伸试样的减少截面区域通常会安装应变片,以准确测量该区域的应变。应变片对于精确获取材料在受力过程中的应变数据至关重要。

💡标距

标距是指在拉伸试验中定义的用于测量应变的试样长度部分。视频中提到,应变片通常安装在减少截面的某个位置,这个位置的长度就是标距。标距是计算应变的关键参数,因为应变是通过测量标距长度的变化来确定的。

💡塑性强化

塑性强化是指材料在经历塑性变形后,其强度增加的现象。在视频中,通过继续加载应力,材料的应力-应变曲线显示出随着塑性变形的增加,材料的应力水平也在增加,表明材料变得更强。塑性强化是材料在塑性变形过程中的一个常见现象,它与材料的加工硬化有关。

💡弹性恢复

弹性恢复是指材料在去除应力后能够恢复到原始形状的能力。在视频中,当材料被卸载时,可以看到应力-应变曲线呈现出斜率,这表明材料在经历塑性变形后仍然具有弹性恢复的特性。弹性恢复是材料力学性能的一个重要方面,它与材料的弹性模量有关。

Highlights

介绍了拉伸实验中的应力-应变曲线,并展示了如何生成这些曲线。

演示了如何使用一个小型拉伸样品进行实验,这是一个典型的狗骨试样。

讲解了为什么样品的中间部分更窄,这被称为减少区域,是材料塑性变形和断裂发生的地方。

强调了使用应变仪测量减少区域的应变,该应变仪是精密的电子设备,用于准确测量应变。

通过实验展示了金属材料的应力-应变曲线,包括弹性变形和塑性变形的阶段。

提到了在曲线开始部分的非线性区域,称为“曲线趾”,这是实验装置固有的误差。

通过手动加载展示了应力-应变曲线的形状,并指出这类金属材料的典型应力-应变行为。

讨论了杨氏模量的重要性,解释了尽管材料变得更强,但杨氏模量不变。

展示了材料在塑性变形后的弹性恢复现象,并指出了弹性恢复与杨氏模量的关系。

引入了应力松弛现象,并通过卸载和重新加载实验展示了滞后效应。

通过继续加载展示了材料的进一步强化,并强调通过塑性变形使材料变得更强。

实验显示了材料在不断加载下断裂的过程,并解释了断裂发生的机制。

通过对比实验前后的试样长度,展示了塑性变形对材料形状的影响。

讨论了断裂后材料的弹性恢复现象,并强调了材料回弹的可视化效果。

总结了实验的重要性,并预告了后续课程将进一步探讨材料强度和杨氏模量的关系。

Transcripts

play00:00

okay so in this video I'd like to show

play00:02

you how we actually determine create one

play00:05

of these stress-strain curves that we've

play00:07

been talking a little bit about at least

play00:08

in the elastic region so far so what

play00:10

we're gonna do without further ado is

play00:12

we're gonna test one of these samples

play00:15

this is a little bit of a bit of brass

play00:16

it's a tensile specimen you might call

play00:19

it it's got a certain shape I'll sketch

play00:21

it out for you it looks something like

play00:26

this

play00:32

okay sort of narrows down a bit like

play00:35

that it's gonna figure reason at the

play00:37

ends yeah that's not too bad there you

play00:42

go so that's a what we call a tensile

play00:46

specimen coupon or sample sometimes if

play00:51

you want to be hip you call it a dog

play00:53

bone specimen because it kinda looks

play00:57

like a female or something right um no

play01:01

kidding anyway it is so what why do we

play01:05

have this shape why is it narrower here

play01:07

and bigger at the ends what's up with

play01:09

these big regions well you'll see in a

play01:12

moment that these larger regions at the

play01:14

end of where we're gonna grip it I'm

play01:16

gonna tighten it down in this machine

play01:18

quite quite hard and we have to make

play01:23

sure it doesn't slip there we also have

play01:26

to make sure that the section here in

play01:29

the middle which has a smaller

play01:32

cross-sectional area right this

play01:36

cross-sectional area here is smaller

play01:39

that's also where we define our a knot

play01:42

for our stationary stress so this is

play01:45

this region with the smaller

play01:46

cross-sectional area is called often

play01:48

that the reduced section okay reduced

play01:52

because the cross-sectional area is

play01:54

reduced so that's where all the good

play01:55

stuffs gonna happen you know when we

play01:57

start to stretch this thing out that's

play02:00

where the plastic deformation is going

play02:01

to occur and ultimately that's where

play02:02

it's gonna fail so we as engineers can

play02:04

study it and by making that reduce

play02:07

section in there smaller like that in

play02:09

cross-section we know all the good

play02:11

stuffs gonna happen there and that's

play02:12

where we can study it and get the data

play02:13

so that's the reduced section and the

play02:16

final thing is that somewhere in this

play02:20

region doesn't have to be actually in

play02:21

the middle but somewhere in here usually

play02:23

what we do is we clip on a little

play02:26

instrument called a strain gauge and

play02:29

it's a delicate little piece of

play02:31

electronics that accurately measures

play02:33

this

play02:34

and so that's called the gauge length

play02:37

that gauge length okay that's where we

play02:42

define L naught usually you clip on this

play02:46

little strain gauge it's got a couple of

play02:47

razor blades that just touch into the

play02:49

surface them don't slip and it could be

play02:52

anywhere in that reduced section because

play02:53

of course a knots the same through this

play02:55

reduced section so the stress is the

play02:57

same all right so without further ado

play02:59

I'd like to actually show you a tensile

play03:01

test and I'd like you to think about

play03:03

something we haven't talked about yet

play03:06

that's this if this is a stress-strain

play03:09

curve and we've talked about this linear

play03:14

elastic region what is the rest of the

play03:17

curve gonna look like is it gonna look

play03:19

like that you know is it gonna look like

play03:23

this sort of straight up and then maybe

play03:27

braking or is it gonna look like say

play03:33

this and then break somewhere let's see

play03:36

which one of those do you think it's

play03:37

gonna be take a moment think about that

play03:41

so here we have tensile specimen I'm

play03:46

just gonna show you if this camera round

play03:48

like this so you can see this tensile

play03:51

tester okay and this is a portable

play03:55

tensile tester normally for material

play03:58

testing you'd use a bigger machine than

play04:02

this but this one's pretty good for a

play04:04

little demonstrations and hands-on

play04:07

activities so there I've already mounted

play04:09

the little brass specimen in there okay

play04:12

I've got another one this is the one I

play04:14

was showing you and I've mounted that

play04:16

one and it's gripped on these ends okay

play04:18

so that's where it tightened these bolts

play04:20

down so it grips on the grip region

play04:22

reduced section right through the middle

play04:24

enough for this simple test we're not

play04:25

going to put a strain gauge on we're

play04:27

just going to use the length of that

play04:28

reducer section for our strain and over

play04:31

here you'll see there's a little rock

play04:32

around this is a little unconventional

play04:33

but what happens is it's just the way

play04:36

that this particular little machine

play04:37

records the load so this is a load cell

play04:39

and it's going to record the load that

play04:41

the results from the application of

play04:44

strain and the strain

play04:46

apply by turning this little wheel over

play04:48

here on the right-hand side of the

play04:49

screen so I'm gonna crank that it will

play04:51

impose strain on this and we will record

play04:53

the stress men let me show you here the

play04:58

software will plot I've already coded

play05:02

into the software the sample dimension

play05:04

is a cross sectional area so over here

play05:06

you'll see it's gonna calculate the

play05:08

stress for us and it's gonna calculate

play05:11

the strain now this strain I don't know

play05:12

why it says F there just ignore that and

play05:14

we're actually not gonna see any

play05:16

negative values it just happens to it

play05:18

auto scales the axes but it starts off

play05:20

and you're gonna collect if we're gonna

play05:21

collect the first data point right here

play05:23

in the middle but of course it this is

play05:26

the software likes to put those negative

play05:28

ones I'm just so it's right in the

play05:29

middle but we're gonna get just positive

play05:32

values okay so I'm going to zero the

play05:36

load cell I'm gonna start the test and

play05:38

here we go and start cranking the handle

play05:40

here and look at this we start to

play05:42

accumulate some data and so this is now

play05:45

the brass sample starting to go through

play05:50

it stress drinkers I'm gonna stop right

play05:52

there and now you might look at that and

play05:53

say wait a second that doesn't look

play05:55

linear right but experimentally this is

play05:57

beautiful linear the linear curve so

play06:00

right through here that's where you

play06:01

would calculate the Youngs modulus sure

play06:04

there's a bit of scatter but some of

play06:05

that's probably from inconsistencies in

play06:07

the way I was turning the crank the

play06:08

other thing you'll notice is down here

play06:10

there's a little toe of the curve we

play06:11

often call it and that's mostly from

play06:13

bolts in the in the machine actually

play06:16

settling in a bit to there threads a bit

play06:18

of strain there so that's kind of an

play06:19

artifact of the experimental test but

play06:22

right through here this is good data and

play06:24

we can see if I continue to deform it

play06:28

like this it continues to go to higher

play06:31

higher values of stress but you can see

play06:34

now what's happened it's done I guess

play06:37

what we had called C right it's curving

play06:39

off like this always go back over here C

play06:42

is this generalized shape for the

play06:44

stress-strain curve for a metal okay and

play06:47

that's what we're doing there so if you

play06:49

had to guess where would you say the

play06:52

material first

play06:54

exceeded the elastic region first

play06:56

started to deform permanently and I

play07:01

think if you look at this you would

play07:02

probably say well somewhere in here

play07:04

maybe around 400 mega pascals or

play07:06

something I want to show you something

play07:08

interesting what's gonna happen now I

play07:10

continue to load it continue to load it

play07:12

what's gonna happen if I unload it I

play07:14

start to reduce the stress which what do

play07:17

you think it's gonna go is it gonna go

play07:18

off you know maybe this way straight

play07:20

down back this way well in fact you

play07:23

remember from the previous video that we

play07:25

talked about the young's modulus being

play07:27

this really important structure

play07:29

independent property so although we've

play07:31

changed the strength let me show you

play07:33

that we've changed the strength it's

play07:34

exciting it's really exciting

play07:36

where was this material first

play07:39

permanently deforming and we'll explore

play07:41

this later in more detail in a separate

play07:43

video

play07:43

but where did it first stop being

play07:45

elastic well you'd probably guess

play07:47

somewhere around here near the end of

play07:49

the straight line so say around we'll

play07:50

call it 400 mega Pascal's if I unload

play07:53

here well look at this I'm I can't

play07:55

ignore the fact that that's got a slope

play07:58

to it that slope is the same as the

play08:00

slope over here why because it's elastic

play08:03

recovery I unload it I reduce the stress

play08:06

on sample and it recovers elastically it

play08:09

springs back it pulls back even though

play08:12

it has also plastically or s right not

play08:14

permanently deformed okay so this slope

play08:17

is the same as this slope because it's

play08:19

no it's the Youngs modulus and even

play08:22

though we've strengthened it we haven't

play08:24

changed the Youngs modulus why have we

play08:26

strengthened it well let me show you

play08:27

that if I unload it all the way here

play08:30

unload it right down to zero and now if

play08:33

I bring it back up I load it up again

play08:35

you can see there's a little bit of this

play08:37

loop we call it hysteresis that's really

play08:39

more of an experimental artifact here in

play08:41

this case and I'm gonna see that it's

play08:46

suddenly right there where we left it

play08:48

off last time up here close to 500 mega

play08:51

Pascal's is when it starts to

play08:52

plastically deform the second time so

play08:54

the first time around 400 mega Pascal

play08:56

strength and then 500 we've made it

play08:58

stronger we've made it stronger and this

play09:01

is in fact an actual way that the

play09:04

through planet

play09:05

deformation like this you know you see

play09:06

one of these blacksmiths hammering away

play09:08

on a sword or something like that or a

play09:09

horseshoe or or whatever that that

play09:13

horseshoe is actually getting stronger

play09:15

through that deformation operation so

play09:18

we're strengthening we'll learn about it

play09:19

more in more detail later in the course

play09:21

but of course the whole time the Youngs

play09:23

modulus does not change it's not

play09:25

exciting I think it is anyway I hope you

play09:29

do is well now look at this I can

play09:30

continue to deform it will continue to

play09:32

get stronger the little saucer just from

play09:35

the way I'm turning it I'm trying to

play09:36

turn this smoothly as I can but I pause

play09:39

for a second and the Machine just

play09:40

relaxes a bit and if we are lucky here

play09:44

we'll actually get this to break before

play09:48

I run out of strain on a machine so it's

play09:52

getting quite strong getting quite

play09:53

strong I'm going up to 600 mega Pascal's

play09:55

here right I could unload at any time if

play09:58

I wanted and it'll still have the same

play10:00

Young's modulus loaded back up again

play10:02

same Young's modulus continued to load

play10:04

it continued load it

play10:05

it's a it's deforming permanently

play10:07

absolutely it's deforming permanently

play10:10

now I can actually show you here on this

play10:13

camera you can see that's the size it

play10:15

was to start with now it's it's

play10:19

substantially longer what's gonna happen

play10:22

is the stress on it what's gonna happen

play10:23

what's gonna happen am I gonna be able

play10:25

to get this to happen in this video is

play10:27

it kind of break is it gonna break this

play10:29

is a very ductile there we go okay I

play10:31

stopped right away look at that so it

play10:34

broke it fractured and look at this look

play10:37

how long it is but also pay close

play10:39

attention to this see that little gap in

play10:41

there what is that what's that gap well

play10:44

that's the elastic spring back or

play10:45

recovery we can explore that more in a

play10:48

subsequent video okay but I hope that

play10:50

was exciting here it was for me okay

play10:52

thank you

Rate This

5.0 / 5 (0 votes)

Related Tags
应力应变拉伸测试塑性变形弹性恢复材料科学工程原理杨氏模量金属强化实验操作应变计
Do you need a summary in English?