Notion Calendar é qui e ti spiego come funziona nel dettaglio
Summary
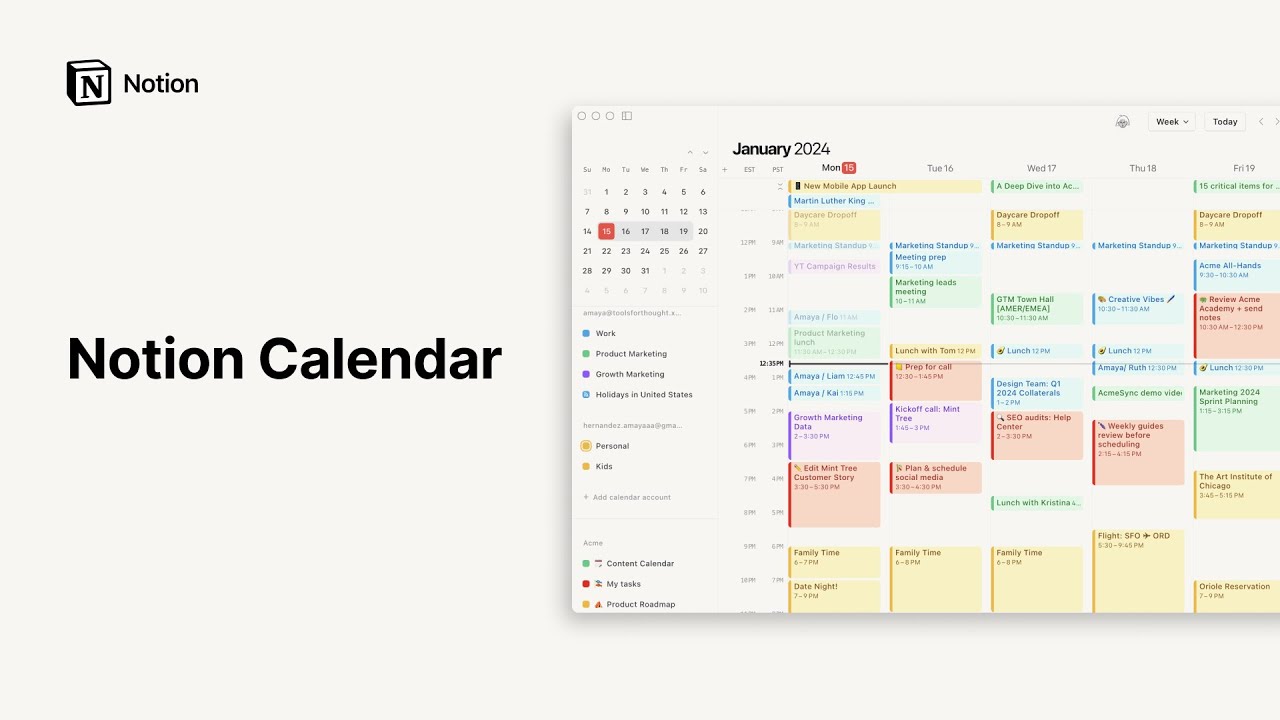
TLDRThe video script introduces Notion Calendar, a new feature that seamlessly integrates with existing Notion calendars. It guides users through the setup process, including downloading the app, signing in with a Google account, and connecting Notion workspaces. The script demonstrates how to add events to the calendar, sync them with Notion, and customize settings. It also highlights the ability to create pages for events, set time zones, and share availability for appointments. The tutorial covers Notion Calendar's interface, preferences, and integration options, offering a comprehensive guide for Notion users.
Takeaways
- 📅 Notion has released a new feature called Notion Calendar, which integrates seamlessly with existing calendars.
- 📲 Users need to download the Notion application on both computer and smartphone platforms to access the new calendar.
- 🔑 To register for Notion Calendar, a Google account is required, with the possibility of other login options in the future.
- 📝 Notion Calendar allows users to connect their Gmail calendars and view all events and appointments.
- 🗓 Users can quickly add events to their Google Calendar from Notion and see the difference between native and imported events.
- 🔗 Connecting Notion to Google Calendar involves granting permissions and accessing the workspace for integration.
- 💡 Notion Calendar provides the ability to modify event details such as date, time, and format directly within the application.
- 🎨 Users can customize the appearance of their calendars, including changing colors and selecting which calendars to display.
- 📝 Notion Calendar also includes features for creating new databases and adding them to the calendar with ease.
- 🔗 There is an option to share a link for scheduling appointments, which integrates directly with Notion and sends notifications to participants.
- ⚙️ The interface offers various views, including daily, weekly, and monthly, and allows for searching and setting preferences.
Q & A
What is the new feature released by Notion called?
-The new feature released by Notion is called Notion Calendar.
How can I access Notion Calendar?
-To access Notion Calendar, you need to download the application from the website for both computer and smartphone.
What is the first step after launching the Notion Calendar application?
-The first step is to sign in using a Google account, as the script mentions the possibility of signing in with other types of calendars in the future.
How can I connect my Notion workspace to Notion Calendar?
-You can connect your Notion workspace by clicking on 'Add Calendar account' and then selecting 'Connect' under the Notion option, which will prompt a web page asking for access to your workspace.
What happens when I add an event to my Google Calendar from Notion Calendar?
-When you add an event to your Google Calendar from Notion Calendar, it will appear in both calendars, and you can manage the event's details in Notion Calendar as well.
Can I create a recurring event in Notion Calendar?
-As of the script's information, you cannot create a recurring event within Notion Calendar itself, but you can set up recurring events for those already on your calendar.
How can I add a Notion database to my calendar?
-You can add a Notion database to your calendar by clicking on the three dots, then selecting 'Add Notion database', and searching for the database you want to add.
What are the options available when creating a new calendar event in Notion?
-When creating a new calendar event in Notion, you can set a title, start and end times, choose if it's an all-day event, define the time zone, and set a repetition for the event.
How can I share my availability for appointments or meetings using Notion Calendar?
-You can share your availability by indicating free slots on your calendar, setting the duration for each slot, and creating a link that others can use to book a time slot with you.
What customization options are available for the Notion Calendar interface?
-You can customize the view (daily, weekly, monthly), search for events, and access preferences to set the start day of the week, language, time format, map service, theme, and notification settings.
How can I manage multiple workspaces in Notion Calendar?
-You can connect Notion Calendar to multiple workspaces, view which workspaces you are connected to, and block time slots across all connected calendars if needed.
Outlines
📅 Introduction to Notion Calendar Integration
The video introduces Notion's new Calendar feature, which seamlessly integrates with existing calendars. Users are instructed to download the Notion app for various devices and sign in using a Google account. The tutorial covers how to activate permissions, connect Notion to a Google Workspace, and import events from Gmail into Notion. It demonstrates adding an event to the calendar, distinguishing between Gmail events and those imported from Notion, and connecting Notion databases to the calendar for better organization.
🔗 Enhancing Productivity with Notion Calendar Features
This section delves into advanced features of Notion Calendar, such as adding participants to an event, creating Google Meet links, and integrating Notion pages for related documents. It explains how to set up a time zone, which is crucial for accurate event scheduling across different regions. The video also shows how to create 'hold' slots for appointments, customize keyboard shortcuts, and share a link for others to book appointments directly into the Notion Calendar. It covers the process of confirming appointments, managing participants, and the interface for viewing daily, weekly, and monthly views.
🛠 Customizing Notion Calendar Settings and Profiles
The final paragraph focuses on customizing Notion Calendar settings, including the start of the week, language preferences, and map services. It discusses setting up a menu bar for quick access to current events and configuring notification preferences. The tutorial also covers tab integration for connecting additional calendar services like Google Meet or Zoom and profile management for users connected to multiple workspaces. It explains how to block time slots across calendars and provides a guide for new Notion users, inviting them to subscribe for more tutorials.
Mindmap
Keywords
💡Notion Calendar
💡Integration
💡Workspace
💡Event
💡Google Calendar
💡Database
💡Time Zone
💡Google Meet
💡Shortcuts
💡Availability Slot
💡Profile
💡Block on Calendar
Highlights
Introduction of Notion Calendar, a new feature that integrates seamlessly with existing Notion calendars.
Users must download the Notion application for both computer and smartphone platforms.
To register, a Google account is required, with the possibility of other types of calendar logins in the future.
Instructions on how to activate permissions and open the Notion application on the computer.
Linking Notion workspace with Google Calendar to sync events and appointments.
Demonstration of adding an event to Gmail calendar and the difference between Gmail and Notion-imported events.
Connecting Notion to the calendar by adding a Notion Calendar account.
How to create an event in Notion and automatically add it to the Notion Calendar.
Adjusting the time format and visibility of events within the Notion Calendar.
Creating a new Notion database and adding it to the Notion Calendar through the settings.
Assigning events to specific calendars and changing their colors for organization.
Differentiating between events created in Notion and those imported, and the limitations of creating repetitive events within Notion.
Adding participants, conference links, and location pins to Google Calendar events.
Creating a Notion page for event-related documents and setting the correct time zone.
Importance of setting the correct time zone for accurate event scheduling across different regions.
Using keyboard shortcuts and customizing the Notion Calendar interface for efficiency.
Setting up availability slots for booking calls or appointments directly from the Notion Calendar.
Sharing the availability link and allowing others to schedule appointments on the Notion Calendar.
Options for viewing daily, weekly, and monthly calendar views and searching for events.
Customizing preferences for the Notion Calendar, including language, time format, and appearance.
Integrating additional services like Google Meet or Zoom for conference calls within the Notion Calendar.
Managing multiple workspaces and calendars within the Notion Calendar for better organization.
Blocking time slots across multiple calendars to indicate unavailability.
Encouragement to subscribe to the channel for more Notion tutorials and guides.
Transcripts
Finalmente una grande novità in casa
notion è uscito notion Calendar
sostanzialmente si tratta di un
calendario che si Integra alla
perfezione con i vostri calendari
presenti su notion la prima cosa che
dovete fare È scaricare l'applicazione
dal sito sia per computer che per
smartphone Una volta avviata
l'applicazione Questa è la schermata che
vi apparirà e dovrete avere un account
Google per potervi registrare
sicuramente in futuro ci sarà la
possibilità di loggarsi anche con altre
tipologie di calendario Quindi prima
cosa da fare lghi amci con Google vi
chiederà di attivare una serie di
autorizzazioni cliccate su Continua Vado
ad attivare anche questa voce in modo da
aprire sempre l'applicazione installata
sul computer adesso dobbiamo andare a
collegare il nostro workspace notion
Quindi se avete un calendario Gmail vi
ritroverete qui tutti gli eventi e tutti
gli appuntamenti che già sono nel vostro
calendario con eventualmente altri
calendari che avete creato quindi
proviamo ad aggiungere velocemente un
evento al nostro calendario in questo
caso di Gmail e trasciniamo uno slot per
aggiungere un evento evento di prova
Questo per mostrarvi la differenza fra
gli eventi presenti nel calendario di
Gmail e gli eventi invece importati da
notion per collegarlo a notion dobbiamo
cliccare su Add Calendar account e nella
voce notion dobbiamo cliccare su Connect
ora vi aprirà una pagina web in cui vi
chiederà appunto di consentire l'accesso
al vostro workspace quindi clicchiamo su
allo
Access e la nostra connessione è andata
a buon fine qui Vi appariranno i vostri
calendari presenti su notion qualora
vogliate nasconderli vi basterà cliccare
sull'occhio che ho appena creato su
notion ora andiamo su notion e vediamo
che cosa succede quando aggiungiamo un
evento clicchiamo su più e aggiungiamo
un nuovo evento ad esempio creazione
database come data andremo a selezionare
giorno mese anno e come Time Format Non
c'è bisogno perché se lo prende in
automatico e la nostra voce nel
calendario di lavoro è stata creata come
potete vedere vengono aggiunti qui i
miei calendari presenti su notion che
posso come dicevo nascondere E qui
abbiamo la nostra voce che in questo
caso la vediamo impostata come tutto il
giorno perch non abbiamo specificato un
orario ci basterà Infatti andare a
trascinare questa voce all'interno del
nostro calendario in un orario specifico
e andiamo a vedere sul notion che cosa è
successo e come possiamo vedere questa
cosa è stata fatta in modo corretto
cambiando qui l'orario dovremmo vedere
anche su notion un cambio di orario qui
possiamo andare a modificare anche il
formato quindi giorno mese anno 24 ore
quindi abbiamo modificato alle 13:30
andiamo a vedere sul calendario Ecco qui
come vedete funziona molto bene quindi
nel momento in cui andate a creare un
nuovo database su notion in visione
calendario potete poi aggiungerlo
facilmente a notion Calendar facciamo un
altro esempio scriviamo dieta e creamo
un nuovo database
calendario una volta creato un nuovo
calendario su notion possiamo andare ad
aggiungerlo cliccando sui tre puntini e
poi su Add notion database e possiamo
semplicemente cercarlo cliccarci e viene
aggiunto all'interno del nostro
calendario quando create un nuovo evento
per assegnarlo al calendario corretto
dovrete andare in quest'area e andare a
selezionare Qual è il calendario nel
quale volete inserire Appunto questo
evento in questo caso il mio calendario
è dieta e volendo potrei anche cambiare
il colore invece di azzurro tasto destro
e clicco su Giallo cliccando sui vari
eventi potete capire a quale calendario
assegnato in questo caso a Gmail mentre
questo è assegnato a calendario lavoro e
quest'altro a calendario dieta cliccando
su Open in notion potrò aprire
direttamente l'evento che è presente in
questo caso su notion quando create un
evento calendario in questo caso non
collegato a notion avete la possibilità
di fare una serie di cose quindi dare un
titolo impostare un orario di inizio un
orario di fine potete eh decidere se è
tutto il giorno quindi andrà posizionato
in questa parte alta dove c'è scritto
All Day
potete definire il time zone per questo
evento e impostare una ripetizione
Quindi se volete che questo evento venga
ripetuto ogni mese questa cosa è
possibile farla solo per gli eventi
presenti sul calendario Mentre se
cliccate su un evento presente su notion
non potete creare un evento ripetitivo
all'interno di notion calendar quindi
non potete Ad esempio far apparire un
determinato evento ogni mese ma
sicuramente questa funzione verrà
implementata in futuro ritornando
sull'evento presente su Google Calendar
Possiamo aggiungere dei partecipanti
aggiungere una conferenza quindi
scegliere Google meet ad esempio e verrà
creato automaticamente un link di Google
meet potete inserire un un punto sulla
mappa cliccando su docel link invece
avete la possibilità di creare una
pagina nel vostro workspace notion per
allegare eventuali documenti e contenuti
inerenti questa attività proviamo a
farlo subito creiamo una nuova pagina
che chiameremo evento di prova qui
dovrete selezionare una pagina in cui
inserire questi contenuti e cliccare poi
su create come potete vedere sul mio
notion è stata creata Appunto una pagina
che mi permetterà di inserire allegati e
quant'altro una cosa molto importante da
impostare è il time zone Infatti
cliccando su questa icona io ho inserito
come nome una bandierina italiana Ma
potete inserire quello che volete ad
esempio
Italia qui scegliamo Roma questo time
zone verrà impostato come principale se
ne avete uno solo questa cosa è molto
importante perché potreste vedere qui un
orario che non è corretto Quindi bisogna
andare a cliccare su questa voce e
impostare il time zone corretto per
l'Italia nel nostro caso ma immaginiamo
di dover lavorare anche con un altro
continente andiamo a cliccare su più su
questa vocina e selezioniamo ad esempio
New York Qui metteremo New York e diamo
Ok A questo punto come potete vedere
verrà creata una nuova colonna con gli
orari di New York Quindi sarà più
semplice per noi capire effettivamente
In quale orario Impostare i nostri
eventi in base al time zone di
riferimento ora non ci interessa vedere
New York quindi clicchiamo sui tre
puntini e rimuoviamo questa zona quando
Non cliccate da nessuna parte qui Vi
appaiono una serie di cose che adesso
andiamo a vedere Innanzitutto abbiamo la
possibilità di vedere alcune delle
scorciatoie da tastiera più utilizzate
più interessanti ma cliccando su punto
interrogativo potrete vedere tutte le
scorciatoie da tastiera cliccando su
questo tasto invece potete fare una cosa
molto interessante ovvero potete
decidere di indicare sul vostro
calendario degli slot in cui è possibile
prenotare una call con voi oppure un
appuntamento fisico clicchiamo su questo
pulsante e andiamo ad esempio a indicare
che
domani fino alle 18 sono libero per
eventuali appuntamenti qui possiamo
decidere la durata di ogni singolo slot
ad esempio 30 minuti il time zone è
corretto quello di Roma e qui abbiamo
riepilogo di quando è possibile appunto
prenotare questa Call con me cliccando
su create verrà creata questa barra blu
che ci indica che siamo disponibili per
un eventuale meeting andiamo a vedere
cosa succede quando condividete questo
link Ecco questa è una delle cose
sicuramente più interessanti vi indica
Qual è il giorno in cui si è disponibili
ad esempio il 19 e qui posso andare a
scegliere uno slot di 30 minuti in cui
andare a pianificare un appuntamento
proviamo a cliccare su 12:30 e qui
dobbiamo inserire la nostra email per
poter appunto pianificare un
appuntamento una volta inserita Ecco che
cosa apparirà sul vostro calendario di
notion e come potete vedere viene
aggiunto in automatico nel nostro notion
Calendar l'appuntamento che in questo
caso è stato confermato dalla persona a
cui ho girato il link cliccando poi
sull'appuntamento ho la possibilità di
vedere chi sono gli invitati aggiungere
nuovi partecipanti e ho un link rapido
per connettermi alla riunione cliccando
sui tre puntini posso ovviamente
rimuovere eventuali partecipanti oppure
semplicemente posso cancellare il mio
evento E quindi cliccare sul tasto rosso
per eliminare del tutto l'evento e
verranno inviate delle notifiche a tutti
i partecipanti se voglio cancellare la
mia disponibilità mi basterà cliccare su
tasto destro e poi Delete hold per
cancellare la mia disponibilità a
eventuali riunioni diamo un'occhiata
velocemente all'interfaccia e alle
preferenze qui ho la possibilità di
vedere la vista giornaliera la vista
settimanale e la vista mensile potete
cliccare su D per Day quindi per giorno
W per week quindi per vista settimanale
e m per month quindi vista mensile
cliccando su Today vi mostrerà il giorno
attuale qui ovviamente potete cercare un
evento all'interno del vostro calendario
e diamo un'occhiata anche alle
preferenze Per capire che cosa dobbiamo
andare a impostare Sicuramente la cosa
più importante è impostare che la
settimana deve cominciare con lunedì
come lingua ci sono diverse lingue Però
attualmente possiamo selezionare inglese
che è quella che utilizziamo già su
notion sicuramente in futuro sarà
disponibile anche la lingua in italiano
Qui impostiamo 24 ore qua possiamo
decidere se utilizzare Google Maps o
Apple Maps se siete su Mac ovviamente il
tema se volete che si adatti al sistema
operativo in questo caso io ho impostato
su auto però potete decidere se avere
una versione del calendario bianca
oppure in Dark
Mode nelle notifiche lasciamo tutto così
com'è Qui ci darà la possibilità di
scegliere eventualmente dei suoni oppure
la notifica di default quanto tempo
prima deve essere impostata quindi un
minuto prima in questo caso menu bar vi
permette di attivare una barra che su
Mac la trovate in alto a destra su
Windows non so dove è possibile
visionarla che vi permette di vedere gli
eventi in corso e qui potete impostare
una serie di parametri relativi alla
visualizzazione appunto di questa menu
bar nella Tab integration possiamo
andare a collegare più calendari in
conferenze possiamo andare ad aggiungere
eventuali servizi dedicati come Google
meet oppure zoom invece su no abbiamo la
possibilità di connetterci a differenti
workspace e fare in modo che i nostri
calendari siano presenti in quest'area
su profile invece possiamo andare a
modificare il nostro profilo Infatti se
connettete notion Calendar a diversi
workspace qui avrete la possibilità di
vedere quali sono i workspace a cui
siete connessi e poi cliccare su questa
avete la possibilità di fare una cosa
ovvero di bloccare Uno slot perché
magari siete impegnati e volete che
questo slot che inserite blocchi la
vostra disponibilità su più calendari
Ora io non ho collegato un altro
calendario però Vi mostro praticamente
cosa si può fare nel momento in cui
create un nuovo evento cliccando con il
tasto destro come potete vedere c'è una
voce che in questo caso è disabilitata
perché ho un solo calendario dove c'è
scritto Block on Calendar questa cosa mi
permette di creare una sorta di slot e
indicare questo slot come occupato
Quindi se avete altri calendari che
condividete magari anche con altre
persone grazie a questa funzionalità
potete creare un blocco di tempo che
semplicemente mostrerà la voce busy
quindi impegnato e questo blocco verrà
inserito in tutti i calendari Gmail che
avete collegato se vi state approcciando
da poco con notion e volete approfondire
questo argomento Ho creato una guida
dedicata che vi permetterà di imparare
notion Io vi ringrazio per essere
arrivati fino a qui Vi invito ad
iscrivervi al canale se ancora non
l'avete fatto e noi ci rivediamo al
prossimo
tutorial
Посмотреть больше похожих видео
5.0 / 5 (0 votes)