Blender Tutorial for Complete Beginners - Part 1
Summary
TLDRThis script is a beginner-friendly tutorial on using Blender, an open-source 3D creation suite. The speaker, with 20 years of experience, guides viewers through the software's interface and basic navigation. They introduce essential tools for 3D modeling, such as selecting objects, navigating the 3D viewport, and manipulating objects through moving, scaling, and rotating. The tutorial emphasizes the importance of mastering core features, which cover 80% of common use cases. The session also touches on rendering for creating polished images and customizing materials for objects. By the end, viewers are encouraged to practice and prepare for the next part, where they will start building a donut, a classic project for learning 3D modeling in Blender.
Takeaways
- 🎓 **Beginner's Guide**: This tutorial is designed for complete beginners who want to learn Blender, an open-source 3D software.
- 🆓 **Free Software**: Blender is 100% free and will always be free, making it accessible to everyone interested in 3D modeling.
- 🔄 **Regular Updates**: The tutorial has been updated every few years to keep up with Blender's development, ensuring users learn the most current features.
- 📈 **Learning Curve**: The script emphasizes that mastering Blender doesn't require knowing every tool, focusing on the 20% of features used 80% of the time.
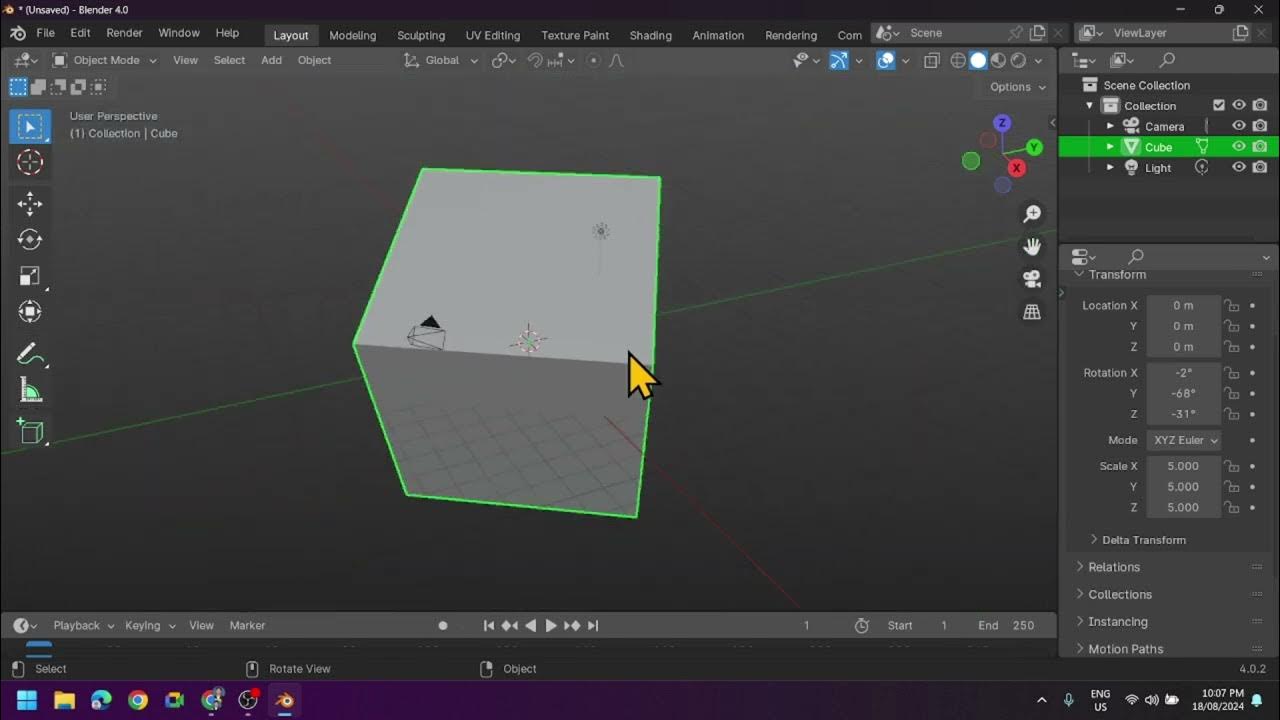
- 🖥️ **Interface Overview**: The tutorial introduces the 3D viewport, which is where most of the work will be done, and how to navigate it.
- 🐵 **Blender's Mascot**: Blender uses a monkey head as a complex object for testing shaders and scenes, similar to other 3D software's unique objects.
- 👆 **Selection and Manipulation**: The script explains how to select, move, and scale objects using both mouse controls and keyboard shortcuts.
- 🌟 **Lighting and Rendering**: It's important to understand the difference between viewport shading and rendered view mode for creating final images.
- 🎨 **Materials and Colors**: The tutorial covers how to add and change materials to give objects color and texture.
- 📸 **Rendering Images**: To create a high-quality image, the script demonstrates how to use Blender's rendering function instead of taking a screenshot.
- 👉 **Camera Controls**: The script explains how to move and rotate the camera to frame a scene from the desired perspective.
- ➕ **Adding Objects**: Learn how to add new objects like a party hat to the scene and adjust their position, scale, and rotation.
Q & A
What is Blender and what can it be used for?
-Blender is an open-source 3D software that can be used for creating animations, visual effects, game assets, and practically any other 3D content. It is 100% free to use.
How often has the speaker updated their Blender tutorial?
-The speaker has updated their Blender tutorial every few years since the first one was made back in 2016 to keep up with Blender's development.
What is the default object in Blender that users often start with?
-The default object that comes with Blender is a cube, but it can be replaced with other primitives such as a monkey head, which is a complex object used for testing shaders or scene complexities.
How can one navigate around the 3D viewport in Blender?
-Navigation in the 3D viewport can be done by using the middle mouse button to orbit, the scroll wheel to zoom in and out, and holding shift with the middle mouse button to pan.
What is the term used for Blender's lightweight optimized way to view the scene during construction?
-The term used for Blender's lightweight optimized way to view the scene during construction is 'viewport shading'.
How can one switch to a more visually appealing rendering mode in Blender?
-To switch to a more visually appealing rendering mode, one can go to the top right corner and select 'Rendered View' from the available options.
What keyboard shortcut is used to move an object in Blender?
-The keyboard shortcut used to move an object in Blender is 'G' for grab.
How can one take a high-quality image of a Blender scene?
-A high-quality image of a Blender scene can be taken by rendering the scene. This can be done by going to 'Render' and hitting 'Render Image' or using the keyboard shortcut F12.
What is the significance of the camera's point of view in rendering a Blender scene?
-When rendering a Blender scene, the image is always rendered from the point of view of the camera, not the current view that the user is looking at.
How can one add a new material to an object in Blender?
-To add a new material to an object, one can go to the 'Material' properties under the selected object, and create a new material by clicking on 'New'. Then, the 'Base Color' can be adjusted to change the object's color.
What keyboard shortcut is used to scale an object in Blender?
-The keyboard shortcut used to scale an object in Blender is 'S'.
How can one rotate an object in Blender?
-To rotate an object in Blender, one can use the 'R' key for rotate and then use the middle mouse button to perform the rotation along the desired axis.
Outlines
🎨 Introduction to Blender: A Comprehensive Tutorial for Beginners
The video script introduces Blender as an open-source 3D software capable of creating animations, visual effects, and game assets. It emphasizes that Blender is free and will remain so. Aimed at complete beginners, the script promises to teach core features and build confidence to start personal projects. The tutorial's presenter has 20 years of experience and has updated the tutorial to keep up with Blender's development. The script outlines the process of downloading and installing Blender, navigating the interface, and starting with a basic 3D viewport. It encourages viewers not to be overwhelmed by the multitude of tools, highlighting the 8020 rule, where 20% of features are used 80% of the time. The first steps include deleting the default cube and adding a new object, such as the Suzanne monkey head, a Blender-specific primitive used for testing. The script also covers basic navigation techniques like orbiting and zooming in the 3D viewport.
🖼️ Exploring Viewport Shading and Rendering Modes
The script explains the difference between viewport shading, a lightweight way to view the scene during construction, and rendered mode, which creates a final, visually appealing image. It guides viewers on how to switch between these modes and how to navigate and manipulate objects within the 3D space. The presenter discusses the use of the mouse for orbiting and panning, as well as keyboard shortcuts for grabbing, moving, and confirming object placement. The script also touches on changing the focus of the scene, adjusting lighting to improve visibility, and the concept of using hotkeys for efficiency. Additionally, it provides a resource for a PDF cheat sheet of Blender's common hotkeys and mentions the option to change keymaps for users accustomed to other 3D software.
📸 Rendering Images and Adjusting Camera Views
The paragraph details how to render a high-quality image in Blender, which is different from taking a screenshot as it provides a clean, noise-free output. It covers the process of rendering an image using the render menu or the F12 hotkey and saving the rendered image. The script highlights that rendering is done from the camera's point of view and explains how to move and adjust the camera for better framing. It also introduces the concept of locking the view to the camera for easier manipulation. The presenter then guides viewers on how to add color and materials to objects, specifically changing the color of the Suzanne monkey head as an example. The paragraph concludes with adding another object, a party hat, to the scene and adjusting its position and scale.
🎉 Final Touches: Adjusting the Scene and Preparing for Further Tutorials
The final paragraph focuses on adding a material to the newly created party hat to give it an exciting color, such as aqua. It guides viewers on rendering the scene again to view the changes. The presenter then addresses the camera's position and provides an alternative method for adjusting it using the middle mouse button and the 'G' key. The script also covers the rotation of the monkey's head to face the camera directly using the rotate tool and the 'R' key. The video concludes with a reminder to save the work and a humorous suggestion to upload it to ArtStation, an online platform for artists. The presenter then prompts viewers to start a new scene in preparation for part two of the tutorial, where they will build a donut and learn more core features of Blender.
Mindmap
Keywords
💡Blender
💡3D viewport
💡Navigation
💡Rendering
💡Hotkeys
💡Materials
💡Add Menu
💡Camera View
💡Interface
💡Donut Animation
💡Monkey Head (Suzan)
Highlights
Blender is an open-source 3D software that can be used for a variety of purposes including animations, visual effects, and game assets.
Blender is completely free and will always remain so, making it accessible to a wide range of users.
The tutorial is aimed at complete beginners, providing a foundation for starting their own 3D projects.
The presenter has been using Blender for 20 years and will guide users through its core features.
By the end of the tutorial, users will have completed a donut animation, showcasing their newfound skills.
The tutorial will be updated periodically to keep up with Blender's ongoing development.
Blender's interface can be overwhelming for beginners, but only 20% of its features are commonly used.
The 3D viewport is where most of the work takes place, and it's where users will spend the majority of their time.
Blender includes a variety of primitives, including a monkey head, which is used for testing shaders and scene complexities.
Navigation within Blender can be done through orbiting, zooming, and panning, with specific hotkeys for each action.
Viewport shading is a lightweight mode for building scenes, while rendered view mode is used for creating final images.
Hotkeys are essential in Blender for efficient object manipulation, such as moving (G), confirming (left click), and canceling (right click or Escape).
A cheat sheet of Blender's most common hotkeys is available for download to assist with learning.
Blender's hotkeys can be customized to be industry compatible for users familiar with other 3D software.
Rendering in Blender is done from the camera's point of view, not the current viewport.
Materials can be added and adjusted in the Properties section to change the appearance of objects.
The tutorial demonstrates adding and manipulating additional objects, such as a party hat, to the scene.
Rendering a scene in Blender can be done with the F12 hotkey, producing a clean, noise-free image.
The next part of the tutorial will focus on building a donut and learning more core features of Blender.
Transcripts
this is blender open- Source 3D software
that can be used to make animations
visual effects game assets or
practically anything 3D and best of all
it's 100% free and it always will be if
you've never used it before but you want
to learn it well then you're in the
right place this is a tutorial for
complete beginners I've been using
blender for 20 years so I'm going to
show you how to use all of its core
features and by the end you'll finish
with not only the confidence to start
your own projects but with your very own
dut animation and I know this looks
complex but I promise you it's
achievable for a complete beginner and I
say that with confidence because many
already have this is actually the fourth
version of this tutorial I made the
first dut tutorial back in 2016 and I've
been remaking it every few years to keep
up with blender's development in that
time millions of people just like
yourself have gone from having never
used 3D to successfully making their own
Donuts one artist even snuck his into a
little film called everything everywhere
all at once very clever so if you're
ready to take your first steps in 3D hit
the Subscribe button and let's begin
first go to blender.org download or just
click the link in the description then
obviously you got to hit the big
download button once downloaded on
Windows double click it and then just go
through the install steps but if you're
on a Mac just drag it into the
applications folder then just find the
blender shortcut and open it then once
it's open just click anywhere off the
splash screen to close it and welcome to
the wonderful world of 3D first tip do
not get overwhelmed if you go clicking
around you might find lots of buttons
and some of them with very scary names
and it can all get very overwhelming
very quickly thing you need to know is
blender can do a lot of things which
means it has a lot of tools but you
don't need to know every tool in order
to do what you want to do if you're
familiar with the 8020 rule there's
really only 20% of blender features that
you end up using 80% of the time and
that's what I'm planning to teach you in
this tutorial Series so stay with me and
you should be fine we'll start making
the donut in the next video in this one
we're just going to look at the
interface and I'm going to show you some
of the basic navigation so for starters
this view this window right here is your
3D viewport and it's where you'll spend
probably 90% of your time because it is
the 3D World so you can see that we have
three objects here we've got a camera
we've got a cube and we've got a lamp
and when we click on it you can see it's
selected because it has the yellow
outline so let's delete the default cube
of course and replace it with something
else so we could do that by going up to
the add menu up here or by remembering
the hot key which is shift a so shift a
for add so usually the one you're
looking for is underneath mesh so these
are called your Primitives and it's what
you use to start something when you're
looking to uh make an object like if
you're going to make a chair you might
start with a cylinder as the chair leg
and then build out from there but the
one I'm sure you're all very curious you
want to click it it's the monkey so
let's just click the monkey why does
blender have a monkey well fun fact
every 3D software has its own little
random complex object because it's
useful to test things like shaders or
complexities of scenes so 3ds Max has
the Utah teapot Houdini has the toy and
I think Pig's head uh blenda has the
monkey and it's actually called the
suzan monkey head which you can see in
the the top left there named after the
rangang from the film Jay and Silent Bob
Strikes Back random piece of trivia so
let's get a better look at it and to
that we need to orbit which you can do
by on your mouse there your scroll wheel
that is called your middle Mouse button
if you push that in and then drag around
that is now orbiting now for my laptop
users you've just panicked cuz you
realize you don't have a mouse how are
you going to orbit around first of all
probably good idea to get a Mouse for 3D
work it will come in handy um but in a
pinch you can get by without it just by
up here in the top right hand corner
this little gray Circle anywhere in the
gray section if you just left click drag
on that that will do the exact same
thing or if you want you can go to edit
preferences and then underneath input
there's emulate three button Mouse and
that means that if you hold down alt and
then left click drag that will do the
exact same thing also whilst you are in
user preferences you might want to go to
inter face and you've got resolution
scale if you're on a 4k monitor you
might find that your menus and buttons
are really small and you kind of have to
like squint in to see it so personally I
like to keep my 4k monitor around about
1.5 but since this is a tutorial I make
it nice and big so you can see what I'm
doing okay so that's orbiting around
with the middle Mouse button if we want
to zoom in we can do that just by
scrolling in and out we could also do it
by going up to the magnifying glass tool
there and then just left click dragging
and then moving the the uh mouse back
and forth that does the same thing or
you could hold down control and then
middle Mouse button and that will do a
smooth Zoom as well okay so one thing
you might notice looking at this is that
it's not very pretty right it's just
kind of got this flat Bland gray
lighting over everything and that's
because this state right now is called
viewport shading and it's kind of a
lightweight optimized way to view the
scene just as you're building it but if
you want to create a final pretty image
that's called rendering and you can
actually switch into rendered mode by
going up here into the top right hand
corner you can see we're currently in
the viewport shading mode if we go to
across you should see rendered View mode
so if we click that your computer might
stall for a quick second whilst it loads
it in but you can see it's now different
we have directional light we have shadow
cast across the monkey so it's now
currently being lit by this lamp up here
so if I wanted to uh you know zoom in on
that lamp there and just kind of like
move it around you can see it's kind of
hard to focus on like it's always
exactly not in the right View and that's
because we are centered on our monkey
right now we need to change the focus we
need to pan to something else so we
could do that one of two ways one if
you're on a laptop you could use a
little move tool there that will do that
or everyone else shift middle Mouse
click drag that will do the same thing
so middle Mouse is for orbiting shift
middle Mouse is for pan to change your
view to something else okay so I want to
move my light because it's uh it's too
Moody I want to be able to see the
monkey's face there so to move an object
you could do it one of two ways one you
could go over to the left hand corner
here and you've got the move tool when
you click that you can see that the
selected object the lamp has this uh
this Gizmo it's called with these axes
on it and if I just clicked and dragged
on any of those arrows there you can see
I can move it along any of those axes I
could also just click on that uh white
circle there and that will just freehand
drag it um depending on my view but it's
kind of tedious every time you want to
move something you have to like go to
that tool and then find the arrows and
yada yada so actually most people in
blender prefer to use the hot keys so we
just keep it in the default selection
State here and instead remember the hot
key which is G for grab now I've just
tapped the key and you'll notice as I
move my cursor that it's now attached to
my cursor it's not my cursor isn't even
actually close to it
in fact my cursor could be on the other
side of the screen and I could tap G and
it will move it and at first this is
kind of awkward you're like why is it
working this way but once you get used
to it you realize it's actually handy
because you don't have to spend all this
time like navigating your cursor to
something just so that you can move it
your cursor could be over here and then
just tap it and you're moving it so
whilst you're in this move state if you
want to cancel a movement you can do it
one of two ways you could just hit
Escape or you could rightclick then if
you want to confirm a movement like say
I want to move my lamp here and I like
the movement I could just do a single
left click so again if I want to cancel
something just right click if I want to
confirm the movement left click but
let's say I wanted to move it along an
axis like you know I like these arrows
here and I want to be able to move it on
just a specific axis well I can do that
whilst I'm in that grab State as well so
after I have hit the g key to grab it I
can then tap the letter of the axes that
I want to move it on so if you don't
know in the real world and in the 3D
software there are three axis cuz
there's three dimensions there's the x
axis which I can move it by hitting the
X key the Y AIS to move it back and
forth along the Y AIS with the y key or
the Zed axis to move it up and down on
the Zed axis so you can remember those
uh those letters the X Y and Zed or the
method that I actually prefer to use is
whilst you're in that g state if you
just hold down the middle Mouse button
and then pull out you can see you get
this like Gray Line that pulls out from
the center and then if you just drag out
and move around it will snap it to the
nearest axis which again is maybe an odd
way to work but it's actually really
handy because it means you don't have to
think of the the letter and locate it on
your keyboard I can just tap G to move
it and then middle Mouse drag out and
then just find that exact axis that I'm
looking for and so it's very fast to
just quickly move the lamp exactly where
I want it by the way if you're finding
it hard to remember all of the keyboard
shortcuts that I've mentioned I've
actually put together a PDF a cheat
sheet of blender's most common hot keys
and you can download that by clicking
the link in the description so you could
print it out or you could just have it
on a separate monitor while you work
also if you are from another 3D software
package you might notice that blenders
hot keys are different than what you are
used to so if you actually go to
preferences just for those people that
are from other softwares if you change
the key map to Industry compatible
you'll find that these shortcuts are
probably more in line with what you
remember from other software I'll also
put a link to a cheat sheet that is just
for the industry compatible keymaps that
somebody else put together I've got
nothing to do with it but I'll put that
link there so you can check it out as
well for the rest of this tutorial
series I'm going to use blender's
hotkeys just keep that in mind now let's
say as I am moving around here I'm like
oh this looks really good I've got some
nice Rembrant lighting across the
monkey's face I want to take a photo I
want to take a nice pretty image of this
and post it on socials for clout right
well I could take a screen screenshot of
it but that would be silly cuz it's got
all these lines all over it's all noisy
right we don't like it the way you take
a photo a pretty image in leenda is to
do a render so you could do that one or
two ways by going up to render and
hitting render image or remembering the
hot key which says next to it
F12 so when you do that a little window
will pop up it will use your CPU or GPU
depending on which render you've got
active and it will render out a pretty
image and from here you could go image
and then save as and that'll save it as
a PNG or whatever wherever you want to
save it but you might notice looking at
this that this is actually a different
view than what we have here right so
here I've got a nice view of the
monkey's face but up there was a
different View and the reason for that
is when you do a render it's not
rendering from The View that you're
looking at currently it's always going
to render from the point of view of the
camera so this is our camera over here
and it's looking from this angle and we
can actually look through the camera by
just clicking the little camera icon
there or by remembering the hotkey which
is number pad
zero so how do we move the camera well
blender is a little awkward maybe a
little different to other software
packages but you're supposed to like hit
G to move it and then like middle Mouse
to zoom in and out and then if you want
to like move it along an axis I guess g
and then X you could do that but
actually what a lot of users prefer
especially those from other software
packages is if you've got your camera
selected which by the way I haven't
mentioned this but up here this is your
outliner it's kind of an inventory of
every item that you've got in your scene
okay so with the camera there selected
if I hit n n is to bring up the
properties n for properties for whatever
reason um and then go to view there's a
little box there that just says lock to
camera to view so now with that active
if I just use the same keyboard
shortcuts as before middle Mouse button
to orbit around shift middle Mouse to
drag it you can see that the camera is
moving with it so essentially The View I
can set it up exactly as I want then hit
n again and then I can disable that and
then now as I pull out you can see the
camera will stay exactly where it was
and I could do a lovely pretty render
but this is too simple if we post this
on the internet people are bound to make
fun of us imagine that well we could
give it some color right so with our
monkey head selected we can go over to
here to the properties so this property
section is where you might spend the
other I don't know another eight 5 to 8%
I don't know getting too exact there you
might spend another 5% of your time in
this section but it's where all of the
properties for things are in blender so
for example you've got uh like the
render properties like the size of the
image that you're saving something as is
defined there and some of these
properties will stay here um no matter
what is selected but others are
selection dependent so you can see
actually if I click the camera there you
can see I get a little camera tab at the
bottom there but if I select my monkey
you'll see the camera tab disappears but
instead I have some other ones that
appear so one that we might want to
change is underneath material and this
will enable us to add a
material change the color to something
else essentially so underneath here
where it's got new I'm just going to hit
new and then you've got a bunch of
options very conf o i subsurface again
don't worry about it we'll get to all of
that later on the one that defines the
color is the base color so if I do a
single left click on that white box
there I can then change this color to
whatever I want I could uh make it an
odd creepy skin toned monkey head right
like that and do a random okay so hey
all right it's better but still it's too
simple I think people will think we
haven't put enough effort into this uh
Masterpiece so let's add another object
let's give the monkey a hat so if we
want to add another object how do we do
it well we could go to the add menu like
I mentioned before or the hotkey shift
a so what sort of hat do we want to add
we could do a boxy hat uh let's do a
party hat with a cone so once we've
added that object you can see it's just
plopped it straight in the center
intersecting our monkey so we need to
move it can move it and we could grab it
with the G key so it's now moving it
just on our cursor there I don't want to
move it just freehand though cuz I like
the position but I just want to move it
up so I'm going to hit Zed to move it
along the Zed axis right I like it there
so once I like the placement I'm just
going to do a single left click okay
great but too big oh so see need to
learn another tool which is scale so we
could go to the scale tool there and
then we get this familiar um little axes
there but again most people prefer to
remember the hotkey which for scale is
just s so s to scale so resizing that
okay that's pretty good let's move it
down again so G and Zed okay all right
but yeah let's say we want to make it a
little taller okay so we could scale it
along just the Z axis so s and then Zed
whoops s z there we go and it's now
making it a tall party hat scale it down
there we go ha look at that be very
Bland party if it's gray though so let's
give it another material and EXC
exciting color a vibrant uh
aqua color why not give that a render by
hitting F12 okay camera is in the wrong
position so let's go to camera view mode
with number pad zero I'm going to select
my camera and rather than dabbling with
that little thing I had before I'm going
to hit G and then middle Mouse just tap
it once as I said it's a little awkward
blenders um the way it handles with the
camera but anyway just uh move that out
and and then uh I got to rotate it done
all right so I'm going to rotate so with
the camera selected tap r then middle
Mouse and it's now kind of like freehand
rotating around so I'll just uh move it
up slightly there we go okay this is
this is just a full around session so
don't worry if you're making mistakes
we'll get to actual practical building
stuff in the next part I'm just trying
to find ways to throw in these like
fundamental
tools rotate right the monkey's head is
just he needs to look dead on at the
camera and currently he's off ah what an
excuse to use the rotate tool so you
could enable the rotate tool right The
Familiar axes there you could click and
rotate it around like that again most
people prefer to remember the hot key
which is R to rotate right so it's now
just freehand rotating on my cursor
remember the uh the axis as I mentioned
before can be used for any mode so uh
the x axis will rotate it back and forth
the y axis tilt it or Zed there we go to
turn it toward towards the camera just a
little bit right and there you go F12
and we've done it let's save it let's
upload it to
artstation and then just wait for the
recruiters essentially all right let's
start a new scene so that we can get
ready for part two where we're going to
actually start building our donut and
learning some of the more core features
of blender so click here and I will see
you in part
two
Посмотреть больше похожих видео
Introduction to Blender 3D: Getting Started with the Interface & Essential Tools in Blender
Watch This Before you Get Started with Blender (7 Tips)
Beginner Blender 4.0 Tutorial - Part 5: Shading
Navigation in Modo
Understanding Edit Mode: Working with Vertices, Edges, and Faces
Mengenal Software 3D Blender - Bagian 2
5.0 / 5 (0 votes)