How to make a DOOM CLONE in Unity || E1M2 Enemy Hit Detection
Summary
TLDR本视频教程介绍了如何为游戏角色设置类似《毁灭战士》的枪械行为和目标敌人的能力。首先,通过调整玩家的移动脚本,为角色添加了动量效果,使其移动更加自然。接着,创建了基础的敌人系统,包括敌人健康值的管理。然后,详细讲解了如何为枪械添加检测敌人和视线检测的功能,并通过射线检测来确定是否对敌人造成伤害。最后,通过调整伤害值和设置射线层遮罩,完成了一个基本的枪械和敌人交互系统,为游戏开发提供了一个坚实的基础。
Takeaways
- 🎮 视频讲解了如何设置枪械行为和敌人目标系统,模仿《毁灭战士》(Doom)风格的瞄准辅助功能。
- 🔧 首先,需要解决玩家的移动惯性问题,使其不会像当前那样突然停止,而是模仿《毁灭战士》中的平滑减速。
- 🗂️ 组织项目窗口,创建了动画相关的文件夹,包括动画器和动画剪辑。
- ⏩ 通过修改玩家移动脚本,引入了输入向量的线性插值(Lerp),实现平滑的移动效果。
- 🚶 更新了玩家移动逻辑,区分了按键持续按住和释放时的不同行为。
- 🔫 创建了一个基本的敌人系统,包括敌人健康值,并为敌人添加了刚体组件用于碰撞检测。
- 📁 建立了一个敌人管理器,用于跟踪玩家面前的敌人,并在触发器进入和退出时添加或删除敌人。
- 🔒 通过射线检测(Raycast),确保玩家在射击时有视线范围内的敌人才能造成伤害。
- 💥 实现了枪械的射击功能,包括射击频率控制和对敌人造成伤害的逻辑。
- 🎯 根据敌人与玩家的距离,调整了伤害值,实现了距离越远伤害越小的效果。
- 🛠️ 视频最后提供了一个基础框架,为未来游戏开发提供了扩展的可能性。
Q & A
视频中提到的'doom style'瞄准辅助是如何实现的?
-视频中通过设置枪的射线检测(raycast)来实现'doom style'瞄准辅助,允许玩家射击高于或低于玩家位置的敌人,并检查是否在视线范围内。
如何在游戏中实现玩家的动量(momentum)效果?
-通过在玩家移动脚本中使用线性插值(lerp)将输入向量平滑地向零过渡,实现了类似Doom游戏中玩家移动的动量效果。
视频中提到的'player move script'是做什么用的?
-'player move script'用于控制玩家的移动。它接收输入值,并根据这些值来移动玩家角色。
如何在游戏中创建一个基本的敌人系统?
-通过创建一个带有刚体(Rigidbody)组件的3D胶囊形状的敌人对象,并为其添加敌人(enemy)组件和敌对管理器(enemy manager)脚本来实现基本的敌人系统。
视频中提到的'gun trigger'组件的作用是什么?
-'gun trigger'组件是一个触发器(trigger)类型的盒子碰撞器(Box Collider),用于检测玩家枪口前方的敌人,并在玩家射击时触发事件。
如何在游戏中实现敌人的健康系统?
-通过在敌人脚本中添加一个私有浮点数变量来表示敌人的健康值,并提供一个公共的'take damage'方法来减少健康值,当健康值降至零或以下时,敌人将被销毁。
视频中提到的'enemy manager'脚本的作用是什么?
-'enemy manager'脚本用于管理游戏中所有敌人的集合,提供添加和移除敌人的方法。
如何在游戏中实现枪械的射击功能?
-通过检测鼠标左键的按下事件,并在满足射击间隔(fire rate)条件时,调用'fire'方法来实现射击功能。
视频中提到的射线检测(raycast)如何用于判断敌人是否在玩家视线内?
-通过从玩家位置发出射线,检测是否能够直接击中敌人位置,如果可以,则认为敌人在玩家视线内。
如何在游戏中实现不同距离下的敌人受到不同伤害的效果?
-通过计算玩家与敌人之间的距离,并根据这个距离来调整对敌人造成的伤害值,距离越远,伤害越小。
视频中提到的'layer mask'在射线检测中的作用是什么?
-'layer mask'用于指定射线检测时应该忽略的层,例如在这个视频中,射线检测需要忽略枪的层,以防止误检测到枪本身。
Outlines
🎮 游戏开发:设置玩家动作和枪械系统
本段介绍了如何在游戏中设置玩家的移动和枪械行为,模仿《毁灭战士》(Doom)的风格。开发者首先强调了保持项目窗口整洁的重要性,然后创建了动画相关的文件夹。接着,他们修改了玩家移动脚本,加入了动量衰减和速度调整,以模拟《毁灭战士》中的玩家移动特性。此外,还提到了如何通过脚本实现玩家的行走和停止动作,并解决了头部晃动的问题。最后,为了测试枪械,创建了一个3D胶囊形状的敌人,并为其添加了刚体组件,但移除了重力以用于碰撞检测。
🔫 枪械机制:检测敌人和射线投射
在这一部分中,开发者详细说明了如何创建枪械机制,包括使用盒子碰撞器来追踪玩家前方的敌人,并通过射线投射来确定玩家是否对敌人有视线。他们创建了一个空对象作为玩家的枪,并为其添加了盒子碰撞器,设置为触发器。然后,通过脚本修改盒子碰撞器的大小和中心点,以表示枪的射程。此外,还介绍了如何通过触发器进入和退出事件来管理敌人列表,并创建了敌人管理器脚本来处理敌人的添加和移除。
👾 敌人管理:创建敌人列表和伤害系统
本段讲述了如何创建和管理敌人列表,以及如何实现对敌人的伤害。开发者首先创建了一个名为'enemy manager'的空游戏对象,并为其添加了脚本来管理敌人列表。然后,他们为敌人组件添加了健康值,并实现了一个'take damage'函数,用于减少敌人的健康值并在健康值降至零时销毁敌人对象。此外,还介绍了如何在敌人管理器中添加和移除敌人,以及如何通过射线投射来检测玩家是否能够击中敌人。
🎯 射线投射和敌人伤害逻辑
在这一部分中,开发者实现了枪械的射线投射功能,以确保玩家只能击中视线内的敌人。他们首先在枪脚本中创建了一个射线投射,从玩家的位置出发,向敌人的方向投射。然后,通过检查射线投射是否击中了敌人,来调用敌人的'take damage'函数。此外,还介绍了如何设置层级掩码,以确保射线投射忽略特定的对象,如枪的碰撞器。最后,他们通过调试工具来可视化射线投射,并测试了整个系统。
🛡️ 完善系统:调整伤害和优化射线投射
最后一段介绍了如何完善敌人检测系统和枪械的伤害逻辑。开发者首先通过射线投射来检查敌人是否在玩家的视线范围内,并根据敌人与玩家之间的距离来调整伤害值。他们设置了不同的伤害值,以模拟远距离和近距离的伤害差异。此外,还介绍了如何通过设置层级掩码来优化射线投射,确保它能够正确地忽略特定的对象。最后,他们测试了整个系统,确保枪械可以在不同的位置和视线条件下正确地击中并伤害敌人。
Mindmap
Keywords
💡枪械行为
💡目标敌人
💡玩家动量
💡动画剪辑
💡射线检测
💡触发器
💡敌人管理器
💡伤害
💡线视线检测
💡层蒙版
Highlights
视频将设置枪支行为和目标敌人的能力,采用毁灭战士风格。
将考虑毁灭战士的瞄准辅助,能够射击玩家上方或下方的敌人。
在设置枪支之前,将解决玩家的动量问题,使其不会突然停止。
强调保持项目窗口整洁的重要性,并创建动画相关文件夹。
介绍玩家移动脚本,解释输入值如何影响玩家移动。
使用move towards函数和lerp实现玩家动量衰减。
通过if语句区分玩家是否按住WASD键,并实现不同移动效果。
移除原有的head bob功能,改为在玩家行走时手动添加。
创建3D胶囊形状的敌人,并为其添加材料和刚体组件。
使用box collider和raycast检测玩家与敌人之间的视线。
创建枪支空对象,并为其添加box collider作为触发器。
编写枪支脚本,包含敌人管理器和敌人列表,用于追踪敌人。
实现枪支射击逻辑,包括射击频率控制和敌人伤害计算。
为敌人添加健康值和受到伤害时的逻辑处理。
通过raycast检测玩家与敌人之间是否视线清晰。
设置层级掩码,确保raycast能够正确识别敌人。
实现基于距离的伤害计算,远距离敌人受到的伤害较小。
完成枪支和敌人的基础系统,为未来扩展打下良好基础。
Transcripts
in this video we'll set up the gun
behavior and ability to target enemies
doom style
we'll take into consideration doom's aim
assist be able to shoot enemies above or
below the player
and check for line of sight in the
process we'll set up a super basic enemy
system with enemy health
before we get into the gun stuff i was
referencing doom's gun mechanics and i
noticed that the og doom has momentum
for his player
he doesn't come to an abrupt stop like
our player does so we'll address that
first
okay first off let's clean this project
window i can't stress how important it
is to keep this thing clean
so i'm just going to move my scripts
where they need to go i'm going to
create a new folder
for animation things one's going to be a
animators folder and what's going to be
an animation clips folder
now let's go straight into our player
move script
so this block of code is where we get
our starting input it's either negative
one
zero or one and then we put it all
together and we finally use that to move
our player
if we're holding the keys we want this
to happen when we release the keys we
want something else to happen
we'll just say that here for now and
it's that we want the last number
used as input vector to be alert down
towards zero
there's a function called move towards
which is probably better for this since
alert never truly makes it to zero but
for us it's good enough
so let's learn our input vector and
we're gonna lerp it
towards vector 3.0
and the time variable will be time dot
delta time
but multiplied by something that we
control so we'll call this
momentum damping
[Music]
and at the top we'll just say it's a new
float
and we'll set it equal to five and while
we're here let's go ahead and slow down
our player a bit
and we'll change this to 10.
so back down in input we're going to say
this part
is if we're holding down wasd and this
part
is if you're not
so the easiest way that i thought to do
this was just make an
if statement so we'll just go back up
to above this block and we're going to
use an if statement and it's going to be
input.getkey instead of getkeydown
and it's going to be keycode.w and we're
going to use
the double pops to mean or and then we
can copy and paste it a few times
then we can go back and change this to
make sure it says
w a s or d
and then we can get rid of the last or
and then lastly we'll throw this bit of
code inside the if block
so now we can say else if none of those
keys are held we want to do our alert
and since the code above doesn't get a
chance to update the input using the
axes
we'll have whatever the last input was
to lerp to zero
so after that we can clean the script up
a little bit
but now we have to do something about
this head bob let's go down here and
look at the way it works
so it uses the velocity of the character
controller but now we have the situation
where like at the very end of your walk
the camera will still be bobbing so
let's just go ahead and get rid of this
function completely
and instead we'll check here when we're
holding the keys down
and if we're doing that we must be
walking so we'll put a is walking equals
true
and if we're not well we're not walking
and then we'll put a
is walking equals false now we can go
back up to the update and we can delete
the old function and let's save and go
into unity
if we go to our player and we look at
the player speed
it's different than what we set in the
script we're going to go to reset
and that's going to change everything
it's also going to make us lose our
camera
enum reference so let's just go ahead
and drag that back
in
and if we save and test you'll see that
our player has momentum
to work on the gun we'll need an enemy
to test let's create a 3d capsule
we're going to name it enemy
reset its transform and pull it out of
the ground
so we're going to hop into our materials
and duplicate our player material
rename it to enemy gonna make it a
red
then we can drag that onto our enemy
since we're gonna need our gun to detect
the enemy then they're gonna need a
rigid body
so we're gonna add a rigid body to this
since it's only for collision detection
though we can remove gravity from it
as well as making it kinematic
so let's post this little enemy up here
and we'll take a look at how the gun
works
so you can see here we're using this big
box collider
about one meter wide cast out in front
of the player
and it's keeping track of what enemies
are in that collider
then when you pull the trigger it'll
shoot a raycast at every enemy that's in
the clotter
and make sure you got line of sight to
that enemy and if you do
it damages that enemy so with that crash
course let's get started on the gun
first we'll create it as an empty object
of the player
we'll name it gun as we also check that
his position is zeroed out
so now on the gun object we need to add
a box collider
that will set as trigger
now using scripting we're going to
modify its size and center points
to represent the gun's range so we'll go
to the bottom and we'll add a component
and we'll call this gun and we'll hit
enter twice
and open it up first we need a reference
to that box collider that we just set up
and since it's on this game object we
can make a private reference
to a box collider
and we'll call this gun trigger
and then in our start function we'll
just say gun trigger
equals get component box collider
now back up top we'll need two variables
to modify the spots collider
and they'll both be public floats one
will be called range
and the other will be called vertical
range
so back in the start right after we get
the gun trigger we'll change its size
with gun trigger
dot size equals a new vector three
and for the x i want to keep one meter
to mimic aim assist
and i want vertical range for its y
and for the z it's just going to be
range
so on the next line to compensate for
the size we're going to say gun trigger
dot center
equals new vector 3 0 on the x
0 on the y and on the z we want it to be
half of our range so we're going to say
range times 0.5
let's say we put this code in the update
block just to see what happens
so if we say we go in here now we can
see if we move our range
the pivot corresponds with that
so let's put this back into our start
because we only wanted to happen
when the game starts and
up here we're going to go ahead and set
our range to 20
and our vertical range we're going to
set it to 20 as well
and underneath our void update we're
going to need two unity functions
uh one's on trigger enter and the other
is going to be
on trigger exit and for our ontrigger
enter
we're gonna want to
add a potential enemy
and then on our on trigger exit
we want to remove enemy
but to add remove these enemies we're
gonna need to know what an enemy is
so we're going to go back into unity and
on our enemy we're going to
add a new component and it's going to be
called enemy
we'll hit enter twice and that's pretty
much it
for now
and let's put these scripts in the
folder
so now we go back to our player and our
gun and
inside the gun script we now have a way
to get our enemies
so in the trigger enter we're going to
try to get the enemy component from
another object
by saying enemy named enemy equals
other.transform.getcomponent
top enemy
and then we can use if enemy which just
checks whether the enemy variable
isn't null
and if there's an enemy then we can add
it here
and then we can copy this over to the
exit trigger because we're gonna do the
same thing
but only this time we're gonna remove
enemies
so now we need something to keep track
of these enemies
back in unity we're going to go to the
hierarchy and we're going to
create a new empty game object we're
going to reset its transform to be 000
and we're going to name it we're gonna
call it
enemy manager and we're also going to
add a script to it
called enemy manager
so double click it to open it up and we
can get rid of all the starting
functions
we'll be using the public list and this
is a list of
type enemy and we'll call the list
enemies and trigger and is equal to
a new list of top enemy
we're using a list because it's easy to
add and remove objects to and that's
what we're going to do here
we're going to add a new public void add
enemy
and we're gonna pass in an enemy and
it's just gonna be called
enemy
[Music]
and then inside we're gonna say enemies
and trigger
dot add
and then we're gonna add the enemy
and then we can copy and paste this
function down below
and this is gonna be identical except
it's going to be called
remove enemy and it's going to access
the dot remove function
of enemies and trigger now we can save
and we're pretty much done with the
script so let's go back into our
gun script of the player so now we know
what enemies are and we have a way to
add and remove them from a collection
so first thing we'll do is declare a
public variable that's going to be the
reference to our enemy manager
and we'll call it enemy manager as well
so if you save and go into unity we have
a new field called enemy manager
so let's just drag in our enemy manager
and go back in the script
so down here in the ontrigger enter
after we check if there's an enemy
we're gonna say enemymanager dot
add enemy
and then we're gonna pass in enemy and
that's this guy
right here
so we can just copy this line and we're
gonna paste it down here on the
ontrigger exit
and this time it's going to be remove
enemy
[Music]
now we can save and go into unity and
we'll
create a few more enemies here to test
this
so now if you test out the enemy manager
while playing
you'll see that our enemies are getting
added and removed from our collection
so once more back in our gun script and
now that we have a way of knowing what
enemies are in front of the player let's
get a way to damage them so first we'll
make our gun fire
we'll use a public float which will be
our fire rate
and then we'll use a private float
called next time to fire
to keep track of it to get our gun to
shoot
it's simply an if statement saying if
input dot get mouse button down
and we'll use the index of zero which is
the left mouse button
then we'll fire
so we'll go beneath this and we'll make
the fire method
and inside of it well what do we want to
do is we want to hurt
the enemy so once we get the enemy
damage code in here this should be fine
except for you can spam the mouse button
and it's gonna fire as fast as you click
the button
so let's go ahead and implement our fire
rate
so in this if statement we'll say if our
mouse button is pressed
and time dot time which is the time this
passes the game
started is greater than next time to
fire
which starts out at zero's default then
fire
so right off the bat we'll be able to
fire so in our fire method we need to
reset this time so now we're going to
say
next time to fire equals time dot time
and then we're going to add on to that
our fire rate
so every time we fire it's taking the
time and adding on so
when making this i didn't have a default
uh fire rate in mind so i didn't set one
in the script
so we're gonna save and hop into unity
real quick
we'll go to the gun and we'll make sure
that we have something assigned here for
the fire rate
i'm just going to use one for now and
then our gun script and the fire
method we're going to finally damage our
enemies by using
a for each statement
and it looks like this so we have four
each variable in a collection and we
just so happen to have a collection
so the variable name is enemy and we're
going through the collection
of enemy manager dot
enemies and trigger and then for each
enemy that's in the trigger
it's gonna damage that enemy so we're
gonna save this
and we're gonna make one last detour
back to the
empty enemy strip that we made earlier
so up here we're gonna need a private
float and this is gonna be
some health that we can take away from
our enemy and we're just gonna default
that to two
then beneath the update function we're
going to make a
public void take damage
and it's going to take in a float called
damage and then we can set
enemy health minus equals the damage
and then in our update we'll have a
death check
and this will just be an if statement
that says enemy health is
less than equal to zero then you're dead
so first we want to destroy the game
object
but we also want to remove this from the
list because
if we don't we'll get some weird errors
with the box collider so we're gonna
make a public
enemy manager called enemy manager
and then back in the update we can just
say enemymanager.remove
enemy and then the enemy is gonna be
this
so the enemy is removing itself so now
this one's pretty much done so we can
save it
go back into unity so now my enemy
component
has a new field for enemy manager so i'm
going to select all
enemies that i have and i'm going to
drag in my enemy manager
so now the enemy manager is done and the
enemy script is done
for now so let's go back into our gun
script and finish it up
so under here where it says four each so
for each enemy that we get in our
collider we want to damage the enemy so
now that there's a function
on the enemy component we can just call
it so we'll just say
enemy dot take damage
and we're going to pass in damage
which is a variable our gun doesn't have
yet so we'll go to the top
and we'll make a public float called
damage and we're going to default that
to two and give it full damage so now we
can save and test
bang
bang so you can see that it works but it
works the walls too
the final thing we'll be doing is a
raycast to see
if the enemy is in line of sight of the
player
so in the gun script and inside our for
each statement we'll start constructing
this raycast
we'll start by needing a hit variable
and this is going to be a raycast
hit that we just name hit
then we can say if physics.raycast
and our origin is just going to be us so
it's going to be transform.position
and then we need a direction and getting
our directions pretty simple
since we have the enemies transform
position
so we'll say r d i r
for direction equals
enemy dot transform dot position
and we'll subtract our position by using
transform dot position
and that should give us our direction
so now we can say that we want it to out
our hit
variable and for the distance we want it
to be the range of the gun
but if we test this and think about it
for a second the raycast would reach
straight ahead all the way to the end of
the clotter but if the enemy would say
in this corner it would not reach
because the ray would have to be longer
so let's extend the range
of the ray cast just a little bit by
multiplying it by something like
1.5 and then finally we'll need a layer
mask
and this is just going to be called
raycast layer mask
and we'll go up to the top and make a
reference to this by saying public
layer mask and it's going to be called
raycast layer mask
so back inside the if statement of our
raycast so if we hit something now we're
going to do another comparison we're
going to say
if hit.transform is equal to
our enemy.transform so this goes to our
list of enemies gets the direction
towards the enemy
raycasts towards it and after all that
if it hits the enemy we can finally call
our enemy damage function and now
we can save this so we can go into unity
and now we can set up our layer mask
this box collider here is the reason we
need the mask
we need the raycast to ignore this
collider so we'll go to our layer
add new layer and we'll create one
called gun
and then we'll have to go back to the
gun object to assign its layer
as the new gun layer then we need to go
to the gun script component
in the inspector and for the layer mask
we'll select default
and this will correctly ignore our gun
layer
this would be easy to visualize by
adding debug.drawarray in the code
and we can use our origin and the
direction that we've already calculated
and since it happens in a fraction of a
second we can also use
debug.break to pause our editor so we
can
see what's happening so i'm gonna shoot
this guy here
and it paused and shows us the line so
we continue
so now this enemy over here by the wall
so they're in the trigger and i'm
spamming the button but nothing's
happening
and it's not until i walk around the
corner and get line of sight that
now the game will pause and let me know
that i've hit this enemy
now that we know that works we can
delete those debug lines and i think to
pretty much wrap up the system we can do
a range check so enemies farther away
can take less damage
to do that we'll use a float for our
distance
and we can set that equal to vector
3.distance
and we want the distance from the enemy
transform to our transform
then we can use that float in an if
statement saying
if our distance is greater than our
range times 0.5 so i'm saying if our
distance
is greater than half of our range
then we're going to damage the enemy's
sum else if the enemy is in the first
half of our box collider that means it's
closer and we're gonna deal a lot of
damage
so we're gonna grab this enemy.take
damage function
and we're gonna paste it in both
conditions and in the true condition
we'll set this to small damage
and for the false statement we'll go
with big damage
and back up at the top we'll change our
regular damage
to big damage since it's already set at
two and our enemy only has two health
and then we'll make a new flow for small
damage and we'll default that to one
so i'll look over the script one last
time and then up here we're gonna add a
comment for this line
and now we can save and go back into
unity
so let's check over the gun script and
make sure all the variables are assigned
and make sure that all of your enemies
have the enemy manager assigned
so now if we test we should have our
enemy detection system fully working
we have a gun we have enemies we can
shoot them on level ground
and elevated or lowered positions as
long as we can see them
and they can take damage with two
different versions of damage from
here we have a good base for everything
else so until next time spine camp out
関連動画をさらに表示
How to make a DOOM CLONE in Unity || E1M3 Enemy AI and NavMesh Part 1
How to make a DOOM CLONE in Unity || E1M6 Doors and Keys
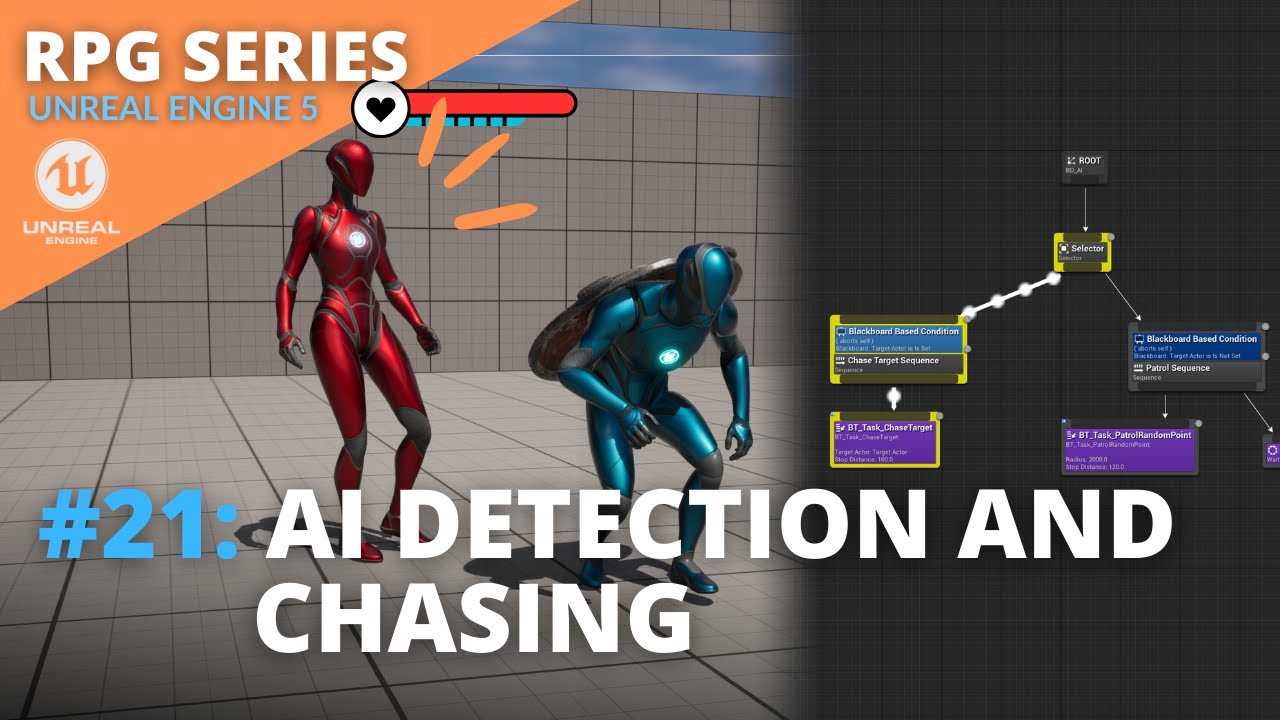
Unreal Engine 5 RPG Tutorial Series - #21: AI Detection and Chasing
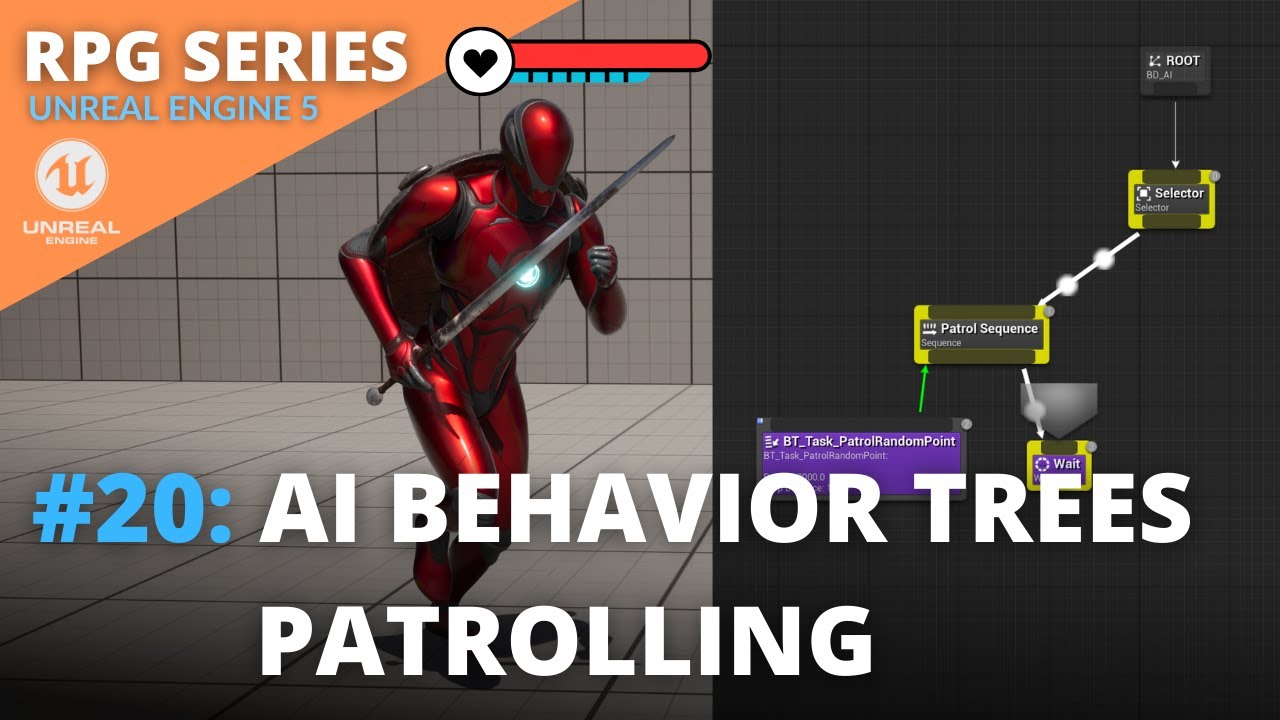
Unreal Engine 5 RPG Tutorial Series - #20: AI Behavior Trees Patrolling
Unreal Engine 5 RPG Tutorial Series - #10: Sword Trace Damage and Hit Reactions
Unreal Engine 5 RPG Tutorial Series - #4: Assassinations
5.0 / 5 (0 votes)