Materi 04 Material

andry 3dsmax
23 Sept 202417:40

Summary

TLDRThis video tutorial covers the essentials of material functions in 3D modeling, focusing on enhancing object realism through color, texture, light reflection, and transparency. It introduces two types of material editors: compact and slide, with a preference for the compact version for easier learning. The tutorial demonstrates how to apply colors and materials to objects, manipulate properties like base color, reflection, metalness, glossiness, and transparency, and use the material editor's interface effectively. It also explores adding textures to objects and adjusting bitmap settings, concluding with a Q&A segment for viewer engagement.

Takeaways

  • 🎨 The video discusses materials and their functions in making objects appear more realistic in terms of color, texture, reflection, transparency, and contour.
  • 🛠️ Two types of material editors are introduced: compact and slide material editors, with the compact version being easier for learning purposes.
  • 🔑 The 'M' key is a shortcut to apply materials to objects.
  • 🎨 The script explains how to create and apply colors to objects using the material editor, enhancing realism by adding glossiness, reflection, and transparency.
  • 🖼️ The 'sample window' or 'slot' in the material editor can be customized and contains samples that can be modified or reset.
  • 🔄 There are two methods to apply materials to objects: activating the object and clicking the 'Mat' button, or by dragging the material to the object.
  • 🔍 The script suggests using the 'render' button or pressing 'F9' for a preview of how materials will look on objects.
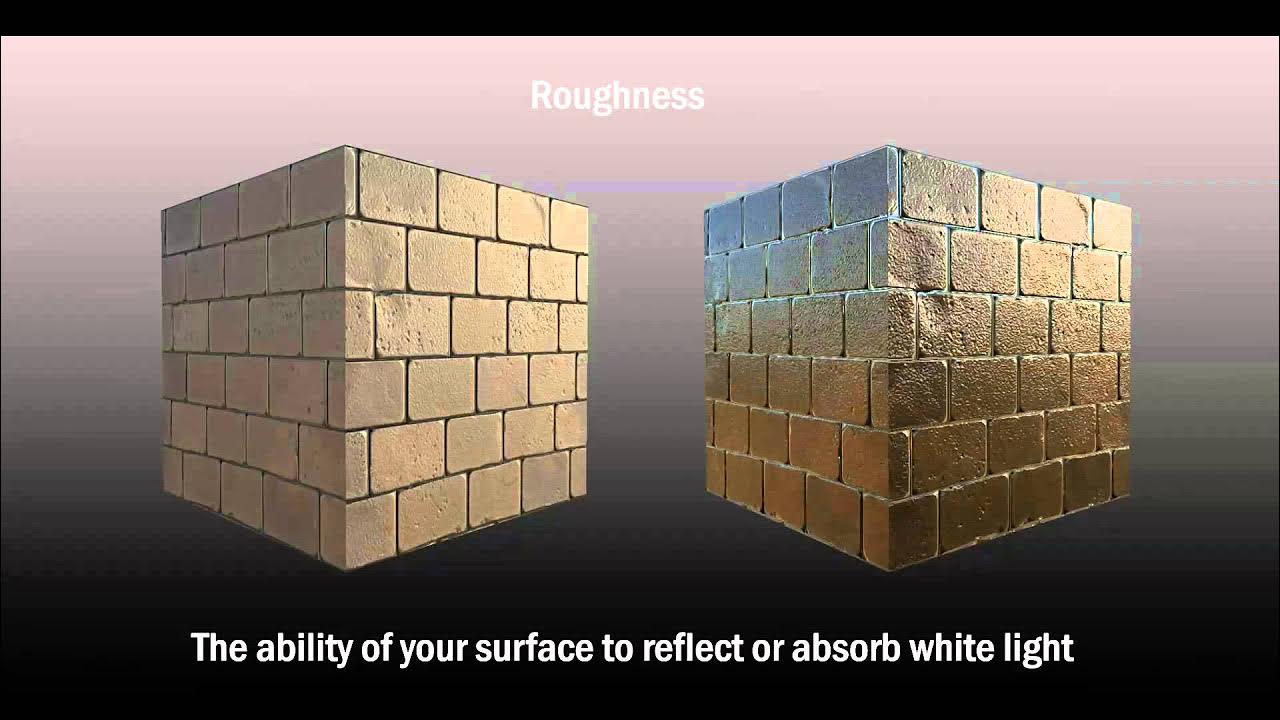
  • 🔑 Parameters like 'metalness', 'roughness', 'glossiness', and 'IOR' (Index of Refraction) are discussed to control the reflective properties of materials.
  • 🌟 The 'transparency' parameter is explained, showing how it affects the visibility of an object's color and its ability to be seen through.
  • 🌈 'Sub Surface Scattering' is introduced for blending colors to create a non-uniform color appearance on objects.
  • 💡 'Emission' is explained as a way to create self-illuminating objects, like neon lights, by applying a specific color.

Q & A

  • What is the function of materials in 3D objects?

    -Materials make 3D objects appear more realistic by adding properties like color, texture, light reflection, transparency, and depth. They can also simulate objects that emit light, such as lamps, or objects with reflective surfaces.

  • What is the difference between the compact and slide Material Editor in the video?

    -The compact Material Editor is simpler and easier for beginners, while the slide Material Editor provides more advanced settings. The video recommends using the compact Material Editor for easier learning.

  • How can you apply a material to an object in the Material Editor?

    -There are two ways to apply a material to an object: 1) Select the object and click the 'Assign Material to Selection' button in the Material Editor. 2) Drag and drop the material directly onto the object.

  • How do you change the color of an object using the Material Editor?

    -To change an object's color, choose a sample slot in the Material Editor, select 'Base Color' in the material properties, and pick a color from the RGB or hue/saturation options. Then click OK to apply the color.

  • What is the purpose of the Glossiness and Roughness settings in the Material Editor?

    -Glossiness controls how shiny or reflective a surface is, while Roughness determines how dull or rough the surface appears. Glossiness and Roughness are inversely related; increasing one decreases the other.

  • How does Metalness affect the appearance of a material?

    -Metalness defines the metallic look of a material. Higher metalness values make the object appear more metallic, while lower values give it a more non-metallic, matte finish.

  • What is the function of the IOR (Index of Refraction) in material settings?

    -IOR controls the intensity of reflections on the material. Higher IOR values create stronger reflections, often used for materials like glass or mirrors, while lower values make the reflection weaker.

  • How does transparency work in the Material Editor?

    -Transparency defines how see-through an object is. A value of 0 means the object is opaque, while a value of 1 makes it fully transparent. Intermediate values create partial transparency.

  • What is Emission, and when is it used in materials?

    -Emission gives an object a glowing effect, simulating a light source. It is commonly used for objects like neon lights or lamps. You can adjust the color and intensity of the emission to make the object emit light.

  • How can you add a texture to an object in the Material Editor?

    -To add a texture, click on the texture slot in the Material Editor, select 'Bitmap' from the list, and choose an image file to apply as the texture. This texture can then be applied to various objects like boxes, spheres, or cylinders.

Outlines

00:00

🎨 Material Editor Basics

The video discusses the use of materials to make objects appear more realistic in terms of color, texture, light reflection, transparency, and contour. It introduces two types of material editors: compact and slide. The compact editor is recommended for easier learning. The video demonstrates how to apply the material editor to objects, such as a box and a cylinder, using the 'M' shortcut key. It explains how to color objects using the object color or the material editor for a more realistic appearance. The material editor's sample window or slot is highlighted, which can be customized and contains various samples of materials. The process of applying a color to an object using a sample slot is shown, including selecting a base color and reflection.

05:01

🖼️ Modifying Material Properties

This section covers how to modify the appearance of materials by adjusting properties such as color, reflection, metalness, glossiness, and transparency. The video explains the impact of light on color and how to preview materials using the render button or the F9 shortcut. It also discusses the relationship between roughness and glossiness, and how adjusting these affects the shininess of an object. TheIOR (Index of Refraction) property is introduced, which controls the intensity of reflections, useful for creating effects like mirrors or glass. The video also touches on how to reset materials and objects to their default settings.

10:02

🌟 Advanced Material Features

The video delves into advanced material features like adjusting theIOR for reflective properties, using transparency to make objects see-through, and the subsurface scattering effect for objects with mixed colors. It also covers the emission property, which is used to create self-illuminating objects like neon lights. The process of applying these properties to objects is demonstrated, and the video shows how these settings affect the final render of the objects.

15:03

🖌️ Applying Textures to Objects

In this part, the video script explains how to apply textures to objects to enhance their realism. It guides through the process of selecting a texture, choosing a bitmap, and assigning it to objects like a box, sphere, and cylinder. The video demonstrates how to adjust the texture settings and apply them to the objects, showing the impact on the final render. It also provides instructions on how to revert to the parent material settings and apply the textures to different objects.

Mindmap

Keywords

💡Material

In 3D modeling, a material refers to the properties assigned to an object that determine its appearance, including color, texture, reflection, and transparency. The video explains how materials can make objects look more realistic by adjusting these attributes.

💡Material Editor

The material editor is a tool used to modify the material properties of an object. The video describes two types of material editors: compact and slide, with a preference for using the compact version for simplicity during learning.

💡Base Color

Base color is the primary color applied to an object’s material. It defines the object’s visible surface color. The video demonstrates how to change this color in the material editor, showing the impact it has on an object’s appearance.

💡Reflection

Reflection refers to the amount of light that bounces off the surface of an object, making it appear shiny or dull. The video shows how adjusting the reflection settings in the material editor can make an object look metallic or mirror-like.

💡Glossiness

Glossiness affects how shiny or matte an object appears by controlling how light is spread across its surface. The video discusses how increasing glossiness makes an object more reflective, like a mirror, while reducing it makes the surface dull.

💡Transparency

Transparency defines how much light can pass through an object, making it appear see-through. The video illustrates how adjusting transparency levels can make an object fully opaque or almost invisible.

💡Emission

Emission is the property that allows an object to emit light, making it appear as a light source. The video uses the example of creating a glowing effect, such as for a neon light, by increasing the emission setting and changing its color.

💡Metalness

Metalness is a property that determines how metallic a surface appears. In the video, increasing metalness makes the object reflect light more like metal, while reducing it creates a more diffuse, non-metallic surface.

💡IOR (Index of Refraction)

IOR (Index of Refraction) measures how much light is bent when passing through a transparent object, affecting its reflective quality. The video shows how increasing the IOR creates a stronger reflection, typically used for materials like glass or mirrors.

💡Bitmap

A bitmap is a texture file applied to a 3D object to give it more detailed surface properties, such as patterns or images. The video explains how to assign a bitmap image to an object’s material, changing its appearance beyond just color and reflection.

Highlights

Introduction to materials and their role in making objects appear more realistic in terms of color, texture, reflection, transparency, and contour.

Explanation of how objects that emit light, like lamps or shiny objects, can be represented using materials.

Introduction to the compact and slide material editors and their ease of use for learning.

Demonstration of how to switch between the compact and slide material editors.

Guide on creating objects and applying color to them using the object color.

Explanation of how to use the material editor to make objects look more realistic.

Description of the sample window or slot in the material editor and how to modify it.

Tutorial on how to view the entire appearance of the material samples.

Instructions on how to apply a material to an object using the material editor.

Explanation of the two methods to apply a material to an object: activating the object and clicking the Mat button, or dragging the material to the object.

Guide on how to adjust the appearance of the sample window for better visibility.

Process of deleting or resetting materials in the material editor.

Explanation of how to reset all objects to their default materials using the utilities option.

Introduction to the basic parameters in the material editor such as base color and reflection.

Tutorial on adjusting the base color and reflection to influence the lighting effect on the object's color.

Explanation of metalness and how it provides a metallic effect on the object's color.

Description of the relationship between roughness, glossiness, and how they affect the object's shininess.

Guide on adjusting theIOR (Index of Refraction) to control the intensity of reflections.

Introduction to transparency and how it can be adjusted to make an object look non-transparent or highly transparent.

Explanation of subsurface scattering and its application for objects with mixed colors.

Tutorial on using emission to create light-emitting objects like neon lights.

Guide on applying textures to objects and the process of selecting and applying a bitmap texture.

Explanation of how textures affect the appearance of objects and their rendering.

Transcripts

play00:00

di video kali ini kita akan membahas

play00:01

mengenai material nah fungsi material

play00:04

itu untuk membuat objek terlihat lebih

play00:07

realistis baik dari segi pewarnaan

play00:10

tekstur pantulan cahaya

play00:13

transparansi objek yang memiliki kontur

play00:17

kedalaman kemudian objek yang

play00:20

memancarkan cahaya contohnya adalah

play00:23

lampu atau objek yang mempunyai ee

play00:27

kilauan cahaya atau mengkilat untuk

play00:30

menampilkan material editor di sini ada

play00:33

dua sini ada dua ini adalah compact

play00:37

material editor di sini ada slide

play00:40

material editor kita pilih dulu yang

play00:43

compact Nah untuk beralih

play00:47

ke slide Ini adanya di bagian bawah nah

play00:51

seperti ini Nah untuk pembelajaran

play00:54

sebenarnya lebih mudah kita gunakan yang

play00:56

compact material editor

play01:00

tampilannya seperti

play01:03

ini apabila kalian mau menampilkan

play01:06

dengan shortcut bisa dengan menekan

play01:08

tombol m pada

play01:14

keyboard untuk mengaplikasikannya kita

play01:16

coba dulu membuat objek

play01:18

e misalnya di sini ada bok dan silinder

play01:23

Kemudian untuk pewarnaan sebenarnya yang

play01:25

pernah kita pelajari adalah kita bisa

play01:28

mewarnai dari objek color di

play01:32

sini nah ini sebenarnya juga bisa

play01:37

digunakan kalau kita mau mewarnai objek

play01:41

itu secara simpel aja maksudnya tidak

play01:43

ada glosinesnya enggak ada pantolan

play01:47

cahayanya atau transparansinya dan lain

play01:51

sebagainya kalau dari objek color ini

play01:53

kita hanya ingin mewarnai objek itu

play01:56

secara

play01:57

standar tapi kalau kita membuat

play02:01

pewarnaan dari material editor itu

play02:03

nantinya akan

play02:05

ee objek itu akan terlihat lebih

play02:10

realistis baik di sini ada material

play02:13

editor yang

play02:15

ditampilkan di sini ada sampel

play02:17

window-nya atau istilahnya adalah slot

play02:20

ya slot

play02:21

ee ini bisa diubah karena ada bagian

play02:27

sample window yang tersembunyi

play02:32

ini juga ada yang

play02:34

tersembunyi seperti

play02:36

ini Nah untuk melihat tampilannya secara

play02:39

keseluruhan kita Klik Kanan di sini ada

play02:42

6* 4 sample window maka akan dimunculkan

play02:46

semua

play02:47

sampel-sampel dari material yang

play02:50

tersedia di

play02:52

sini Nah untuk yang warnanya abu-abu di

play02:56

sini belum terisi dengan material di

play02:59

sini ini sampelnya masih kosong nah

play03:02

kemudian Gimana cara mengaplikasinya ke

play03:04

objek ini misalnya kita pakai

play03:08

yang sampel yang kosong ya 21 default di

play03:12

sini bisa kita beri namanya misalnya

play03:15

warnanya

play03:16

merah kemudian di sini ada eh base color

play03:21

and

play03:22

refletion ini kita klik kemudian kita

play03:26

pilih warna merah di sini

play03:31

atau juga bisa kalian

play03:33

Eh pilih dari campuran RGB atau hue

play03:38

saturation dari

play03:40

sini di sini tingkat eh

play03:46

wiess-nya di sini kita bisa mililih e

play03:49

warna yang kita

play03:50

inginkan kemudian kalau udah sesuai Klik

play03:53

tombol Oke kemudian yang sampel kedua

play03:57

misalnya saya pilih

play04:01

atau bisa juga kita pilih warnanya dulu

play04:05

tadi kan e diberi nama dulu Nah kalau

play04:08

sekarang diatur pewarnanya dulu misalnya

play04:11

warna biru kemudian di sini baru kita

play04:14

beri nama biru Nah setelah itu gimana

play04:17

cara menerapkan pada objek ada dua cara

play04:21

ya pertama objeknya ini kita

play04:25

aktifkan kemudian di sini ada yang

play04:27

namanya tombol Mat

play04:31

diklik maka objek ini akan berubah

play04:33

warnanya sesuai dengan samp sampel color

play04:37

yang ada di sini bisa juga dengan cara

play04:40

menarik ke sini kebetulan warnanya udah

play04:45

biru kita bisa menarik ke sini bisa

play04:49

menarik itu adalah cara yang kedua

play04:52

terserah e Kalian mau pakai cara yang

play04:55

mana bebas Sa sama aja

play04:57

ya nah apabila eh sampel window ini

play05:01

tidak terlalu terlihat Kita juga bisa

play05:04

mengklik dua kali untuk melihat tampilan

play05:07

eh review yang lumayan besar di sini

play05:11

sample

play05:13

window-nya nah apabila Ee Kita ingin

play05:18

menghapus kita bisa

play05:24

juga mereset Map di sini ada klik

play05:29

Nah kemudian ada window yang menanyakan

play05:33

kita mau apa nih e Apakah berefek pada

play05:38

material dalam slot dan di scene atau di

play05:43

pada objeknya atau kita ingin menghapus

play05:46

sampel window yang ada di sini

play05:48

nih yang ada di slot

play05:52

ini kalau

play05:54

misalnya kita pilih

play05:57

ini maka e yang ada di sini tidak

play06:03

berubah

play06:05

ya ini kita

play06:10

hapus kalau kita pilih yang atas

play06:14

maka ini juga akan menjadi default Nah

play06:18

kita juga sebenarnya bisa e melakukan

play06:21

reset objek-objek yang sudah kita buat

play06:23

di sini kita pengin Hapus semua gitu ya

play06:28

caranya adalah dengan memilih

play06:32

utilities ini kalau ini menghapus

play06:35

merreset semua reset material editor

play06:38

slot ya maka yang tadi udah kita buat

play06:43

akan dikembalikan ke untuk

play06:46

default-nya nah seperti itu

play06:52

Oke kita kembali lagi ke

play06:54

sini ini adalah sampel-sampel window

play06:58

atau sampel slot yang sudah jadi ya

play07:00

sebenarnya

play07:01

ee Ini juga bisa langsung Kalian pakai

play07:05

misalnya kayak gini k gini tapi kalau

play07:08

misalnya yang kosong ini kalian bisa

play07:11

bikin atau kalian bisa modifikasi yang

play07:14

ada dari sini karena ini kita

play07:16

pembelajaran maka kita coba buat ee yang

play07:19

barunya dari sini nih oke akan kita

play07:21

bahas bagian di sini satu persatu ya

play07:26

Yang pertama adalah base color and

play07:28

Reflection

play07:31

Ee kita pilih dulu yang 21 default atau

play07:35

sample window yang pertama ini yang

play07:37

masih

play07:40

kosong kalian klik e tadi sempat dibahas

play07:43

ya untuk pembuatan

play07:47

warna Nah di sini ada angka yang

play07:50

menunjukkan angka

play07:51

sat apabila kita turunkan maka dia akan

play07:56

menjadi gelap atau menjadi lebih hitam

play08:00

ini pengaruhnya adalah ke pencahayaan

play08:04

terhadap

play08:05

warna kita aplikasikan di sini kalau

play08:09

cahayanya lebih gelap maka ini

play08:11

diturunkan aja Kemudian untuk

play08:13

menampilkan material sebaiknya kita

play08:16

lihat dari preview di rendernya yaitu

play08:20

dengan mengklik tombol ini render

play08:27

production atau Kalian juga bisa

play08:30

menggunakan shortcut

play08:34

f9 untuk melihat hasil material yang

play08:37

kita gunakan pada

play08:44

objek nah kemudian di bagian bawah ini

play08:47

ada metalness metalness ini fungsinya

play08:50

untuk memberikan Efek metalik terhadap

play08:54

ee warna yang kita kasih ini saya tukar

play08:58

dulu posisinya

play09:00

nya kemudian ini

play09:03

saya panjangin

play09:07

objeknya

play09:09

tinggiin biar nanti

play09:13

terlihat kemudian di sini ada yang

play09:16

namanya rones rones kalau kita Klik di

play09:20

sini ada

play09:22

glossininess n rones dan glosines ini

play09:25

saling bertolak belakang maksudnya gini

play09:28

kalau nya 0 maka sama juga glosinusnya

play09:33

itu

play09:34

S kebalikannya kalau kita pakai yang

play09:39

glossinusnya

play09:41

0 berarti rnessnya itu S Maksudnya

play09:44

gimana sih jadi objek itu terlihat

play09:47

mengkilat atau enggak Kalau mengkilat

play09:49

Itu otomatis objek itu terlihat seperti

play09:54

cermin kalau kalian terbiasa dengan

play09:56

glosines maka ee Misalnya ini 0 0

play10:01

ya kalau saya tambahkan dia menjadi satu

play10:06

maka objek

play10:09

ini kalau diender

play10:12

ya Jadi terlihat ada pantulan gambar

play10:16

yang ada di sini seperti

play10:19

cermin nah sebenarnya defaultnya itu

play10:22

ronesnya tuh nol Ini juga udah otomatis

play10:25

dia terlihat cermin

play10:30

nah yang saya bilang tadi kalau

play10:33

misalnya rnya sat maka di sini menjadi

play10:39

Dove Tidak ada

play10:42

pantulan dari objek yang

play10:52

dipannya kalau pakai GL sinus 1 maka di

play10:56

sini akan ada nya atau pantulan dari

play11:02

objek yang di

play11:04

depannya kemudian di bagian bawahnya ada

play11:07

eh ior atau ior ya ini intensitas dari

play11:13

cerminannya Jadi kalau misalnya ini kan

play11:17

1,52 kalau saya

play11:20

tambahkan maka pantulan gambar yang dari

play11:23

sini itu makin lebih

play11:27

kuat kita lihat ya lebih

play11:31

kuat biasanya digunakan untuk pembuatan

play11:34

kaca

play11:40

cermin kayak

play11:43

gitu Ini bisa kita turunin lagi

play11:47

ke default-nya itu

play11:52

1,52 1,52

play12:00

kemudian eh di sini ada

play12:04

transparansi ini saya eh

play12:08

ubah dulu deh Ini dari jadi warna

play12:15

biru warna biru kemudian yang ini saya

play12:19

bikin jadi

play12:23

transparansi nilai 0 berarti objek itu

play12:26

tidak transparan kalau nilai sat

play12:29

maka objek ini sangat-sangat

play12:36

transparan sehingga warna birunya Tuh

play12:39

hilang tapi kalau seandainya saya

play12:42

kurangi

play12:44

Sedikit

play12:47

nih kururangi 0,75 misalnya maka ee

play12:52

warna biru ini lebih terlihat

play12:59

selanjutnya ini adalah ada

play13:02

Sub yang ketiga ni saya pakai ini untuk

play13:07

sub Surface scating jadi ini perpaduan

play13:11

antara dua warna

play13:13

nih yang ini dengan skater ini jadi

play13:16

kalau misalnya diaplikasikan ke objek

play13:19

biasanya untuk objek-objek yang terlihat

play13:22

warnanya itu enggak e enggak bersih guu

play13:29

misalkan saya kasih warna

play13:38

hijau

play13:40

ini saya aplikasikan ke sini ya Nah tapi

play13:44

kalau nol ee enggak berpengaruh nih akan

play13:48

saya tambahkan supaya terlihat

play13:52

hasilnya lalu akan

play13:54

ditampilkan pada saat diender

play14:02

jadi warnanya itu tidak mulus ada

play14:05

perpaduan dua warna hijau dengan krem

play14:08

ini

play14:12

nih kemudian yang keempat ini ada

play14:16

emission

play14:18

emission ini e seperti warna cahaya ya

play14:22

contohnya kalau kita mau bikin lampu

play14:25

neon

play14:31

lampu neon Nah emision-nya kita eh buat

play14:35

jadi satu aja kemudian kita aplikasikan

play14:39

ke sini nanti pada saat dirender dia

play14:42

akan terlihat menyala seperti

play14:47

ini nah ini pun bisa diberi warna

play14:51

emission itu misalnya saya kasih warna

play14:54

kuning

play14:59

nanti lampunya akan terlihat berwarna

play15:02

kuning

play15:10

oke itu e mengenai penggunaan dari basic

play15:14

parameter yang ada di material editor

play15:18

nah kemudian Eh bagaimana kalau

play15:21

seandainya kita ingin memberikan tekstur

play15:23

pada objek

play15:27

nih memberikan tekstur pada

play15:32

objek saya bikin

play15:35

tiga sampel untuk

play15:42

tekstur Nah kayak gini ada boks ada ada

play15:46

bola atau spare sama

play15:48

silinder ini saya bikinnya satu aja di

play15:54

sini Nah untuk membuat tekstur itu kita

play15:58

pilih bagian basic parameter yang ada di

play16:02

kotak sini nih ini kotak ini bisa diklik

play16:04

untuk mengambil tekstur yang akan kita

play16:08

buat ini diklik kemudian dipilih

play16:11

eh bagian general di sini ada bit map

play16:16

Kemudian dioke Kemudian kita cari nih

play16:19

gambarnya misalnya gambar seperti ini

play16:23

ya Nah kemudian di sini Kok tampilannya

play16:28

berubah ya gitu nah ini untuk pengaturan

play16:30

bitmap-nya

play16:32

sebenarnya kalau mau balik ke tampilan

play16:34

yang tadi ee kalian bisa pilih go to

play16:37

parent ini kembali ke tampilan yang tadi

play16:40

inih Nah kalau tampilan yang barusan itu

play16:43

ada di dalam sini kalau kita klik ini

play16:46

maka tampilannya adalah untuk pengaturan

play16:51

bitmap-nya kalau di atas ini

play16:54

untuk pengaturan materialnya

play16:59

cara mengaplikasikannya sama tinggal

play17:01

klik e assign atau bisa juga ditarik ke

play17:04

sini bebas saja

play17:07

ya Nah ini

play17:09

e tekstur yang kita terapkan pada tiga

play17:13

objek yang

play17:15

berbeda bisa dilihat di sini ya hasilnya

play17:19

Dan ini juga akan berpengaruh pada saat

play17:21

e dirender sihilnya akan

play17:26

sama baik demikian i mengenai material

play17:31

ya Jadi kalau seandainya ada

play17:34

pertanyaan bisa diisi di kolom komen

play17:37

Sekian dan terima kasih

Rate This

5.0 / 5 (0 votes)

関連タグ
3D ModelingMaterial DesignRealismLightingTexturesRenderingTransparencyEmissionMetalnessGlossiness
英語で要約が必要ですか?