Fabricación de Molde de Arena
Summary
TLDRThis video transcript describes a detailed process of molding, involving multiple steps like preparing the molding box, handling sand and clay, and applying specific techniques to shape the product. The script explains how to carefully pack the sand around the mold, ensuring the correct pressure, using tools like a paleta and a fine meter to assess hardness. The video also covers important steps such as flipping the mold, applying careful precision, and avoiding rough handling to ensure quality. Overall, the process emphasizes technique, precision, and the importance of attention to detail for creating high-quality molds.
Takeaways
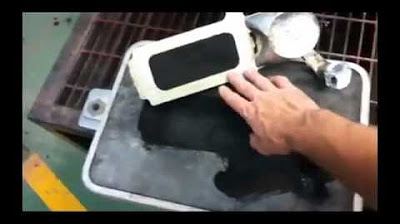
- 😀 The molding box is placed with the ears facing down, and the first step involves positioning it on the right side with three fingers behind the notes.
- 😀 The model is slightly inclined toward the upper part for further adjustments.
- 😀 After placing the mold, a small hole is made in the model, and the powder is used to fill the product area.
- 😀 The clay and ground are added to cover the model fully, ensuring the mold's desired finish.
- 😀 The contour of the model is carefully pressed using a palette to ensure an even surface.
- 😀 The process involves using a micrometer to measure the mold's hardness, ensuring precise consistency.
- 😀 The mold is further compacted by gently pressing the edges with a pressure tool (Pisón).
- 😀 Sand is added around the edges, creating a solid barrier to ensure the mold holds its shape.
- 😀 The box is turned by carefully holding the two tubes and dragging it out, ensuring the model stays intact.
- 😀 After turning the box, another round of pressing and adjustments are made to ensure the mold's quality without over-compacting.
- 😀 The final step involves ensuring the sand level is balanced before the mold is left to settle without further additions.
Q & A
What is the first step in the molding process described in the script?
-The first step involves placing the molding box with its ears facing down, as shown in the model. Then, the right side is filled with three fingers of material, slightly inclined toward the upper part.
Why is the powder mentioned in the transcript important in the process?
-The powder is used to cover the product in the molding process, helping to create a more even surface and ensure proper molding.
How is the mold prepared for further steps after applying the powder?
-Once the powder is applied, the surface is worked over with a fine server to smooth the area and ensure it is properly covered in clay before the final steps.
What tool is used to create the necessary texture and hardness in the mold?
-A micrometer is used to measure the hardness of the mold. It has a pointer that indicates the mold's firmness, helping ensure the correct consistency for molding.
What role does the 'pisón' play in the process?
-The 'pisón' is used to press down on the mold, ensuring that the material is compacted and firmly in place. It helps achieve the necessary firmness for the mold.
Why is the hardness of the mold important, and how is it tested?
-The hardness is crucial for the quality of the final product. It is tested using a device like a micrometer, which measures the firmness to ensure that the mold is neither too soft nor too hard.
What is the significance of the four fingers of sand mentioned in the transcript?
-The four fingers of sand are used to create a wall around the mold, forming the necessary boundaries for the next steps of the process.
Why must care be taken not to overload the mold with sand in the middle?
-Overloading the middle with sand could make it harder to smooth and align the mold properly, resulting in uneven surfaces or difficulties when linking with the ruler later.
What is the correct method for flipping the mold, and why is it important?
-To flip the mold correctly, it should be grasped by two tubes with both hands and dragged outward. Lifting it improperly could distort the model or damage the mold's shape.
What is the purpose of checking the mold with three taps for each tube?
-Tapping each tube three times ensures that the mold has settled properly without any strong impacts that might compromise the quality of the mold or cause it to break.
Outlines

このセクションは有料ユーザー限定です。 アクセスするには、アップグレードをお願いします。
今すぐアップグレードMindmap

このセクションは有料ユーザー限定です。 アクセスするには、アップグレードをお願いします。
今すぐアップグレードKeywords

このセクションは有料ユーザー限定です。 アクセスするには、アップグレードをお願いします。
今すぐアップグレードHighlights

このセクションは有料ユーザー限定です。 アクセスするには、アップグレードをお願いします。
今すぐアップグレードTranscripts

このセクションは有料ユーザー限定です。 アクセスするには、アップグレードをお願いします。
今すぐアップグレード


5.0 / 5 (0 votes)
