Introductory fxDreema course. Video 1. The builder.
Summary
TLDRThis video tutorial guides users through the vendor interface, focusing on building EA projects. It covers the interface's top menu options like project management, indicator import, user profile, and options for customization. The video also explores the design area, explaining the use of constants, variables, and code blocks. It highlights the organization of pre-configured blocks by function and color, and the purpose of different tabs for event-specific blocks. The aim is to equip viewers with the knowledge to design and execute EA projects effectively.
Takeaways
- 😀 The video tutorial covers the tools available on the vendor's interface for building EA projects.
- 🔧 The interface's top menu includes options for project management, indicator import, user profile access, and platform options.
- 📁 The 'Project' menu allows users to load, create, import, and copy projects, with specific formats like mp4 or mp5.
- 📊 'My Indicators' menu enables importing custom indicators in mp4 or mpfi format, not available by default.
- 👤 The 'User Profile' menu provides links to personal profiles, subscription payments, and session logout.
- ⚙️ 'Options' menu includes 'Project Options' for viewing project details and 'Global Options' for customizing platform visualization.
- 🔎 The 'Help' menu offers access to tutorials, examples, and updates history of the platform.
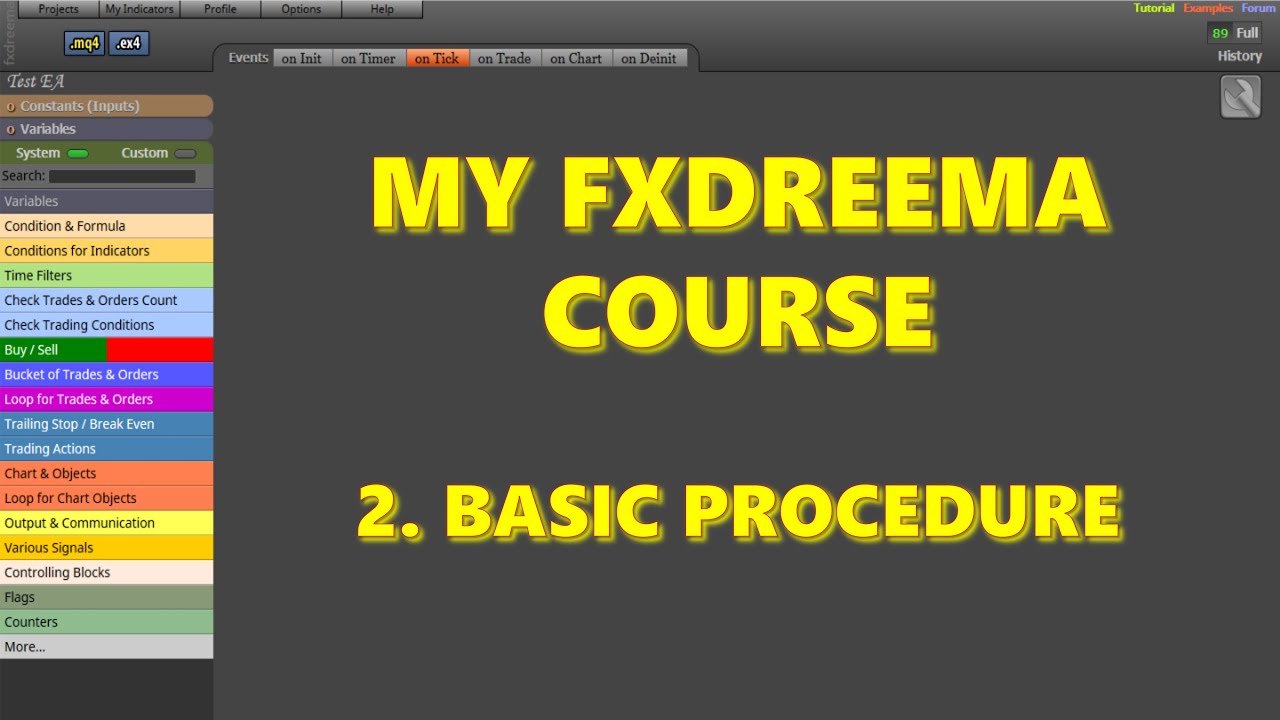
- 📈 The design area features tools for project naming, constants and variables management, and code block creation.
- 🎨 Pre-configured code blocks are color-coded by function and searchable for ease of use.
- 📝 The platform includes tabs for separating predefined events, each with specific blocks for different execution contexts like on timer, on trade, and on chart.
Q & A
What are the four options available under the 'Project' menu in the interface?
-The 'Project' menu offers options to load a project, create a new project, import a project, and create a copy link of the current active project.
What file formats are supported for creating a new project in the interface?
-When creating a new project, users can choose between mp4 and mp5 file formats.
Is it possible to import projects created outside the platform into the interface?
-No, only projects that have been previously created with the platform can be imported.
What is the purpose of the 'My Indicators' menu?
-The 'My Indicators' menu allows users to import custom indicators in mp4 or mfi format into their account that are not offered by default on the platform.
What options are available under the user profile menu?
-The user profile menu provides links to the personal profile, a page to pay the platform subscription fee, and an option to disconnect from the current session.
How can users customize the visualization of their projects?
-Users can customize the visualization of their projects through the 'Global Options' link, where they can set the default path, choose whether to display block identifiers, select the font size for block titles, and choose the platform language.
What are the three options available under the 'Help' menu?
-The 'Help' menu offers access to the tutorial page, the examples page, and the updates history subforum.
What does the 'History' link on the top right side of the screen display?
-The 'History' link displays a list of all actions carried out in the current project.
What are the two buttons used for exporting a project found on the top left corner of the Builder?
-The two buttons are used to export the project in mp4 or ps4 format, and if MQL5 was selected as the programming language, the buttons would be labeled mq5 and es5.
How are the pre-configured code blocks in the design area organized?
-The pre-configured code blocks are organized by color, which defines their function, and they are listed under the titles of each function.
What is the purpose of the 'On Timer', 'On Tick', 'On Trade', and 'On Chart' tabs in the design area?
-The 'On Timer' tab is for blocks executed at a specific time, 'On Tick' for blocks executed at every tick, 'On Trade' for blocks linked to market order actions, and 'On Chart' for blocks linked to visual elements on the active chart.
Outlines
🛠️ Introduction to the Vendors Interface
This paragraph introduces the user to the various tools available on the vendors interface for building EA projects. It starts with an overview of the buttons and options on the top menus, including the project menu with options to load, create, import projects, and create a copy link. The 'My Indicators' menu is mentioned for importing custom indicators, and the user profile menu for accessing personal profile, payment, and logout options. The 'Options' menu allows for project-specific and global settings adjustments, such as project description and normalization of block identifiers. The paragraph concludes with a brief mention of the 'Help' menu, which provides access to tutorials, examples, and updates history.
🔧 Customizing the Interface and Project Options
The second paragraph delves into the customization options available in the interface. It discusses the 'Global Options' link, which opens a dialog box for adjusting various settings like default paths, identifier visibility, font size, and platform language. The paragraph also touches on the 'Help' menu, providing links to tutorials, examples, and a community forum for updates. Additionally, it mentions the subscription days counter, the history link for reviewing project actions, and the export buttons for saving projects in different formats. The design area is introduced, focusing on the design tools column, where users can change the project name, manage constants and variables, and create new code blocks.
📊 Exploring Design Tools and Code Blocks
The final paragraph focuses on the design tools and code blocks available for EA project creation. It explains the organization of pre-configured code blocks by color and function, with over 200 blocks available. The paragraph introduces a search engine for finding specific blocks and describes the use of tabs for separating predefined events, such as initialization, timer-based events, trade-related actions, chart events, and more. It concludes by emphasizing the course's goal to teach the use and combination of these tools for effective EA project design.
Mindmap
Keywords
💡EA projects
💡Interface
💡Design Area
💡Code Blocks
💡Constants and Variables
💡Project Options
💡Global Options
💡Subscription
💡Normalization of Block Identifiers
💡On Chart
💡On Trade
Highlights
Introduction to the vendor's interface tools for EA project building.
Exploration of the top menu options including project management and user profile links.
Description of creating a new project with options for EA or script and format selection.
Importing projects from other devices and the limitations regarding platform-specific projects.
Utility of creating a copy link for sharing projects in community forums.
Accessing and importing custom indicators not available by default on the platform.
Navigation to personal profile, subscription management, and session disconnection options.
Customization of project visualization through global options like default paths and identifier visibility.
Options to modify font size and platform language (English and Bulgarian).
Overview of the help menu with links to tutorials, examples, and updates history.
Display of subscription days remaining and the history of actions performed in the current project.
Exporting projects in various formats depending on the programming language selected.
Focus on the design area with tools for project naming and modification.
Explanation of constants and variables management within the project.
Introduction to creating new code blocks and the option for custom block creation.
Organization of pre-configured code blocks by function and color coding.
Use of the search engine to find specific blocks by name or function.
Tabs for separating predefined events and their corresponding code blocks.
Details on the specific use of each tab for different event types in the EA.
Conclusion on starting the design process with the available interface elements and tools.
Transcripts
in this video we will study all
available tools included on the vendors
interface we will build our EA projects
here firstly we will see the buttons and
options on the menus on top of the
interface then we will see the
components of the design area we start
on top left corner of the screen here we
find a link with the website name
leading us to the effects - in my home
page on its right we have the following
menus from left to right project menu if
we select it we are offered four options
the first one is loading any project
from those currently saved in our
effects team account a window will pop
up there we can select any of those who
have created so far
the next option is new project here we
can create a new project to be included
in our FH stream account by selecting it
a dialog window will pop up in which we
will have to choose if we want to create
a new EA or a script as well as if we
want it to be in mp4 or mp5 language
then we can select the name for this new
project and finally click on the create
button
the third option is importing a project
from any other device into our F extrema
account here we must say that only those
projects that have been previously
created with F extrema can be imported
it is not possible to import projects
created from outside the platform the
last option is to create a copy link of
the current active project this option
is especially useful to share our
project in the community forum so that
it can be reviewed by any other user of
the platform the second available menu
is called my indicators
by selecting it a dialog window pops up
in which we can import into our if
extreme account any indicator mp4 or
mpfi format that is not offered by
default on the platform later in this
course we will show how to use this
option
the third available menu is the one
corresponding to our official email user
profile if we select it we are offered
three links the first one is leading us
to our personal profile by clicking on
it we'll see it in a new browser window
[Music]
immediately below we have the link that
will allow us to pay the platform
subscription fee in our case we are
already subscribed so we don't need to
use it finally we find a link that will
disconnect us from the current open
session on the platform the fourth menu
is the one corresponding to options here
we are offered two links project options
and global options if we select the
first one there are three available
alternatives the first one will show us
the options of the current active
project
by clicking on it a dialog box pops up
with detailed information about the
technical characteristics of our project
later in the course we will show how to
use this option the second one is called
project description by clicking on it a
text box will open
in which we can write all the relevant
information for this project the last
one is dedicated to normalization of
block identifiers it uses linked to the
design area of the current project later
in the course we will show how to use
this option now let's select the global
options link a dialog box will pop up
with a series of items that allow us to
customize the visualization of our
projects the first to show us the
default path on our device where we will
find any installed empty for an empty 5
platforms we can modify them if
necessary the third one is a drop-down
menu with which we can select whether we
want to visualize the identifier number
of the box or not later in the course we
will show which use for the moment we
will keep the default option
the fourth one allows us to select the
size of the font of the blog titles
we will also see later again we will
give this one by default
finally we find a drop-down menu where
we can select the platform language we
can choose between English and Bulgarian
if we want to confirm any change in this
window we must take on the Update button
the last menu is the help 1 if we select
it we are offered three options the
first one leads us to the tutorial page
of the platform
[Music]
we are led to the same page if we select
the link with the same name on the
screen top right corner additionally we
have a link to the examples page
the second option moves us in the for
use of the EFX Rhema community
we can also go there if we click on the
link with the same name that's on the
screens top right corner
finally if we select the updates history
option we will be led to the sub forum
in which the latest platforms
modification made by designer are
detailed we have already seen some of
the tools provided by the interface on
the top right side of the screen there
we find a few more
here we can see the number of our
subscription days left once it reaches
zero we will have to renew it again if
we want the platform to be fully
functional immediately below we find a
link called history by clicking on it we
will see a list with all the actions
carried out in the current project until
now in this example the list is very
short because no actions have been made
yet
then we find the icon of a range that
when selected will pop up the same
dialog box for the project options
previously seen before
these are the last two buttons that we
can find on the top left corner of the
Builder we will use them to export our
project in mp4 or ps4 format in case we
had selected mql5 as the programming
language of our project the buttons
would be called mq5 and es5 later in the
course we will see its use
let's see now the design area firstly we
will focus on the design tools column on
the left the first on top is where we
can change the name of our current
project by clicking on it we can modify
the text and then confirm it by
selecting done immediately below we have
constants and variables
if we select any of them a dialog box
pops up in which all constants and
variables that are being used in our
current project are listed we can create
new ones and modify them here later in
the course we will explain how it works
the next available tool is used for
creating new code blocks as we will see
below if extrema offers many available
pre-configured blocks however if we are
MQL programmers we can create our own
customized ones to do so we can select
the custom option
this leads to a new screen in which we
can freely design them it is not the aim
of this course to deal with this
platform stool so it will not be
explained
all pre-configured codeblocks offered by
f extrema are organized by a color that
defines its function here they are
if we click on the title of each
function we will see the names of those
blocks included more than 200 are
available in the wiggler the aim of this
course is teaching how to use and
combine some of them to be able to
already a here we have a search engine
that will let us easily find any blog we
want if we remember any of the words in
its name just two examples now we write
the word candle and now the word self
finally we have a series of tabs
designed to separate all a predefined
events
on the on any tab we will place those
clubs that are initialized only once at
the beginning of the EBA on the on timer
tab we will use those that are to be
executed at a specific time only on the
antic tab those that must be executed at
every tick arriving to our empty for
organ device platform as we are now in
this tab we see it highlighted on the on
trade tab we will use those blocks that
must be executed when they are linked to
any action related to a market order
only on the on chart AB there will be
those linked to any visual element
appearing or disappearing on the active
chart of our empty for mp5 platform
finally on the on the init tab we will
use those that must be executed only
when the EA is the initialized some of
these tabs offer precompute blocks that
are specific to that event and not
available to any other this is the case
of the tabs on timer
on trade
and chart
now that we know all elements and tools
available in our interface we can
finally start designing
関連動画をさらに表示
Introductory fxDreema course. Video 2. Basic procedure.
Introduction to Multisim | how to use multisim | Multisim Tutorials | Mruduraj
Basic Syntax Of A C Program: C Tutorial In Hindi #5
Como o Obsidian funciona
Membuat Prototyping & Interactions di Figma - Belajar Figma Bareng (3/3)
LESSON 1 - AUTOCAD USER INTERFACE
5.0 / 5 (0 votes)