Camera Car With Pan Tilt Control | ESP32Cam
Summary
TLDRThis video tutorial guides viewers on creating an upgraded surveillance camera car with pan-tilt control. It uses an ESP32 camera module to capture images and sends them to a mobile phone via Wi-Fi and WebSocket. The car is controlled through a custom mobile app, utilizing components like servo motors, a 4WD car kit, and a motor driver module.
Takeaways
- 🚗 The project involves creating an upgraded surveillance camera car with pan-tilt control.
- 📷 The car will use an ESP32 camera module to capture images and send them to a mobile phone via a WiFi connection.
- 🔧 Key components needed include an ESP32 CAM module, pan-tilt servo assembly, SG90 servo motors, a 4WD car kit, L298 motor driver module, UBC or buck converter, a rechargeable battery, Arduino Uno, double-sided tape, and jumper wires.
- 🔩 The assembly process involves fixing servos to a pan-tilt bracket, soldering wires to gear motors, and mounting motors on the car chassis.
- 🛠️ The L298 motor driver module is connected to the ESP32 CAM module, and the servos are connected to specific I/O pins.
- 📱 Control of the car is managed through a custom mobile app, utilizing a WebSocket for communication.
- 🖥️ The ESP32 board needs to be installed via the Arduino Board Manager, and additional libraries such as Async TCP, Async Web Server, and ESP32 Servo must be added.
- 🌐 The car's WiFi settings, including SSID and password, are configured in the code, and a web server is set up on port 80.
- 🔄 The code includes functions for rotating motors, moving the car, handling root requests, and managing WebSocket events for both car control and video streaming.
- 📸 The camera captures images and sends them to the camera WebSocket client, with the setup and send camera picture functions handling the image capture and transmission.
- 🔌 Important considerations include setting the 'ws max queued messages' to one for smooth video streaming, ensuring proper WiFi connection, and providing a separate 5V DC supply to servos with sufficient current.
Q & A
What is the main project discussed in the video?
-The main project discussed in the video is making an upgraded surveillance camera car with pan-tilt control that can be operated remotely using a mobile app.
What is the purpose of the pan-tilt assembly in this project?
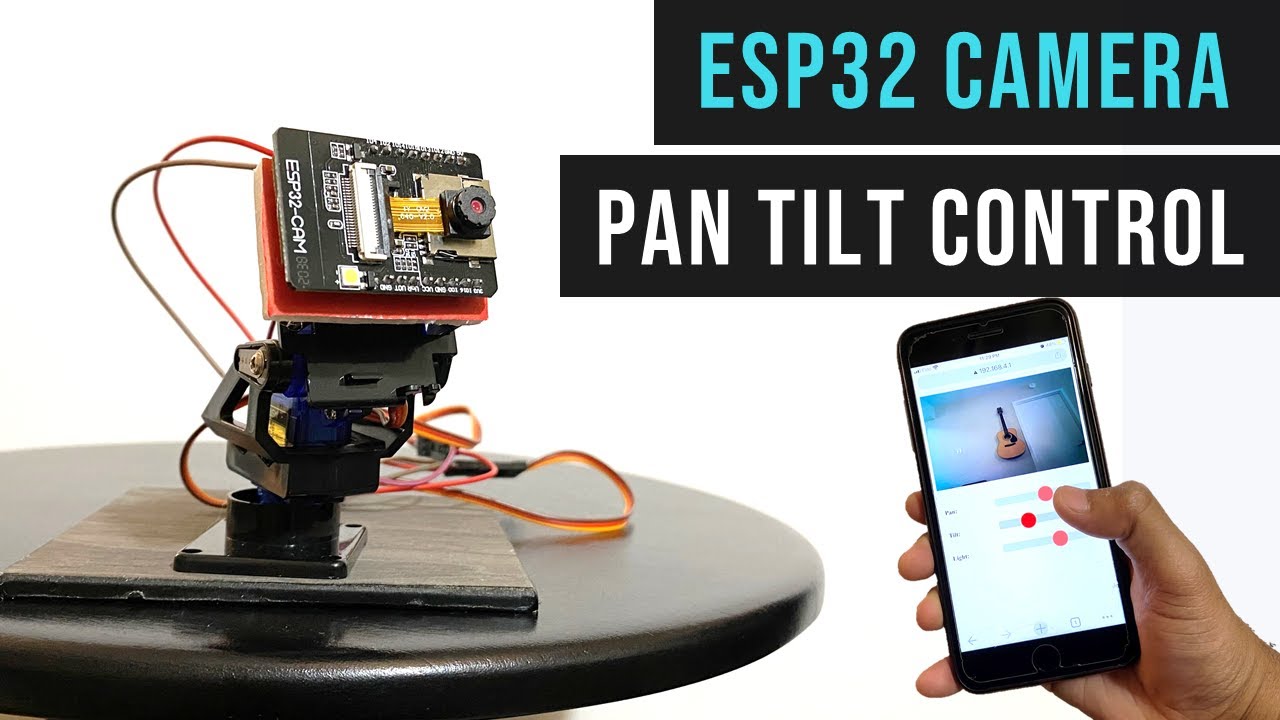
-The pan-tilt assembly allows the camera to rotate both horizontally and vertically, providing a 0 to 180-degree range of motion for capturing images.
Which module is used for capturing images in the car?
-The ESP32 camera module is used for capturing images in the surveillance camera car.
How are the images captured by the ESP32 camera module sent to the mobile phone?
-The images are sent to the mobile phone using a WebSocket through a Wi-Fi connection.
What components are needed to assemble the pan-tilt bracket and servos?
-The components needed include an ESP32 CAM module, a pan-tilt servo assembly, and two SG90 servo motors.
What is the car kit included in the project and what does it come with?
-The 4WD car kit included in the project comes with a car chassis, 4 TT gear motors, wheels, connectors, and screws.
Which motor driver module is used to control the car's motors?
-The L298 motor driver module is used to control the car's motors.
What is the purpose of the UBC or buck converter in the project?
-The UBC or buck converter is used to provide 5 volts to the servos from a 7 to 12-volt DC rechargeable battery.
How is the ESP32 board installed in the Arduino IDE for this project?
-The ESP32 board is installed using the Arduino Board Manager, by adding the ESP32 board link provided in the description and then searching for and installing the ESP32 in the Board Manager.
What libraries need to be installed for the project to function properly?
-The required libraries include Async TCP, Async Web Server, and the ESP32 Servo library, which can be installed via the Arduino IDE's Library Manager.
What is the importance of setting 'ws max queued messages' to one in the AsyncWebServer library?
-Setting 'ws max queued messages' to one is crucial for ensuring that the video stream runs smoothly without delays.
How does the mobile app control the car and the camera?
-The mobile app controls the car and the camera by sending commands to the ESP32 via WebSocket, which then processes these commands to move the car, adjust the camera, or control the servos.
What is the process for connecting the car to the mobile device for control?
-To connect the car to the mobile device, one must connect to the car's Wi-Fi SSID using the provided password, then open Google Chrome on the mobile and type '192.168.4.1' to access the control app.
What are some troubleshooting tips provided in the video for issues with the car or app?
-Troubleshooting tips include setting 'ws max queued messages' to one for smooth video, reconnecting Wi-Fi on the mobile if the app doesn't open, not using the IO 16 pin of ESP32 CAM as it's used internally, and ensuring a separate 5V DC supply with more than 2 ampere current for the servos.
Outlines
🚗 Building an Upgraded Surveillance Camera Car
This video tutorial guides viewers through the process of constructing an advanced surveillance camera car equipped with pan-tilt control. The car is designed to rotate the camera horizontally and vertically from 0 to 180 degrees, capturing images with an ESP32 camera module. These images are then transmitted to a mobile phone via a Wi-Fi connection using WebSocket. The car is controlled via a custom mobile app, and the video provides a step-by-step assembly guide, including the use of components such as the ESP32 CAM module, pan-tilt servo assembly, SG90 servo motors, a 4WD car kit, L298 motor driver module, UBC or buck converter, a rechargeable battery, Arduino Uno, double-sided tape, and jumper wires. The assembly involves soldering wires to gear motors, mounting motors on the car chassis, connecting motors to the motor driver module, and setting up the ESP32 camera module with the pan-tilt assembly.
💻 Programming the Surveillance Camera Car
The second part of the video focuses on the software aspect of the project, detailing the necessary steps to program the surveillance camera car. Viewers are instructed to install the ESP32 board using the Arduino Board Manager, and to add the ESP32 board link provided in the video description. Libraries such as Async TCP and Async Web Server are required, which can be added through the Arduino IDE's library manager. Importantly, the video emphasizes the need to adjust the 'ws_max_queued_messages' parameter in the 'async/websocket.h' file to ensure smooth video streaming. The ESP32 Servo library is also installed for servo control. The code includes setting up the pan and tilt servo pins, defining motor control pins, and configuring Wi-Fi credentials. The video demonstrates how to create a web server, handle WebSocket events for car control, and manage the camera's image stream. The mobile app is accessed by connecting to the car's Wi-Fi and navigating to the car's IP address in a browser, allowing users to control the car and view the camera feed.
🔍 Final Tips and Troubleshooting
In the final segment, the video provides crucial tips and troubleshooting advice for the surveillance camera car project. Key points include setting the 'ws_max_queued_messages' to one for optimal video performance and ensuring the video displays correctly on the mobile app. If the video does not appear, reconnecting the Wi-Fi on the mobile device is suggested. The video also warns against connecting the IO 16 pin of the ESP32 CAM, as it is used internally by the PSRAM. If there are issues with code uploading, reconnecting the USB cable to the laptop or ensuring a stable power supply to the servos with more than 2 amperes current is recommended. The video concludes with a reminder to like, share, comment, and subscribe for more content.
Mindmap
Keywords
💡Surveillance Camera
💡Pan-Tilt Control
💡ESP32 Camera Module
💡Websocket
💡Mobile App
💡SG90 Servo Motors
💡4WD Car Kit
💡L298 Motor Driver Module
💡UBC or Buck Converter
💡Arduino Uno
💡Async Web Server Library
Highlights
Introduction to creating an upgraded surveillance camera car with pan-tilt control.
The car can rotate the camera 0 to 180 degrees horizontally and vertically.
Use of ESP32 camera module for capturing images.
Images are sent to a mobile phone using WebSocket through Wi-Fi.
Control of the car is managed through a custom mobile app.
List of components required for the project, including ESP32 CAM module and servo motors.
Assembly of the pan-tilt bracket and fixing of servos.
Soldering wires to gear motors and mounting them on the car chassis.
Connecting the L298 motor driver module to the ESP32 CAM.
Fixing the ESP32 camera module on the bracket.
Mounting the pan-tilt assembly on the car chassis.
Connecting the UBC to the battery supply for servos.
Steps to install the ESP32 board using Arduino Board Manager.
Installation of necessary libraries for the project.
Adjusting the 'ws max queued messages' parameter for smooth video streaming.
Inclusion of ESP32 servo library for controlling servo motors.
Code setup for pan and tilt servo pins, motor control, and Wi-Fi connection.
Creation of a web server and WebSocket for camera and servo input control.
Development of an HTML page for the car control app.
WebSocket event callback functions for receiving commands from the mobile.
Setup of the camera and Wi-Fi server within the code.
Instructions for uploading the code using Arduino Uno.
Connecting the battery to the car and opening the mobile app for control.
Important points and troubleshooting tips for the project.
Conclusion and call to action for likes, shares, comments, and subscriptions.
Transcripts
[Music]
hey guys welcome back to hash include
electronics with another video and in
this video we are going to make upgraded
surveillance camera car with pan tilt
control using this pan tilt assembly we
can rotate the camera horizontally and
vertically from 0 to 180 degrees we will
capture images using esp32 camera module
and send these images to our mobile
phone using websocket through wifi
connection we will control car using our
own mobile app so let's get started and
make this car if you haven't subscribed
please hit subscribe button below and
press bell icon to get latest updates
[Music]
we will need following components
esp32 cam module
pan tilt servo assembly
sg90 servo motors
we will need two motors
[Music]
4wd car kit
this car kit comes with car chases
4 tt gear motors
wheels
connectors and screws
we will also need l298 moto driver
module ubc or buck converter to provide
5 volt to servos 7 to 12 volt dc
rechargeable battery in our case lipo 2s
battery arduino uno for uploading code
double sided tape and few jumper wires
let's first assemble the pan tilt
bracket and fix servos please check my
video on pan tilt control for detailed
assembly
[Music]
[Music]
let's assemble the car now first let's
solder wires to gear motors
mount all four motors on car chases
using connectors and screws
[Music]
[Music]
now attach both the cartridges plate
using screws and make sure that it is
tightened properly so that we don't have
any loose part
[Music]
[Music]
join red to red and black to black wires
of dc motors on each side
attach l298 and motor driver module on
car chases now
now let's make a connection as per
circuit diagram
connect right side motors to out 1 and
out 2 pins of l2 98 motor driver module
now connect left side motors to out 3
and out 4 pins of motor driver module
now connect l298 and motor driver module
to esp32 campaigns as per table
connect both enable a and enable b pins
to io02 pins of esp32 cam
we will take plus 5 volt and ground from
l298 and motor driver module and provide
to esp32 cam module
fix esp32 camera module on bracket now
[Music]
mount pan tilt assembly on car chases
now
connect pan servo and tilt solver to i o
14 and i o 15 respectively
connect ubc to battery supply and
provide plus 5 volt and ground to servos
[Music]
attach dc battery power connectors to
motor diver module to plus 12 volt pin
and ground pin
attach wheels to car now
[Music]
[Music]
let's take a quick look at the code
first we need to install esp32 board
using arduino board manager i have
provided the esp32 board link in the
description below go to file then go to
preferences and add the esp32 board link
then go to tools and then board manager
and search for esp32 and install it
after that we need to install the async
tcp and async web server library
download these libraries from the links
provided in the description below
once downloaded go to sketch include
library and then click on add zip file
select the downloaded zip library file
and click add similarly add async web
server library as well
now we need to set one parameter which
is very important step so that video
runs smoothly go inside your sketch
folder then libraries folder search for
esp async web server folder and then go
inside src folder open async websocket.h
file and change ws max queued messages
to one for our esp32 board and save it
now we need to install esp32 servo
library as well for controlling servo
motors go to tools and then manage
library search for esp32 servo and
install it
now we need to include the esp
underscore camera async tcp library and
async web server library also we need to
include esp32 server library as well
after that define pan and tilt servo
pins as io 14 and io 15. we have created
objects for pan and tilt servos we no
longer need to create any dummy servos
because of timer issues i have figured
that issue and sorted out by changing
timer used by camera settings we have
assigned the right and left motor pins
we will use single io2 pin for enable
and enable b pins of motor driver module
then we have defined light pin as io4 we
have defined some constant for car
movements we have set pwm frequency
resolution and channels for speed and
light we have defined some settings
related to camera we need to set the
ssid and password for our esp32 wi-fi we
have created web server at port number
80. we will be using websocket for
camera and servo input control then we
have created html page for our car
control app and stored it in html
homepage variable this is the main page
which will be displayed on mobile it has
image section to display the video and
also has all buttons to control the car
when any control button is pressed on
mobile it will send particular number to
esp32 using websocket we have created
websocket to display the image sent from
the car we have created rotate motor
function which takes motor number and
direction as arguments it will rotate
motor in forward or backward direction
then we have move car function which
will take command like up down left
right stop and move the car accordingly
we have handle root function which will
send the html page when we type app
address on mobile browser we have oncar
input websocket even callback function
which will be called when esp32 receives
any command from mobile if received
control is move car then we will call
mookar function if received control is
speed then we will set the car speed if
received control is light then we will
set the flash if received control is
spanned or tilt then we will move the
servos accordingly we have on camera
websocket even callback function which
will be called when we get request for
video stream once connected we will set
the client id we have created setup
camera function to emit the camera then
we have created send camera picture
function which will capture the image
and send it to camera websocket client
we have created setup pin mode function
to setup the servos it will attach servo
pins to servo objects it will also set
the motor pins as output inside setup
function we will call setup pinmode
function then begin wifi using soft ap
mode setup callback function on root and
on not phone then attach the websocket
handler to web server now begin the
wi-fi server also set up the camera
inside loop function we just need to
call cleanup cloud function to clean up
old client connections we will also
capture and send the camera images i
have provided the link to the code in
the description below you can upload it
directly in our case we will use arduino
uno for uploading the code check my
previous video on esp32 cam car for
detailed explanation on how to upload
code using arduino uno connect battery
to car now
let's open mobile app now go to wi-fi
settings and connect to my wi-fi car
ssid using password as one two three
four five six seven
open google chrome browser on mobile and
type
192.168.4.1 it will open our camera car
control app sometimes we might have to
reconnect the wi-fi if app does not open
that's it let's see how it works
[Applause]
[Music]
[Music]
[Music]
[Music]
we need to remember some important
points we need to set ws max skewed
messages to one otherwise the video will
be very slow if video is not displayed
on the app then reconnect the wi-fi on
mobile do not connect io 16 pin of esp32
cam it is used internally by ps ram if
uploading of port fails then try after
reconnecting usb cable to laptop make
sure to provide separate 5v dc supply to
servos the power supply should have more
than 2 ampere current hope you guys
enjoyed the video and thanks for
watching stay safe and please like share
comment and don't forget to subscribe to
my channel
[Music]
you
Voir Plus de Vidéos Connexes
DIY | Smartphone (Bluetooth) controlled Robot Arm using Arduino | HC-05
GSM Based Smart Dustbin | कचरा भरते ही मोबाइल पर मेसेज आ जाता है
Holy Stone HS175D GPS Foldable Drone - Setup, Pairing, WIFI Connection, Calibration & App
Does #tata Curvv Best In Coupe Design : In-Depth Look at Tata’s Futuristic SUV"
Arduino UNO Smart Home Lighting Simulation w/LEDs, HC-05 Bluetooth Module + mBlock 3 [Tutorial]
tensorflow custom object detection model | raspberry pi 4 tensorflow custom object detection
5.0 / 5 (0 votes)