Create a Sprite with the Scratch Paint Editor | Tutorial
Summary
TLDRThis tutorial guides viewers through creating an original sprite in Scratch using the paint editor's vector tools. It covers drawing basic shapes like circles and squares, reshaping them, and adding elements like ears and whiskers. The vector mode allows flexibility in editing and remixing, making it ideal for custom creations. The tutorial demonstrates using tools like Reshape, Select, and Copy/Paste to perfect the design, as well as hand-drawing with the Brush tool. The process ends by adding code to bring the sprite to life, encouraging creativity and experimentation.
Takeaways
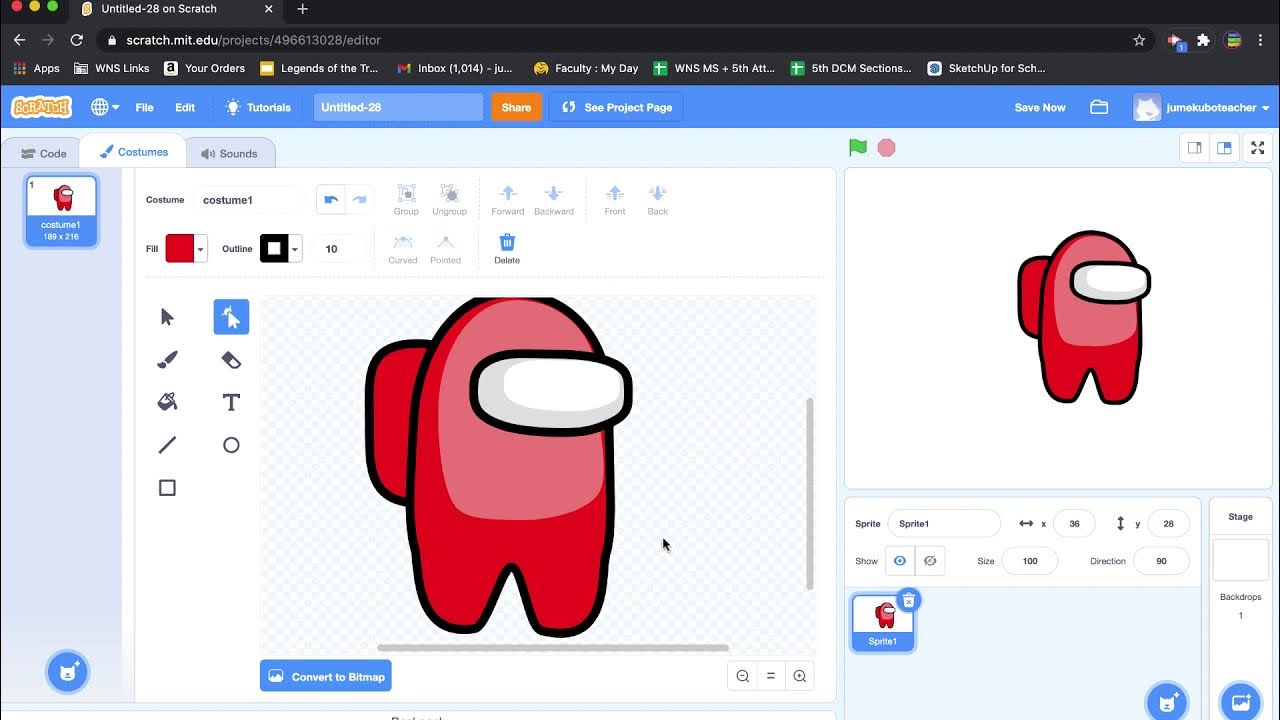
- 😀 Stay in vector mode when creating sprites for flexibility in adjusting shapes, colors, and elements.
- 😀 The Scratch paint editor offers two drawing modes: Bitmap for photos and pixels, and Vector for scalable designs.
- 😀 Vector mode is essential for users who want to remix sprites as it allows for easy manipulation of shapes.
- 😀 The Circle tool helps in drawing perfect circles, and holding the 'shift' key ensures it's proportionate.
- 😀 You can create ears using the Rectangle tool by holding the 'shift' key to form a perfect square.
- 😀 The Reshape tool allows for easy manipulation of vector points to modify shapes, such as turning squares into triangles.
- 😀 The Delete tool helps remove unwanted points in your vector shapes for clean designs.
- 😀 Adjusting curves in shapes can be done by changing points to curves and manipulating their handles.
- 😀 The Select tool in Scratch allows users to resize, rotate, and move shapes to position them as needed.
- 😀 To duplicate elements like ears, use the Copy, Paste, and Flip functions to create identical shapes.
- 😀 The Brush tool can be used to draw freehand elements like whiskers, and colors can be adjusted afterward to fix mistakes.
Q & A
What is the primary difference between Bitmap and Vector mode in Scratch?
-Bitmap mode allows users to edit photos and work with pixels, while Vector mode allows users to adjust colors, change the shape of objects, and add or remove elements, providing more flexibility for creating and modifying sprites.
Why is it important to stay in vector mode when creating original sprites in Scratch?
-Staying in vector mode is important because it allows you to adjust shapes, colors, and elements more easily, and if others remix your sprites, they will benefit from the flexibility of vector graphics.
What tool can you use to create a perfect circle in Scratch’s paint editor?
-The Circle tool can be used to create a perfect circle. Holding down the 'shift' key while drawing ensures the circle is perfectly symmetrical.
How can you create perfect squares in Scratch’s paint editor?
-To create a perfect square, you can use the Rectangle tool and hold down the 'shift' key while drawing, ensuring the sides are equal.
What is the purpose of the Reshape tool in Scratch’s paint editor?
-The Reshape tool allows you to select and manipulate points on your vector drawing, enabling you to adjust the shape by moving points or deleting them, and even converting points into curves.
How can you adjust the curvature of a shape in Scratch’s paint editor?
-To adjust the curvature, you can convert a point into a curve and use the handles to modify the shape of the curve to your liking.
How can you rotate or resize a shape in Scratch’s paint editor?
-You can use the Select tool to rotate, resize, and reposition a shape, making it easy to adjust its placement and dimensions within your drawing.
What steps can you take to create two identical ears for your cat sprite?
-To create two identical ears, you can use the Copy option to duplicate one ear, then use the Paste option and Flip it to create a mirror image.
How can you draw whiskers for a sprite in Scratch?
-You can use the Line tool to create perfectly straight whiskers, or you can use the Brush tool to hand-draw them, adjusting the size to your needs.
What should you do if you accidentally create a shape or line in the wrong color in Scratch?
-If you accidentally create a shape or line in the wrong color, you can select the individual element and change its color using the color adjustment options in the paint editor.
Outlines

Esta sección está disponible solo para usuarios con suscripción. Por favor, mejora tu plan para acceder a esta parte.
Mejorar ahoraMindmap

Esta sección está disponible solo para usuarios con suscripción. Por favor, mejora tu plan para acceder a esta parte.
Mejorar ahoraKeywords

Esta sección está disponible solo para usuarios con suscripción. Por favor, mejora tu plan para acceder a esta parte.
Mejorar ahoraHighlights

Esta sección está disponible solo para usuarios con suscripción. Por favor, mejora tu plan para acceder a esta parte.
Mejorar ahoraTranscripts

Esta sección está disponible solo para usuarios con suscripción. Por favor, mejora tu plan para acceder a esta parte.
Mejorar ahoraVer Más Videos Relacionados
07. Scratch - Drawing and Animating a Sprite
Game Gurita Mengejar Bintang Dari Tutorial di Scratch

Geometry Dash – "How to make a Scratch Game"

Project 4 - Multi-level Maze Game In Scratch | maze | scratch | knowledgequotient | scratchgame |
Crazy Simple Raycasting E1 - 🎮 How to make awesome 3d games in Scratch
Lecture: 13 | MAKE SHOOTING GAME IN SCRATCH
5.0 / 5 (0 votes)
