Tutorial Membongkar dan Merakit Komputer
Summary
TLDRThis video script guides viewers through the process of assembling or disassembling a computer. It covers essential steps such as disconnecting power supply cables, removing connectors, and safely handling components like the motherboard, hard drives, RAM, and CPU. It also details the process of installing components like the processor, fan, and PSU, ensuring each part is properly secured and connected. Throughout the script, clear instructions are given to prevent damage to parts and to ensure everything fits correctly, providing a step-by-step approach for both beginners and those with some experience in computer assembly.
Takeaways
- 😀 Step 1: The required tools include a flathead screwdriver and a star screwdriver for disassembling components.
- 😀 Step 2: Disconnect the power connector that supplies power from the PSU to the processor.
- 😀 Step 3: Remove the connector cables that transfer power from the PSU to other components like drives.
- 😀 Step 4: Disconnect connectors that provide power to the motherboard and hard drives.
- 😀 Step 5: Unplug the drive cables that connect various drives to the motherboard.
- 😀 Step 6: Detach cables for components like speakers, LED indicators, and CPU fan from the motherboard.
- 😀 Step 7: Loosen screws at one corner of the casing, then remove screws from the opposite corner.
- 😀 Step 8: Carefully detach the fan cable from the motherboard and remove the fan.
- 😀 Step 9: Remove screws securing the hard disk drives to the case and release the RAM slots by pressing the side locks.
- 😀 Step 10: For the PSU installation, ensure proper alignment of the PSU with the case and screw it in securely.
- 😀 Step 11: Align the processor in the proper slot on the motherboard, ensuring the right orientation before locking it in place.
- 😀 Step 12: Carefully insert and secure RAM, ensuring the proper fit in the motherboard's RAM slots.
- 😀 Step 13: When attaching the CPU fan, tighten the screws diagonally but not too tightly to avoid damage.
- 😀 Step 14: After securing the fan, connect the fan power cable to the motherboard to ensure it receives power.
- 😀 Step 15: Reassemble components like the front casing and ensure everything is correctly aligned before securing the case back in place.
Q & A
What tools are needed to follow the steps in the script?
-The tools required include a flathead screwdriver (obeng minus) and a star or cross screwdriver (obeng bintang).
What is the purpose of the connector cables mentioned in the script?
-The connector cables are used to transfer power from the PSU (Power Supply Unit) to various components such as the motherboard, processor, drives, and fans.
How should the processor be installed in its slot?
-To install the processor, align it with the designated slot carefully, ensuring the correct orientation with the slot's notch.
What should be done after the screws securing the PSU to the casing are removed?
-Once the screws securing the PSU are removed, carefully pull the PSU out from the casing.
Why is it important to be cautious when removing the motherboard from the casing?
-It is important to remove the motherboard slowly to avoid any damage, as it is a delicate component.
What should you check when aligning the PSU with the casing holes?
-Make sure the PSU is aligned correctly with the screw holes in the casing before securing it in place.
What does the script recommend when installing the RAM into its slot?
-Ensure that the RAM is oriented properly, matching the slot's shape, and press firmly until the RAM is securely locked into place.
How should the CPU fan be attached to the motherboard?
-The CPU fan should be mounted by first securing screws at one corner and then tightening the screws on the opposite corner.
What is the function of the various cables mentioned in the script, such as those for the floppy disk and hard disk?
-The cables connect power from the PSU to different components such as the floppy disk drive, hard disk, and motherboard, ensuring proper electrical connections.
How should the front casing be installed on the CPU?
-Place the front casing on the CPU, ensuring it is aligned with the correct position, and then press firmly to secure it in place.
Outlines

Esta sección está disponible solo para usuarios con suscripción. Por favor, mejora tu plan para acceder a esta parte.
Mejorar ahoraMindmap

Esta sección está disponible solo para usuarios con suscripción. Por favor, mejora tu plan para acceder a esta parte.
Mejorar ahoraKeywords

Esta sección está disponible solo para usuarios con suscripción. Por favor, mejora tu plan para acceder a esta parte.
Mejorar ahoraHighlights

Esta sección está disponible solo para usuarios con suscripción. Por favor, mejora tu plan para acceder a esta parte.
Mejorar ahoraTranscripts

Esta sección está disponible solo para usuarios con suscripción. Por favor, mejora tu plan para acceder a esta parte.
Mejorar ahora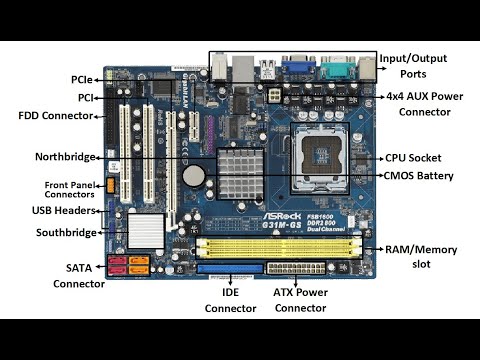


5.0 / 5 (0 votes)
