Complete Guide to Setting up Azure Virtual Desktops

Tech Pub
21 Dec 202218:27

Summary

TLDRThis tutorial walks through setting up Azure Virtual Desktops, detailing the process of creating a resource group, virtual network, and host pool. It explains selecting the right region for resources, configuring a virtual machine with Windows 11, and setting up access control. The guide also covers creating a workspace and configuring RDP access for secure, web-based connections, culminating in a demonstration of accessing the virtual desktop environment.

Takeaways

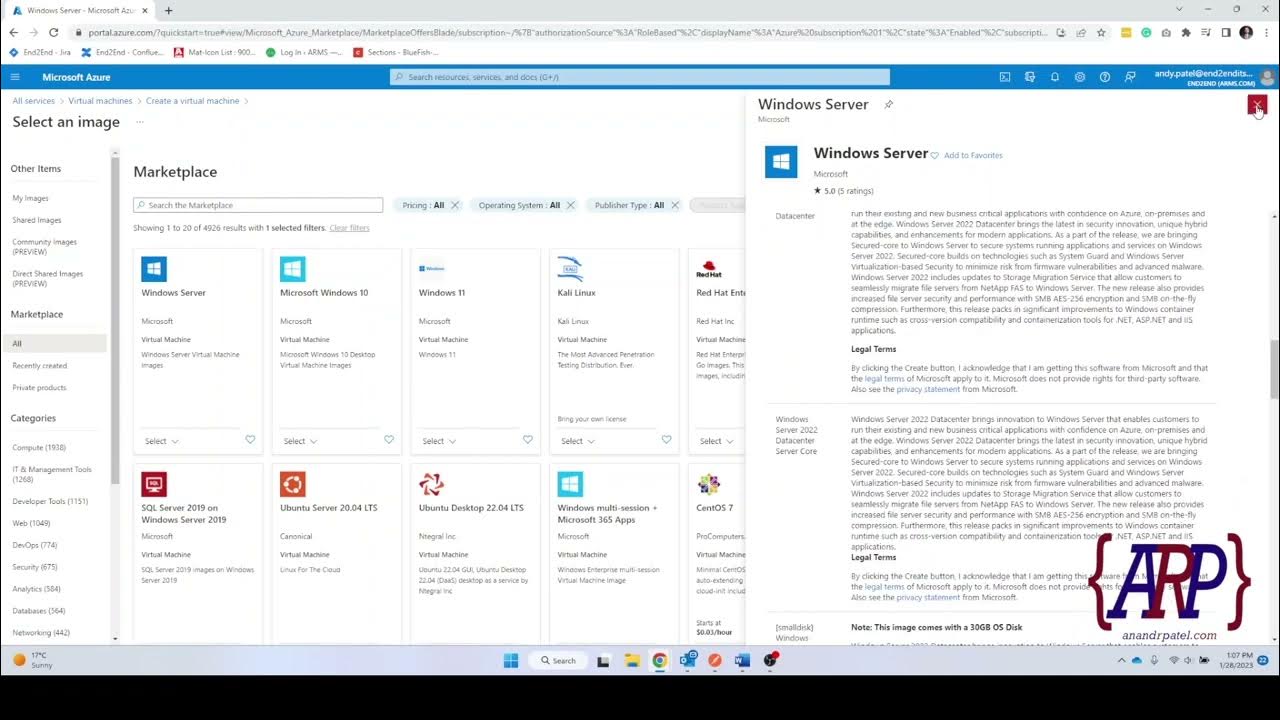
  • 🌐 Azure Virtual Desktops allow users to create and manage virtual machines using client operating systems like Windows 10 or 11 within Azure services.
  • 🔍 To get started, users must navigate to the Azure portal and access the list of all resources, which includes virtual networks, workspaces, and storage accounts.
  • 🚀 The process of creating a virtual desktop involves several steps, including setting up a resource group, a virtual network, and a host pool.
  • 📝 Creating a resource group is essential as it acts as a 'bucket' to organize the various resources needed for the virtual desktop.
  • 🌐 A virtual network is necessary for the virtual desktop and must be created before setting up the host pool, ensuring all resources are in the same region for proper functionality.
  • 💻 The host pool is a collection of virtual machines that users can access; it's created by specifying a name, location, and other configuration options like pool type and load balancing.
  • 🖥️ Virtual machines within the host pool can be created directly during the setup or added later, with options to customize the VM's name prefix, location, image, and hardware specifications.
  • 🔐 Security is a consideration, with options to enable public inbound ports for remote access, although this is not recommended due to potential security risks.
  • 👤 Role assignments are crucial for managing access control, allowing users or administrators to have different levels of access to the virtual desktops.
  • 🔗 Workspaces are used to organize and deliver applications to users, and they can be associated with one or more application groups for a streamlined user experience.

Q & A

  • What is Azure Virtual Desktops?

    -Azure Virtual Desktops is a service that allows users to create and manage virtual machines running client operating systems like Windows 10 or 11 within Azure services.

  • Why can't you create a virtual desktop directly in Azure?

    -You can't create a virtual desktop directly in Azure because it involves multiple steps similar to setting up a remote desktop application on a Windows Server, including creating a resource group, virtual network, and host pool.

  • What is the purpose of creating a resource group in Azure?

    -A resource group in Azure acts as a container that holds related resources for an application, making it easier to manage and organize them.

  • Why is it important to place all resources in the same region in Azure?

    -Placing all resources in the same region ensures that the services work correctly and efficiently as some Azure services may not function properly if resources are spread across different regions.

  • What is a virtual network in Azure and why is it needed for Virtual Desktops?

    -A virtual network in Azure is a representation of your own network in the cloud, providing logical isolation from other networks. It is needed for Virtual Desktops to provide a secure and dedicated network for the virtual machines.

  • What is a host pool in the context of Azure Virtual Desktops?

    -A host pool in Azure Virtual Desktops is a collection of one or more virtual machines that are configured as a group to provide desktops to users.

  • What is the difference between a personal and pooled host pool?

    -A personal host pool allows a one-to-one mapping between a user and a virtual desktop, while a pooled host pool allows multiple users to access a shared set of virtual desktops.

  • What is the purpose of creating a workspace in Azure Virtual Desktops?

    -A workspace in Azure Virtual Desktops is used to organize and publish applications to users, providing a centralized location for users to access their virtual desktops and applications.

  • How can users access their Azure Virtual Desktop sessions?

    -Users can access their Azure Virtual Desktop sessions through a web browser or a remote desktop client, depending on the configuration and security settings.

  • What is the significance of assigning role-based access control (RBAC) in Azure Virtual Desktops?

    -Assigning RBAC in Azure Virtual Desktops allows for fine-grained control over who has access to resources and what actions they can perform, enhancing security and management.

Outlines

00:00

💻 Setting Up Azure Virtual Desktops

The paragraph introduces the process of setting up Azure Virtual Desktops, which involves adding virtual machines using client operating systems like Windows 10 or 11 within Azure services. The user navigates to the Azure portal and plans to create a virtual desktop, acknowledging that it's a multi-step process akin to setting up a remote desktop application on a Windows Server. The user outlines the necessary steps, such as creating a resource group, a virtual network, and a host pool, and begins by creating a resource group within the Azure portal. The importance of placing all resources in the same region for proper functionality is emphasized. The user then proceeds to create a resource group named 'virtual desktop-Dash group' in the US West region.

05:02

🌐 Creating a Virtual Network for Azure Virtual Desktops

This section details the creation of a virtual network, which is a crucial component for Azure Virtual Desktops. The user explains that while the virtual desktop pool could be created with all the components within it, doing so separately provides clarity on each component's function. The user creates a virtual network named 'virtual desktop-Dash Network' and selects an IP address and subnet provided by default. The explanation covers the address space and subnet concepts, highlighting how multiple subnets can fit within an address space. The user completes the creation of the virtual network and moves on to the next step, which is creating the host pool.

10:02

🛠️ Configuring the Host Pool for Virtual Desktops

The host pool configuration is the focus of this paragraph. The user explains that a host pool is necessary before creating virtual desktops and guides through the creation process within the Azure portal. The user selects the 'virtual desktop group' resource group and names the pool 'jump in.' The location is chosen to match previous selections for consistency. The paragraph covers various options such as the validation environment, preferred app group type, pool type, load balancing method, and maximum users per session. The user decides to create a virtual machine within the host pool, setting the name prefix, location, security type, and image. The user also configures the virtual machine's resources, such as vCPUs and RAM, and chooses the virtual network previously created. The paragraph concludes with the user setting up access methods for the virtual desktop, opting for a web browser access over a public IP for security reasons.

15:03

🔑 Assigning Permissions and Access to Virtual Desktops

In this paragraph, the user discusses assigning permissions and setting up access control for the virtual desktop. The user navigates to the host pool, assigns an application group, and adds a user account to access the virtual desktop. The user then sets up role assignments for both a standard user and an administrator, explaining the difference between the two access levels. The user also creates a workspace, which is used to organize and deliver applications to users. The workspace is configured with a name and friendly name, and the user assigns an application group to it. The user then sets up RDP access, ensuring that the virtual desktop can be accessed through a web browser. The paragraph concludes with the user demonstrating how to connect to the virtual desktop using a provided URL, showcasing the login process and the desktop environment once accessed.

Mindmap

Keywords

💡Azure Virtual Desktops

Azure Virtual Desktops is a service that allows users to create and manage virtual machines running client operating systems such as Windows 10 or 11 within the Azure cloud environment. In the video, the narrator demonstrates how to set up these virtual desktops, highlighting its use for remote access and resource management. It's a key concept as the entire video is a tutorial on how to create and configure Azure Virtual Desktops.

💡Resource Group

A Resource Group in Azure is a container that holds related resources for an Azure solution. The narrator explains the necessity of creating a Resource Group as a 'bucket' to organize the various resources needed for the virtual desktop setup. This is foundational to understanding the structure of Azure services as it helps in organizing and managing resources efficiently.

💡Virtual Network

A Virtual Network in Azure is a representation of your own network in the cloud. It is a key component when setting up Azure Virtual Desktops as it allows for the creation of a secure network environment. The video script mentions creating a Virtual Network and associating it with the Resource Group, which is essential for the connectivity and security of the virtual desktops.

💡Host Pool

A Host Pool in the context of Azure Virtual Desktops refers to a collection of one or more virtual machines that are configured identically and provide desktops or applications to multiple users. The script describes creating a host pool as a critical step in setting up the virtual desktop environment, as it determines how the virtual machines will be used and managed.

💡Session

In the video, a session refers to an interactive period during which a user is logged in and using the virtual desktop. The script mentions setting up a session as part of the process to access the virtual desktop, which is crucial for understanding how users will interact with the Azure Virtual Desktop service.

💡Role Assignment

Role Assignment in Azure is the process of assigning permissions to users, groups, or services at a particular scope. The video script includes a step where the narrator adds role assignments to control access to the virtual desktops. This is an important concept for managing permissions and ensuring that only authorized users can access the virtual desktop resources.

💡Active Directory

Active Directory is a directory service by Microsoft that allows for centralized management of user accounts and other directory services. In the script, the narrator discusses the option to use Azure Active Directory for managing user authentication for the virtual desktops, which is essential for understanding how user access is controlled in an Azure environment.

💡Remote Desktop Protocol (RDP)

RDP is a protocol used by Microsoft for remote login services. Although the video script mentions not using RDP over a public IP for security reasons, it does discuss setting up RDP access via a web browser, which is a key aspect of how users will remotely connect to their virtual desktops in Azure.

💡Virtual Machine (VM)

A Virtual Machine is a software implementation of a machine that executes programs like a physical machine. The video script includes the creation of VMs as part of the host pool, which is a fundamental step in setting up the virtual desktop environment. VMs are the building blocks of the virtual desktop infrastructure in Azure.

💡Workspace

In the context of Azure Virtual Desktops, a Workspace is a logical container that contains user sessions and applications. The script describes creating a workspace, which is important for understanding how users will access and organize their applications and desktops within the virtual environment.

💡Load Balancing

Load Balancing is a method of distributing network traffic across a number of servers to ensure no single server becomes overwhelmed. The video script mentions 'breadth first' as a type of load balancing strategy for the host pool, which is crucial for understanding how the virtual desktop service manages the distribution of user sessions to ensure optimal performance.

Highlights

Introduction to Azure Virtual Desktops and the process of adding Virtual Machines using client operating systems like Windows 10 or 11.

Accessing the Azure portal and navigating to the 'All resources' section to view available services.

The necessity of creating a virtual desktop through a multi-step process akin to setting up a remote desktop application on a Windows Server.

Creating a resource group as a prerequisite for organizing the various resources needed for the virtual desktop.

The importance of placing all resources in the same region to ensure proper functionality.

The process of creating a virtual network and its integration with the resource group.

Explanation of IP addressing and subnetting within the virtual network.

The distinction between a personal and pooled host pool and the choice between breadth-first and depth-first load balancing.

The option to create a virtual machine during the host pool creation or to do it later.

Customization of virtual machines, including naming, location, security type, and image selection.

The allocation of resources such as vCPUs and RAM to virtual machines and the consideration of costs.

The selection of a virtual network for the virtual machines and the option to enable public inbound ports.

The process of assigning permissions to access the virtual desktop and setting up role assignments for user and administrator access.

The creation of a workspace to manage and deliver applications to users.

The configuration of RDP access for secure connection to the virtual desktop without using a public IP address.

The final step of accessing the virtual desktop through a web browser and the ability to connect to Azure Active Directory resources.

Comparison of Azure Virtual Desktops to Windows Server remote desktop application mode, highlighting the configurability in the Azure cloud.

Transcripts

play00:00

Azure virtual desktops are a way that we

play00:04

can add in Virtual machines using client

play00:07

operating systems like Windows 10 or 11

play00:09

inside Azure services so I'm logged into

play00:12

portal.azure.com and I'm going to go to

play00:16

where it says all resources just so you

play00:19

can see a list of all the resources I

play00:20

have there's all different kinds of

play00:22

things in here virtual networks

play00:24

workspace storage accounts things like

play00:26

that what I want to do is I want to

play00:28

create a virtual desktop but I can't

play00:32

just create it directly it's almost like

play00:35

creating a remote desktop application

play00:38

set up on a Windows Server there's a lot

play00:40

of steps you have to do before you get

play00:42

to that point so let's take a look at

play00:44

the different steps and get started

play00:48

here's a list of assignments that we're

play00:50

going to need to do such as creating the

play00:51

resource Group create a virtual Network

play00:53

create a host pool Etc

play00:56

let's start by creating the resource

play00:59

Group

play01:00

I'm back at portal.azure.com and if you

play01:03

don't see the resource Group in your

play01:05

list just go ahead and type in Resource

play01:07

Group in the search box and then it'll

play01:10

show up and you can go ahead and add one

play01:12

so I'll click on resource groups this is

play01:15

also assuming that you already have an

play01:17

Azure subscription if you don't have one

play01:19

yet you'll need to log in the first time

play01:21

create an account and add in your credit

play01:24

card and then you'll be able to add in

play01:26

your subscription so assuming that that

play01:28

part is already done let's go ahead and

play01:31

continue on

play01:32

you can see I've already got multiple

play01:34

resource groups the reason we need to

play01:36

create a resource Group is because this

play01:38

is like a bucket we're going to need to

play01:41

create a lot of other things but we have

play01:42

to put it in something and a bucket is

play01:45

the best place to put it and in this

play01:47

case that bucket is called a resource

play01:49

Group you can see I already have my

play01:51

subscription now I need to create the

play01:54

resource Group name

play01:55

and I'll call this the virtual desktop

play01:57

Dash group and this next part is really

play02:00

important because if you don't put all

play02:02

of your different resources the things

play02:04

we're going to create in the same region

play02:07

then some things may not work right so

play02:09

I'll choose us West

play02:12

and click on next

play02:15

tags are just something used to create

play02:18

Organization for billable purposes so I

play02:21

don't need to worry about that and now

play02:23

I'll click create

play02:25

and this doesn't take very long and it's

play02:27

all done I'm going to go back to home

play02:32

and back to

play02:35

my search box and I'll type in the

play02:37

second thing we need to do which is to

play02:39

create a virtual Network

play02:43

and I'll click on Virtual Networks

play02:46

now one of the interesting things about

play02:48

doing all this is I can do this within

play02:51

creating the virtual desktop pool

play02:54

however if I do it all there you may not

play02:57

understand exactly all the different

play02:59

pieces and what they do so just for

play03:01

teaching purposes I'm going to go ahead

play03:03

and do this outside of the pool and then

play03:06

add them into the pool once we're done

play03:07

so that'll make a lot more sense at that

play03:09

time so I've already created the

play03:11

resource Group now I can tie that to

play03:15

my virtual Network by selecting it here

play03:19

and now I'll give this a name

play03:22

I'll call it virtual desktop Dash

play03:24

Network now I'll choose the IP address

play03:27

by default it's going to pick a 10 dot

play03:30

address maybe something you haven't used

play03:31

before so I'm going to choose the subnet

play03:34

that it's picked for me which is 10.4

play03:37

I'm perfectly fine with that you can see

play03:39

that it creates an address space which

play03:41

is going to be 10400 16 which gives you

play03:44

65 000 addresses but then it adds a

play03:47

subnet so the difference between the two

play03:49

are that you can put a lot of different

play03:51

subnets inside your address space and

play03:54

it's picking a slash 24 which gives you

play03:56

254 addresses it's just the way that

play03:59

Azure does it so I'm going to go ahead

play04:02

and choose this default subnet that it's

play04:06

created along with the address space at

play04:10

the top so if I wanted to I could create

play04:12

additional subnets that would be

play04:17

10.4.1.010.4.2.0 and they would all

play04:18

nicely fit inside this 10400 slash 16

play04:23

address space if I chose to do so and I

play04:26

don't really need to do that so I'll go

play04:27

ahead and click next

play04:28

I don't need to make any other changes

play04:30

so I'll just click next and I'll go

play04:33

ahead and choose to create

play04:38

and this doesn't take very long to

play04:39

create

play04:40

and that has been created I can go to

play04:43

the resource and take a look at the

play04:45

different properties but I need to get

play04:46

on to the next step

play04:49

so we've created our Resource Group

play04:50

we've created a virtual Network and now

play04:52

it's time to create the host pool

play04:56

I'm going to go back to home

play05:01

and I'm going to type in either Azure

play05:04

virtual desktop or if you see the icon

play05:07

there you can just go ahead and click on

play05:08

it so once again you can click on the

play05:09

search box if you'd like

play05:11

now before I can create a virtual

play05:13

desktop as I mentioned before I have to

play05:15

create a host pool so I'll click on the

play05:17

create a host pool and then from there I

play05:20

can create my desktops once again my

play05:22

Azure subscription the resource Group

play05:25

will choose virtual desktop group

play05:28

the pool name I'll call it

play05:31

jump in

play05:33

and the location you can see it

play05:34

defaulted to something other than what I

play05:36

was using before so I want to make sure

play05:38

that I go down and choose the exact same

play05:41

one I chose last time

play05:43

now you have the validation environment

play05:47

the validation environment just

play05:48

basically allows you to test things out

play05:50

before you apply them to production but

play05:53

I'm going to go ahead and keep it as no

play05:55

so we can keep moving forward then you

play05:57

have the option for the preferred app

play05:59

Group type you see you have the desktop

play06:01

and you have the remote app

play06:04

remote app allows you to deliver

play06:07

applications remotely and desktop is

play06:10

going to be where you just allow those

play06:12

installations to happen locally I'm just

play06:14

going to leave it a desktop and then

play06:16

when it comes to the pool type

play06:19

personal will allow a one-to-one

play06:21

selection between the user and the

play06:23

virtual desktop and pooled allows you to

play06:26

create a group of people that can access

play06:29

those desktops so I'm going to choose

play06:32

the pooled option in this case just as

play06:34

an example but you can do it either way

play06:36

breadth first versus depth first breath

play06:40

to First is going to be a way of load

play06:43

balancing so we can do load balancing

play06:45

where we allow a certain amount of

play06:47

virtual desktops to log in before we

play06:49

create another one or we can have

play06:51

multiple different people log in and

play06:53

then we create the other one later on so

play06:55

I'm just going to choose the breadth

play06:56

first and then the maximum number of

play06:59

users per session you can put whatever

play07:01

it is you'd like I'll just choose two

play07:03

but you can choose as many that works

play07:05

for you and it's a good idea to test

play07:06

those out now the next thing I can do is

play07:08

I can create a virtual machine right

play07:11

here or I can choose no and do it later

play07:12

I'll go ahead and choose yes to add this

play07:15

virtual machine now the name prefix that

play07:18

is going to be whatever your hosts start

play07:21

with as a name so for instance if I call

play07:23

this one jump in

play07:27

then what's going to happen is the first

play07:29

virtual desktop is created is going to

play07:31

be jump in zero then jump in one then

play07:32

jump in two that kind of thing and once

play07:35

again I gotta make sure my virtual

play07:37

machine location is in the same place

play07:40

every single time

play07:42

I don't want to add in infrastructure

play07:45

redundancy although you can do that for

play07:48

additional charge and you've got the

play07:50

security type I'll leave that standard

play07:52

and

play07:54

here are your images I'm just going to

play07:56

go ahead and choose a Windows 11.

play07:59

multi-session although you can add in

play08:02

with applications already pre-installed

play08:06

so I'll choose that one and by default

play08:08

it's going to choose these two vcpus and

play08:11

eight gigs of RAM but you can go ahead

play08:13

and change that if you need more or less

play08:15

based on your cost I'm going to create

play08:17

just a single virtual desktop but you

play08:20

may want to choose 5 or 10 or however

play08:22

many you'd like of course you'll be

play08:24

charged per desktop to do that standard

play08:27

SSD is fine

play08:29

I don't necessarily need any Diagnostics

play08:32

separate from what's shown there and

play08:35

under the virtual Network I want to make

play08:37

sure that I choose

play08:40

my virtual desktop Network that I

play08:43

created earlier

play08:45

I can also add in public inbound ports

play08:48

if I'd like and then I can remote into

play08:50

that virtual desktop

play08:53

it's not really recommended that we have

play08:54

public inbound ports because it is a bit

play08:56

of a security risk but you can do that

play08:58

I'm going to choose no and the way I'm

play09:00

going to access this is through a web

play09:03

browser and it will work just as well as

play09:05

say a remote desktop client over a

play09:07

public IP but it'll be a lot more secure

play09:09

you can also connect to this user remote

play09:12

desktop if you have a VPN tunnel between

play09:14

your network and Azure that requires a

play09:17

lot of extra setup and there is a cost

play09:20

roughly about five dollars a day from

play09:22

what Microsoft tells us but that could

play09:24

vary

play09:26

under active directory there's no reason

play09:28

to choose your on-premises active

play09:30

directory if you've got Azure active

play09:32

directory set up so I'm going to choose

play09:34

that I don't need to enroll an InTune

play09:36

but you may decide you would like to do

play09:38

that

play09:39

and I went ahead and added in a local

play09:42

username and password that's separate

play09:43

from active directory just in case you

play09:45

need to log into it locally to fix any

play09:47

particular problems I don't have an arm

play09:50

template to add in this is supported by

play09:53

virtual desktop classic we're going to

play09:55

be using the newer version so this is

play09:57

something that you may not even want to

play09:59

configure I'm going to go on to

play10:01

workspace I don't need to

play10:04

and I'll click on advanced

play10:07

and tags and review and create so I

play10:10

didn't need to make any other changes

play10:12

there so now I'll click create now this

play10:14

portion can take up to about 20 minutes

play10:16

because it's creating the pool then it's

play10:19

creating the virtual desktop and it just

play10:21

takes a lot of time to do this once this

play10:24

is all set then we can go ahead and

play10:27

finish up our configuration and start

play10:28

accessing our virtual desktop

play10:32

if I go back to our list you can see the

play10:35

host pool has been created the Azure

play10:37

virtual desktop's been created next I'm

play10:39

going to be assigning an active

play10:41

directory user and setting up Access

play10:43

Control into that virtual desktop and

play10:46

you need to add in a role assignment and

play10:48

add in members as well

play10:50

these next steps after creating the host

play10:54

pool and virtual desktop actually go

play10:55

fairly quickly it's just the host pool

play10:59

and desktop portion that does take quite

play11:01

a while to do the resource has been

play11:03

created I'll click on go to resource

play11:06

and now you can see that we have a

play11:09

virtual desktop ready to go there's lots

play11:11

of other settings I'm just going to

play11:12

click on the virtual machines for the

play11:14

virtual desktop and you can see that it

play11:16

appended that jump in with the dash zero

play11:19

just as I said that it would

play11:21

and everything looks the way it should

play11:23

so I'm going to go back to the host pool

play11:28

now I need to assign some permission so

play11:31

I'll click on application groups

play11:34

and there's the jump in dash application

play11:36

group now that was automatically created

play11:38

I didn't create that myself it just

play11:39

became created when I created the pool

play11:44

so I'm going to click on assignments

play11:47

and I'm going to click on ADD

play11:50

and off to the right hand side you can

play11:53

add in users or groups

play11:59

and click select

play12:02

so now my user account has access to the

play12:05

dag or desktop application group

play12:09

although now I'm available to log in

play12:11

using the pool I need one additional

play12:13

assignment so I'm going to go back

play12:17

to home and I'll just go into

play12:21

my virtual desktop Group which is the

play12:23

resource Group

play12:26

so I'm going to go up to access control

play12:28

click on that

play12:30

and then I'll click add

play12:34

and I'll choose add role assignment

play12:37

and there's lots of different role

play12:38

assignments this is all part of the

play12:40

role-based access control that Microsoft

play12:42

is moving to so I'll type in Virtual

play12:46

machine

play12:48

because that ultimately that's exactly

play12:50

what it is

play12:51

and I'll click on virtual machine user

play12:54

login

play12:57

and I'll click next

play13:00

and once again I will select members

play13:06

I'll add in my account and click select

play13:11

I'll choose review and assign

play13:16

looks good and now it's added that role

play13:20

assignment now take a look at all these

play13:22

different options here you can choose

play13:24

who has access to this resource you can

play13:26

also set up deny assignments and create

play13:29

a custom role as well here's your deny

play13:31

assignments here you have your roles and

play13:34

you have your classic administrators

play13:36

we're not using classic administrators

play13:37

anymore so we'll continue to move

play13:39

forward with the latest and greatest

play13:43

I'm going to do this one more time but

play13:45

this time I'm going to add in a role

play13:46

assignment for an administrator to the

play13:49

virtual desktop

play13:50

and I'll choose administrator login

play13:54

click next and basically just do the

play13:56

same thing

play13:59

the difference between the two are going

play14:01

to be whether a user will have complete

play14:03

Administration over that virtual desktop

play14:05

or just basic user and if you don't want

play14:09

them to be adding their own applications

play14:10

or making any changes then you don't

play14:12

want them to be part of this

play14:14

administrator group but in my case I do

play14:18

I'm gonna go back home once again I'm

play14:21

done there I'm going to click on Azure

play14:23

virtual desktop

play14:25

and now I need to create a workspace so

play14:28

I'll click on workspaces

play14:30

and I'll click on create a workspace

play14:35

and what the workspace does is it

play14:36

basically allows you to push out

play14:38

applications off to those users if you

play14:40

choose to do so but it's going to be

play14:43

what it is that they see when they log

play14:45

in so I'm going to choose my virtual

play14:47

desktop group my subscription

play14:48

everything's good there now I'm going to

play14:50

call this workspace name

play14:52

virtual desktop workspace

play14:55

and we could have a friendly name as

play14:58

well

play14:59

I'll call it workspace one and once

play15:02

again we have to choose our same

play15:05

location

play15:07

so I'll click next

play15:10

I'm not going to register any

play15:11

application groups at this time so I'll

play15:14

click next Advanced tags we don't need

play15:16

to worry about that review and create

play15:19

and click create so there really wasn't

play15:21

a lot of customization there but we need

play15:23

to have at least one of our workspaces

play15:26

assigned into our virtual desktop

play15:29

now I'm going to click on go to that

play15:31

resource

play15:34

and I could have assigned an application

play15:35

group during the creation but I just

play15:37

wanted to show you these properties so I

play15:39

can go ahead and add that in separately

play15:43

so we'll choose

play15:45

the one

play15:47

application group already created and

play15:50

click select

play15:53

and now that has been added into our

play15:55

workspace

play15:56

now there can be multiple application

play15:58

groups if you need to use those I'm just

play16:01

going to have the one so now I'm going

play16:04

to go back home and I'm going to go into

play16:07

my host pool called jump in

play16:10

and there's our pool once again

play16:14

now we need to set up RDP access

play16:16

although we're not getting in using a

play16:17

remote desktop protocol over a public IP

play16:19

address we are doing it over a web

play16:22

browser so I need to allow that to

play16:24

happen

play16:26

so I'm going to paste in the semicolon

play16:29

Target is aad joined and then colon I

play16:33

colon one and that just lets any

play16:35

applications know that this is going to

play16:37

be an Azure active directory joined

play16:40

computer so I'm going to paste this in

play16:42

at the very end

play16:45

just as you see here and click save

play16:50

another good reason to do that is

play16:52

because it also supports a single

play16:54

sign-on

play16:56

I'm going to click on overview

play16:59

and my virtual desktop virtual machines

play17:02

and everything is available

play17:06

one of the last things to do is going to

play17:08

be to copy this URL and

play17:12

paste it into a web browser and connect

play17:15

to our virtual desktop

play17:17

I'm going to open up a new tab

play17:21

right click and paste it in

play17:28

and it's loading and there's the virtual

play17:32

desktop session so I'll click on that

play17:34

you can choose what you want to access

play17:36

as far as local resources goes you can

play17:39

choose whether or not to have it

play17:40

continued to prompt

play17:42

and now we're opening it up

play17:45

it's asking for my username and password

play17:52

and there it is my session is opening up

play17:55

for my virtual desktop

play17:58

now if you have any Azure active

play18:00

directory resources such as storage that

play18:02

you'd like to connect to you can do that

play18:04

as well

play18:06

and there is my desktop

play18:09

I of course have access to all the same

play18:11

menus and any applications that I might

play18:13

have decided to set up

play18:15

Azure virtual desktops Works in a

play18:18

similar way as Windows Server remote

play18:19

desktop application mode but you can

play18:21

configure it instead in the Azure cloud

Rate This

5.0 / 5 (0 votes)

Etiquetas Relacionadas
Azure Virtual DesktopsResource GroupVirtual NetworkHost PoolWindows 10/11Cloud ServicesRemote AccessSecurity SetupMulti-SessionAzure Portal
¿Necesitas un resumen en inglés?