Trading Was Hard Until I Understood This ONE Concept
Summary
TLDRこのビデオスクリプトでは、90%のトレーダーが損失を被る理由として「スマートマネー」と「市場操作」について語られています。スマートマネーが非利益トレーダーを繰り返し罠にはめる5ステッププロセスを明かします。彼らは価格を一定範囲で動かすことで流動性を作り出し、その後には価格を意図した方向に動かすための操作を行います。トレーダーはこのプロセスを理解し、市場の動きを予測し、適切なタイミングでトレードに参入することが重要です。
Takeaways
- 📊 大部分交易者亏损是因为不了解市场中的“聪明资金”如何操纵市场。
- 🔑 聪明资金在进行大动作前会创建一个价格区间,这是操纵的第一步。
- 🤔 价格区间是价格在一定时间内在高点和低点之间横向移动的现象。
- 📈 聪明资金通过区间操作,诱导市场形成对价格走势的预期。
- 💡 区间内的高点和低点分别创造了卖方和买方的流动性。
- 💸 聪明资金通过诱导卖方和买方在特定价格区域设置止损单来积累流动性。
- 🚫 第二步是清算阶段,聪明资金会通过卖出来打破支撑位,创造供应假象。
- 📉 清算阶段的目的是清除市场中的流动性,为后续的价格上涨做准备。
- 🤝 第三步是启动阶段,聪明资金在此阶段展示他们真正的交易意图。
- 🔄 第四步是缓解阶段,聪明资金在此阶段通过价格回调来减少损失并重新积累订单。
- 🏁 第五步是持续阶段,价格将继续按照聪明资金的意图移动,直到完成目标。
- 👀 交易者应该识别出这些阶段,并在第四阶段进入市场,以期在第五阶段获得利润。
- 📚 通过理解这些概念,交易者可以更好地识别市场操纵并据此制定交易策略。
Q & A
スマートマネーとは何ですか?
-スマートマネーとは、市場を操作するために大口の投資家が使用する資金のことを指します。彼らは市場を分析し、小口投資家を罠にかける戦略を用いて利益を得ようとします。
スマートマネーが小口投資家を罠にかけるプロセスはどのようなステップを踏むのでしょうか?
-スマートマネーは5つのステップを踏むプロセスで小口投資家を罠にかけます。それは、レンジの形成、流動性の形成、流動性の消却、真の意図の開始、そして継続です。
レンジとはどのような市場の動きを指しますか?
-レンジは価格が高値と安値の間で行ったり来たりする横ばい移動を指します。これはスマートマネーが市場を操作するための第1段階です。
スマートマネーがレンジを形成する目的は何ですか?
-レンジを形成することでスマートマネーは市場の両側に流動性を創出します。これは後で価格を動かすための準備として、売りと買いの注文を誘導する戦略です。
流動性の消却とは何を意味していますか?
-流動性の消却はスマートマネーが市場に対して売りまたは買いを強打し、小口投資家の注文を引き離すプロセスを指します。これにより、スマートマネーはより良い平均価格で自分の注文を実行できます。
スマートマネーの意図を示すために使用される市場構造の変化とは何ですか?
-市場構造の変化はスマートマネーが価格を自分の望む方向に動かすために、買いまたは売りの意図を示すために使用されるシグナルです。これは価格が新しい高値または安値を記録することを意味します。
リスク管理の観点から、スマートマネーはどのように損失を軽減しようとしますか?
-スマートマネーは価格を操作して損失を軽減し、利益を最大化します。彼らは市場に戻り、自分の売ポジションの損失を締めくくり、さらに注文を市場に戻して価格を継続的に動かします。
小口投資家はスマートマネーの戦略を理解することによってどのように利益を得ることができますか?
-小口投資家はスマートマネーの戦略を理解し、彼らの意図を読み取り、適切なタイミングで市場に参入することで利益を得ることができます。
スマートマネーが使用する誘導とはどのような手法ですか?
-誘導はスマートマネーが価格を特定のレベルに押し上げたり押し下げたりして、小口投資家の注文を引き離す手法です。これにより、スマートマネーは市場に流動性を創出して自分の注文を実行します。
スマートマネーが価格を継続的に動かすために使用する戦略とは何ですか?
-スマートマネーは価格を継続的に動かすために、市場に戻りながら注文を残し、価格が自然に戻るのを待ちながら、新たな注文を市場に入れることで流動性を維持します。
実際の市場でスマートマネーの戦略を確認するためにはどのようなシグナルを見应该知道か?
-実際の市場でスマートマネーの戦略を確認するためには、価格のレンジ、誘導による流動性の形成、意図の開始、そして価格の継続的な動きを監視する必要があります。
Outlines

Dieser Bereich ist nur für Premium-Benutzer verfügbar. Bitte führen Sie ein Upgrade durch, um auf diesen Abschnitt zuzugreifen.
Upgrade durchführenMindmap

Dieser Bereich ist nur für Premium-Benutzer verfügbar. Bitte führen Sie ein Upgrade durch, um auf diesen Abschnitt zuzugreifen.
Upgrade durchführenKeywords

Dieser Bereich ist nur für Premium-Benutzer verfügbar. Bitte führen Sie ein Upgrade durch, um auf diesen Abschnitt zuzugreifen.
Upgrade durchführenHighlights

Dieser Bereich ist nur für Premium-Benutzer verfügbar. Bitte führen Sie ein Upgrade durch, um auf diesen Abschnitt zuzugreifen.
Upgrade durchführenTranscripts

Dieser Bereich ist nur für Premium-Benutzer verfügbar. Bitte führen Sie ein Upgrade durch, um auf diesen Abschnitt zuzugreifen.
Upgrade durchführenWeitere ähnliche Videos ansehen
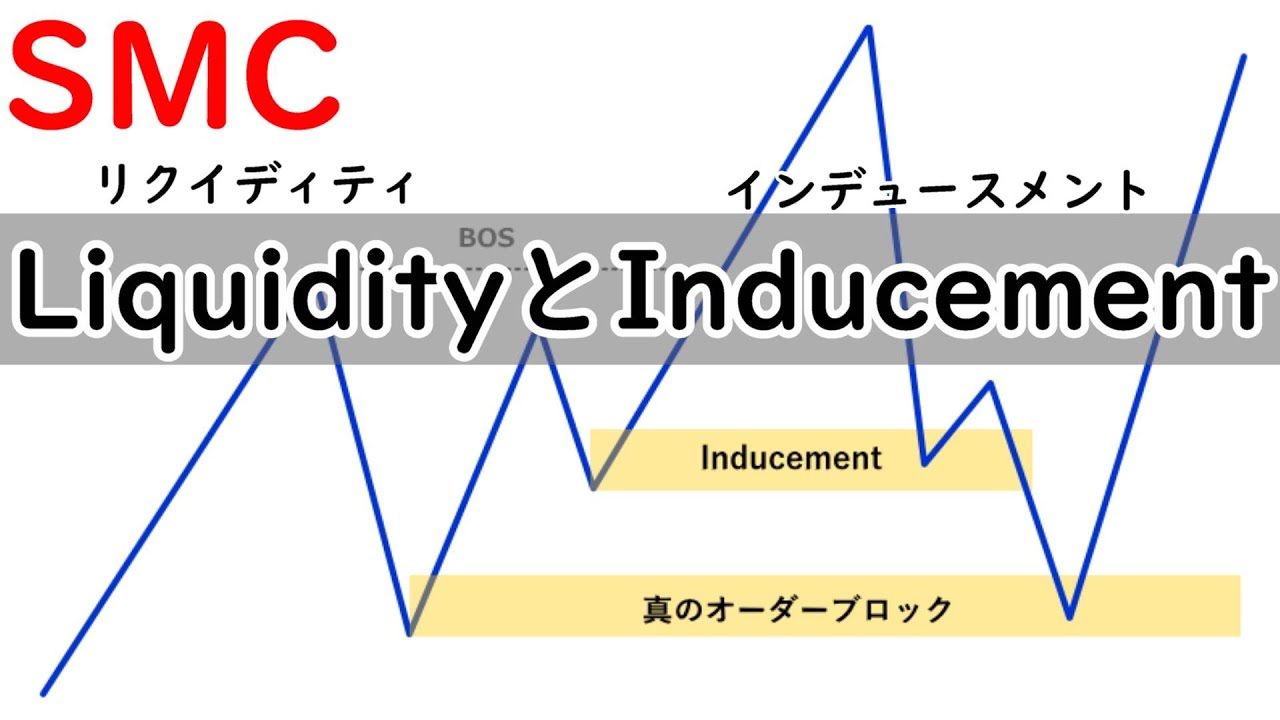
【SMC】LiquidityとInducementの解説

【株式投資】これは絶対理解しておくべき。株式投資はこれをすると負けるように出来ている。【テスタ/株デイトレ/初心者/大損/投資/塩漬け/損切り/ナンピン/現物取引/切り抜き】

Used Motorcycle Prices – A Statistical Analysis

ゲーム制作で一番大事にしてほしいこと【フォロワーから質問①】

専業トレーダーになる為に。ビジネス編①トレーダーをビジネスとして捉えた時の必要な能力や葛藤。日経平均先物取引、日経225オプション取引、日経225先物取引、解説。投資初心者で大丈夫。

中国各地で洪水被害拡大‥共産党の優先順位は被災者救済よりも体制保全 by榊淳司
5.0 / 5 (0 votes)
