Shift Register : Serial In Serial Out (SISO) Register Explained | Bidirectional Shift Register
Summary
TLDRThis video from the ALL ABOUT ELECTRONICS YouTube channel delves into the workings of the Serial IN Serial OUT (SISO) shift register, explaining its two types: shift right and shift left. It illustrates how data moves through a shift right register using a 4-bit example, detailing the process with clock pulses and flip-flops. The video also touches on the control of the input line with an enable signal and the use of multiplexers for input control, concluding with the applications of SISO registers in arithmetic operations and time delays.
Takeaways
- 😀 The video explains what a shift register is and its different types, focusing on the Serial IN Serial OUT (SISO) type.
- 🔄 SISO shift registers can shift data either to the right or to the left, with two types discussed: shift right and shift left.
- 👉 In a shift right SISO register, data enters from the left and moves right, with the diagram of a 4-bit version provided for clarity.
- 💾 The data movement in a shift register is illustrated with an example of storing the binary sequence 1010.
- ⏱ The importance of clock pulses in moving data through the flip flops of the shift register is highlighted.
- 📊 The script includes a detailed explanation of how data is shifted bit by bit with each clock edge in a shift right register.
- 📈 A timing diagram is used to visualize the shifting process, showing the outputs of flip flops at each clock pulse.
- 🔧 The video mentions the need to control the input line to prevent random data entry into the shift register.
- 🔄 The concept of a bi-directional shift register is introduced, allowing data to be shifted both left and right.
- 🛠️ The use of 2x1 multiplexers to control the direction of data shift in bi-directional shift registers is explained.
- 🔑 The applications of SISO shift registers in arithmetic operations and time delays are briefly mentioned as areas for future discussion.
- 📚 The video concludes by inviting viewers to ask questions, suggest improvements, and engage with the channel for more educational content.
Q & A
What is a shift register and what are its types?
-A shift register is a type of digital memory storage device that stores data in a sequence of flip-flops. It comes in various types, including Serial In Serial Out (SISO), Serial In Parallel Out (SIPO), and Parallel In Serial Out (PISO).
How does data enter and exit a SISO shift register?
-In a SISO shift register, data is entered serially into the register and is also taken out serially, which means it moves in a single-bit stream both in and out of the register.
What are the two types of SISO shift registers based on data shifting direction?
-The two types of SISO shift registers are shift right and shift left registers. In a shift right register, data moves from left to right, while in a shift left register, data moves from right to left.
Can you explain the concept of a 4-bit shift right type of SISO register?
-A 4-bit shift right type of SISO register consists of four flip-flops connected in series, where the output of one flip-flop is connected to the input of the next. Data is entered from the leftmost flip-flop and moves rightward, exiting from the rightmost flip-flop.
How does the data move within a shift right type of SISO register?
-Data moves within a shift right type of SISO register through a series of clock pulses. Starting from the LSB, each bit is shifted in, and the data in the register moves rightward, with the oldest bit being discarded at the rightmost flip-flop after each clock pulse.
What is the significance of the clock pulse in a shift register?
-The clock pulse is crucial in a shift register as it triggers the flip-flops to store new data and shift existing data. The data moves from one flip-flop to the next in synchronization with the clock pulses.
How is the propagation delay of flip-flops relevant to the output of a shift register?
-The propagation delay of flip-flops is the time it takes for the output to respond to changes at the input. This delay affects the timing of data movement within the shift register and must be accounted for to ensure accurate data shifting.
What is the purpose of the enable input in a shift register?
-The enable input allows control over the input line of a shift register. When high, it enables data shifting; when low, it prevents new data from entering, effectively freezing the current state of the register.
Can you describe the role of a 2x1 multiplexer in controlling the input line of a shift register?
-A 2x1 multiplexer is used to control the input line of a shift register based on the state of the enable input. When the enable input is high, the multiplexer connects the data input to the flip-flops, allowing data shifting. When the enable input is low, the multiplexer connects the output of the flip-flop back to its input, retaining the current state.
What are the typical applications of SISO shift registers?
-SISO shift registers are typically used for arithmetic operations and providing time delays. They can also be used in bi-directional shift registers to move data either left to right or right to left, depending on the operation required.
How does a bi-directional shift register differ from a standard SISO register?
-A bi-directional shift register allows data to be shifted both left to right and right to left, depending on the control signals. It uses additional circuitry, such as 2x1 multiplexers, to control the direction of data flow, making it versatile for various applications.
Outlines

Dieser Bereich ist nur für Premium-Benutzer verfügbar. Bitte führen Sie ein Upgrade durch, um auf diesen Abschnitt zuzugreifen.
Upgrade durchführenMindmap

Dieser Bereich ist nur für Premium-Benutzer verfügbar. Bitte führen Sie ein Upgrade durch, um auf diesen Abschnitt zuzugreifen.
Upgrade durchführenKeywords

Dieser Bereich ist nur für Premium-Benutzer verfügbar. Bitte führen Sie ein Upgrade durch, um auf diesen Abschnitt zuzugreifen.
Upgrade durchführenHighlights

Dieser Bereich ist nur für Premium-Benutzer verfügbar. Bitte führen Sie ein Upgrade durch, um auf diesen Abschnitt zuzugreifen.
Upgrade durchführenTranscripts

Dieser Bereich ist nur für Premium-Benutzer verfügbar. Bitte führen Sie ein Upgrade durch, um auf diesen Abschnitt zuzugreifen.
Upgrade durchführenWeitere ähnliche Videos ansehen

Mengenal Register Siso ,Sipo,Piso ,Pipo

How Shift Registers Work - The Learning Circuit

Introduction to Registers | What is Shift Register? Types of Shift Registers
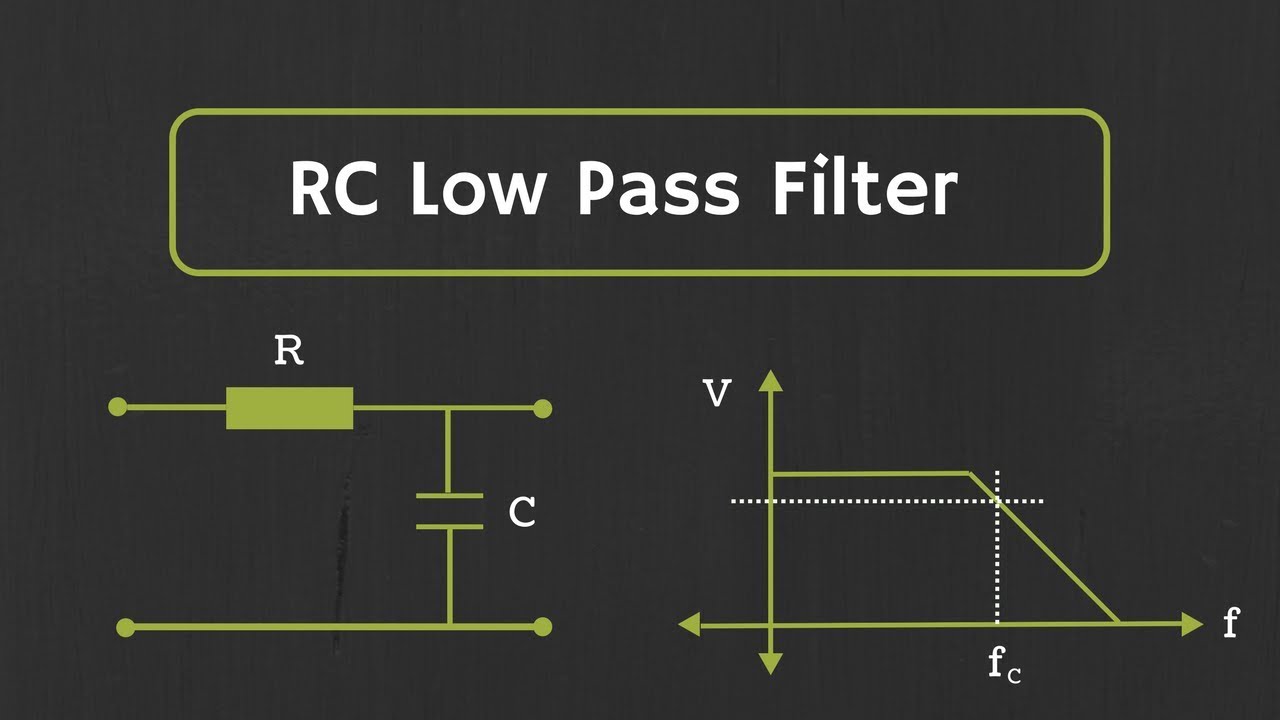
RC Low Pass Filter Explained
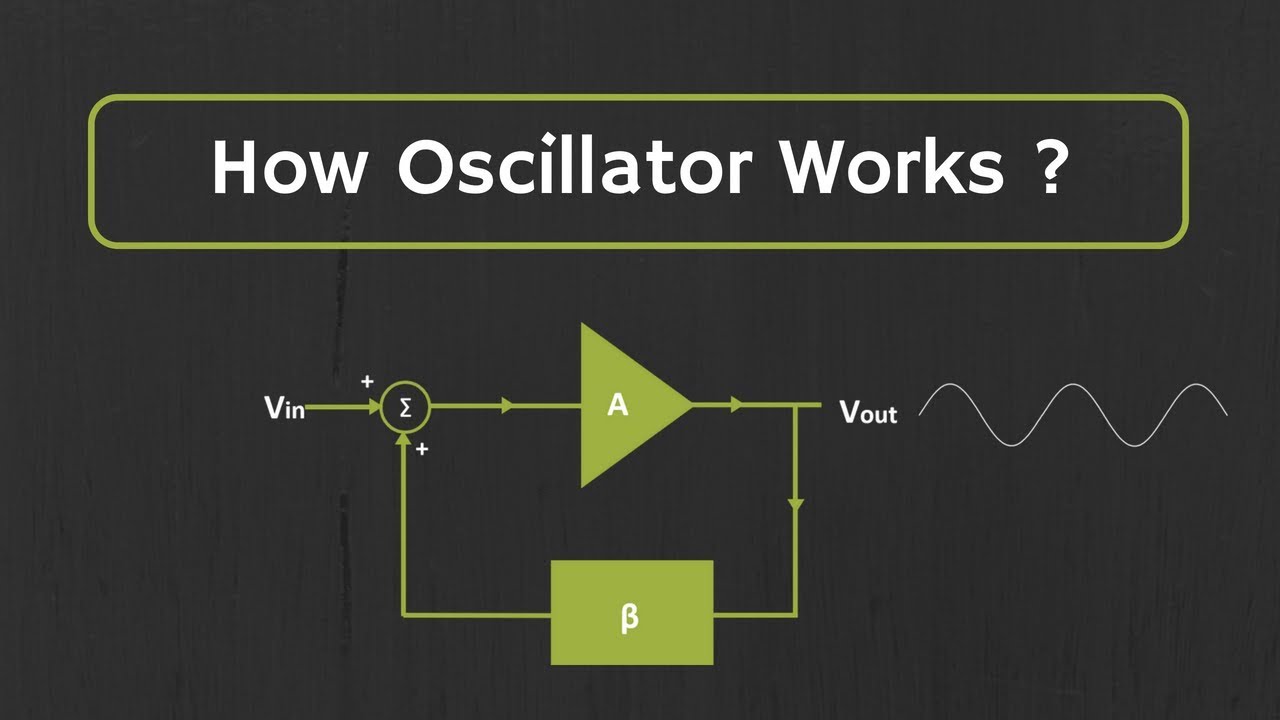
How Oscillator Works ? The Working Principle of the Oscillator Explained

Lec-76: What is Schedule | Serial Vs Parallel Schedule | Database Management System
5.0 / 5 (0 votes)
