This CHANGED My Editing... Learn Lightroom Curves In 20 Minutes
Summary
TLDRThis Lightroom tutorial simplifies the complex Tone Curve tool, making it accessible for beginners while offering advanced techniques for seasoned editors. It covers how to adjust brightness and contrast in specific image areas (highlights, shadows, midtones) and fine-tune colors using RGB curves. The tutorial also demonstrates how to improve skin tones, add subtle color grading, and apply selective adjustments using masks. With practical examples, you'll gain better control over your images, transforming your workflow and enhancing your editing precision. Whether you're a beginner or experienced, this guide helps you harness the full potential of the Tone Curve.
Takeaways
- 😀 Tone curves allow precise control over brightness and contrast in specific areas of an image, beyond global adjustments.
- 😀 Gray curves adjust overall image tones without affecting color, while RGB curves control individual color channels.
- 😀 Digital images use red, green, and blue as primary colors because human eyes perceive color through these wavelengths.
- 😀 Adding points on the tone curve lets you target specific tonal ranges, such as shadows, midtones, or highlights.
- 😀 S-curves (lifting highlights, lowering shadows) enhance contrast effectively, while adjusting whites and blacks can create vintage fades.
- 😀 Copying tone curve adjustments across RGB channels preserves contrast while allowing further selective color tweaks.
- 😀 Tone curves can achieve selective color grading, such as enhancing blues in shadows or adjusting warm highlights, which is more precise than using the HSL panel or color grading tools alone.
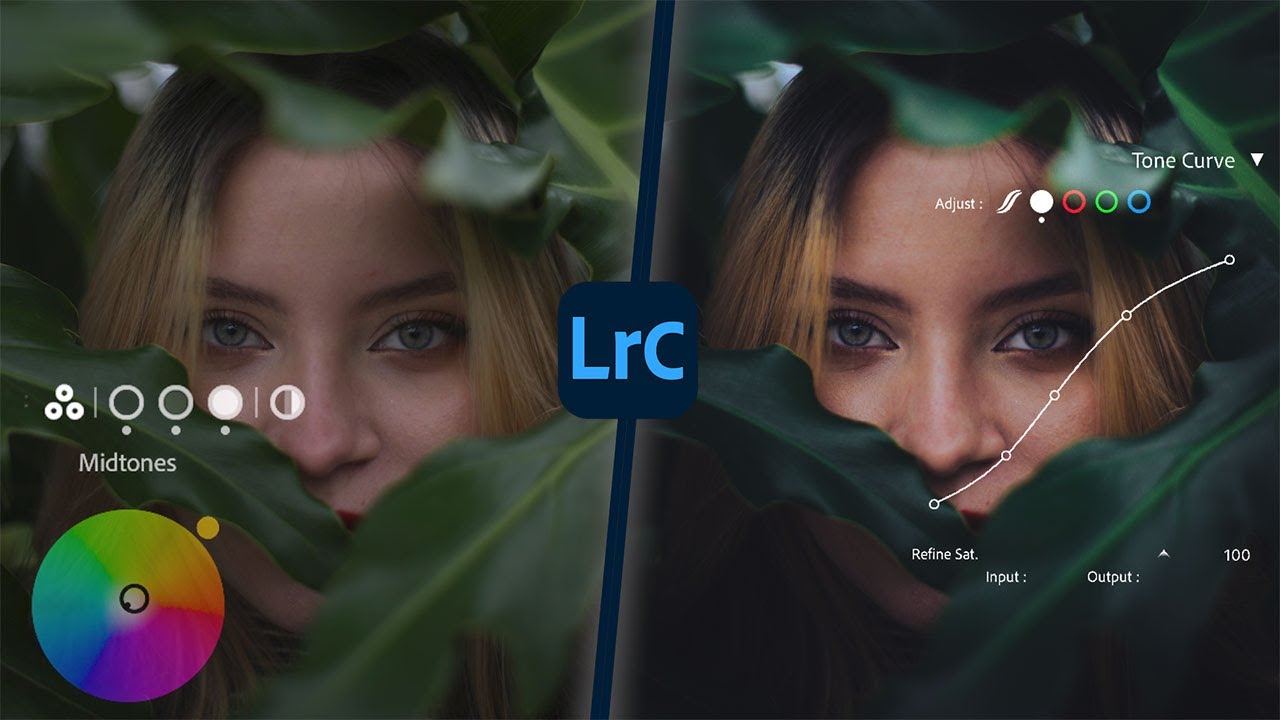
- 😀 Using masks with tone curves enables advanced edits like smoothing skin tones and correcting harsh lighting on portraits.
- 😀 Fine adjustments can be made using Option/Alt key or arrow keys for precise control over points on the curve.
- 😀 Combining tone curves with other Lightroom tools (HSL, color grading, main adjustments) provides maximum flexibility and creative control.
- 😀 Tone curves are not only for contrast and brightness; they can subtly add color grading effects, recover detail, and enhance specific image areas selectively.
Q & A
What is the primary purpose of using the tone curve in Lightroom?
-The tone curve in Lightroom allows for precise adjustments to the brightness and contrast of an image, enabling users to fine-tune shadows, midtones, and highlights. It offers a more detailed level of control compared to general sliders like contrast or exposure adjustments.
How do the two gray curves in the tone curve panel function?
-The two gray curves represent all tones in an image. The left side controls the blacks (darkest tones), and the right side controls the whites (lightest tones). By adjusting these curves, you can increase or decrease the brightness of specific tonal areas without affecting the colors.
What is the role of the red, green, and blue curves in the tone curve panel?
-The red, green, and blue curves allow users to adjust the specific color channels in an image. This enables selective color grading, such as making shadows more green or highlights more red, to fine-tune the color balance and mood of an image.
Why does the tone curve display as a diagonal line?
-The diagonal line represents the relationship between brightness levels in the image, with blacks at the bottom (0% brightness) and whites at the top (100% brightness). The curve is diagonal because it shows the natural progression of tones from dark to light across the image.
How does the tone curve compare to using the basic adjustment sliders in Lightroom?
-The basic adjustment sliders (like Highlights, Shadows, Whites, and Blacks) apply broad changes to the entire image. In contrast, the tone curve provides more specific control, allowing users to adjust very particular tonal areas for more precise edits.
Can the tone curve be used to adjust only specific areas of an image?
-Yes, the tone curve can be used to adjust specific areas of an image by adding points to the curve and moving them up or down. Additionally, you can use the point tool to isolate certain parts of the image (like shadows or highlights) and make targeted adjustments.
What is an 'S curve,' and how is it used in Lightroom?
-An 'S curve' refers to a tone curve that is shaped like the letter 'S.' It involves pulling the shadows down and pushing the highlights up, which increases contrast in the image. This technique is commonly used to enhance the overall contrast without affecting the midtones too drastically.
Why is it important to be subtle when using the tone curve on skin tones?
-Skin tones are delicate, and over-adjusting them with the tone curve can result in unnatural or harsh effects. Subtle adjustments, such as brightening shadows or lowering highlights, can smooth skin tones and make them appear more natural and flattering.
What is the advantage of using the tone curve over the color grading panel or HSL sliders?
-The tone curve offers more precise control over color and brightness than the HSL sliders or the color grading panel. While other tools adjust the image globally, the tone curve allows for targeted adjustments in specific tonal areas, which can lead to more refined and nuanced edits.
How can you create and use custom presets with the tone curve adjustments?
-Once you've dialed in your tone curve settings, you can save them as a custom preset in Lightroom. This allows you to apply the same adjustments to other images with a single click. The preset can include adjustments to the tone curve, color channels, and even masking tools like skin tone corrections.
Outlines

Dieser Bereich ist nur für Premium-Benutzer verfügbar. Bitte führen Sie ein Upgrade durch, um auf diesen Abschnitt zuzugreifen.
Upgrade durchführenMindmap

Dieser Bereich ist nur für Premium-Benutzer verfügbar. Bitte führen Sie ein Upgrade durch, um auf diesen Abschnitt zuzugreifen.
Upgrade durchführenKeywords

Dieser Bereich ist nur für Premium-Benutzer verfügbar. Bitte führen Sie ein Upgrade durch, um auf diesen Abschnitt zuzugreifen.
Upgrade durchführenHighlights

Dieser Bereich ist nur für Premium-Benutzer verfügbar. Bitte führen Sie ein Upgrade durch, um auf diesen Abschnitt zuzugreifen.
Upgrade durchführenTranscripts

Dieser Bereich ist nur für Premium-Benutzer verfügbar. Bitte führen Sie ein Upgrade durch, um auf diesen Abschnitt zuzugreifen.
Upgrade durchführen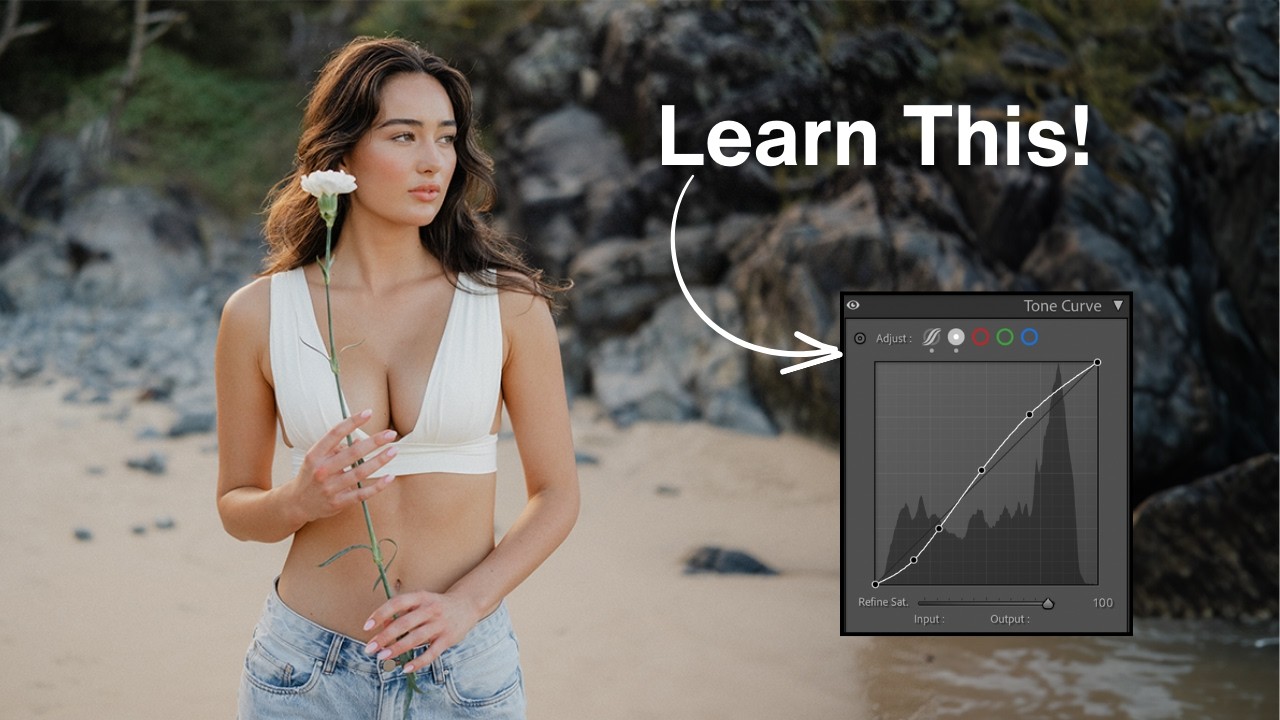


5.0 / 5 (0 votes)
