Tutorial konfigurasi dasar mikrotik beserta sharing file & sharing printer
Summary
TLDRIn this tutorial, the video demonstrates how to set up and configure a MikroTik router to connect to the internet, bridge multiple ports, create a Wi-Fi network, and manage internet speed. It also covers blocking websites, setting up a hotspot, sharing files, and network printing. Key steps include configuring IP addresses, setting up DHCP clients, creating a wireless network, limiting bandwidth, blocking access to specific websites, and sharing files and printers over the network. The video provides an easy-to-follow guide for beginners to set up and manage a MikroTik network.
Takeaways
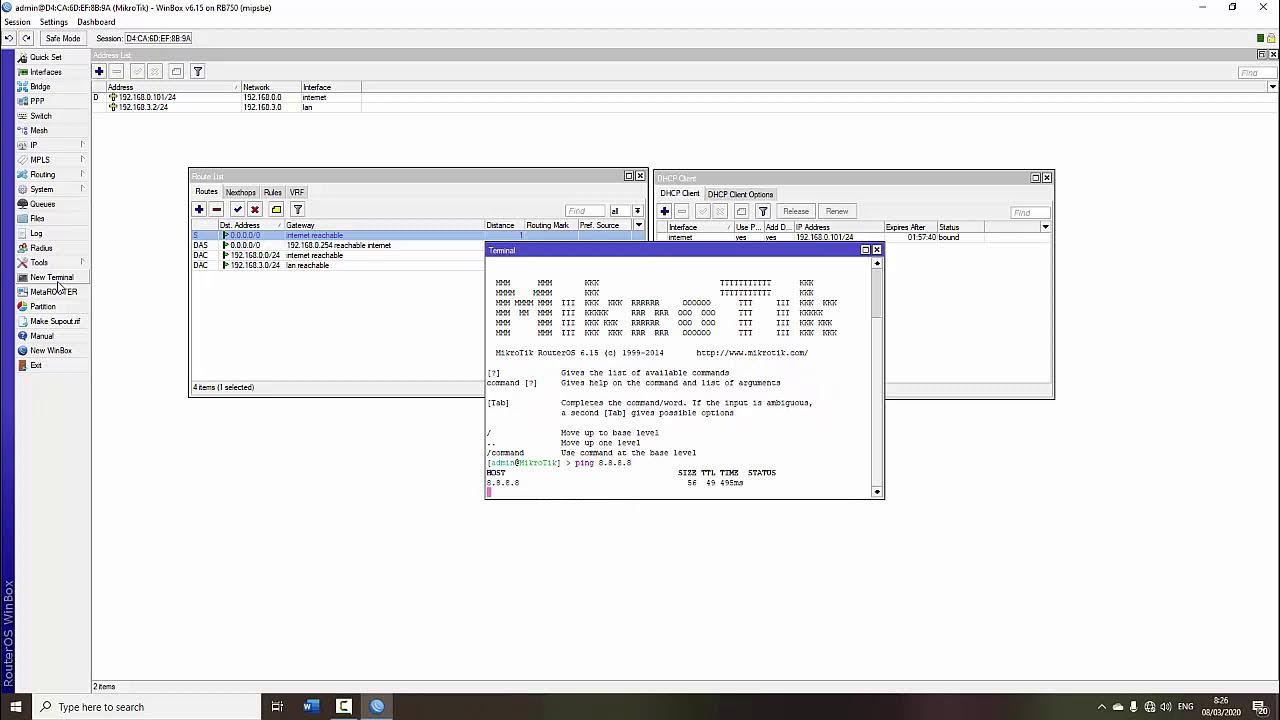
- 😀 Connect Mikrotik to the internet by setting up a DHCP client on the 'ether1' port.
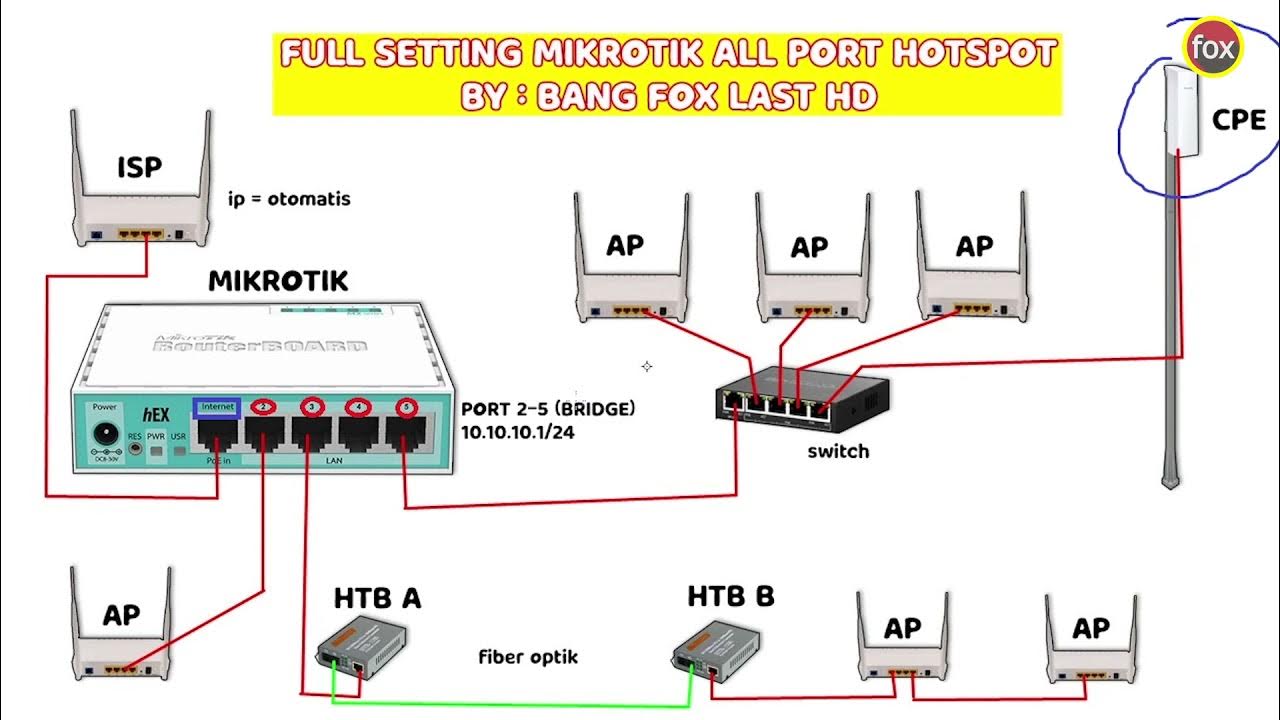
- 😀 Create a bridge on 'ether2', 'ether3', and 'ether4' ports to ensure they have the same IP address.
- 😀 Configure an IP address for the bridge and WLAN, for example, '10.0.0.1/8'.
- 😀 Set up a DHCP server for both the bridge and WLAN to automatically assign IP addresses.
- 😀 Add a firewall rule to allow internet connectivity by configuring NAT and interface settings.
- 😀 Set up a Wi-Fi network by enabling wireless settings, choosing WPA2 for security, and setting a password.
- 😀 Use Mikrotik's simple queue feature to limit internet speed for devices connected to the Wi-Fi network.
- 😀 Block specific websites using firewall rules and address lists, such as blocking a school website.
- 😀 Set up a hotspot server to manage user access, including creating user profiles and login pages.
- 😀 Share files between computers by setting up network sharing and ensuring the correct permissions.
- 😀 Share a printer on the network by configuring the printer on one computer and making it accessible from another.
Q & A
How do you connect MikroTik to the internet?
-To connect MikroTik to the internet, you need to enter the Winbox interface, go to the 'DHCP Client' section, and add 'ether1' to establish the internet connection.
What is the purpose of bridging ports on MikroTik?
-Bridging ports on MikroTik ensures that multiple ports (such as 'ether2', 'ether3', and 'ether4') share the same IP address, enabling devices connected to these ports to communicate under a single network.
How do you assign an IP address to a bridge on MikroTik?
-You assign an IP address to the bridge by navigating to 'IP' > 'Addresses', and then creating an address such as '10.0.0.1/8' for the newly created bridge.
How can you set up Wi-Fi on MikroTik?
-To set up Wi-Fi, go to the 'Wireless' section, enable Wi-Fi, select 'Bridge' mode, set a network name (SSID), and configure WPA2 security with a password.
What are the steps to limit Wi-Fi speed on MikroTik?
-To limit Wi-Fi speed, go to 'Simple Queue', add a new rule targeting the 'WLAN' interface, and set the maximum speed limit (e.g., 5MB).
How do you block a website using MikroTik?
-To block a website, add the website's IP address to the 'Address List' in the 'Firewall' section, and then add a firewall filter rule to drop packets to that address.
What is the process for creating a hotspot on MikroTik?
-To create a hotspot, navigate to 'IP' > 'Hotspot', and run the 'Hotspot Setup'. Follow the steps to configure the hotspot DNS name, admin credentials, and user profiles.
How do you share files between two computers using MikroTik?
-To share files, set up a shared folder on the first computer, enable network sharing, and on the second computer, access the shared folder using the first computer’s IP address.
How do you share a printer between two computers in a network?
-To share a printer, go to 'Control Panel' > 'Devices and Printers', set up the printer for sharing, and on the second computer, access the shared printer through the network.
What is the significance of DHCP server configuration on MikroTik?
-The DHCP server configuration on MikroTik automatically assigns IP addresses to devices on the network, simplifying the management of network connections and IP allocations.
Outlines

Dieser Bereich ist nur für Premium-Benutzer verfügbar. Bitte führen Sie ein Upgrade durch, um auf diesen Abschnitt zuzugreifen.
Upgrade durchführenMindmap

Dieser Bereich ist nur für Premium-Benutzer verfügbar. Bitte führen Sie ein Upgrade durch, um auf diesen Abschnitt zuzugreifen.
Upgrade durchführenKeywords

Dieser Bereich ist nur für Premium-Benutzer verfügbar. Bitte führen Sie ein Upgrade durch, um auf diesen Abschnitt zuzugreifen.
Upgrade durchführenHighlights

Dieser Bereich ist nur für Premium-Benutzer verfügbar. Bitte führen Sie ein Upgrade durch, um auf diesen Abschnitt zuzugreifen.
Upgrade durchführenTranscripts

Dieser Bereich ist nur für Premium-Benutzer verfügbar. Bitte führen Sie ein Upgrade durch, um auf diesen Abschnitt zuzugreifen.
Upgrade durchführenWeitere ähnliche Videos ansehen
Full Setting Mikrotik Semua Port Bridge untuk Mode Hotspot Voucheran + Topologi Settingan Mikrotik
TUTORIAL DASAR MIKROTIK (KONEKSI INTERNET)
Setting Router Mikrotik RB750 sampai Konek ke Internet (Untuk Pemula)

Cara Cepat Seting Internet dan Wireless Mikrotik hAP Lite RB941-2nd
How to setup Mikrotik to access the Internet
LOAD BALANCE - Menggabungkan 2 Koneksi Internet dengan MIKROTIK
5.0 / 5 (0 votes)
