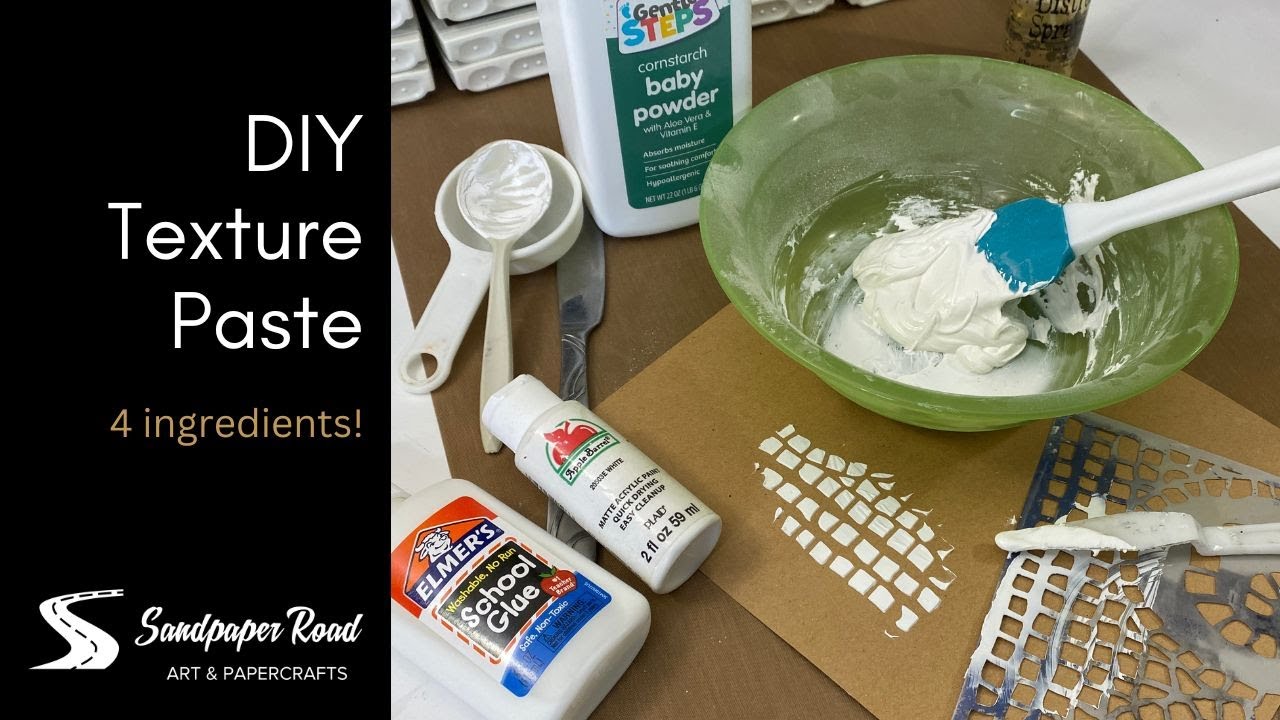
2 Different Ways to Make Diy Texture Paste : Baby Powder & Baking Soda
Summary
TLDRIn this creative tutorial, Chris demonstrates how to make homemade texture paste using simple, affordable ingredients like PVA glue, baby powder or baking soda, and acrylic paint. The video explores two different recipes, comparing their drying times and suitability for various craft projects such as card-making or box decoration. Viewers learn to achieve a 3D effect with their paste, and are encouraged to experiment with different colors and mediums to enhance their craft projects, all while keeping costs low and creativity high.
Takeaways
- 🎨 The video is a DIY tutorial on creating texture paste using common household items.
- 🔍 Two different recipes for texture paste are demonstrated: one using baby powder and the other using baking soda.
- 🛠 The main ingredients for both recipes include PVA glue (Elmer's glue), acrylic paint, and either baby powder or baking soda.
- 👶 For the baby powder recipe, the process involves mixing baby powder, glue, and white acrylic paint, adjusting the consistency with tap water if needed.
- 🧂 The baking soda recipe is similar, substituting baking soda for baby powder and potentially adding more due to its different absorbency.
- 🎭 The texture paste can be used for various craft projects, such as card-making or decorating boxes, and can be applied in thick layers for a 3D effect.
- 🖌️ Acrylic paint can be used in any color for the texture paste, allowing for customization and the possibility of layering different colors.
- 🕰️ The drying time for the texture paste may vary depending on thickness and room temperature, potentially taking hours or overnight to fully dry.
- 📏 A stencil is used in the demonstration to apply the paste in a specific pattern, but the paste can also be used freehand or with other tools.
- 🔄 The final dried texture can be tested for sturdiness by gently scraping or pressing it, with the baby powder paste holding its shape better initially.
- 🌈 The video suggests experimenting with different colors, adding sand for extra texture, and using the paste with other mediums like watercolors or alcohol inks once dry.
Q & A
What is the main purpose of the video?
-The main purpose of the video is to demonstrate how to make texture paste using two different recipes and to explore the differences in how they dry and their suitability for various craft projects.
What are the three main ingredients used in the first texture paste recipe?
-The three main ingredients used in the first texture paste recipe are PVA glue (specifically Elmer's glue), baby powder, and white acrylic paint.
What is the reason for using an airtight container to store the texture paste?
-An airtight container is used to store the texture paste to ensure it remains usable for a long time, preventing it from drying out or developing a bad smell over time.
Why might one consider using distilled water instead of tap water in the texture paste?
-Distilled water is suggested for use in the texture paste to prevent it from going bad or developing a bad smell over time, as tap water may contain minerals or impurities that could affect the paste's longevity.
What is the suggested method for mixing the texture paste ingredients?
-The suggested method for mixing the texture paste ingredients is to go slow to avoid creating a mess, and to mix everything well before adding water to achieve the desired consistency.
What type of effect does the texture paste made with baby powder aim to achieve?
-The texture paste made with baby powder aims to achieve a thick, 3D effect that maintains its shape and does not fluff down after drying.
What is the purpose of using a stencil when applying the texture paste?
-A stencil is used when applying the texture paste to create a specific pattern or design on the surface, such as a cardstock or a box.
What is the second ingredient used in the alternative texture paste recipe?
-The second ingredient used in the alternative texture paste recipe is baking soda, which is expected to give the paste a little grip and grit.
What is the concern with the texture paste made with baking soda?
-The concern with the texture paste made with baking soda is whether it will maintain its raised, 3D effect after drying, as it has a puffy and airy texture similar to that of a cake made with baking powder.
What is the final step before applying the texture paste to a project?
-The final step before applying the texture paste to a project is to ensure that the stencil is securely in place and then to apply the paste in a thick manner, covering the stencil well.
What are some potential uses for the homemade texture paste?
-Potential uses for the homemade texture paste include decorating cards, upcycling old boxes, or giving a different look to items like vases.
What is the recommended waiting time for the texture paste to dry completely?
-It is recommended to wait at least overnight for the texture paste to dry completely to ensure it is thoroughly dry and maintains its shape and texture.
How can one modify the texture paste to create more tooth or grip?
-One can modify the texture paste to create more tooth or grip by adding sand to either the baby powder or baking soda based paste.
What are some possible mediums that can be used on top of the dried texture paste?
-Possible mediums that can be used on top of the dried texture paste include watercolors, alcohol inks, and other types of paint.
Outlines
🎨 DIY Texture Paste with Baby Powder and Glue
In this segment, Chris introduces a project to create homemade texture paste using simple ingredients like PVA glue, baby powder, and acrylic paint. The purpose is to explore the paste's usability for crafting projects such as card-making or decorating boxes. Chris demonstrates how to mix these ingredients in small batches, adjusting the consistency by adding water if necessary. The paste should be thick to create a 3D effect and can be stored in an airtight container for long-term use. The process emphasizes precision and care to avoid mess, with the final texture paste expected to hold its shape once dried.
🖌️ Applying Texture Paste through Stencil on Cardstock
Chris proceeds to apply the homemade texture paste onto black cardstock using a stencil. The aim is to achieve a thick and even application to create a 3D effect. The video emphasizes the quick and economical nature of the project, suggesting that no expensive materials are needed. Chris adds more paste to ensure full coverage of the stencil and notes the paste's ease of application without lumps. After applying a generous amount, Chris leaves the paste to dry, comparing the texture to puffy paint and speculating on whether it will maintain its raised form once dry.
🎨 Experimenting with Baking Soda Texture Paste
In this part, Chris experiments with a second recipe for texture paste, substituting baby powder with baking soda to introduce a grittier texture. The process involves mixing baking soda, glue, and acrylic paint, resulting in a fluffy and airy texture. Chris applies this paste using a stencil and a different color, red, to compare the effects with the previous baby powder paste. The concern is whether the baking soda paste will maintain its volume after drying, as it feels squishy to the touch. The video showcases the raised texture of the paste before it is left to dry completely.
🔍 Evaluating the Drying Process and Final Texture Effects
Chris returns after an hour to assess the drying process of the texture pastes applied earlier. The baby powder paste on black cardstock is not yet dry, while the baking soda paste appears to be drying but remains squishy to the touch. It is noted that drying times may vary depending on room temperature and thickness of the paste. Chris anticipates that both pastes will maintain their 3D effect once fully dried, but advises waiting overnight for best results. The final segment also suggests potential uses for the dried texture paste, such as upcycling boxes or vases, and hints at future experiments with different mediums and colors on the dried paste.
📣 Conclusion and Call for Tutorial Ideas
Chris concludes the video by encouraging viewers to try making their own texture paste with easily available and affordable materials like baby powder and baking soda. The video highlights the versatility of the texture paste for various decorative applications. Chris invites viewers to give feedback, subscribe for more tutorials, and share the video on social media. There is also an open call for tutorial ideas from the audience, with Chris expressing willingness to create content based on viewer suggestions and available materials.
Mindmap
Keywords
💡Texture Paste
💡PVA Glue
💡Baby Powder
💡Acrylic Paints
💡Airtight Container
💡Stencil
💡Baking Soda
💡3D Effect
💡Upcycling
💡Crafting
Highlights
Introduction to making homemade texture paste with two different recipes.
Using three main ingredients: PVA glue, baby powder, and acrylic paint.
Option to use Elmer's glue or any other preferred brand.
The first recipe involves mixing baby powder with white paint and glue.
Suggestion to use distilled water for longer shelf life of the paste.
Adding tap water if needed to adjust the consistency of the paste.
Instructions for mixing the paste slowly to avoid mess.
Adding water gradually to achieve the desired paste thickness.
Applying the paste through a stencil onto black cardstock for a 3D effect.
Demonstration of the paste application process without any lumps.
Comparison of the texture paste to commercial texture pieces.
The second recipe uses baking soda instead of baby powder.
Baking soda provides a gritty texture to the paste.
Application of the baking soda paste with a red color.
Observation of the paste's texture and its similarity to puffy paint.
Concerns about the paste's ability to maintain its shape after drying.
Results after an hour show the baby powder paste is still wet.
The baking soda paste seems to be drying faster and maintaining its 3D shape.
Recommendation to wait overnight for complete drying.
Final assessment of the texture and potential uses of the paste.
Suggestion to add sand for more tooth to the texture paste.
Encouragement to try the DIY texture paste for various decoration purposes.
Invitation for viewers to share tutorial ideas and feedback.
Transcripts
[Music]
hi everybody this is Chris thank you for
joining me in today's video we're going
to be making our own texture paste and
I'm gonna do two different to see if
there is a real difference and how do
they dry and is it really good for using
on your projects maybe on for
card-making or just for decorating a box
for example so it's gonna be very simple
we're gonna use three main ingredients
I'm gonna be using a PVA glue I'm gonna
use Elmer's glue you can use whatever
you want or you what you have for the
first recipe we're going to use a baby
powder and we're going to use also some
acrylic paints so I'm gonna use white
acrylic paint you can do that in any
color you wish I think what it's nice
because you can always come back over it
and put another color or you can do
small batches in different colors
apparently you can keep these in an
airtight container for a very long time
if it was to use on a very long time I
would probably not add water or I would
use distilled water because it might go
bad over time and have a bad smell to it
but in case it's just for now you want
to use it very quickly you can also add
a little bit of tap water I have tap
water here just in case I need a little
bit more because Elmer's glue doesn't
have that much water that school glue
has for example so I'm gonna do small
batches here so I'm just gonna use a
tablespoon
I've already did one I already tried it
out and it seems really nice so first
I'm gonna do I'm gonna use two
tablespoons of baby powder or talcum
also called and you can see I'm not
exactly very precise you can add more if
you want to and also more glue I'm gonna
add one spoon of white paint
and this is quite thick so I might need
to add a little bit of water and I'm
going to use one tablespoon as well of
glue
and because it's going to have a
horrible noise and I'm gonna use the
plastic spoon here to mix it up that's
gonna be fine don't forget you have a
airtight container next to you and we're
gonna start mixing go slow because
otherwise you're gonna have above this
baby powder floating in the air and on
your table is gonna be a big mess but if
you go slow it's gonna be just right and
before adding water I'm gonna really
start mixing everything really well it
seems like yes I'm gonna need a little
bit of water here just a tiny but don't
add too much if you add too much you
might need to add a bit more baby powder
it doesn't matter and you can also have
this more pasty more liquidy that's
really up to you what you want to have
this one is really thick I'm gonna add
just a tiny bit of water
I want it fairly thick because I want to
have texture I want to have the 3d
effect I don't want it to be running
like any texture piece you can find on
the market it's usually quite thick so
make sure that you scrape all the sides
and of course this is a small batch you
can do much more it's very smooth I
think it's a bit too liquidy for me I
don't know if you can see that so I'm
going to add a little bit more of baby
powder let's see how it goes it seems
like the baby powder is absorbing quite
a lot of them of the liquid here so I'm
going slow it's still a little bit
liquidy for me I want something a little
thicker okay I think I like this
consistency now I've added a little bit
more and this is quite thick as you can
see it's quite thick and I think I'm
gonna like that better because I know
that it's gonna take or hopefully it's
gonna keep its shape and it's not going
to fluff down afterwards but we'll see
when it dries completely so now I'm
gonna take a piece of paper I'm gonna
use a black cardstock and I'm gonna use
a stencil here and I'm going to apply
this in on a thick way just not scraping
it being really over going over it in a
very thick matter I'm going to use a
little bit more here quite a lot
actually not a little bit but quite a
lot more
I haven't taped down my um my stencil I
guess I should have done that before so
I'm gonna try not to move I'm gonna use
a bit more here and you can do this
really at the very last minute because
it doesn't take long it doesn't take it
takes about a minute you mix everything
maybe add a little more not glue I
wouldn't use more glue but I would
probably add a bit more maybe powder if
you want to have it thicker alright it's
really nice to apply I don't have any
issues there are no lumps I'm going to
apply a little bit more on that side
here so as you can see I'm really
covering my stencil very well you don't
see it anymore all right I'm gonna tick
it off oh that's nice oh if that's
really nice I'm not going to take this
away because there's a whole big layer
here so I'm going to put it back into
this and then I will put it into a
airtight container but look at this I'm
going to show you the volume the 3d
effect that it
all right can you see this it's really
high it's really raised I hope you'll be
able to see that and it was really done
in a minute no time consuming very
economical everybody has school glue or
Elmer's glue
baby powder also you can you don't need
to buy a very expensive brand for this
just say cheapo one is gonna do the
trick I'm going to put this aside I'm
going to clean up my tools and I'll be
back to do the second batch using baking
soda because it's going to give a little
grip a little grit to the texture and
we'll see how again is going to behave
after drying I don't think this one is
going to go flutter then this I think is
going to hold its shape and we'll
compare this with the other one so see
you in a second alright so now we're
going to do the same using the baking
powder baking soda if you prefer baking
soda and I'm going to put a little bit
more because it doesn't really add the
same way as the baby powder it seems to
be less absorbent in some way so I need
to put a little bit more to get the same
amount that's what I I I found I'm gonna
put the same amount though of glue
alright about a tablespoon of glue and I
will put also a tablespoon of white
acrylic paint and this is quite a heavy
body paint but you can use whatever
paint you have really you shouldn't buy
anything expensive for this baking soda
is also really cheap and it's good for a
lot of things in your house can clean up
a lot of things with baking soda right
I'm going to put this aside and we're
gonna mix as well
it's funny because the texture looks
like puffy paint it looks like like you
when you make a cake and you use baking
powder to in your cake it has the same
feeling there's some great to it but it
also it seems very Airy very fluffy like
if there was a lot of air in it so I
don't know when it's gonna dry is it
gonna keep its shape is it gonna stay
you know high and raised or is it going
to go down and flat there are no lumps
that's good and the texture is quite
nice actually I'm not gonna add anything
no water for short all right now I'm
going to use another color I'm going to
use red for this one here I'm going to
use the same stencil and we're going to
apply this paste and I'm sure if you
want to have more texture to this
texture paste you could also use and add
some sand
it's really nice to apply no resistance
it's not difficult at all I'm going to
add more here I can see I don't have
enough and I think it would be nice if
you want to cover or upcycle an old box
for example that is you don't like
anymore or maybe on a vase or something
that would be nice I think to apply it
you have anymore a different look to it
okay a little bit more up there just
want to make sure I'm going to have it
more or less the same height as on my
other example with a baby powder and see
how it goes that is it going to flatten
out that's the only worry I have because
that's what can happen with a cake it
looks beautiful when you take it out of
the the oven and then it goes mmm goes
down all right I'm gonna stop it here
I'm going to take my stencil away
I'm gonna scrape it and I'm gonna show
you how it's going so far so again it's
really raised I'm gonna show you this
right now can you see this it's raised
as at least as much as the other so
right now it's fine I'm gonna let it to
try and I'll come back afterwards to
show you the final result and see if it
stayed in place or not so here I am it's
about an hour later and I wanted to see
if it was already dry this one seems to
be dry the first one on the black
cardstock was made out of baby powder
and it's not yet dry I think depending
on the room temperature it might take
between I don't know two three hours
maybe overnight to make sure because
this one especially was quite thick okay
so it's gonna take time to dry not only
on the surface but um all the depth of
it so that's really important because
otherwise if you put something on it
it's gonna be squishy and you're gonna
damage it but I like the fact that it
didn't move it out it's still very very
3d let me show you this so it didn't
move it's still really raised and it's
absolutely perfect this one there's not
much on it so as you can see I can
scrape it of course if I would scrape it
hard it would go away but if I just put
my finger on top it's not running
there's no powder going away so that's
perfect I'm really happy with it and I
would wait probably until tomorrow
overnight to make sure it's completely
dry and when you look at the back of it
it's not really working you can't just
see the little spots where I put my
paste but it didn't buckle that much so
I would put this on a layer and then
glue it onto your card or if you want
maybe to upcycle a box that would be
perfect just on top and I love the fact
that it's really nice everywhere and I
love the effect on this side was the one
using the baking soda and look at this
after I think it's even over an hour it
is still really well raised you've got
some really well raised
three the effect I love this it I don't
think that it went down actually but
it's certainly not if I show you this if
I put my finger in there it's it's a
little bit squishy okay so this means
that it's drawing on the surface if I
put my finger there nothing is going off
but it's just that it's very squishy you
can see my fingernails there so again I
would wait at least overnight to make
sure that it's completely dry but I love
the texture so let me come here I'm
gonna scratch this one normal paste
nothing unusual and this one here I'm
gonna try there okay I'm scratching a
bit too hard but it's really sexy like
if there was a little bit of sand and
you could put sand in here whether this
one or the other one you could put sand
do you have even more tooth to it and I
think it's really interesting this
wooden looks really puffy and this one
it looks a little harder but both are
really nice are gonna have different
effects so give it a try and it this is
so cheap and it's it's really nice for
all kinds of decorations so I would give
it a try
you can find baby powder everywhere you
can find baking soda almost everywhere
some people use it again for cooking so
really easy and so cheap to do and again
if you want to do very small batches
just change the color of your paint use
it a different way when it will be
completely dry I will try to put I think
is going to be pours on either of the
two examples so you could even come over
next once it's all dry completely dry
maybe with watercolor we'll see what we
can do with these was also alcoholic
eggs and things like that
do you see how it moves along and how it
it reacts to different kinds of other
mediums and colors so please if you
liked this video give me thumbs some
thumbs up don't forget to subscribe and
hit the bell buttons you know every time
I put out a new video and don't free
to share in social medias and if you
have any kind of tutorial ideas that you
would like me to do please leave me your
comments below I will do it with my with
big pleasure if I do have the materials
or if they're not too expensive to buy
so thank you again see you soon for
other tutorials and take care bye bye
Weitere verwandte Videos ansehen
![](https://i.ytimg.com/vi/obJRs63dPiI/hq720.jpg)
DIY Texture Paste
![](https://i.ytimg.com/vi/eqFzrK0YNNY/hq720.jpg)
How To Use Baking Soda to Kill Pests - COCKROACHES, BEDBUGS, ANTS, MICE, Etc
![](https://i.ytimg.com/vi/sGrZClpDySA/hq720.jpg)
How to Make Taiyaki (Recipe) 鯛焼きの作り方(レシピ)
![](https://i.ytimg.com/vi/bLhzgDCrT3o/hq720.jpg)
🎨 Tutorial Pittura ad Olio: Pennelli per Effetti Magici nei Paesaggi! 🌳🌼🌊 #ArtePaesaggistica
![](https://i.ytimg.com/vi/qjw1M12Rcho/hq720.jpg)
Make A Bike Tire in Blender With A Non-Destructive Modelling Workflow
![](https://i.ytimg.com/vi/Yf9xo4g3bBc/hq720.jpg)
How Easy Can Sketching Be? The Answer Might SURPRISE you!
5.0 / 5 (0 votes)