TUTORIAL AUTODESK INVENTOR UNTUK PEMULA PART 1
Summary
TLDRThis tutorial walks users through creating a simple 3D model using Autodesk Inventor 2017. The instructor demonstrates how to work with isometric drawings and various dimensions, starting with a basic rectangle sketch and adding specific measurements. The guide covers techniques like using the isometric view, creating half-circles, and adding intricate details, such as thickness adjustments and direction settings. It provides step-by-step instructions on rotating the model and finalizing the design. The video encourages viewers to practice these skills, like making cuts and adjustments, to improve their 3D modeling proficiency.
Takeaways
- 😀 The tutorial aims to create a simple 3D model using Autodesk Inventor 2017.
- 🔧 The model is built using student-friendly methods and an isometric drawing for guidance.
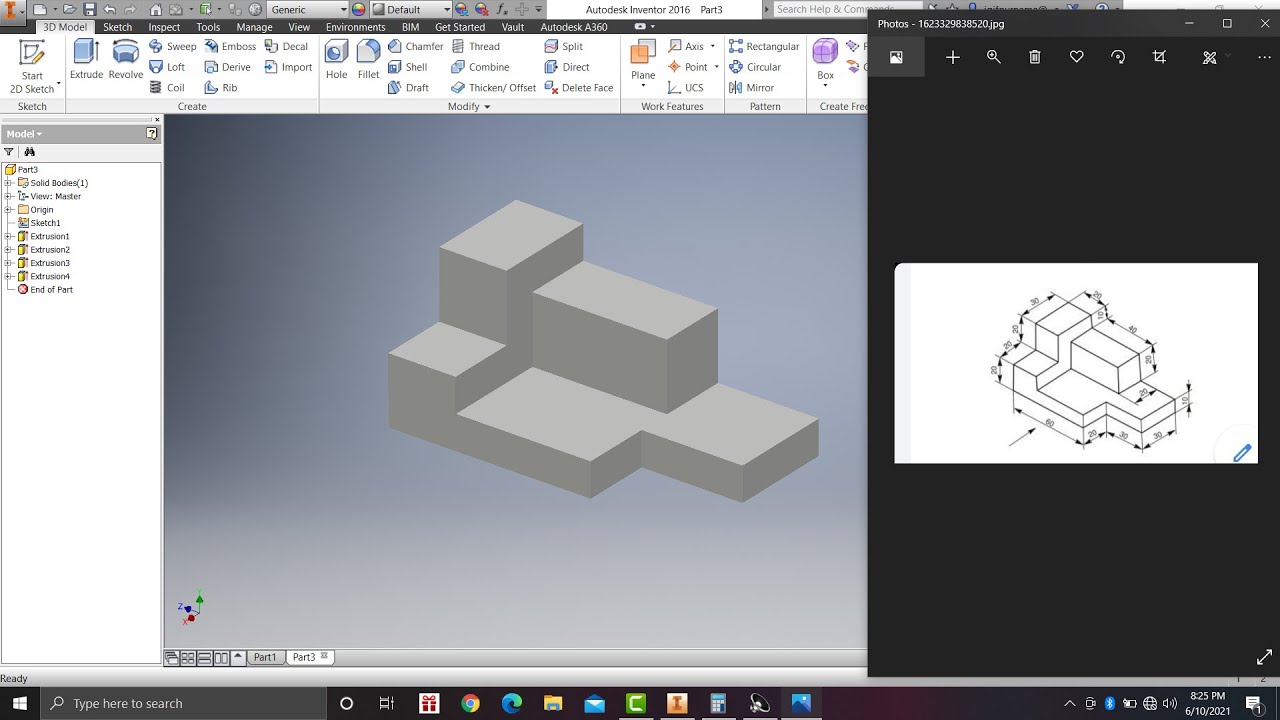
- 📏 The process begins by creating a rectangular sketch with dimensions of 96mm x 1064mm.
- 🛠️ Various tools such as the rectangle and line tools are used to construct the model's framework.
- 📐 The tutorial emphasizes setting correct dimensions for precise modeling (e.g., 6mm thickness, 216mm extension).
- 🖼️ Switching to isometric view helps visualize the model from different perspectives.
- 📝 Multiple dimensions and shapes, including half circles and rectangles, are employed to refine the model's geometry.
- 🔄 Users are guided on how to rotate and navigate the model in a 360-degree view.
- ✂️ The tutorial demonstrates creating a cutout section for further refinement of the 3D model.
- 📤 Finally, the model is exported, and the process is wrapped up with a reminder to share, like, and comment on the video.
Q & A
What software is being used in the tutorial?
-The tutorial uses Autodesk Inventor 2017 to create a 3D model.
What kind of model is the user creating in the tutorial?
-The user is creating a simple 3D model using an isometric drawing.
What is the initial step in the modeling process?
-The first step is to create a sketch, starting with a rectangle at the origin point.
How are the dimensions for the rectangle set?
-The rectangle is set to 96 millimeters for one dimension and 1064 millimeters for the vertical dimension.
What feature is used after sketching the rectangle?
-The user applies an extrusion feature to create a 3D body, extending the model by 216 millimeters.
How does the tutorial instruct the user to view the model?
-The tutorial advises switching to isometric view to better visualize the 3D model.
What is the next feature added after the base extrusion?
-The tutorial adds a second sketch and extrudes it to create a plate with a 6-millimeter thickness.
How are the corners of the new sketch created?
-Corners are defined using a two-point rectangle tool, ensuring alignment with the existing geometry.
What is the role of the half-circle feature in the model?
-A half-circle is added to create rounded edges or a cutout in the model.
How can the model be rotated for better inspection?
-The model can be rotated 360 degrees by using the mouse wheel for better viewing angles.
Outlines

Dieser Bereich ist nur für Premium-Benutzer verfügbar. Bitte führen Sie ein Upgrade durch, um auf diesen Abschnitt zuzugreifen.
Upgrade durchführenMindmap

Dieser Bereich ist nur für Premium-Benutzer verfügbar. Bitte führen Sie ein Upgrade durch, um auf diesen Abschnitt zuzugreifen.
Upgrade durchführenKeywords

Dieser Bereich ist nur für Premium-Benutzer verfügbar. Bitte führen Sie ein Upgrade durch, um auf diesen Abschnitt zuzugreifen.
Upgrade durchführenHighlights

Dieser Bereich ist nur für Premium-Benutzer verfügbar. Bitte führen Sie ein Upgrade durch, um auf diesen Abschnitt zuzugreifen.
Upgrade durchführenTranscripts

Dieser Bereich ist nur für Premium-Benutzer verfügbar. Bitte führen Sie ein Upgrade durch, um auf diesen Abschnitt zuzugreifen.
Upgrade durchführenWeitere ähnliche Videos ansehen
Learn autodesk inventor 3dimensional # 13 mechanical engineering
PEN in | Autodesk Inventor CAD
Tutorial Drawing #1 Mengubah Ukuran Kertas dan Garis Tepi Di Autodesk Inventor Indonesia

Membuat Augmented Reality dengan Unity 3D

Computer Mouse Surface Modelling in Creo 3.0 | Creo Beginner Tutorial 2021

Create Emotion Recognition Mobile App || MIT App Inventor || Personal Image Classifier Extension[AI]
5.0 / 5 (0 votes)
