Godot 4 ARPG Tutorial - Lesson 3: Player Animations & Camera Setup

Outback Nerd
11 Aug 202325:29

Summary

TLDRIn this tutorial, the creator guides viewers through developing animations and a follow cam for a top-down Zelda-like game in Godot 4. Key topics include setting up player animations for different directions, creating a camera that tracks the player, and coding to integrate these features. The video also delves into the history of arcade games, emphasizing the impact of Zelda's open-world design on the gaming industry. The creator encourages personalizing the game with unique experiences and concludes with a quote from Albert Einstein about embracing new challenges.

Takeaways

  • 🎮 The tutorial series focuses on creating a Zelda-like top-down ARPG in Godot 4.
  • 🔍 The title of the series was humorously changed to 'Zero to Bogan Zelda' after introducing a character named Bogan.
  • 🕹️ The lesson's objectives include completing player animations and setting up a camera that follows the player.
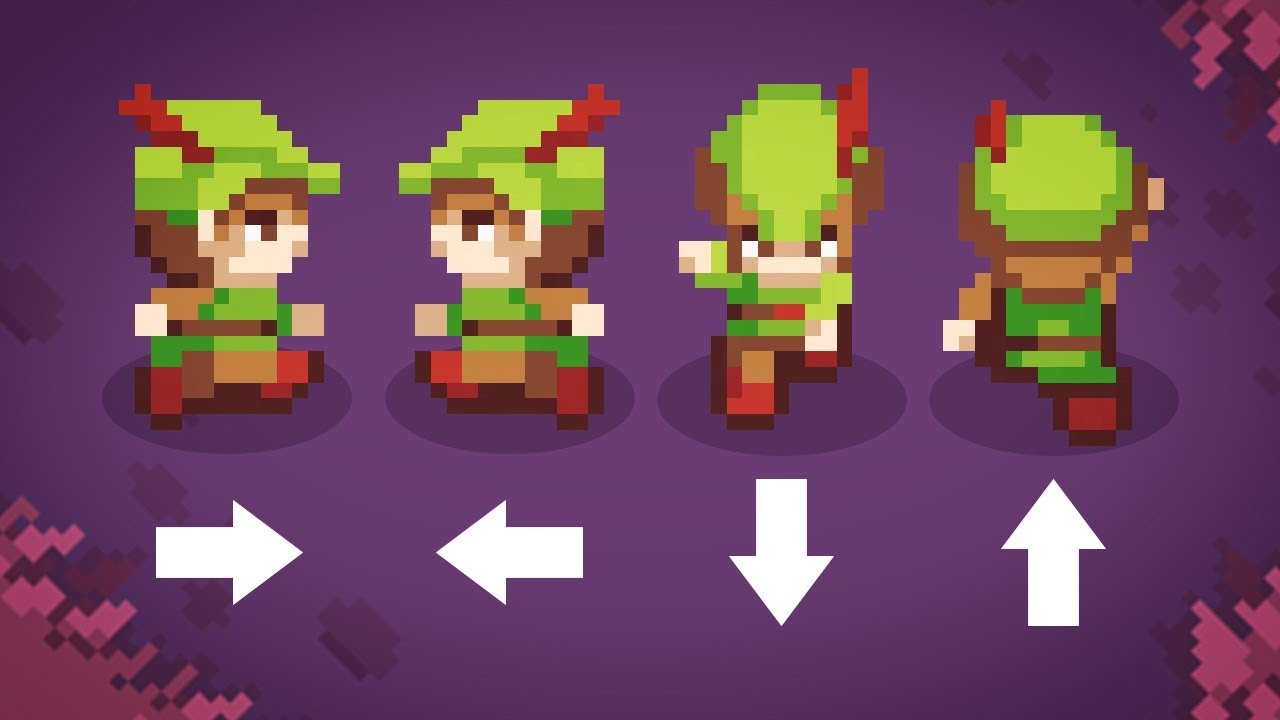
  • 🎨 Animations are crucial for making games enjoyable and giving characters life.
  • 📹 The 'follow cam' is necessary to keep the player visible at all times on the screen.
  • 🛠️ Skills from the previous lesson on setting up animations are applied, and new skills for setting up the follow cam are introduced.
  • 🕹️ The Golden Age of arcade games is discussed, highlighting the evolution from rigid games to more explorable and saveable game experiences.
  • 🌟 The success of Zelda is attributed to its design as an adventure role-playing game (ARPG) that allows exploration and choice from the start.
  • 👨‍🎨 Shigeru Miyamoto's childhood experiences influenced the design of Zelda, emphasizing the importance of childhood memories in game development.
  • 💡 The tutorial encourages学员s to incorporate their own life experiences to make their games unique.
  • 🛠️ The process of setting up the follow cam in Godot is demonstrated, including limiting the camera's view to the map area.

Q & A

  • What is the main focus of this lesson in the Godot series?

    -The main focus of this lesson is to complete the player animations and set up a camera that follows the player around in a Zelda-like top-down ARPG game in Godot 4.

  • Why did the instructor change the title from 'Zero to Zelda' to 'Zero to Bogan Zelda'?

    -The instructor changed the title to 'Zero to Bogan Zelda' after adding a Bogan character to the game, which is a humorous nod to the character's appearance and the personal nature of game characters.

  • What is the purpose of adding animations to the player character?

    -Animations are added to the player character to give the game and the character more life, making it more enjoyable to play by having fully animated movements rather than just idle states.

  • Why is a follow cam important in a top-down game?

    -A follow cam is important because it ensures that the player is always visible on the screen, providing a better gameplay experience by allowing the player to see their character and actions at all times.

  • What skills are required for today's lesson?

    -The skills required for today's lesson include setting up animations from the previous lesson and following along to set up the follow cam.

  • What is the significance of the 'Golden Age of arcade games' mentioned in the script?

    -The 'Golden Age of arcade games' is significant as it represents a time when games were simple, rigid, and had limited exploration. It contrasts with games like Zelda, which introduced more open-world exploration and complexity.

  • How does the world design of Zelda contribute to its addictive nature?

    -The world design of Zelda contributes to its addictive nature by creating a sense of a vast open map to explore, even though it's relatively small in size. It allows players freedom of choice from the start without instructions, which encourages exploration and discovery.

  • What does the instructor suggest as a key element for creating a successful video game?

    -The instructor suggests that a key element for creating a successful video game is designing it with a childlike heart and drawing from memories of childhood, as exemplified by Shigeru Miyamoto's approach to developing The Legend of Zelda.

  • What is the advice given by Shigeru Miyamoto that the instructor shares with the students?

    -The advice given by Shigeru Miyamoto, as shared by the instructor, is to draw on personal childhood experiences and a sense of wonder to create engaging and successful games.

  • How does the instructor guide students to create animations in Godot?

    -The instructor guides students to create animations in Godot by first demonstrating the process for one animation and then allowing students to follow along quickly for the rest, emphasizing the importance of consistent naming conventions for animations.

  • What is the role of the 'lastDirection' variable in the code?

    -The 'lastDirection' variable in the code keeps track of the direction the player is facing to ensure that the correct idle or walking animation is played based on the last known direction of movement.

Outlines

00:00

🎮 Introduction to Bogan Zelda and Animation Setup

The script begins with a welcome to the lab and a series focused on creating a Zelda-like top-down action RPG in Godot 4. The previous lesson was humorously titled 'Zero to Zelda,' but with the addition of a 'Bogan' character, the title was playfully changed to 'Zero to Bogan Zelda.' The instructor acknowledges the personal significance of characters and introduces a boat, suggesting a 'Bogan Link' rather than 'Bogan Zelda.' The main objectives for this lesson are to complete the player's animations and set up a camera that follows the player. The importance of animations in bringing a game and character to life is discussed, as well as the necessity of a follow cam for player visibility. The skills required for the lesson involve setting up animations and configuring a follow cam. The historical context of arcade games and their evolution into more expansive experiences like Zelda is also touched upon, highlighting the open-world design and lack of instructions as a key element of Zelda's addictive nature.

05:01

🗺️ Setting Up the Follow Cam and Limiting Camera Movement

The paragraph describes the process of setting up a follow cam in Godot. The instructor guides viewers through adding a Camera2D node as a child to the player in the world scene. The initial camera setup is critiqued for showing unwanted gray space, so adjustments are made to limit the camera's view to the map's boundaries. The instructor demonstrates how to use the rulers in the Godot editor to determine the right and bottom limits for the camera, ensuring the camera follows the player without revealing the gray space outside the map. The process involves a practical demonstration within the Godot engine, showing the before and after effects of the camera limit adjustments.

10:03

🚶‍♂️ Creating Player Animations

This section details the creation of player animations within the Godot engine. The instructor explains the need for six animations: idle down, idle up, idle right, walk down, walk right, and walk up. The process involves selecting the appropriate sprite sheets and setting them up in the Animated Sprite 2D node. The naming convention for animations is emphasized, with the use of underscores to separate words. The instructor demonstrates the setup for the 'walk right' animation and then quickly goes over the remaining animations, suggesting viewers follow along or pause the video to keep up. The goal is to have fully animated player movements that enhance the game's visual appeal.

15:05

💻 Coding Player Animations and Movement

The focus of this paragraph is on coding the player's animations and movement within the Godot engine. The instructor presents a new script with extensive comments to guide viewers through the code. The script includes variables for tracking the player's last direction and the animated sprite. The 'physics process' function is explained, detailing how it processes the player's movement and updates animations accordingly. The code checks for movement in the X and Y directions to trigger walking animations, and it includes logic to play idle animations when the player is not moving. A feature to flip the sprite horizontally based on the last direction is also implemented. The instructor encourages viewers to understand the code thoroughly to facilitate future customization.

20:06

🔍 Testing Animations and Encouraging Creativity

In this part, the instructor tests the newly coded animations within the game engine. The player's ability to walk in different directions and flip horizontally is demonstrated, showing that the animations play correctly based on the player's direction. The instructor also encourages viewers to use an online pixel art editor called Piskel to customize their player sprite, emphasizing the importance of experimentation and personalization in game development. The idea is to not be limited by the provided assets and to explore one's own creative vision.

25:06

🏁 Lesson Wrap-up and Preview of Next Steps

The script concludes with a wrap-up of the lesson's achievements, which include completing player animations and setting up a follow camera. The instructor provides a 'must, may, might' list for further practice, suggesting experimentation with the sprite editor and adjusting the map size and camera limits. The lesson's final thoughts are encapsulated in a quote attributed to Albert Einstein about making mistakes and trying new things, which is presented as inspiration for continued learning and creativity. The instructor previews the next lesson, which will involve adding collision shapes to improve player interaction with the game world.

Mindmap

Keywords

💡Godot

Godot is an open-source game engine that allows developers to create 2D and 3D games. In the context of the video, Godot is used to develop a top-down action role-playing game (ARPG) similar to 'The Legend of Zelda'. The script references setting up animations, a follow cam, and coding within the Godot engine.

💡Zelda

'The Legend of Zelda' is a popular action-adventure video game series. The video's tutorial series is inspired by this franchise, aiming to create a game with similar mechanics and aesthetics. The script mentions 'Zelda' as a reference point for the game being developed in the series.

💡Top-down ARPG

A top-down action role-playing game (ARPG) is a subgenre of role-playing video games where gameplay is seen from a top-down perspective. The script discusses creating such a game in Godot, focusing on character animations and camera movement typical for the genre.

💡Animations

Animations in video games are the visual representation of movement or action. The script describes creating various player animations like 'idle down', 'walk right', etc., to enhance the game's visual appeal and player experience.

💡Camera

In video games, the camera refers to the perspective from which the game is viewed. The script discusses setting up a 'follow cam' in Godot that tracks the player's movements, ensuring they remain visible on screen.

💡Bogan

Bogan is an Australian slang term for a particular stereotype of lower-class or unsophisticated individuals. In the script, 'Bogan' is humorously used to rename 'Zelda' to 'Bogan Zelda' after adding a character that fits this stereotype.

💡Alliterative

Alliteration is a literary device where the initial consonant sounds or letters are the same in a series of words. The script mentions 'zero to Zelda' as an alliterative title, emphasizing the catchy nature of such titles.

💡Pixel Art

Pixel art is a form of digital art where images are created on the pixel level, often giving it a retro or 'blocky' appearance. The script refers to using pixel art for game characters, specifically mentioning an online editor called 'piscal' for editing sprite strips.

💡Collision Shapes

Collision shapes in game development define the areas of objects that can collide with other objects. The script alludes to adding collision shapes to the player and world in future lessons to improve interaction and gameplay mechanics.

💡Shigeru Miyamoto

Shigeru Miyamoto is a Japanese video game designer and producer, known for creating iconic games like 'The Legend of Zelda' and 'Super Mario'. The script quotes Miyamoto regarding his inspiration for 'Zelda', highlighting the impact of personal experiences on game design.

💡Code

Code, or coding, refers to writing source code for software. The script discusses the process of coding in Godot's scripting language to implement animations and camera functionality in the game.

Highlights

Introduction to creating a Zelda-like top-down ARPG in Godot 4

Renaming the series to 'Zero to Bogan Zelda' with the addition of a character

Importance of personalizing game characters and respecting player attachment

Explanation of the plan to complete player animations and set up a follow cam

Reasoning behind animations to give games and characters life

The necessity of a camera that follows the player for visibility

Skills required for the tutorial including setting up animations and follow cam

Historical context of the Golden Age of arcade games and their limitations

Evolution of games from arcade to home consoles allowing for save games and larger worlds

How Zelda's world design made a small map feel vast and open for exploration

The significance of the ARPG genre in creating an engaging game experience

Inspiration from Shigeru Miyamoto's childhood experiences in creating Zelda

Encouragement for game developers to incorporate their own life experiences into game design

Guide on setting up the follow cam in Godot to limit it to the map space

Explanation of how to use rulers in Godot to set camera limits

Process of creating player animations in Godot

Details on coding the animations to correspond with player direction and movement

Testing the new animations and ensuring they work correctly with player movement

Invitation to customize the player character using an online pixel art editor

Albert Einstein quote on the importance of making mistakes in the pursuit of innovation

Transcripts

play00:02

foreign

play00:04

guys and welcome back to my lab and to

play00:08

our series on creating a zelda-like

play00:11

top-down arpg in Godot 4. last lesson we

play00:15

called it zero to Zelda which I thought

play00:17

was a great alliterative title but

play00:20

because we added in our Bogan character

play00:22

in that last episode I thought maybe we

play00:24

should change it up and now it's zero to

play00:26

Bogan Zelda

play00:28

that might really upset some people I

play00:31

don't know we'll see we did say in the

play00:33

last episode that uh characters could be

play00:35

pretty personal and pretty important to

play00:36

people hopefully I haven't offended

play00:38

anyone introducing the boat well really

play00:40

it's a Bogan link isn't it not Bogan

play00:42

Zelda Zelda was the princess and anyway

play00:45

this lesson we will be getting the rest

play00:48

of our animations done for our player at

play00:50

the moment all we have is the idle down

play00:52

which is a little bit boring it just

play00:53

means that guy sort of Bops along no

play00:55

matter which way he's facing so we're

play00:57

going to get that sorted and we're also

play00:59

going to set up a camera that will

play01:00

follow our player around so let's have a

play01:03

quick look at what we're going to be

play01:04

covering in this lesson and then I'm

play01:05

going to talk to you a little bit about

play01:07

some of the aspects of Zelda that I

play01:09

think set it apart so what are we doing

play01:11

in this lesson well first up we're going

play01:13

to create the rest of our animations for

play01:17

our players so that they're fully

play01:18

animated and then we're also going to

play01:20

create a follow cam so that we get to

play01:22

see our player all the time not just

play01:24

when they happen to be in the right

play01:25

place and why are we doing this well

play01:27

animations give our game and our

play01:30

character life they make it far more

play01:32

enjoyable to play a game when it's fully

play01:34

animated so that's why we're doing that

play01:35

to get rid of the boring and of course

play01:38

we need the camera to follow the player

play01:39

so we can see what we are doing the

play01:41

skills you're going to need today we're

play01:43

going to need to be able to apply the

play01:44

skills from our last lesson where we set

play01:46

up our animations because you're going

play01:47

to be doing that without me for some of

play01:49

them but you also need to follow along

play01:51

as we set up the follow cam so that you

play01:54

have that organized for you as well and

play01:56

our success today is that you've got a

play01:59

fully animated character and a camera

play02:01

that follows them around

play02:03

the Golden Age of arcade games was

play02:06

actually a little bit before my time

play02:08

when I used to spend times in arcades

play02:10

the games we were playing with things

play02:12

like cigarelli and Daytona USA and

play02:15

things like that but a bit before then

play02:18

games like Pac-Man and asteroids and

play02:21

things like that Space Invaders were all

play02:23

the rage and you got to admit that by

play02:26

today's standards those sorts of games

play02:28

leave a little bit to be desired so back

play02:30

in the early 80s games were very rigid

play02:33

and fixed every pixel was super duper

play02:35

important because of the low resolution

play02:37

so things like Space Invaders it really

play02:40

all happened on the one screen at the

play02:42

same time you didn't really explore you

play02:44

didn't really progress same like Pac-Man

play02:46

the whole maze was there right in front

play02:48

of you

play02:49

but when games started leaving the

play02:53

arcade and finding their way into living

play02:55

rooms developers were able to change

play02:57

things up a little bit

play03:01

save games for example meant that

play03:03

suddenly we didn't need to keep our game

play03:06

to a size that was conquerable within a

play03:09

standard setting of an arcade game what

play03:11

a couple of hours maybe you couldn't

play03:14

really extend it much beyond that most

play03:15

arcade games were all about the high

play03:17

score as opposed to completing the game

play03:21

when games like Zelda came along in the

play03:23

80s though this kind of changed see

play03:26

Zelda's world is actually only about 16

play03:29

screens by 16 screens I think it might

play03:31

even be smaller 16x8 and that's quite

play03:34

tiny but the way they designed the world

play03:36

made it feel like an enormous open map

play03:39

that you could explore right from the

play03:41

start you could choose from the very

play03:43

beginning of Zelda to go left to go

play03:46

right to go into a cave it was all open

play03:48

there were no instructions you were just

play03:51

dumped there in the middle of a clearing

play03:52

and a sort of expected to find your own

play03:55

way but within that is actually the

play03:57

secret of why Zelda is such an addictive

play04:01

game even to this day you see the reason

play04:04

the Legend of Zelda was so incredibly

play04:07

successful is actually sort of hidden

play04:09

away in the arpg title the arpg stands

play04:13

for adventure role playing game and I

play04:16

want to read to you

play04:18

um a little bit that the designer or

play04:21

developer of the original Legend of

play04:23

Zelda had to say about his design

play04:24

choices and the process there and I

play04:26

think the secret to the success is

play04:29

actually hidden in what he said here so

play04:31

follow along so this is the words of

play04:32

Shigeru Miyamoto who is I guess one of

play04:36

my heroes considering all the amazing

play04:38

things that he had a hand in there at

play04:40

Nintendo let's read this through and

play04:42

you'll see what I mean when I was

play04:44

younger I grew up in the countryside of

play04:46

Japan what that meant was I spent a lot

play04:49

of my time playing in the rice paddies

play04:51

and exploring the hillsides and having

play04:52

fun Outdoors when I got into the Upper

play04:55

Elementary School ages that was when I

play04:57

really got into hiking and mountain

play04:59

climbing there was a place near Kobe

play05:01

where there's a mountain and you climb

play05:03

the mountain and there's a big lake near

play05:05

the top of it we had gone on this hiking

play05:07

trip and climbed up the mountain I was

play05:09

so amazed it was the first time I had

play05:12

ever experienced hiking up this mountain

play05:14

and seeing this big lake at the top of

play05:18

it I drew on that inspiration when we

play05:20

were working on the Legend of Zelda game

play05:22

and we were creating this Grand Outdoor

play05:25

Adventure where you go through these

play05:27

narrowed confined spaces and come out

play05:29

upon this great lake so it was around

play05:32

that time that I really began to start

play05:35

drawing on my experiences as a child and

play05:38

bringing that into game development so

play05:41

you see one of the key elements of a get

play05:44

extremely successful video game

play05:46

franchise is actually designing it with

play05:49

a childlike heart referring back to

play05:52

memories of childhood are how Shigeru

play05:54

miyamotso created such an amazing game

play05:56

as a Legend of Zelda now most of you

play05:58

watching this are still children so

play06:01

hopefully you've got some first person

play06:02

real world experiences where you have

play06:05

experienced that sense of wonder that

play06:07

you can actually bring into your game

play06:09

development right so remember whilst

play06:11

you're following along with this

play06:12

tutorial you are following what I am

play06:14

asking you to do but what's going to set

play06:17

your game apart from just the

play06:19

boilerplate that I give you is you

play06:21

influencing it with your own life

play06:23

experiences what are things that you

play06:25

enjoy what are things that you think

play06:28

would become an exciting feature in your

play06:30

game don't just follow what I do start

play06:33

thinking about what you can do to make

play06:35

your game unique and true to yourself

play06:37

and remember the words of Shigeru

play06:40

Miyamoto that it was actually when he

play06:42

started bringing his chai childhood into

play06:44

his game development that he really

play06:46

became successful and I think that's

play06:49

something for us to remember so now

play06:50

we're going to go over into Godot and

play06:52

get started on our camera setup and then

play06:56

we're going to do our rest of our

play06:57

animations which is going to have a

play06:58

pretty hefty chunk of coding in there

play07:00

and once we've got all of that done you

play07:04

will have a player that can move all

play07:06

around the screen the camera is going to

play07:08

follow them and their animations are

play07:09

going to change depending on which way

play07:12

the player is currently facing all right

play07:14

we're backing a dough and it's time to

play07:16

sort out our follow cam now this is

play07:19

actually exceptionally easy all right so

play07:21

make sure you're on the world scene

play07:22

which is the one that shows you the tile

play07:24

map and if you remember we dragged our

play07:26

player into the world scene in the last

play07:28

episode so make sure you're on that so

play07:30

this is what it looks like I got my

play07:31

little dude up in the corner there

play07:32

there's me world map I'm going to click

play07:34

on the player node in the world scene

play07:37

and I'm going to right click and go add

play07:39

child node and then we're going to

play07:40

search for the camera 2D so you start

play07:43

typing in the search window and it

play07:45

should come up as the first thing when

play07:46

you start typing that in so I'm going to

play07:48

hit enter and now we've got the camera

play07:49

2D attached as a child node to our

play07:52

player in the world scene all right

play07:56

super easy but we need to refine it a

play07:59

little bit so if we go and hit play now

play08:02

something a bit annoying happens right

play08:04

so our camera is showing all of that

play08:06

gray space there's no limits to it we

play08:09

haven't created any limits for our

play08:10

camera so it'll just go wherever our guy

play08:12

goes but at the moment our guy can walk

play08:15

straight off the map we're going to

play08:16

change that in a later episode we're

play08:18

going to set it up with some Collision

play08:20

shapes but for now we also just want to

play08:22

limit the camera to the actual map space

play08:25

so that our guy can walk to the edge of

play08:26

the map and the camera doesn't keep

play08:28

going and showing the gray it'll

play08:30

actually stop and the guy will sort of

play08:31

walk to the edge if that makes sense so

play08:33

right now it looks like this terrible

play08:35

terrible let's close that down now we've

play08:38

got over here so as long as you've got

play08:39

camera 2D selected on the left hand side

play08:42

you should be able to go to the

play08:43

inspector window come down and click on

play08:45

the limit and open those up and now you

play08:48

see you've got all these numbers in here

play08:50

left top right bottom big numbers too so

play08:53

the left and the top are actually going

play08:55

to be super easy if you've done your map

play08:58

the same way as me so I started my map

play09:00

at that origin point there and I've only

play09:02

Built down and to the right which means

play09:05

that my left pixel can be zero and my

play09:09

top pixel can be zero so just to show

play09:12

you what that does if we now hit play

play09:15

the camera no longer shows that gray

play09:17

space and our player can walk and it'll

play09:20

still follow in that direction it'll

play09:22

follow here but it'll stop at the edge

play09:24

so our player doesn't um expose all that

play09:27

gray space right that's what we're going

play09:29

for there so let's close that back down

play09:31

and work out how we're going to do the

play09:32

other two so the other two are clearly

play09:34

not going to be zero right because we've

play09:36

built a mile along so make sure we've

play09:38

got our camera 2D selected we've got our

play09:40

limits here now there is a little cheat

play09:42

so there's probably a way to do this

play09:43

that's like perfect but I'm not a

play09:46

perfectionist right near enough is good

play09:48

enough with a lot of things especially

play09:49

when we're just learning about them in

play09:50

the first stages your canvas actually

play09:53

has a ruler around the edge that tells

play09:55

you how many pixels along you are so we

play09:58

can just use these rulers to work out

play10:01

roughly where we want our camera to stop

play10:03

so for our right guide you can see we've

play10:06

got a 750 here and an 800 here so

play10:09

probably something around 770 or 760

play10:13

actually maybe even higher let's go to

play10:16

say 770

play10:18

um that works for me and it actually has

play10:21

created a little guide there showing us

play10:22

roughly where it is so we can actually

play10:24

go a bit further 775 or we can go

play10:26

further 780 that'll do all right 780 but

play10:29

now we've still got to deal with the

play10:30

bottom and we won't get that guide for

play10:32

the bottom it's a little bit different

play10:33

but we can still zoom in and work out

play10:36

what we can work out so our bottom is

play10:40

between 400 and 450

play10:43

um probably closer to 400 so let's just

play10:45

go say 410

play10:47

um I'm pretty happy with that now let's

play10:49

press play again and see if we've

play10:51

actually successfully got that set up

play10:53

hang on let me just put that back on

play10:54

there to double check so yours should

play10:55

look something like mine if you made the

play10:57

map the same size as mine but if you've

play10:59

made your map larger or smaller these

play11:02

numbers are going to need to be

play11:03

different so use your rulers to make

play11:05

sure you're getting the right

play11:06

measurement for your map we're all going

play11:08

to have slightly different Maps right so

play11:10

that's the settings I've got there I'm

play11:12

going to hit play and hopefully we won't

play11:14

see any gray so we know the camera

play11:16

doesn't follow us left and top that's

play11:18

brilliant we go to the bottom excellent

play11:20

There's No Gray showing and now we're

play11:22

going to take the incredibly long walk

play11:23

to the right do to do we should get some

play11:26

music in here later hey and there we go

play11:28

no gray No Gray anywhere on the map

play11:31

fandantastic all right that is our

play11:33

follow cam sorted our next step is to

play11:35

start working on our animation okay

play11:38

animation time so this is going to get

play11:41

done a little bit different later before

play11:42

what I'm going to do is I'm going to

play11:44

guide you through the first one because

play11:45

we don't we've only done it once right

play11:47

in our last lesson so I'm going to guide

play11:48

you through the first one and then the

play11:50

rest of them I'm actually going to just

play11:52

fast forward so you're going to see it

play11:54

on the screen so if you need to pause to

play11:55

double check what I'm doing you can do

play11:57

that otherwise you can just put on fast

play11:58

forward do it yourself because you've

play11:59

got the hang of it once we got those

play12:01

animations in then it's time for the

play12:03

coding so that's what to look for so to

play12:05

get started with our animations we need

play12:07

to first go to our player scene and we

play12:10

need to click on our animated Sprite 2D

play12:12

so so far all we've managed to do is get

play12:14

our idle down animation done but we're

play12:16

actually going to have six animations

play12:18

you might think we should have eight but

play12:21

we're only going to make right facing

play12:23

ones we're not going to make facing ones

play12:25

I'm not going to tell you why you can

play12:27

have about a bit of a think about how we

play12:29

might do that in the code how do we turn

play12:31

right ones in the left ones in the code

play12:32

anyway we're only going to do the six so

play12:34

we're going to have idle down idle up

play12:36

idle right walk down Walk Up Walk right

play12:39

that's it so six so first thing I'm

play12:42

going to do is make the first one I'm

play12:44

going to call it walk right so I'm using

play12:48

underscores in our naming conventions

play12:50

here and I want to keep that consistent

play12:51

so in our code I'll be using these exact

play12:55

terms so where I've gone idle underscore

play12:57

down or walk underscore right it's

play12:59

really important that what I put in

play13:00

there is the same as what I put in the

play13:03

code all right you can't have variations

play13:05

between those two because in the code

play13:07

we're going to specifically refer to

play13:09

certain animations so make sure you put

play13:12

an understandable name for each of your

play13:14

animations and you use the same ones in

play13:16

your code easiest way to do that is just

play13:18

to copy what I'm doing all right anyway

play13:20

we've got our walk right if you remember

play13:22

how we did this we click on the little

play13:24

grid pattern we click on our Bogan

play13:26

Sprites and then we've got to change the

play13:28

horizontal and vertical if you recall it

play13:31

comes up as like a four by four grid

play13:33

because it doesn't know right how many

play13:35

Sprites there are we just change it I

play13:36

think it was five by ten

play13:39

so there we are so what did I say we

play13:41

were going to do walk right so we're

play13:43

going to have a look here I think our

play13:44

walk right is this set here these four

play13:47

here so I'm going to grab those ones

play13:49

click add frame and then I'm going to

play13:51

press play to see if that looks right

play13:53

yeah you can see his little arms are

play13:54

bopping away his legs are going back and

play13:56

forth I know none of my uh animations

play13:58

and drawings and things are particularly

play14:00

crash hot you are more than welcome to

play14:02

use your own this is just me having a

play14:04

bit of a laugh all right so I've done

play14:06

the walk right I'm now going to rapidly

play14:09

go through the other four of them

play14:12

um so you can either follow along with

play14:14

the fast forward you can pause it

play14:15

whatever works for you

play14:21

please

play15:05

foreign

play15:06

that's all the animations done we've got

play15:09

idle down idle right idle up walk down

play15:12

walk right and walk up hopefully you've

play15:15

got the same ones as me all sorted out

play15:16

because if you've got the same names

play15:18

it's going to make the coding a heck of

play15:19

a lot easier so next thing we're going

play15:22

to do is uh uh head over to the code I

play15:25

would say we'd go and test it but we

play15:26

haven't actually changed anything so

play15:27

there'd be absolutely no point in

play15:29

testing this so we need to save what

play15:31

we've done and head over to our code now

play15:34

so remember how to do that we go to the

play15:36

script up the top

play15:38

like that and then that should bring up

play15:40

all of our code excellent so we're going

play15:43

to now have a look at how we can change

play15:45

our code to allow all of our other

play15:47

animations to take place as well all

play15:50

right so coding time now this is going

play15:52

to be awkward without that so let's just

play15:54

click off of animated Sprite 2D to get

play15:56

rid of that from the bottom there and

play15:58

here is our code from last lesson now

play16:00

I've got a lot of changes to make to

play16:02

this and I think rather than going

play16:03

through and typing them in line by line

play16:05

I'm going to paste in the whole new bit

play16:08

of code we'll talk through it all line

play16:11

by line I've got a ton of comments in

play16:13

there so if you don't want to listen to

play16:14

me you can just I don't know take a

play16:16

screenshot of it or something and read

play16:17

them but the idea is I really want you

play16:20

to understand what each line of code is

play16:21

therefore so that when you decide to

play16:23

make some changes to it and I'm hoping

play16:25

you do later on you will know what to

play16:28

change and why okay so it's there's no

play16:31

point just copying it in blindly that's

play16:33

not going to teach you anything it might

play16:34

get your character moving which is

play16:36

exciting and what we want but the whole

play16:38

point of this is that you are capable of

play16:40

later on in this series actually going I

play16:43

don't like that code I'm going to change

play16:45

it you can't change it unless you

play16:46

understand it right so let's copying

play16:49

copy in the new code and work our way

play16:52

through it

play16:53

so so

play16:55

here we go look at it all so now we've

play16:58

gone from like 20 odd lines to 75 but

play17:00

half of that is still actually comets so

play17:02

back up to the top and you will see

play17:04

there's a lot of things that are still

play17:06

the same so we're still extending our

play17:08

character body 2D we've still got our

play17:10

speed variable I've still got it at 100

play17:12

you may have changed it you're welcome

play17:14

to do that

play17:16

um we are here now creating a new

play17:18

variable called last Direction and so

play17:20

that's just to keep track of which way

play17:22

the player has been facing so that when

play17:24

we switch our animations between idle

play17:26

and walking we get the right one right

play17:28

we don't want to have it walking right

play17:30

and then when it stops walking right it

play17:34

idles facing up or something like that

play17:35

that would look weird the guy would look

play17:38

slightly possessed I think just

play17:39

magically turning like that so that's

play17:41

how we remember our last uh the last way

play17:45

we were facing we've then got another

play17:46

variable called animated Sprite and this

play17:49

is just to uh do with that animated

play17:51

Sprite 2D that um we were just playing

play17:54

around we thought we need to get data

play17:55

from that animated Sprite 2D so we start

play17:57

this variable called animated Sprite

play17:59

then in our function ready we assign the

play18:02

animated Sprite 2D to that variable that

play18:05

we just created okay so keeping on going

play18:07

we've got that physics process Delta did

play18:10

any of you uh do the the might from the

play18:12

last lesson and actually look that up I

play18:14

hope some of you did it's really worth

play18:16

the the time to research some of these

play18:19

things so you get a better understanding

play18:20

of them all right we've got some

play18:22

explanations there but that is all

play18:24

basically the same as last time so from

play18:26

line 24 to line 35 it's basically

play18:28

exactly the same right we've got physics

play18:30

process we've got our get now Vector

play18:33

based on those keys that are

play18:34

automatically coded right the up down

play18:36

left right key on the keyboard is

play18:39

automatically mapped in Godot to the UI

play18:42

left UI right UI up UI down we've still

play18:45

got our velocity equals Direction time

play18:46

speed keeping on scrolling and then we

play18:50

get down here so if the character is

play18:52

moving so the direction is zero that's

play18:54

what the exclamation equals so it is not

play18:57

zero

play18:58

update the last Direction variable so

play19:00

remember our last Direction uh where was

play19:02

that up here somewhere last direction we

play19:04

want to update that last Direction

play19:06

depending on the character's movement

play19:09

scrolling on down so if Direction X is

play19:12

not zero the animated Sprite should play

play19:14

Walking right so have a think about that

play19:16

if it's not zero we're walking right so

play19:19

if it's zero we're not walking we're

play19:22

idling yeah so but if it isn't zero if

play19:25

there is any movement going on we need

play19:27

to play a walking animation so we're

play19:29

saying if it's not zero If X is not zero

play19:32

Play Walk Right else if uh Y is less

play19:37

than zero we're going to be walk up so

play19:39

you think our y to the sky right so from

play19:41

our uh our Cartesian planes and things

play19:44

like that X and Y to the sky so our

play19:48

y-axis is the one going up and down if

play19:50

that is less than zero right we're going

play19:54

to play walk up if it's greater than

play19:56

zero we play walk down so how hopefully

play19:58

that makes sense when you think about it

play20:00

in terms of those planes of movement X

play20:03

and Y and we've still got another else

play20:06

and that's because we need to then have

play20:08

our idle animations so if our Direction

play20:10

isn't is greater than zero we're going

play20:12

to play these ones here which are our

play20:14

walking animations but if our velocity

play20:19

is zero basically we want to do nothing

play20:22

we wanted to play the idle just

play20:24

depending on which way we're facing will

play20:25

determine which idle and if you recall I

play20:28

said earlier have a think about how we

play20:31

might get the right one to just become a

play20:33

left one without creating that animation

play20:34

that's this bit here animated Sprite dot

play20:37

flip H flip horizontal right so if it's

play20:40

this way we're flipping it so that's

play20:42

what that bit is there so based on the

play20:44

last Direction and then we've still got

play20:45

our move and slide so that is our 75

play20:48

lines of code that's actually only about

play20:50

15 or 20 loads of code

play20:52

um I will leave this bit on the screen

play20:55

for a little while longer just in case

play20:57

you're wanting to to copy that down then

play20:59

uh I don't think I can zoom this out to

play21:01

be honest otherwise I would oh hang on

play21:03

we can pop out on the the new version I

play21:05

keep forgetting about things like this

play21:07

the new update to Godot actually lets

play21:09

you pop windows out

play21:11

um so you if you're a multi-monitor user

play21:13

like I am you can just drag bits off

play21:15

into different screens now that doesn't

play21:17

really help when I'm trying to record it

play21:18

obviously but yeah there's lots of

play21:21

opportunities uh to move this around so

play21:24

it works for your sort of workflow

play21:26

but

play21:27

um for now let's just I'll scroll back

play21:30

up to the top so you should have most of

play21:32

this you need less you need line nine

play21:34

because you don't have that you need

play21:35

line 13 because you don't have that 17

play21:38

and 20 you also need but then you can

play21:40

skip down to Line 39

play21:44

um and 41 and then Etc so pause this at

play21:48

the right spot so you can copy the code

play21:50

that you need to code this is the

play21:51

awkward part about doing it like this

play21:53

isn't it I can't just be like here take

play21:55

the file I mean I probably could paste

play21:57

the code in somewhere but pause it copy

play21:59

it in you actually do learn it better

play22:01

when you physically type it when you

play22:02

just copy and paste just saying um it's

play22:05

you're activating different parts of the

play22:06

brain when you're physically typing if

play22:08

you really want to know how to remember

play22:09

something handwriting is actually even

play22:12

more effective but that's enough of a

play22:14

neuroscience Sidetrack for right now

play22:15

handwriting code I'm going to make our

play22:17

Player move so get all that copy down

play22:21

and then what we're going to do we're

play22:23

going to test our new animations then

play22:25

we're going to wrap it up

play22:28

all right are you ready to test to see

play22:29

if our animations all work so I've just

play22:33

gone back into our world to the 2D view

play22:35

but I'm going to come up and click on

play22:36

the play button then we're going to see

play22:38

all right so far so good time to press

play22:41

some buttons so down and he starts

play22:43

walking down righty starts walking right

play22:45

let's see if our flip H works when I hit

play22:47

left it just flips around and you see

play22:49

the idle stays on the last Direction

play22:52

they were facing

play22:54

say that whenever I take my finger off

play22:56

it stays facing that way now we should

play22:58

still have diagonal ones right as well

play23:00

so he sort of walks diagonally up and

play23:02

down

play23:03

I'm really happy with how that's coming

play23:05

out I hope you are too

play23:07

um I did say in our last episode that

play23:08

you'll get to have a bit of control over

play23:10

what the character is for your game and

play23:13

what I would encourage you to do we're

play23:15

going to talk about this in our must

play23:16

main mind in a minute there's a free

play23:18

um bit of software that you can use

play23:20

online in the web called piscal you can

play23:23

take that Sprite strip that I gave you

play23:25

and you can edit it to your heart's

play23:27

content if you don't like the uh the

play23:29

Bogan with the green thongs and the blue

play23:31

footy shorts and you want to change it I

play23:34

have no problems with you changing that

play23:36

all right but I would recommend keeping

play23:38

us like a backup as well because you

play23:40

might do things you're like oh no he

play23:41

looks horrid you know so just experiment

play23:44

right you don't learn nothing unless you

play23:46

experiment okay pretty sure Albert

play23:48

Einstein sits Sun along the lines if

play23:49

you've never failed you've never learned

play23:51

so have a crack at changing up that

play23:54

character you might think that this

play23:55

Bogan does not suit your game that

play23:58

you've got in your mind so we're gonna

play24:00

I'm gonna give you some instructions on

play24:01

that in a moment but don't feel found by

play24:04

what I'm doing follow my instructions

play24:06

but then use your own Creative Flair to

play24:09

make it your game alright so let's head

play24:11

on over let's do a debrief I'll give you

play24:13

your your uh must May might for this

play24:15

lesson just because there's a few things

play24:17

we want to do to wrap up

play24:19

um and then we're going to have a look

play24:20

at what we're doing in the next lesson

play24:22

so it must May might for this lesson as

play24:25

well you need to finish setting up your

play24:27

player animations and you need to update

play24:28

your code so that all those animations

play24:30

start working you may like to experiment

play24:33

with changing your Sprite using the

play24:35

piscal free online pixel art editor or

play24:39

uh you might if you've got the time

play24:41

experiment with changing the size of

play24:44

your map and then adjusting your camera

play24:46

limits

play24:48

so what do we get done today well we

play24:50

finished creating our animations we

play24:52

created our follow camera and we also

play24:55

updated our script to enable those

play24:57

animations to show next time well we're

play25:00

going to add Collision shapes to our

play25:01

player and to our world to start making

play25:04

it so our player can actually interact

play25:06

better with the world around them and

play25:08

the quota I'd like to leave you with

play25:09

this week is from Albert Einstein that I

play25:11

referred to earlier here's the proper

play25:13

one anyone who has never made a mistake

play25:15

has never tried anything new I've put a

play25:18

little asterisk there because it might

play25:19

be apocryphal but I like it anyway

play25:22

see you next time

Rate This

5.0 / 5 (0 votes)

Ähnliche Tags
Godot TutorialGame DevelopmentZelda ARPGAnimationsCamera SetupPixel ArtCode BasicsShigeru MiyamotoFollow CamGame Design
Benötigen Sie eine Zusammenfassung auf Englisch?