How I Built an Automated Social Media Content Planner (No-code Tutorial)
Summary
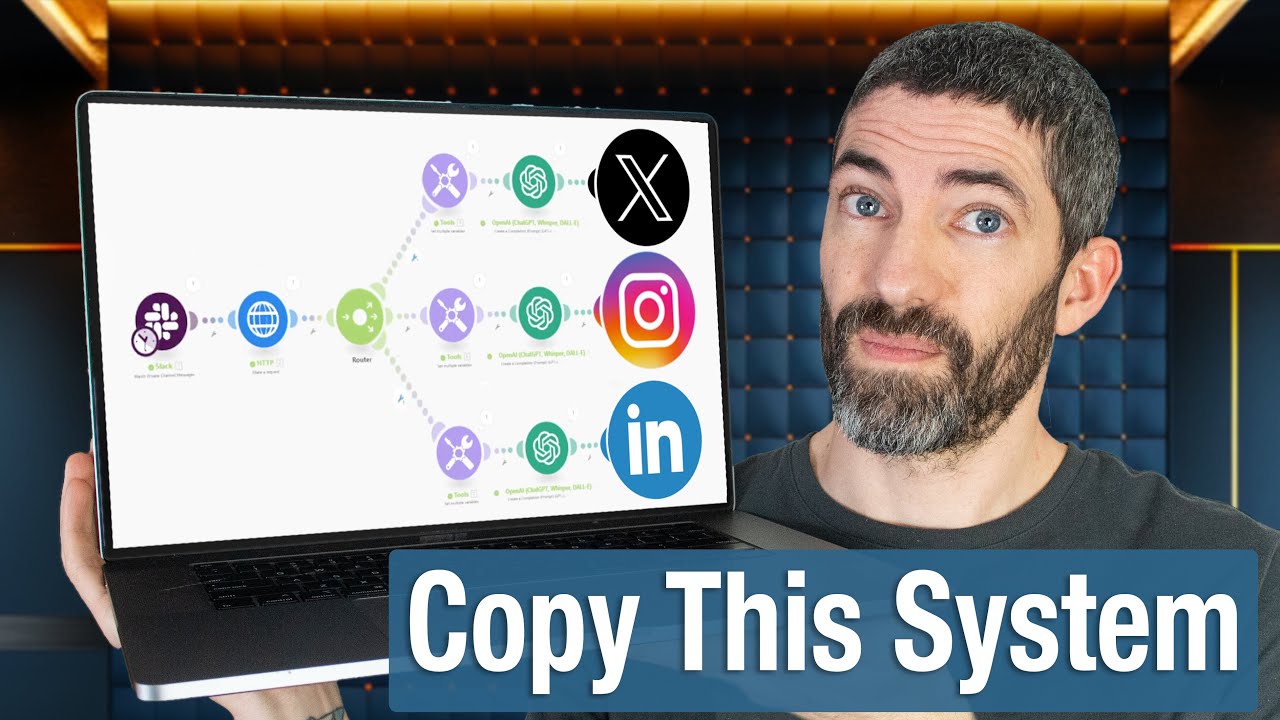
TLDRThis video script outlines the process of building a custom social media post automation tool using Google Sheets for data storage and Make.com for automation. The presenter details creating a user interface with Frontapp for ease of use, setting up a database for post scheduling, and automating posts to platforms like Facebook, Twitter, and LinkedIn via Buffer. The script also covers error checking and notifications, emphasizing the efficiency gains and customization of no-code solutions for specific business needs.
Takeaways
- 🚀 The video discusses building a custom social media post automation software using Google Sheets for data storage and Make.com for the automation process.
- 📅 The creator dislikes manually entering posts in Google Sheets and plans to build a simple UI for easier management.
- 🔗 The UI will allow editing of posts, scheduling them with specific URLs and images, and storing them in a database with their respective schedule dates.
- 📝 The database is prepared with social media posts created using CH GPT, promoting an Excel add-in with time-saving features.
- 🖼️ The importance of having different images for posts is highlighted, rather than using the same image from a URL.
- 🔑 The script mentions using Front Le (likely a typo for Front App) for building the UI on top of the Google Sheets data for better user experience.
- 🔄 The Make.com scenario will check daily for posts that need to be published and will handle posting to Facebook, Twitter, and LinkedIn using Buffer.
- 🛠️ Error checking is incorporated to send notifications about the success or failure of the posting process.
- 🔍 The video includes a detailed walkthrough of setting up the UI in Front App, including data relations and field validations.
- 📝 The process of automating the posting itself is covered, detailing the steps to create posts on different platforms using Make.com.
- 🔔 The video concludes with the setup for email notifications to alert the user of successful posts or errors encountered during the process.
Q & A
What is the main purpose of the software being built in the script?
-The main purpose of the software is to automate the process of posting social media content. It uses Google Sheets to store data and Make.com for the automation of posting to platforms like Facebook, Twitter, and LinkedIn.
Why is Google Sheets used to store social media post data?
-Google Sheets is used because it's a simple and accessible way to store and organize data for social media posts, making it easy to manage content and scheduling.
What is the role of Make.com in this automation process?
-Make.com is used to automate the posting process. It checks the Google Sheets database for posts scheduled for the current day and then posts them to the respective social media platforms.
Why is a UI being built on top of Google Sheets?
-A UI is being built to provide a more user-friendly interface for managing social media posts. It allows for easier editing, scheduling, and monitoring of posts without directly interacting with Google Sheets.
What is the significance of the 'reference feature' in the database?
-The 'reference feature' is used to link the social media posts to specific features of the presenter's product, Minty Tools for Excel. It helps in organizing and identifying the content of the posts.
How does the automation handle different images for each social media post?
-Different images are assigned to each post by storing the image URLs in the Google Sheets database. The automation process then retrieves these URLs and includes the appropriate image in each post when publishing.
What is the strategy for handling errors during the posting process?
-The automation includes error checking and sends notifications via email to inform the user whether the posting process was successful or if there were errors. It uses conditional paths in Make.com to handle success and error scenarios.
How is the status of a social media post updated after it has been published?
-After a post is published, the automation updates the status of the post in the Google Sheets database to 'posted', indicating that it has been successfully published.
What is the reason for using Buffer for posting to LinkedIn?
-Buffer is used for LinkedIn because it allows for easier scheduling and management of posts. The automation takes advantage of Buffer's free version, which supports up to 10 posts.
How does the automation ensure that only posts for the current day are processed?
-The automation uses a filter in Make.com to check the 'schedule date' in the Google Sheets database. Only posts with a 'schedule date' matching the current date are considered for posting.
What is the benefit of using no-code tools for building this automation?
-No-code tools allow for the creation of tailored solutions that meet specific needs without the need for extensive coding skills. They can save costs on recurring fees from other platforms and provide flexibility to customize the automation process.
Outlines
🤖 Building Social Media Automation Software
The speaker introduces a project to create custom social media post automation software using Google Sheets for data storage and Make.com for the automation process. The goal is to avoid manual entry in Google Sheets by building a user interface (UI) with Front App. The software will manage posts, including editing, scheduling, and posting on platforms like Facebook, Twitter, and LinkedIn. The speaker uses their own Excel add-in, Minty Tools for Excel, as an example, showcasing how posts are prepared and stored with scheduling dates, URLs, and images. The UI will facilitate easy editing and posting, with Make.com scenarios checking daily for posts due for publication.
📋 Setting Up the Social Media Automation UI
The speaker details the process of setting up the UI for the social media automation tool using Front App. They discuss linking the Google Sheet as a data source and creating data relations for features and post statuses. The UI includes a table for social media posts with fields for editing post content, scheduling dates, URLs, and image URLs. The speaker emphasizes the flexibility of the tool, allowing for edits and new posts as needed, and the importance of setting up the UI to ensure that the automation process is smooth and error-free.
🔄 Automating Social Media Postings with Make.com
The paragraph explains the automation process using Make.com. The speaker sets up a Make scenario to filter posts scheduled for the current day and with a 'scheduled' status. They detail the steps for posting on Facebook, Twitter, and LinkedIn, including handling images, post content, and URLs. For Facebook, they use the 'create a post with photos' action, for Twitter, they mention a limitation in uploading media directly via Make and opt for text content only, and for LinkedIn, they use Buffer due to its ease of scheduling. The speaker also outlines the process for error checking and notifications to ensure successful posting or to identify issues.
🛠️ Finalizing Automation and Error Handling
The speaker concludes the automation setup by updating the status in Google Sheets to 'posted' after successful posting and implementing error handling with email notifications. They use flow control routers to manage paths for successful posts and those that encounter errors. The email notifications will inform the user whether the posts were successfully published on all platforms or if there were issues with specific platforms. The speaker also sets a filter to ensure the automation only proceeds if there are posts to process and mentions the importance of scheduling the Make scenario to run earlier than the desired posting time to account for potential delays.
📅 Scheduling and Testing the Automation
The speaker discusses the importance of scheduling the Make scenario to run at an appropriate time, earlier than the desired posting time, to ensure posts are published on time. They mention the limitation of Twitter's API not supporting scheduling and how they work around it by posting directly at the desired time. The speaker also talks about testing the automation with a post scheduled for a future time to ensure everything works correctly before relying on it for regular posting. They demonstrate how to edit and schedule a post for testing and how to adjust the scenario for regular use.
🌐 Leveraging No-Code for Custom Automation
In the final paragraph, the speaker reflects on the power of no-code tools for creating custom solutions tailored to specific needs. They compare their custom solution to existing platforms like Feedly and Buffer, highlighting the cost savings and the ability to tailor the tool exactly as needed. The speaker also teases an upcoming video where they will share additional ways to use Make.com for automating routine tasks to save time, and they thank the viewers for watching.
Mindmap
Keywords
💡Social Media Post Automation
💡Google Sheets
💡Make.com
💡UI (User Interface)
💡Frontapp
💡Buffer
💡Scheduling
💡Post Content
💡Image URL
💡Status Update
💡No-Code
Highlights
Building a custom social media post automation software using Google Sheets and Make.com.
Creating a user interface with Front App to manage social media posts without direct Google Sheets interaction.
Utilizing Make.com for the automation of daily posting tasks to streamline the process.
Storing social media post data in Google Sheets, including content, URLs, images, and scheduling dates.
Incorporating a reference feature for image URLs to customize posts with different images.
Scheduling posts for specific dates and times to automate the publishing process.
Implementing error checking and notifications for monitoring the success of automated posts.
Using Front App to create a table for social media posts with linked data sources and relations.
Configuring data types and display settings in Front App for an optimized user interface.
Creating a detailed view for editing and adding new social media posts with various fields.
Automating the posting process with Make.com by filtering and scheduling posts based on the current date.
Integrating with Facebook, Twitter, and LinkedIn to post content automatically.
Using Buffer as an intermediary for posting on LinkedIn due to its limitations with Make.com.
Updating the status in Google Sheets to reflect whether posts are scheduled or posted.
Setting up flow control and email notifications for error handling during the automation process.
Ensuring the automation only proceeds if there are posts to process for the current day.
Testing the automation workflow and receiving confirmation of successful posting via email.
Discussing the advantages of no-code tools for building tailored internal tools that save costs.
Transcripts
today we're ditching page tools like
feed hiive and buffer and building our
own social media post automation
software we'll use Google Sheets to
store all the data for our social media
posts and we'll use make.com to automate
the process of posting and because I
don't really like having to go into
Google Sheets to type in all the posts
and set when they should be posted we'll
also buil a simple UI in front Le to run
everything for us now before we in let
me show you what we'll be building so
we'll be building this interface where
we have our posts we can go in edit them
at URLs images to be posted schedule
them for a specific date and uh also
will be saved in this uh database with
the schedule date URLs and so on and so
forth and then we'll have this make.com
scenario that would go through all those
posts each day and see if there are any
posts that should be published it will
then go through Facebook Twitter for
LinkedIn we'll be using buffer update
the status for the post and we also do
some error checking so we can get a
notification and see whether everything
worked fine or if there were some errors
so here's my database what I did here is
uh I've prepared the social media posts
I used CH GPT to do that and those are
all posts I use to promote my addin
minty tools for Excel which is an Excel
addin with various time-saving features
a little plug here the whole idea is
that uh I have the post content I
obviously have front Le ID because I
want to build the UI on front Le if
you're not using front Le or if you
don't want to use it you can do
everything here in Google sheet and then
uh use the make scenario to run and
everything will still be automatic I
just prefer to have an II on top of that
after the post I have this thing
referenced feature and uh this is from
here I have all my features the only
reason I have that is because I'm using
my UI to upload the images and then the
URL is stored here so that's the only
disadvantage you'll have if you don't
use front Le or any other no code web
Builder you have to upload your images
somewhere and then place URLs here so
this is just for reference for me you
can you can definitely skip that then
what's really important is the schedule
date so I'll add a date here for each of
the posts and when this date comes make
will pick this post and schedule it for
posting I usually post everything around
6:00 p.m. so I won't be dealing with
time here but you can also do it uh with
specific uh times that you can pass pass
through here a URL that I might want to
share and then the image URL for the uh
image that will be in the post I don't
want all posts to just have the same
image that's uh being gathered from the
URL I want to add different images to
all the posts and then just at the end
of the post have check it out and the
URL and here is the status and uh i' I
have it in a separate table so it would
be easier to link it in frontally have
new scheduled posted and that's it now
let's uh go ahead and uh start uh
building uh things out so going to go to
front Le to pages in my admin app and
I'm going to add a new page social media
automation that's good before that I
have to uh link my data source it's
really simple and frontally just copy
the URL Google sheet paste it here and
I'm importing all those three and then I
need to add the data relations so going
to add two relations one will be with my
referenced feature the front Le ID the
ID of the feature should match the
social posts referenced feature and I
want the feature name to be the display
name and my second one is my status
again to my social post the status
should match the front Le ID in uh my
post status uh table and I'm going to
display the status go up here save
changes and I can go back to my page and
uh start building it out and uh once
again you can skip that and go directly
to building the functionality in um make
but uh in my opinion it's much better to
have some form of UI like uh it makes it
much easier to add things and be sure
that you're not breaking anything I'm
going to add a simple table here going
to link it to my YouTube social post
complete setup and uh you see that it
messed a lot of the things up so the URL
is an image and things like that so
actually going to delete that and uh do
something yep leave without saving I'm
going to go back to uh my data sources
and for my social posts I'm going to
click on it I'm going to set everything
up in here so the post content is text
the reference feature doesn't matter
it's linked but uh I can always say that
uh it's a select then the schedule date
that's really important I want to switch
it to date the URL will be just text and
uh the image URL is an image that's good
and the status because it's also going
to be a drop- down also going to uh
switch it to a drop down to select okay
save changes go back to to uh Pages open
the social media automation page and uh
now I can add a
table complete the setup and everything
is as it's supposed to so here I don't
want to show the reference feature
because it's a number I want to show the
referenced Feature Feature so this is
the actual text that's being pulled from
the other table going to say here
reference feature okay uh for schedule
date going to make sure that it's a date
URL is fine image URL and I'm also going
to hide the status and rename this one
to status and uh that should be about it
I'm also going to extend this a bit make
it a bit longer when I'm clicking on any
of those I'm going to use the default
detail view just before that I'm going
to see that everything is a post so I
get new post here and things like that
let's say
and uh here edit detail view we're going
to start by making sure that this is a
text area and I'm going to make it the
Min High to like 200 and going to show
the advanced settings and make it two
columns so that I have a nice big area
to edit then the uh schedule date will
be right after that and my status will
be right after that then I have the
reference feature the URL
and the image URL I also want to make
sure that those are not all required so
for example if I am editing something
and I'm still not ready to set a date or
add the URL or the image I want to still
be able to save it so here I'll say edit
field validation remove the check
unrequired for the uh status again going
to remove uh the required and uh don't
don't worry that it shows nothing here
because it's a related field so those
settings won't apply same for the
referen feature I don't want it to be
required same for the image URL
shouldn't be required and the URL itself
again shouldn't be required okay save
that and uh we should have our uh page
ready so if I hit preview and let's take
a look at it so we have our post post
here you can hover to see the entire
post we have the reference feature and
we can start editing them so we can at
today's date a status can be new the
feature and then for URL going to say
Min tools.com and uh for an image I'm
using this reference to know which image
I should pick so pick the audit formula
uh image so I'll add my image here
that's uh used to portray the audit form
feature and I can hit save and you can
see that this updated and I can now see
my schedule date the URL and uh the
image and I can go along and set
everything else up or add new posts as I
need them now let's uh figure out how to
uh actually automate the posting itself
going to go to uh make and I'm going to
start by using Google Sheets and uh I'm
going to search for row I say search row
going to leave it at uh select from my
drive and uh I'm going to use YouTube
social media post my sheet name will be
YouTube social post it has headers and
now I want to filter we'll have two
filters first I want the schedule date
switch that to date time uh operators
should be equal to the date that uh to
today's date so I'm going to go here and
use this uh format date function and in
here I'm just going to add now so
today's date and in here for the format
I'm going to say ear ear ear Dash month
month Dash day because this is the
format that I'm saving everything in
frontally if you come here you see that
the date is uh the year the month the
day back here we also going to add
another rule so we'll need two rules to
be uh true in order for a post to be
considered ready to post so the first
thing is that the date should be the
same date and the other one is that I
want the status to be here it is one
because we left it at new but I want it
to be two scheduled I need to go over
and make sure it's scheduled so that uh
make will gather it status equal to to
sending going to limit it to like five
posts or something like that although I
never post more than once a day hit okay
and uh this is our um initial place
where everything uh would happen so next
we can start posting essentially so I'm
going to look for Facebook first and uh
going to say Facebook pages create a
post I'm going to say create a post with
photos because I want to add this uh
image I already have my connection set
up you need to add one if you uh don't
have it going to pick my page then for
photos going to add one photo going to
switch that to download photo from URL
then my URL will be my image URL from my
first note here I won't have any caption
then my message will be my post content
and then going to go on your line and
say check it out here and I'm going to
add the URL
and that way I know that the URL is
always at the end and people can click
it if they want to but they'll be seeing
this image instead of always seeing the
same preview of the website also going
to show advanced settings and for the
date I'm going to schedule it for the
same date that's coming from here but
for a specific hour so for example
because right now it's 900 p.m. so for
testing let's say you want to schedule
them for 10 p.m. I'm going to go to date
and time here and I'm going to say at
hours and then in at hours I'm going to
pick the date so the schedule date and
because there's no hours in this date
the hour would be zero so I'm just going
to add 22 hours so it's 10 p.m. and I'm
going to hit okay next I'm going to add
X and uh say create the post going to
link my Twitter account and for my text
content I'm going to add the post
content and then going to say check it
out and add the URL unfortunately it's
kind of hard to add an image to a
Twitter post I couldn't figure it out
because there's no upload media option
in uh make and that's what their API
goes for so let me know in the comments
if you know how to do it but uh for now
just going to leave it like that without
an imit
on Twitter and uh hit okay and last but
not least we need to post on LinkedIn
and uh if you know from previous videos
that I've done I don't really like the
way LinkedIn works so instead of using
its integration I'm actually using
buffer and uh buffer is a social media
posting platform but uh using it that
way I don't have to schedule multiple
posts there so I can always use their
free version which only allows up to 10
posts and uh by doing our own automation
that's all we need from them so going to
pick buffer going to say create a status
update I already have my buffer
connection going to pick my LinkedIn
page and for my text it's going to be
post content and then on a new line
check it out here the URL you're going
to see post an update at scheduled date
and time that would make it easier for
us to see uh to test things because
we'll be able to schedule for a few
hours later as we're doing right now and
then we'll be able to test that and see
if the post appears in buffer before it
goes live on LinkedIn after you're done
with your testing you can always switch
that back to post immediately date
scheduled will be again going to go here
to the date and time going to say at
hours in here going to pick my schedule
date and in here here going to add 22
for 10 p.m. and you need to do that when
you're testing and building this this
needs to be like 1 two 3 hours after the
time you're testing just to make sure
that everything works and then you can
switch that to the time of day that you
want to post so for me this will be 18
because I always post around 6:00 p.m.
going to show the advanced settings here
I'm going to see here that I don't want
to shorten the links and I also want to
attach media no link no no title uh no
description just a link to an image will
be my image URL and uh the thumbnail
will also be my image URL and those are
my settings for buffer once we're done
with all the posting what we can do is
we can go to Google Sheets and pick the
update row to make sure that we switch
the uh status to post it because make
sure that it's posted it's not scheduled
anymore here I'm going to
select by path from my drive and I'm
going to use this to to find my
worksheet then my sheet name will be
social posts and uh my roll number will
be the roll number from this note here
roll number and the only thing that I
want to change is my status I want it to
become three for post hit okay and uh
that's the main part of it but I also
want to make sure that I get notified
whether whether this worked or not so
I'm going to add a flow control router
and we'll have two paths one will be an
email that you'll get if there's no
error so if everything went fine and the
other is an email we'll get if there
were some errors and to also add error
handling for those just to make sure
that uh we can see here which one C the
error so I'm going to right click at
error Handler going say resume and my
post ID and I'm going to say it zero
okay then for X I'm going to add a
Handler resume and post ID will be zero
and uh for buffer I'm going to add an
error Handler resume and I'm going to
add the item and uh status ID will be
zero okay really don't like how they
Auto format those so now what we can do
is uh we can add two email notes here
and then check within the router add two
filters so this will be no errors
everything is fine and this will be if
there's errors let's start with the no
errors one so here I want to send an
email I'm going to pick email I'm going
to grab send an email I already have my
uh email address here for Min analyst
and uh I'm going to say add the
recipient going to add my email here the
one I want to get it at and I'm going to
add it in a bit my subject will be minty
tools promo post all good content type
HTML is fine and content can be all good
going to add my email here and uh hit
okay now in terms of uh adding a filter
here I'm going to say no errors and uh
we'll have three conditions so the first
thing we want is our Facebook post ID we
want this to not equal to zero we also
want an ENT rule we want our Twitter or
X post ID to be not equal to zero and we
want our uh statuses status ID to be not
equal to zero so if all those three are
not equal to zero so there is no error
then we'll get an email saying okay fine
all good no errors on the other hand
we'll also get an email say sent an
email a recipient my subject will be mty
tools promo errors content type HTML and
in terms of uh content I'm going to say
there was an error posting on the
following platforms I'm going to add two
uh new line tags because this is in HTML
and then I'm going to say go to uh this
General functions Tab and say if and in
this if I'm going to say if my Facebook
post ID and then from General I'm going
to say equals zero then I want to say
Facebook and a new line otherwise I'll
say nothing on the next line again I'm
going to say if and in here I'm going to
grab my post ID from X and after that
I'm going to say equals zero I'm going
to say x and then a new line otherwise
nothing so the idea is that whichever
one of those is zero will be listed here
and that way I'll know which one through
the error and here I again have if here
we're going to see buffer statuses
status ID equals zero give me link then
I don't need the new line here otherwise
give me nothing going to hit okay here
and now let's set uh this filter going
to right click set up a filter going to
say errors and uh my conditions for that
will be one of three things so one of
those three has to be uh zero so either
this is equal to zero I'm going to add
an or rule or this equal to Z Z and
another or rule which will be statuses
stus ID is equal to zero so the whole
idea here is that if just a single one
of those equals zero then I have an
error and I want this to go that way and
this is not errors it's uh errors okay
and another thing that I want to do so
the last thing is here I want to make
sure that I only continue if there are
post to process on a right click set up
a filter
when I see anything to post and my
condition will be that the the total
number of bundles will be a numeric
operator greater than zero so if it's
zero if there are no posts for today
this won't move forward okay that was a
long one so now let's uh go ahead and uh
test it going to save it and uh by the
way because in my case will be running
at 6:00 p.m. so
I want to make sure that this is
scheduled to run like a bit earlier than
that and also keep in mind that uh
Twitter does not have like a scheduling
so for Facebook and for buffer you can
provide a a future time so you can
schedule at 5:00 p.m. and it will be
posted at 6:00 p.m. but for Twitter you
don't have that so what I do is I'll
remove those uh dates from here and I
make sure that I'm posting directly at
the time that this runs if I now go back
here and I edit this and make sure that
it's uh scheduled and just save it now I
should be able to run this once it found
one thing to post it's now creating a
post for uh 1000 p.m. in my case and uh
Facebook let's see if that would work
okay then it went to Twitter to buffer
it updated everything and there were no
errors so it went that way and I should
receive an email if I go to uh my admin
here and uh I refresh that I should have
my status as posted and if I go to
Twitter you see here that uh I have this
post I'm remove it because I posted it
already if I go to business. face.com
content calendar I can see that I have
this post scheduled for 1000 p.m. with
the image and everything Gmail says
published by make going to delete that
because I already posted this and I
wouldn't see anything on LinkedIn but on
Buffer you can see here that uh I have
this uh post scheduled with the image
and everything for LinkedIn I going to
delete this one so our scenario works it
takes new posts if it's the same date
and it goes through all those and post
them for you I prefer to keep those
separated but uh if you want you can
even go in buffer and I was trying this
out you can add the Facebook and the X1
as well the reason I kept them
separately was uh one thing for uh X is
that you still have like a limit on how
long your post can be so what I do here
is I'm actually going to go to the uh
text and binary functions and uh use the
substring function so in here I'm going
to move this post content and I'm going
to trim it essentially remove this empty
space I'm going to say from character
Zero to character let's say 180 the
whole concept here is that I have my URL
I have this text here and uh I want to
make sure that the post doesn't get too
long for Twitter and usually I'm fine
with it just being cut off at some point
if you want to make it fancier you can
add an if here that check the length and
if it's above 180 it's trim it and then
add three dots but uh I'm not going to
do that so from now on you can just come
in here you can set up all those or you
can add new posts and be able to post
them automated at specific times without
you having to each time go in and post
to all the platforms and that's another
great example of uh the power of no code
and especially when you're trying to
build something that's tailored to your
exact use case now a lot of people are
trying to build products and customer
facing businesses on top of no code but
for me the no Cod Advantage has always
been in scenarios like this that uh we
just went through building internal
tools that exactly match your need and
cost much less than what's available out
there I know platforms like uh feif and
buffer those are my two favorite ones
actually have a lot of features that we
didn't build and we probably couldn't
build built in this Tex stack but at the
same time I personally never used those
features so for me it made a lot of
sense to just take the simple things
that I use from those platforms and
build them for myself saving from uh
recurring monthly fees and uh also being
able to fully Tor everything exactly as
uh I want it next I want to share a few
other ways that you can use make to
automate routine daily tasks and
literally add hours to your day and I'll
be doing that in this video right here
thanks for watching Kenta I'll see you
in this video
[Music]
تصفح المزيد من مقاطع الفيديو ذات الصلة
My Automated Social Media System - Every Step
LinkedIn Data Scraping Tutorial | 1-Click To Save to Sheets
Make 1,000 YouTube Shorts with THIS AI Automation in 19 Mins! 🤯 (ChatGPT + Canva + Make)
Sub Points using ChatGPT
Automated Ai Social Media Content System Will Post Daily For You
Best Social Media Management Tools 2024: Metricool vs Buffer vs Hootsuite vs Typefully 🫣
5.0 / 5 (0 votes)