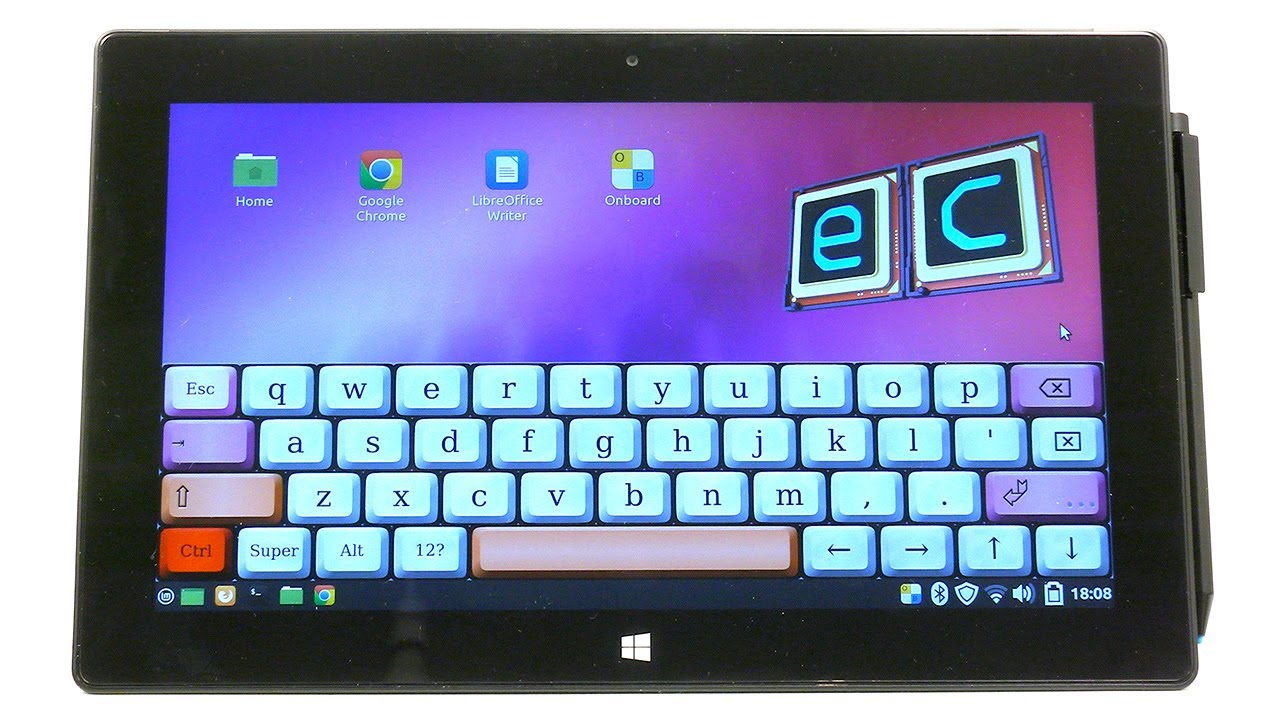
Installing Linux on a Surface RT
Summary
TLDRThe video demonstrates installing Linux on a Microsoft Surface RT tablet. It begins by jailbreaking the tablet to allow installing other operating systems. Raspberry Pi OS is chosen and imaged onto a USB drive along with necessary boot files. After copying the image to the internal drive, wireless networking is set up. Basic web browsing and light gaming are shown to work, but video playback struggles due to lack of hardware acceleration support. Overall, Linux greatly expands the utility of the aging Surface RT hardware.
Takeaways
- 😀 The video is about installing Linux on a Microsoft Surface RT tablet
- 💻 The process involves jailbreaking the Surface RT to allow installing other OSes
- 🔧 Raspberry Pi OS is chosen because it supports ARM devices like the Surface RT
- 📁 Prepping the USB drive involves downloading specific files and modifying some
- ⚙️ After jailbreaking, Raspberry Pi OS is imaged onto the USB drive
- 🖥️ Booting from USB allows testing Linux before overwriting internal storage
- 🗃️ Copying from USB to internal storage expands space and allows full installation
- 📶 Getting wifi working requires extracting firmware modules from a downloaded file
- 🎮 Some games and apps can be installed, but web browsing is slow without hardware acceleration
- 👍 Linux gives the Surface RT new life, despite some limitations due to its age
Q & A
What operating system is the narrator attempting to install on the Microsoft Surface RT tablet?
-The narrator is attempting to install Raspberry Pi OS, a Linux-based operating system, on the Surface RT tablet.
Why does the narrator need to 'jailbreak' the Surface RT before installing Linux?
-The narrator needs to jailbreak the Surface RT to bypass protections that prevent other operating systems from being installed. The 'Tegra jailbreak' exploit is used specifically for Nvidia Tegra devices like the Surface RT.
What prep work and files are needed before writing the Raspberry Pi image to a USB drive?
-The narrator needs to download the Tegra jailbreak files, extract them to a FAT32 formatted USB drive, and modify the startup.nsh file as outlined in the guide.
Once the Raspberry Pi OS is installed, what must be done before it will boot from the internal drive?
-The startup.nsh file needs to be edited again to change the root partition from the USB drive to the internal drive's partition.
What hardware capabilities are not supported by Raspberry Pi OS on the Surface RT?
-Hardware video acceleration, Bluetooth, and the camera are not supported.
Why does web browsing performance suffer even after updating Firefox?
-The lack of hardware acceleration on the older Tegra 3 processor causes poor performance for graphics-heavy sites like YouTube.
How can right-clicking be enabled using the touchscreen?
-A script can be run that enables right-click functionality by holding down on the touchscreen.
Why does the default battery indicator show 0% charge?
-The default applet has issues interfacing with the Surface RT's battery, but another applet called Battery Monitor can show the correct percentage.
What accessories like the touch cover keyboard are supported?
-The Surface RT's touch cover keyboards work for input when connected.
What new software capabilities does Linux enable compared to Windows RT?
-The Raspberry Pi software repository enables installing many more apps and games compared to the limited Microsoft Store on Windows RT.
Outlines
😀 Introduction to Installing Linux on the Microsoft Surface RT
The paragraph introduces the video, which will cover installing Linux on the original Microsoft Surface RT tablet. It mentions trying this after previously installing Windows 10 on the device. The goal is to make the tablet more usable by putting Linux on it.
👨💻 Preparing to Jailbreak the Surface RT
The paragraph explains the need to jailbreak the Surface RT in order to bypass protections that prevent installing other operating systems. It covers downloading necessary files to a USB drive using the Tegra jailbreak guide and booting the Surface from the USB to disable secure boot.
🖥️ Writing the Linux Image and Additional Files
The paragraph details using the Raspberry Pi Imager to write the Raspberry Pi OS image to the USB drive. It then covers downloading additional required files, modifying them as needed, and copying everything over to the USB drive's Windows-accessible partition.
⚙️ Installing Raspberry Pi OS Internally
The paragraph walks through booting the Surface RT from the prepared USB drive and starting the process of installing Raspberry Pi OS to the internal drive. It covers copying the OS, modifying a configuration file, and restarting to boot into the internal installation.
🤔 Assessing Performance and Compatibility
The paragraph evaluates the performance of Raspberry Pi OS on the Surface RT. It tests web browsing, video playback, and other graphical capabilities. Hardware acceleration is found not to work, limiting performance, but other features like the touchscreen and keyboard cover are supported.
😊 Additional Customization and Possibilities
The paragraph explores further customization and usage possibilities with Linux installed. It covers updating the system, enabling right-click, fixing the battery indicator, using the touch keyboard cover, and installing some additional software packages.
Mindmap
Keywords
💡Windows RT
💡Jailbreak
💡Raspberry Pi OS
💡Linux
💡Drivers
💡ARM
💡Performance
💡Dual-booting
💡File system
💡Packages
Highlights
We're going to install Linux on the Microsoft Surface RT to make it more usable than Windows
We'll use Raspberry Pi OS since it's compiled for ARM devices like the Surface RT and has a 32-bit version
First we have to jailbreak the Surface RT using the Tegra jailbreak to bypass protections preventing other OS installs
We use a USB drive to boot into the jailbreak tools and disable secure boot
After imaging the USB drive with Raspberry Pi OS, we copy over additional boot files from the Surface RT GitHub repo
The Linux touchscreen driver works out of the box on the Surface RT
Browsing modern sites is very slow, but simple web pages load fine. YouTube crashes the browser tab though
Updating Firefox helped a bit but video playback still crashes. Hardware acceleration isn't supported
The touch type covers for the Surface RT work for keyboard and trackpad input in Linux
We can install various games and apps from the package manager that aren't possible on Windows RT
Overall, Linux makes the Surface RT much more usable even if the performance isn't great
Putting Linux on here opens up a whole new world of possibilities compared to Windows RT
We had to jailbreak the device and bypass protections to install Linux
Browsing the web is slow but doable, while video playback crashes the browser
We can install apps and games that aren't possible on Windows RT anymore
Transcripts
so towards the end of last year we took
a look at installing Windows 10 on the
original Microsoft Surface RT so today
why don't we try to ruin this thing even
more by putting Linux on it sponsored by
Squarespace hello everybody and welcome
back to another video now I know I know
all the Linux lovers are going to have a
f day on me in the comments for saying
that but I was being sarcastic putting
Linux on this thing is actually going to
make it more usable than any other
operating system that we've tried to run
on this thing which Curr ly is two but
you know what they say third times the
charm right so let's just dive into what
we're going to be doing today so the dro
of choice that I've selected is Believe
It or Not Raspberry Pi OS and there's a
couple reasons for that number one it's
compiled for arm devices which of course
the Surface RT is number two the latest
release of it still has a 32-bit version
available number three the Surface RT
meets and exceeds its minimum system
requirements and four there's a very
handy guide over on the open Surface RT
gitbook page that walks you through how
to do this so I'll have that linked down
below and I'd highly recommend you go
and check it out if you want to get more
information on how to do this or you
know just continue to watch this video
that works too now there is some prep
work needed we do have to jailbreak this
thing to bypass some protections that
normally prevents other operating
systems from being installed on it this
is known as the Tegra jailbreak and it's
what we're going to get into right now
so the first thing we got to do is head
on over to the Tegra jailbreak USB guide
on the Windows RT devices gitbook I'll
have this link down below as well where
we can get the files that we need to put
on a USB drive now you need to have a
USB drive formatted to the fat 32 file
system and all you got to do is extract
that zip file and copy everything over
to your USB drive and now we got to pop
this drive into the Surface RT all right
so we've got the Surface RT all set up
and we have a USB hub plugged into it so
that I can plug in in both a keyboard
and this USB drive at the same time now
it's worth noting that uh you will have
to be running Windows rt8 or 8.1 for
this to work so since I put Windows 10
on this thing I had to restore it back
to factory settings but even if you're
running Windows rt8.1 you're going to
want to double check and make sure your
device has not received any updates that
were pushed out after October
2016 because evidently around that time
Microsoft pushed out an update that
patched this exploit from working and
there is a guide that shows you how to
restore this thing to its Factory
windows rt8 or 8.1 image and either one
will work just fine with all that aside
let's go ahead and hold down the volume
down button and then press the power
button to turn on the surface and this
is how you tell it to boot from the USB
drive so once the surface logo appears
we can let go of the volume down button
and we should see a Windows boot manager
menu and here it is so we're going to
press enter on install golden keys this
is the first part of the jailbreak that
will disable secure boot uh which is of
course necessary to get this to work so
we'll go down and hit accept and install
and then it should just restart the
device so we're going to hold down the
volume down button again and let go of
it to get back to that menu yeah that
wasn't in time so it's going to boot
into Windows 8 but that's fine we'll
just uh turn it off and uh turn it back
on and this time we'll go down to
install yahallo and it looks like that
was successful so it says please reset
your device manually using the power
button so you have to just do a uh force
power off here and now we're going to
boot into Windows 8 just to verify that
secure boot has been disabled because if
it hasn't uh we're going to have to go
through this process again so we're
going to do a Windows key R and run Ms
info 32 and we should see um right here
secure boot State off that is great so
now what we can do is power this thing
back off and eject the USB drive here we
can pop this back into the computer and
set it up for Linux okay so the next
thing we're going to do is run the
Rasberry Pi imager I've already got that
installed here this is available for
download on the Raspberry Pi website so
we can choose device we'll just select
no filtering operating system we want to
get Raspberry Pi OS 32bit and then the
storage we obviously want to select the
USB drive that we've got plugged in so
there's that we'll hit next now it will
allow you to customize some settings I
believe this is just for yeah the host
name username and password uh but we can
just do all of this on device so we'll
just uh hit out of that for now and it's
going to let us know that all of the
data on this device will be erased yes
we want to continue and it will begin to
WR now we can't just uh take the drive
out and put it back into the service RT
we have to copy some files over to it
and uh while this is writing I'll show
you where you can get those at so if you
go back to the open service RT gitbook
page under install Raspberry Pi OS there
are links here to a few files so you
want to click on the USB Linux boot.
ziplink and the Z image link this one
here will just take to the same place
that the Z image link will take you to
so this is the first link here you just
want to download the USB Linux boot. zip
file and the second link will take you
to this page pre-built binaries it
should jump you all the way down to this
latest binary section you just want to
click on this index of link and then
we're going to go into Surface RT we're
going to go to the newest date here
which as of this video is February 13th
2022 and we're going to need the top
three files here so I've already got
those downloaded and let's see the
Raspberry p imager is still going so
we'll give it some more time so we're
going to have to write all these files
to the USB drive once uh it finishes
Imaging it here all right it looks like
the format is done because Windows is
not recognizing what's on Drive J so
we're just going to cancel out of that
it's been written okay so we'll hit
continue but drive K here is the
partition that is readable by Windows
which is great because this is the only
thing we have to actually write uh files
to so what we're going to do is I'm
going to open up this um RT folder again
and we have to modify a couple of these
files first off we have to rename this Z
image file to just Z image so we're just
going to get rid of all this excess
stuff here and just Z image with no file
extension and then we have to open up
startup.nsh
in a text editor so let's just open that
up with uh looks like I don't have
anything else but notepad on here all
right we'll open that up and if we go
back to the open service RT page we can
just copy what's in this text box here
and then we paste it into the file we're
placing what is there and just save that
close out of that and then just write
all of the stuff to the root of the K
drive and that'll do it so now we're
just going to eject this drive put it
back back into the service RT and we'll
see if it works and here we are again so
we're just going to grab our USB hub
plug our drive back into it and uh we'll
see if this actually works now I've not
done this before so this is the first
time but judging from that guide um we
seem to have done everything right so uh
let's just hope that we that we get some
results here and there we go check that
out that is awesome now it's worth
noting that if you just want to run
Linux off of the USB drive and keep
Windows 8 or 8.1 on the surface RT's
internal drive for whatever reason you
can do that um but what we're going to
do is overwrite the internal hard drive
with Raspberry Pi OS because I mean
there's really nothing you can do with
Windows 8 or 8.1 on here anymore it is
out of date now does the touchscreen
work it does check that out uh I mean I
do remember reading this but it's just
cool to just I don't know confirm it in
person we're just going to hit next here
uh we'll enter in a username we'll just
do Michael I'm doing this with one hand
here Michael we'll do mjd as my uh super
secure password oh no I shouldn't say
anything and we're not on the network at
the moment so we're just going to okay
looks like we have to restart uh and
launch the launch the desktop okay so
we'll do that the first thing we're
going to do is go to the Raspberry Pi
menu I believe it is under accessories
and it's the SD Card Copier and we're
going to choose the copy from device as
the uh Memorex swivel which is the drive
if I can select it here using the
keyboard might be better for that all
right so memor swivel copy to device
this right here the only other option is
the internal drive we're going to check
new Partition uu IDs it's going to give
us a warning that will erase all the
current data on the drive we're going to
say yes and we're
off and we're done with that so we have
have to do one more thing before
restarting and that is we got to go into
the file manager and we have to go into
boot FS here uh it will prompt us to
type in our user password to mount the
internal drive again that mmcblk0 P1 so
we'll type in our password hit okay and
now it's mounted so what we have to do
is find the uh startup.nsh file which
let's just use the keyboard and go down
here
there it is startup.nsh um I think can I
hold on this to I think we can just
control click on it though or shift
click command alt click yeah I might
need to get a mouse to right click but
no worries we've got plenty of USB ports
right click on this we will go to text
editor and there it is now this is that
file that we pasted this text into on
our Windows machine but since we're now
going to be booting off of the internal
drive we have to tell it uh that root is
no longer Dev sda2 it is now if I can
click here Dev SL
mmcblk0
P2 definitely a long-winded uh string of
text there but we're just going to save
that so we'll do a contrl S and now we
can restart or actually just shut it
down and I'll wait for it to turn off
we'll unplug the uh USB hub I can
actually just use the keyboard as a USB
hub uh because it is an apple one that's
what I've got the mouse plugged into so
the tablet's off we'll unplug the uh USB
hub and get the keyboard plugged into
there and now we should just be able to
power this on and it should just boot
from the internal drive so I'm going to
quickly open up terminal here we are
going to expand the file system so that
we can utilize you know all the space on
on the internal drive uh so to do that
the guide tells us to type pseudo
raspi-config
I'm doing this with one hand so you have
to excuse the slowness of it there uh I
did not spell that right R A pii config
and should be under Advanced options and
expand file system there it is and root
partition has been resized all right
file system will be enlarged upon the
next reboot that sounds good um is there
anything else we can do from here um
okay we can configure wireless settings
will is it detecting the wireless no
network devices available H okay well
let's just restart and cuz I it the the
wireless adapter should be recognized I
believe uh but we'll just restart the
system uh to allow it to utilize all of
the the space on the on the hard drive
now yeah there is a features page on the
open Surface RT gitbook site and the
only thing that or the only things that
apparently don't work our Hardware
acceleration Bluetooth and the camera
Okay so we've restarted let's go back up
here it still says no network devices
available um let me just run raspy
config again and let's Okay system
options wireless land select the country
in which the pie is to be used okay we
got to scroll down a ways here can we
just do youu yes we can United States
wireless land country set to us please
enter SSID all right I'm just going to
enter in my details manually here there
was an error running option S1 Wireless
landan okay actually I think that we
completely skipped a step uh because if
you remember that modules file we
downloaded earlier I believe that is
just let's go that should be in the boot
folder here yeah in boot firmware this
SRT modules this I believe is just a
yeah a tar.xz file yeah firmware and
modules what we have to do is extract
this stuff and this folder is called lib
so there should be yeah a lib folder on
the root of the drive
and I imagine inside of here we've got
firmware and modules we should have
let's see firmware there we go okay so
let's just drag this over to here and
yes we want to overwrite it we'll just
do apply to all existing files uh looks
like there was an error oh is this
permission stuff directory yeah
permission denied
okay and that was it it recognized the
network adapter and we're online and now
since we're on the internet uh we get to
do some fun stuff I figured first we'd
try to just browse the web a little bit
by opening up Firefox this should be
like the latest version of Firefox that
can run cuz this is the latest release
of Raspberry Pi OS now that's a huge
upgrade right off the bat I mean cuz
going from that super old version of IE
on Windows 8.1 or Windows RT 8.1 on this
thing but keep in mind that we can't
take advantage of Hardware acceleration
on this machine because that is not
supported and so I've got task manager
up here so we can keep track of how much
CPU and memory usage that we're using I
expect the CPU usage to be up pretty
high I can already tell Firefox is it's
definitely struggling a little bit here
it looks like we're running Firefox
120.0 32bit I believe that is the latest
version or well it's not the latest
version but this was released in
November 2023 but that being said I am
noticing just trying to navigate through
these menus and everything um it is
definitely lagging behind but just for
the heck of it let's try to go to my
channel
and see if uh if we could play back a
YouTube video I'm going to be honestly
kind of surprised if we can it is
loading slowly but surely and the CPU
usage is pretty much maxed out we're at
like 95% here memory usage is still
pretty good um we're using like a
quarter of it we've got 2 gigs of ram in
here and this is I believe a uh it's
it's a quad core processor it's a 1.3
GHz quad core processor one of those
Nvidia Tegra uh Tegra 3 specific
yeah this is definitely uh this is
definitely stressing this thing out I
can tell uh even just scrolling down the
page is uh is it's kind of having
trouble keeping up with that let's see
if we can go full screen we can it's
just going to be very delayed it's still
it still has not started playing and I
did hit play oh now it just went oh the
tab just
crashed yeah that is that is to be
expected so that yeah YouTube you know
watching really browsing the web
honestly like let's try to go to
google.com here it does load the mobile
uh Google search results page but yeah
scrolling is a lot better on here we
could probably go to the old net why not
even though this is not an old system I
mean while it's over 10 years old I
guess you could say that's old but it's
not as old as the systems you would
typically be accessing the old net with
and look at that they've got over
600,000 visitors that is pretty awesome
to see because the old net is is is
super cool um so yeah scrolling still a
little bit of a delay um but let's just
try to go to nintendo.com in 1996 why
not and yeah this there's really no
problem with it all that loaded up just
fine we can uh click on the image there
and get in here and yeah all this is is
going to display relatively quickly
without any issues because it's far less
taxing on on the system than trying to
play a YouTube
video all right so we're back after a
little bit of experimenting with this
thing uh the first thing I did is
actually ran through the system updates
because uh I completely forgot to do
that I guess I just got a little bit too
excited um just getting Linux on this
thing so there were a bunch of system
updates that had to be done one of those
was um updating Firefox to a newer
version so if we go in here now we were
running uh
120.0 I believe now we're on
122.0 and this as of filming is the
latest version of Firefox but
unfortunately um Firefox is still uh
very very slow on this thing especially
when going to sites like YouTube now I
did find this um article SLU uh from
Simon from fires spear. deev and I'll
have this link down below and uh he
recommends installing um xf86 video to
the system as well as running a script
that can enable uh right clicking via
the touchcreen so I did that and now
when I hold down on the touchcreen it
will perform a right click uh which is
super useful so yeah that's where
working xf86 video however did not
really do anything to improve video
playback first of all we can't even you
know load a YouTube video it still uh
crashes the tab but I also tried going
into the installed copy of VC that we
have on here and trying to uh open a
network stream which you can do this to
play YouTube videos through VLC you can
go to Media open network stream I've got
one of my YouTube videos uh pasted in
here the URL of it so we'll try to open
that up it will attempt to if I can
actually hit enter there it will attempt
to open it up but VLC will just outright
crash uh which is rather unfortunate but
the guide says this won't necessarily
improve video performance it just says
it'll make it a bit snappier and better
at Graphics um so you can see here VLC
just crashes so yeah like that is kind
of unfortunate but it's honestly not
surprising at all for a tablet of this
age um but just having Linux on here in
general is really awesome and it opens
up a whole new world of possibilities
just what you can do with this thing so
speaking of that let's do a couple more
things with this thing um the first
thing we're going to do I've said thing
like four times in the past 2 seconds
apparently the battery indicator up here
you see it always says that it's 0%
charged and you know if I were to unplug
this thing the battery in here still
works if I were to unplug it um from
external power will it even change it
might not even say that it's yeah it
still thinks it's on external power this
is a problem with the um particular
Plugin or the the uh applet that is used
by default for the battery meter with
just I guess interfacing with the
battery that's in here but there is
another one that's been installed if you
just right click on the uh taskar and go
to panel settings then we go to panel
applets and we're going to scroll all
the way down and remove the power and
Battery one so we'll get rid of that and
then we're going to add battery monitor
and it looks like it's a vertical
battery meter it's uh super tiny but if
we hover over it it does say % charged
but we can remove the spacer there to
get rid of that so yeah now you have an
accurate battery meter and one other
cool thing if you were curious about the
um touch SL type covers they do work so
if I were to connect this to the bottom
of the service RT and then if I just
move around with the trackpad here you
can see uh that the cursor moves around
on screen and of course the uh type
cover will work as well if I just start
typing random stuff so yeah that's
awesome if you were uh wondering about
that we'll go ahead and disconnect that
for now and I figure just to end off
this video let's hop into the Raspberry
Pi um ad remove software or the uh
software package manager and just uh
find a couple things to install maybe
some games I believe there's a bunch of
stuff in here it has been a while since
I've used Raspberry Pi OS and I see
chests so let's grab 3D chests why not
gnome solitaire card game collection
that sounds like it's right up my alley
so I think I'm happy with that we'll
just apply those changes all right so
all that just installed successfully so
if we go into the Raspberry Pi menu
under games you see we've got 3D chess
and the soliter program um so we'll just
uh run through these now yeah this is um
well it is 3D chess which I've never
played before I've only played you know
regular chess um so this you've got like
three separate boards here and I think
you're supposed to stack them like well
I mean I guess in the in the
configuration that it was that it was
stacked in I mean I guess you can
obviously move them around however you
want um but and can we resize them let's
see if we can make them a little bit
larger yes we can okay so that's useful
but yeah it is chest just in three
dimensions and uh if you were curious it
it runs here just fine so um yeah we'll
close out of that and let's briefly
check out the solitire program ah yes
good old solitire I mean I'm not going
to sit here and play through an entire
uh match of solitire uh but you get the
idea there's a bunch of packages you can
install in that package man there's
certainly more uh than you could get
from the Microsoft store on Windows 8
and do you know what else has more to
offer than the Microsoft store in
Windows 8 today's video sponsor
Squarespace because if you want to make
a website whether it's a portfolio a
personal blog or even an online store
they make it incredibly easy to get
started with things like their template
selector where you can choose from a
plethora of beautifully designed themes
to base your side around or use their
blueprint tool to build your own they
also have e-commerce functionality built
right in so if you have something to
sell whether it's physical or digital
they've got the tools to Showcase your
products in their best light and let
your audience know about exclusive
promotions and new offerings through
email campaigns and their new fluid
engine ties everything together allowing
you to easily drag and drop images and
text boxes to customize your site
however you want to really make it yours
so if you've got a great idea for a
website head on over to square
space.com mjd to get 10% off your first
purchase of a website or domain and huge
thanks again to Squarespace for making
this video possible yeah there you have
it that is uh going through the process
of installing Raspberry Pi OS on the
Microsoft Surface RT I hope you guys
enjoyed this video if you did be sure to
give it a thumbs up get subscribed all
that good stuff and if you really
enjoyed this video and want to get early
access to my future episodes I do have a
patreon Down Below you can check out or
you could hit that join button to become
a channel member but either way I just
want to thank you all so much for
watching and I will see you in the next
[Music]
video
تصفح المزيد من مقاطع الفيديو ذات الصلة
An Introduction to ROS, the Robot Operating System: Install and put together (3/6)
How to install Windows 10 on Asus X540 Laptop - Enable USB Boot in Bios Settings
Dual Boot Windows - The Smart Way
Cara Install WSL Linux Di PC Windows [Security & Development]
2. Boot a Linux USB installation in VirtualBox
Raspberry Pi Travel Router - RaspAP (2024)
5.0 / 5 (0 votes)