Aktivitas Belajar 2.2
Summary
TLDRThis instructional video script guides viewers through the process of setting up a wireless network. It begins by introducing the necessary tools, such as a wireless router and power adapter, and explains their functions. The script then details the steps to configure the router, including resetting it, connecting it to the internet source, and accessing its settings via a laptop or PC. It covers the initial setup using default SSID and PIN, navigating through the router's interface, and customizing the network name and password. The tutorial also demonstrates how to change the SSID and password after the initial setup and concludes with a test of the internet connection, ensuring that the viewers can successfully browse the web using their newly established wireless network.
Takeaways
- 🌐 The video provides a tutorial on how to set up a wireless network.
- 🔌 It introduces two types of computer networks: wired (e.g., UTP STP, coaxial) and wireless (e.g., Bluetooth, WiFi).
- 🛠️ The tools required for setting up a wireless network include a Wireless Router, power adapter, laptop or PC, and a UTP cable.
- 📶 The Wireless Router's function is to broadcast a wireless network.
- 🔌 The power adapter supplies power to the Wireless Router.
- 💻 A laptop or PC is used for configuring the Wireless Router.
- 🔢 The video demonstrates using a TP-Link 840N model for the practical setup.
- 🔑 The initial steps include noting down the SSID and PIN for configuration purposes.
- 🔄 The process involves resetting the device by pressing the reset button until all LED lights turn on and then off.
- 🖥️ Configuration is done through a laptop or computer by accessing the SSID and PIN, then proceeding with the setup wizard.
- 🔒 The security settings include choosing an operation mode, setting a dynamic IP if the internet source provides DHCP, and configuring the SSID and password.
- 🔄 The video also explains how to change the SSID and password of the wireless network through the TP-Link configuration page.
Q & A
What is the main topic of the video script?
-The main topic of the video script is how to install a wireless network.
What are the two types of computer networks mentioned in the script?
-The two types of computer networks mentioned are wired networks, such as UTP STP or coaxial, and wireless networks.
What is the function of a Wireless Router as described in the script?
-The function of a Wireless Router is to broadcast a wireless network.
What is the purpose of the power adapter mentioned in the script?
-The power adapter is used to provide power to the Wireless Router.
What devices can be used for configuring the Wireless Router as per the script?
-Laptops or PCs can be used for configuring the Wireless Router.
What is the frequency band used by the wireless technology in the script?
-The frequency band used by the wireless technology in the script is 2.4 GHz.
What is the model of the device used for the practical demonstration in the script?
-The model used for the practical demonstration is TP Link 840n.
What is the initial step to configure the Wireless Router as described in the script?
-The initial step is to note down the SSID and the PIN for login during configuration.
How does the script describe resetting the Wireless Router?
-The script describes resetting the Wireless Router by pressing the reset button for about 10 seconds until all the LED lights turn on and then off.
What website is used to access the settings of the TP Link Wireless Router in the script?
-The website used to access the settings is TP Link wifi.net.
What are the steps to change the SSID and password of the wireless network as per the script?
-The steps include accessing the TP Link website, going to basic settings under the wireless menu, changing the SSID and password as desired, and saving the changes.
Outlines

هذا القسم متوفر فقط للمشتركين. يرجى الترقية للوصول إلى هذه الميزة.
قم بالترقية الآنMindmap

هذا القسم متوفر فقط للمشتركين. يرجى الترقية للوصول إلى هذه الميزة.
قم بالترقية الآنKeywords

هذا القسم متوفر فقط للمشتركين. يرجى الترقية للوصول إلى هذه الميزة.
قم بالترقية الآنHighlights

هذا القسم متوفر فقط للمشتركين. يرجى الترقية للوصول إلى هذه الميزة.
قم بالترقية الآنTranscripts

هذا القسم متوفر فقط للمشتركين. يرجى الترقية للوصول إلى هذه الميزة.
قم بالترقية الآنتصفح المزيد من مقاطع الفيديو ذات الصلة

Cara Cepat Seting Internet dan Wireless Mikrotik hAP Lite RB941-2nd
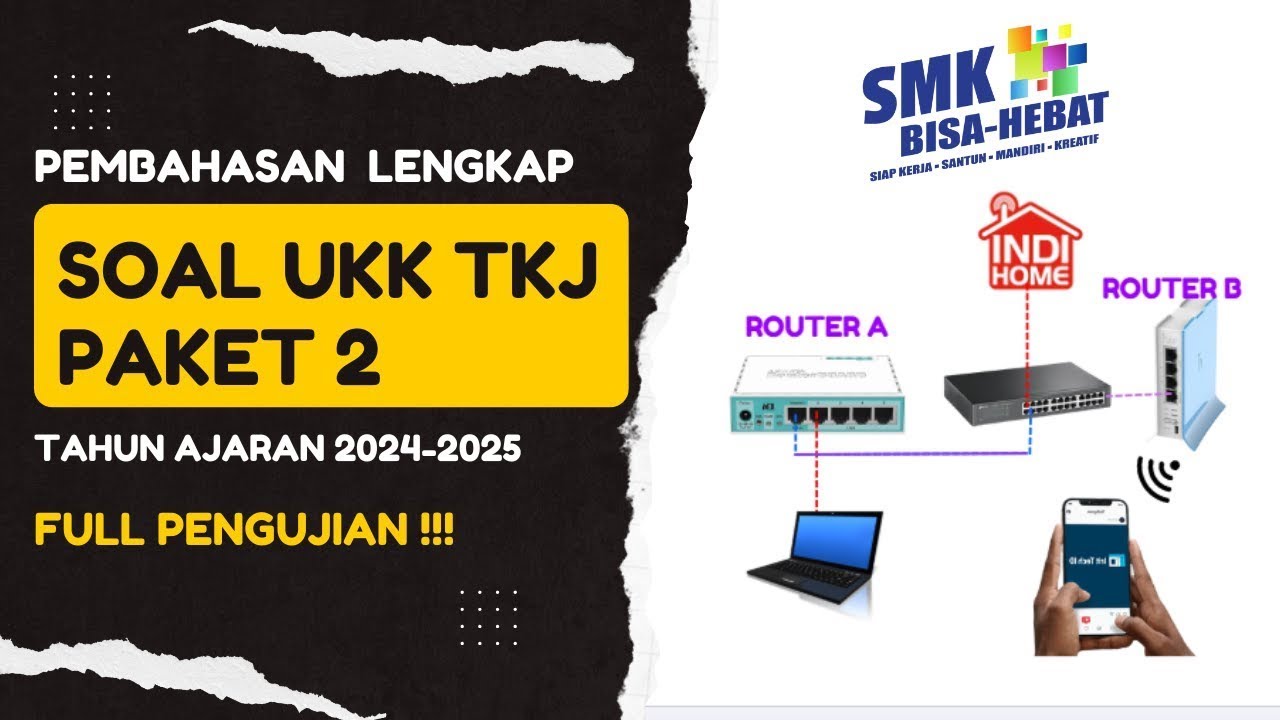
Discussion of UKK TKJ Package 2 Questions for 2025 - 2 Router Dynamic Routing OSPF Mikrotik R8941...

Pembahasan Soal UKK TKJ Paket 2 Terbaru 2024/2025 Full - 2 Router Dynamic Routing ospf RB 951-2HnD

Menginstalasi Jaringan Lokal (LAN) - Teknik Komputer dan Jaringan

Rancang Bangun Jaringan Berbasis Kabel dan Nirkabel dengan VLAN dan Routing (UKK 2023 Paket 2) TKJ
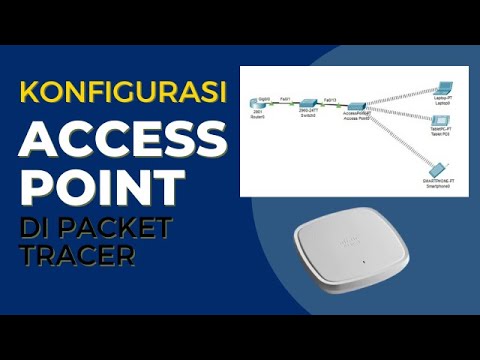
Konfigurasi Access Point Cisco di Packet Tracer
5.0 / 5 (0 votes)
