2 Powerful 'RANGES' that Control Every BIG Move🔥| Dealing & Displacement Ranges | SMC | ICT
Summary
TLDRIn this video, the focus is on understanding *Dealing Ranges* and *Displacement Ranges* within the Smart Money Concepts (SMC) trading strategy. Viewers are guided through the identification of key market structure elements, such as swing highs and lows, liquidity zones, and the use of Fibonacci retracement levels to find premium and discount areas. The video highlights the importance of liquidity sweeps and inducement levels, offering strategies for optimal trade entries. Displacement ranges are explained as impulsive moves with minimal retracement that can also create valuable trade opportunities. Overall, it equips traders with critical tools for making informed, high-probability trades.
Takeaways
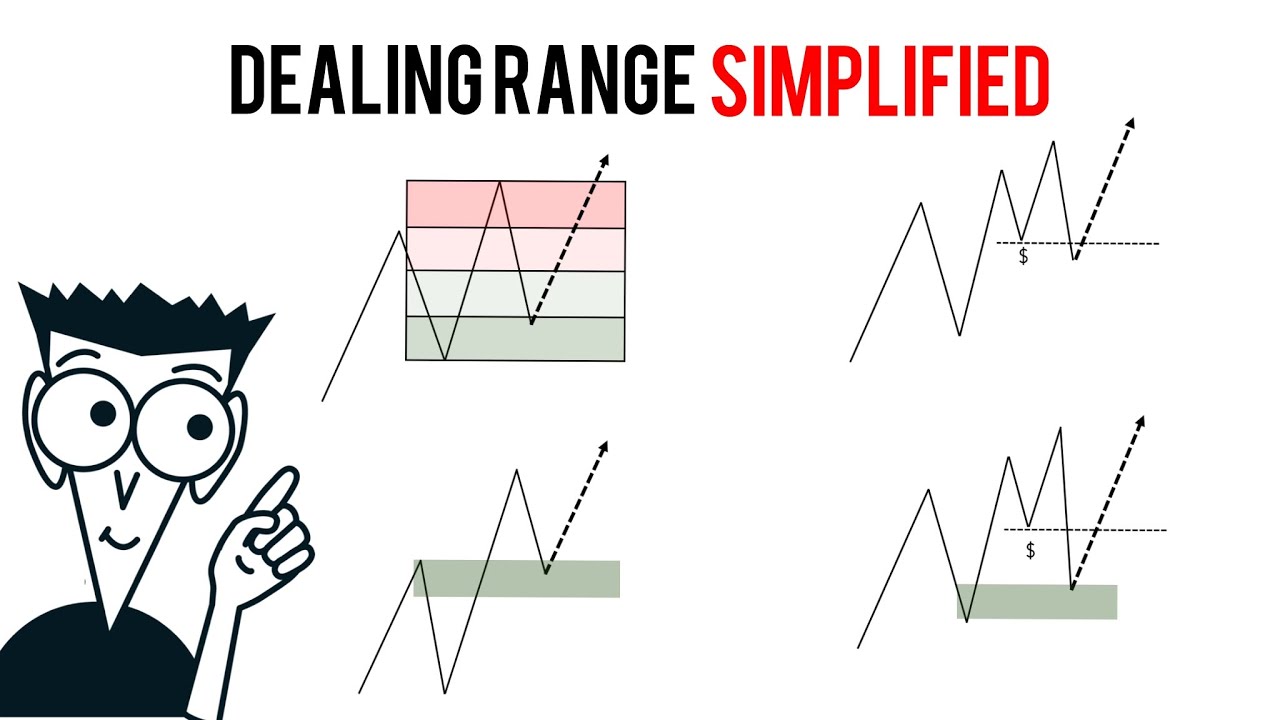
- 😀 Dealing ranges are price ranges between swing highs and swing lows that take out both buy-side and sell-side liquidity, crucial for identifying optimal trade setups.
- 😀 Understanding liquidity sweeps is essential. These are areas where large orders accumulate, often forming within and outside dealing ranges.
- 😀 Premium and discount zones within a dealing range are identified using Fibonacci retracement levels (0%, 50%, and 100%), helping traders buy at discounts and sell at premiums.
- 😀 In bullish markets, the discount zone is below the 50% Fibonacci level, while the premium zone is above it. Traders should aim to buy in the discount zone.
- 😀 A proper dealing range requires swing highs and lows that have already taken out liquidity pools, ensuring that the range is valid for trading.
- 😀 Inducement levels are key in confirming swing highs and lows, particularly after a break of structure or a market retracement.
- 😀 Fair value gaps and order blocks are considered internal liquidity areas within a range, but the focus should be on external buy-side and sell-side liquidity.
- 😀 Displacement ranges are formed by large, impulsive price movements with minimal retracements, typically indicating institutional intent and liquidity hunting.
- 😀 For bullish displacement ranges, the area below the 50% Fibonacci level is considered the discount zone, ideal for long trade setups.
- 😀 To optimize trade entries, move to lower time frames to look for structure shifts, which can confirm a reversal in the trend direction.
- 😀 When market structure shifts from bullish to bearish, it invalidates previous bullish ranges, and traders must reassess with new ranges based on the bearish trend.
Q & A
What is the primary concept being discussed in the video?
-The primary concept discussed is Dealing Ranges (DRT) and Displacement Ranges in Smart Money Concepts (SMC) trading. These concepts help traders identify optimal price zones for trading by understanding liquidity sweeps and institutional manipulation of price action.
How does a Dealing Range function in SMC trading?
-A Dealing Range is a price range between a swing low and a swing high that sweeps both buy-side and sell-side liquidity. This is a key concept in SMC as it helps traders understand where price manipulation occurs, allowing them to anticipate institutional activity and optimize their trade entries.
Why is the concept of liquidity important in identifying Dealing Ranges?
-Liquidity is crucial because institutions manipulate price action by targeting areas with concentrated stop-loss and pending orders, known as liquidity pools. Identifying these liquidity areas within a Dealing Range allows traders to align their entries with institutional intent, improving trade accuracy.
What role do Fibonacci levels play in analyzing Dealing Ranges?
-Fibonacci levels, specifically the 0%, 50%, and 100% levels, are used to mark the premium and discount zones within a Dealing Range. The 50% level is considered the equilibrium point, with the discount zone below it and the premium zone above it. Traders use these zones to guide their entries—buying at discounts and selling at premiums.
What is the significance of 'Inducement' in the context of a Dealing Range?
-Inducement refers to the first pullback after a break of structure that confirms the swing high or swing low in a market. Identifying inducement levels is important for confirming the price action and ensuring a valid Dealing Range is formed before taking trades.
What are the differences between internal and external liquidity within a Dealing Range?
-Internal liquidity refers to stop-losses, order blocks, fair value gaps, and other imbalances within the Dealing Range. External liquidity refers to major swing highs and lows outside the Dealing Range. Both types of liquidity are targeted by institutions to create price movement.
Why should traders avoid using fair value gaps and order blocks when identifying liquidity pools in a Dealing Range?
-Fair value gaps and order blocks represent areas where price moved too fast or where institutional orders were placed, showing imbalance in the market. These are different from buy-side and sell-side liquidity pools, which reflect areas where retail traders have placed stop-losses and limit orders. These liquidity pools are where institutions typically hunt for liquidity.
How can a trader identify a valid swing low and swing high for a Dealing Range?
-To identify a valid swing low and swing high, traders need to find a swing low that has already taken out sell-side liquidity, and a swing high that has swept buy-side liquidity. The liquidity pools should be located below equal lows or internal lows for sell-side, and above equal highs or internal highs for buy-side.
What is a Displacement Range, and how is it different from a Dealing Range?
-A Displacement Range is formed after a strong impulsive price move, often marked by large-bodied candles with minimal retracement or wicks, which create fair value gaps. Unlike Dealing Ranges, Displacement Ranges focus on price moves that sweep liquidity and indicate institutional intent to move price in a particular direction.
How can traders optimize their trade entries when dealing with Displacement Ranges?
-Traders can optimize trade entries by waiting for price to pull back to the equilibrium (50% Fibonacci level) or the discount zone in a bullish Displacement Range, or the premium zone in a bearish one. After a pullback, traders should confirm a structure shift on a lower time frame to ensure a reversal, then enter with a tight stop-loss and a favorable risk-to-reward ratio.
Outlines

此内容仅限付费用户访问。 请升级后访问。
立即升级Mindmap

此内容仅限付费用户访问。 请升级后访问。
立即升级Keywords

此内容仅限付费用户访问。 请升级后访问。
立即升级Highlights

此内容仅限付费用户访问。 请升级后访问。
立即升级Transcripts

此内容仅限付费用户访问。 请升级后访问。
立即升级浏览更多相关视频

Choosing Dealing Ranges & Displacement Ranges - ICT Concepts
Dealing Range Simplified

ICT Concepts: Dealing Ranges (Multi-Timeframe Operation)🚨

Full Trading Plan using Dealing Ranges - Ep 21

C'est quoi le Smart Money Concepts en Trading ? | EP.1

INDUCEMENTS (IDM)🔥 | Smart Money Concepts | SMC | SMT | Episode - 5 | ICT
5.0 / 5 (0 votes)
