PEMBUATAN POLA DASAR BADAN MENGGUNAKAN TEKNIK DRAPING
Summary
TLDRThis video tutorial demonstrates the step-by-step process of creating a basic women's bodice pattern using the draping technique. It covers the preparation of tools and materials, including dress forms, fabric, and measuring instruments. The process involves draping fabric on the dress form, smoothing and pinning it to create a tailored fit, and marking pattern lines for the front and back bodice. The final steps include transferring the markings to fabric, trimming excess material, and stitching the front and back pieces together. The goal is to help students learn how to create a precise bodice pattern efficiently and effectively.
Takeaways
- 😀 Draping technique is used to create garment patterns by draping fabric directly onto a dress form.
- 😀 The purpose of draping is to allow students to easily create accurate body patterns for women’s garments.
- 😀 Preparation of tools and materials is crucial before starting the draping process, including a dress form, fabric, measuring tape, pins, chalk, and scissors.
- 😀 It’s essential to measure the fabric required before starting, ensuring it covers the necessary areas, such as from the shoulder to the waist, with an additional allowance for seams.
- 😀 Draping begins by marking the center front and back, ensuring accuracy in measurements before proceeding with the garment construction.
- 😀 The fabric should be carefully pinned at the center front and along the body’s natural curves to create a smooth fit.
- 😀 For both the front and back pieces, attention must be given to the shoulder and neckline areas to ensure they are neatly draped and aligned.
- 😀 Once the fabric is pinned and aligned properly, the pattern markings are transferred to the fabric using chalk or a fabric pen.
- 😀 After marking the pattern, it’s important to trim excess fabric, ensuring proper seam allowances, especially at the waist and shoulders.
- 😀 The process involves both front and back draping, making sure the patterns are symmetrical and accurately reflect the measurements and body shape.
Q & A
What is draping in fashion design?
-Draping is a technique used in fashion design where fabric or material is directly arranged or draped on a dress form to create patterns for clothing. This method allows designers to work with the fabric in a practical and effective manner.
What is the main objective of draping in this context?
-The main objective is to teach students how to create a basic women's body pattern practically and effectively, allowing them to easily create or draw a pattern that fits correctly.
What tools and materials are required for draping?
-The required tools and materials include a dress form, muslin fabric (blacu), measuring tape, pins, chalk or fabric marking pens, scissors, and a sewing machine or hand tools for making adjustments.
How do you measure fabric for the draping process?
-To measure fabric, first measure from the highest point of the shoulder, passing through the bust line, down to the waist. Add an additional 10 cm for seam allowance. Then, measure the width of the fabric needed for the front and back sections, ensuring you leave 10 cm extra for seam allowance.
What is the first step in creating a women's body pattern through draping?
-The first step is preparing the necessary materials and marking the center front or back of the fabric to start draping the pattern onto the dress form.
How do you ensure the fabric fits well during the draping process?
-To ensure a good fit, the fabric is carefully arranged, pinned along the center front and back lines, and adjusted according to body contours. The fabric should be smooth and flat, with excess fabric gathered or folded as necessary to match the body’s measurements.
What should be done after the fabric is draped and pinned to the dress form?
-Once the fabric is draped and pinned in place, the next step is to transfer all the markings and lines from the fabric onto the material using chalk or fabric pens. Then, the fabric is cut according to the pattern lines, including seam allowances.
How do you handle the armhole during the draping process?
-During the draping process, the armhole area is carefully smoothed and adjusted. Excess fabric is folded or tucked into the body of the garment, and it is pinned to ensure a clean, consistent curve.
What is the significance of seam allowances in draping?
-Seam allowances are crucial because they provide the necessary extra fabric to sew the pieces together. In this process, a 2 cm seam allowance is added to areas like the shoulders and waist to ensure that the garment can be properly constructed.
How is the back pattern created in comparison to the front pattern?
-The process for creating the back pattern is similar to the front pattern. The fabric is folded along the center back, pinned, and adjusted, with markings transferred onto the fabric. Once the back pattern is complete, it is carefully aligned with the front pattern for consistency before cutting.
Outlines

此内容仅限付费用户访问。 请升级后访问。
立即升级Mindmap

此内容仅限付费用户访问。 请升级后访问。
立即升级Keywords

此内容仅限付费用户访问。 请升级后访问。
立即升级Highlights

此内容仅限付费用户访问。 请升级后访问。
立即升级Transcripts

此内容仅限付费用户访问。 请升级后访问。
立即升级浏览更多相关视频

Media Pembelajaran Video Pembuatan Pola Dasar Badan dan Rok berbasis BISINDO
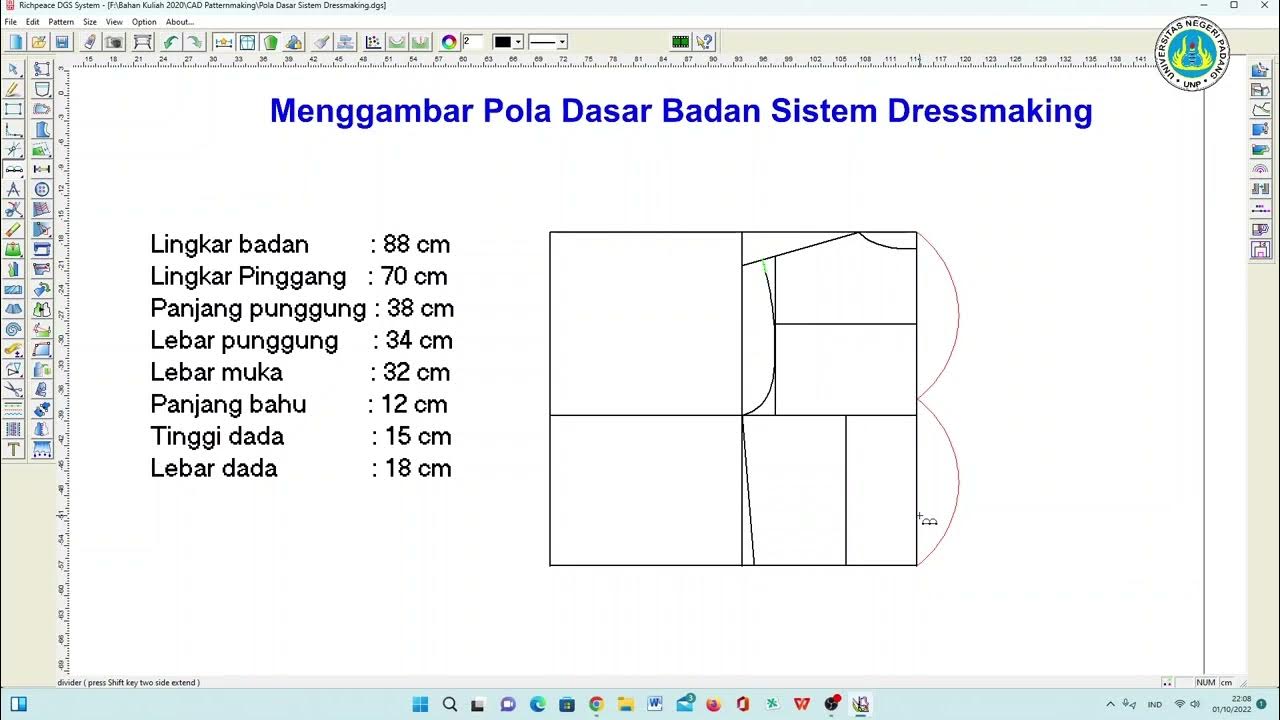
Cara Membuat Pola Dasar Badan Dressmaking dengan Richpeace

teknik dasar sulam payet/teknik daun

Mini crochet shoulder bag tutorial / crochet ruffle bag/ how to crochet a coquette bag for beginners

Tutorial Membuat Menara Kaki 3

How to sew this stylish halter neck dress with a rope
5.0 / 5 (0 votes)
