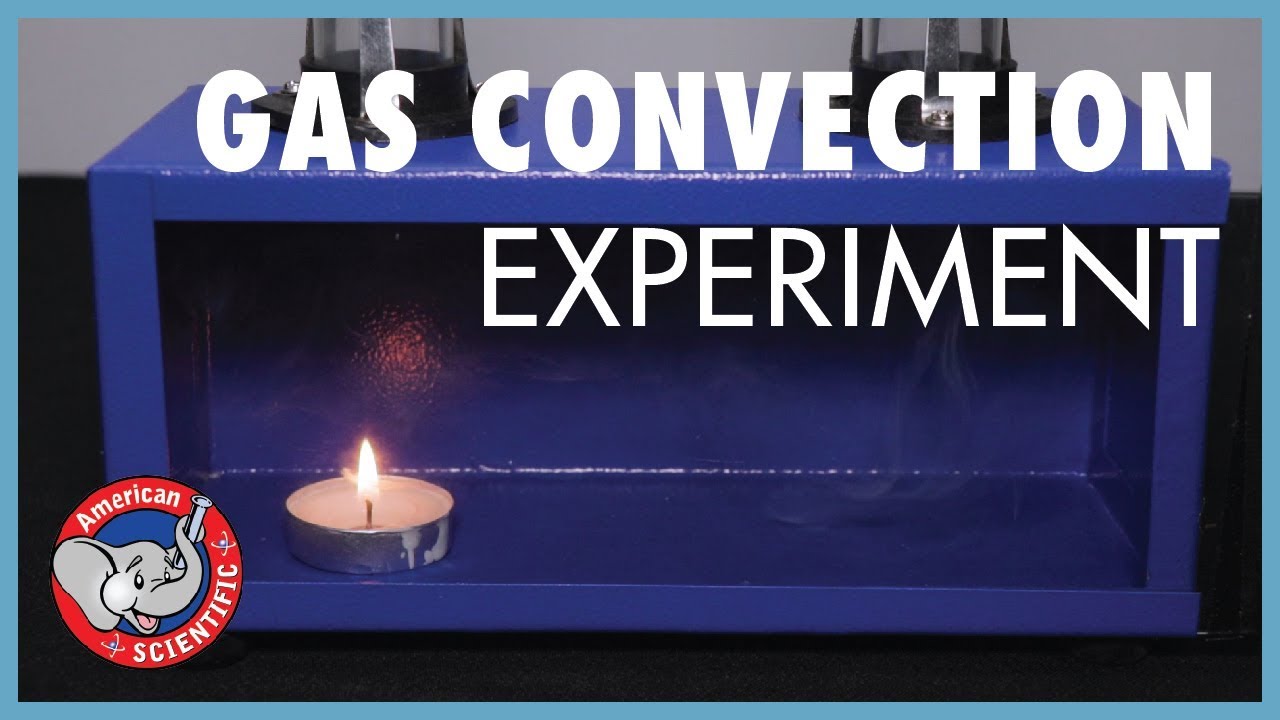
Small Scale Fire Behavior Prop Demonstration
Summary
TLDRThis video demonstrates small-scale fire behavior training using a specialized box prop. Led by Sean Gray and Deputy Chief PJ Norwood, the session covers how to set up, burn, and teach firefighters the fundamentals of fire behavior. The box simulates different fire scenarios, highlighting how ventilation, oxygen control, and modern vs. legacy fuels affect fire dynamics. The training emphasizes the importance of understanding smoke color, velocity, and neutral planes. Techniques such as ventilation-induced flashovers and bi-directional flow are showcased, teaching valuable lessons in fire tactics and firefighter safety.
Takeaways
- 🔥 The fire behavior training uses a box to simulate real fire scenarios, allowing firefighters to understand and control fire behavior.
- 🌾 Fuel is placed only in the lower left compartment, consisting of dry straw and pine strips, with no additional fuel in the other compartments.
- 💨 Observing smoke characteristics, such as color, velocity, and density, is crucial for understanding fire behavior.
- 🚪 Ventilation control is key in manipulating fire growth, by opening or closing compartments to increase or decrease oxygen flow.
- 🧪 Polystyrene materials (e.g., styrofoam cups) are added to simulate modern fuel, showing the difference in smoke density and color.
- 🌫️ The demonstration emphasizes the importance of bi-directional flow and neutral planes in fire behavior, especially in structural fires.
- 🔥 Ventilation can drastically change fire behavior, sometimes leading to flashover if not carefully managed with proper openings.
- 🪵 Controlling airflow can effectively choke out a fire, similar to shutting an oven door during a fire to smother it.
- 🏠 The training simulates various fire scenarios, including vertical ventilation and roof operations, to demonstrate the effects of adding or removing oxygen.
- 💡 The drill highlights that ventilation does not cool a fire, only water does, and ventilation must be coordinated with firefighting operations.
Q & A
What is the main focus of the training discussed in the script?
-The main focus of the training is small-scale fire behavior and how to teach firefighters about it using a fire behavior training prop.
What materials are initially used to start the fire in the training box?
-The materials used to start the fire are dry straw and pine strips, which are placed only in the lower left compartment of the training box.
Why is only the lower left compartment filled with fuel?
-The fire behavior is intended to begin in the lower left compartment, and as the fire progresses, the box itself becomes the fuel, hence no additional fuel is needed in the other compartments.
How does controlling ventilation openings affect the fire behavior?
-Controlling ventilation openings by opening and closing them can change the fire behavior by either decreasing or increasing the amount of oxygen into each compartment.
What is the purpose of adding polystyrene materials to the fire?
-Polystyrene materials are added to demonstrate the difference in smoke characteristics, such as density and color, when modern fuel packages are involved.
What does the color and density of the smoke indicate during the training?
-The color and density of the smoke indicate the type of fuel burning. Light-colored smoke signifies legacy fuels like hay or straw, while darker and denser smoke indicates the presence of modern fuels.
What is a neutral plane and how is it demonstrated in the training?
-A neutral plane is the level where the smoke and hot gases separate from the cooler, fresh air. It is demonstrated when the smoke escapes out the top of the box and fresh air is drawn in from the lower part.
How does the fire behavior change when the lower right compartment's door is opened?
-Opening the door between the lower left and lower right compartments changes the fire behavior by allowing the lower left to become an outlet, and the lower right to experience bi-directional flow with an exhaust and intake of fresh air.
What is the significance of the fire flashing when the lower left compartment is opened?
-The fire flashing when the lower left compartment is opened signifies that the fire is rapidly transitioning to a more aggressive state due to the increased availability of oxygen.
How does roof ventilation affect the fire behavior as demonstrated in the training?
-Roof ventilation, when properly coordinated with fire attack, can be positive by increasing the velocity and density of the smoke, but it requires breaking down the sheetrock to be effective, as demonstrated by opening the slide trays.
What is the key takeaway from the training regarding ventilation and fire behavior?
-The key takeaway is that ventilation, whether through opening compartments or roof operations, significantly affects fire behavior by controlling the amount of air available to the fire, which in turn affects the heat and potential for flashover.
Outlines
🔥 Introduction to Fire Behavior Training
The video opens with Sean Gray and Deputy Chief PJ Norwood discussing small-scale fire behavior training. The setup involves a firebox used to demonstrate the basics of fire behavior and tactics. The fire is started in the bottom left compartment with dry straw and pine strips, progressing as the firebox itself becomes fuel. Observing smoke color, velocity, and density is emphasized to teach students about fire growth and ventilation effects.
🚪 Ventilation and Fire Behavior
This section delves into the role of ventilation in fire behavior, as firefighters control air flow by opening and closing compartments. By adjusting the air supply, the fire's intensity changes. The video demonstrates how the compartment fire can be extinguished by limiting oxygen, similar to closing an oven door during a fire. The importance of controlling air sources and its effects on fire is highlighted.
🏠 Fire Movement and Compartmentalization
In this part, the video focuses on fire movement through compartments. Opening up compartments allows fire and smoke to migrate, illustrating how fire seeks oxygen. As openings are manipulated, changes in fire behavior are observed, with increased turbulence and smoke density. The explanation ties into real-world scenarios, showing how controlling openings in a building can either snuff or spread a fire.
🏗️ Understanding Fire in Multi-Story Structures
The video explores how fire behavior differs in multi-story buildings, with smoke and heat spreading across various levels. As compartments are opened, more oxygen feeds the fire, increasing heat and the chance of flashover. Ventilation strategies are examined, demonstrating that more air leads to more intense fires, reinforcing that ventilation alone doesn’t cool a fire—water is necessary to manage the heat.
Mindmap
Keywords
💡Fire behavior
💡Ventilation
💡Polystyrene materials
💡Bi-directional flow
💡Neutral plane
💡Legacy fuels
💡OSB (Oriented Strand Board)
💡Flashover
💡Backdraft
💡Compartmentalization
Highlights
Introduction of the fire behavior training using a small-scale fire behavior prop to simulate various fire dynamics.
Explanation of how the box simulates different compartments where fire can behave in unique ways based on fuel placement and ventilation.
Importance of observing smoke color, density, and velocity to understand the type of fuel burning and the fire’s behavior.
Comparison of legacy fuels like straw and pine with modern fuels like polystyrene, showing how they produce different smoke characteristics.
Demonstration of how ventilation control impacts fire behavior by opening and closing compartments to either fuel or starve the fire.
Illustration of the neutral plane and bi-directional flow in the box, where hot gases escape and fresh air is pulled in to sustain combustion.
Discussion of how controlling airflow can snuff out fires, similar to closing an oven door in a household fire scenario.
Incorporation of flashover concepts, where increasing air can rapidly heat up the box and cause a ventilation-induced flashover.
Explanation of how unburned combustion products, like smoke, can ignite when heated to sufficient temperatures, showcasing the danger of incomplete combustion.
Observation of how smoke and heat can migrate through the compartments of the box, simulating fire spread in a two-story wood frame house.
Emphasis on the importance of coordinated fire ground operations, showing how ventilation without water application can actually increase fire growth.
Demonstration of roof ventilation and the importance of breaking down sheetrock after cutting a hole to effectively release smoke and heat.
Highlight of the effects of multiple ventilation points, where more air increases fire intensity and growth, eventually compromising the structural integrity of the box.
Reinforcement of the principle that ventilation alone does not cool fires—water application is essential to control and extinguish a fire.
Conclusion with a summary of how the training covers fire behavior, fire attack, search and rescue, and ventilation techniques.
Transcripts
[Music]
welcome to fire engineering training
minutes I'm Sean gray out here with
deputy chief PJ Norwood and today we're
going to be talking about small scale
fire behavior training here behind us we
have the box that we have all the plans
and building plans that you'll be able
to get and PJ is going to walk you
through the whole entire process of
setup how to burn the box and how to
teach your firefighters fire behavior so
welcome so this is an excellent fire
behavior training prop that can be used
to show the basics of fire behavior but
you can also incorporate your tactics
into today we're going to show you the
basics of fire behavior and how we burn
this box and move the fire through this
box that we demonstrate multiple facets
of fire behavior might help us hear from
Cobb County Georgia they're going to
come in they're going to light the fire
in this box and while they do that I'm
going to show you what we're using for
materials so we're starting off with
some dry straw and some pine strips this
dry straw pine strips is located only in
the lower left compartment of this box
that's the only compartment that we're
putting fuel into because that's where
the fire behavior is going to begin as
this fire progresses and burns the box
itself becomes the fuel that's why there
is no additional fuel needed in
compartment 3 or compartment 2 which is
the bottom right and the top right
compartment so again the only
compartments that fuel is going into is
the bottom left what we want to explain
to our students as this fire is lit and
begins to grow you start looking at the
smoke start looking at the color of the
smoke start looking at the velocity and
the density of the smoke and you'll see
the color of the smoke here is light in
color almost a white or a gray you want
to explain to your students that this is
more of a legacy fuel it's your hay your
straw your pine once this compartment
gets going we're going to change that
fire behavior and change how the fire
reacts by controlling the ventilation
openings by opening and closing those
ports to decrease the amount of oxygen
or increase the amount of oxygen into
each compartment
we're also going to add some polystyrene
materials to show the difference in the
smoke so now we can then look at modern
fuel package that we're actually seeing
in today's homes the beginning part of
this drill it will at times seem like it
takes a long time for the box to get
going but once the box heats up the OS
and B starts burning and starts off
gassing will rapidly transition to it to
an excellent fire behavior drill so my
two partners here from Cobb County at
this point they're watching the fire
behavior they're taking a look at how
the fire progresses and we're giving it
plenty of air we're allowing the
materials the legacy materials that are
in there to get going to start burning
and start preheating that compartment so
we can get the OS and B burning and off
gassing so now that we have that
compartment going a little bit we're
going to go ahead and introduce some
polystyrene materials so we can see the
difference in the smoke so we're going
to go throw these styrofoam cups into
that compartment and we'll start seeing
a change of the smoke the smoke will
start getting a little denser and a
little darker and you'll start seeing a
little bit more volume they'll also
begin to shut down that compartment and
decrease the amount of air the decrease
the amount of available air in that
compartment to burn as they do that
there's some things you should start to
look for you can see a change in the
color of smoke you can see the neutral
plane you can explain to them the
difference between the new what the
neutral plane actually is in
bi-directional flow so that the smoke
the heating gases are escaping out the
top of the box and the fresh air is
coming in the lower part of the box you
can begin discussing conduction
convection and radiation how your year
actually works when you're in these
environments when you're fighting
structural fires you see my partners at
this point they're just opening and
closing that open they're controlling
the openings just to progress the fire a
little bit more and by adding more air
it's going to increase the speed of that
fire and how that fire will will develop
you'd see now they provided a lot of air
we started seeing that fire come out of
that compartment as he shut that down
you can clearly see a neutral plane you
can
the bi-directional flow and you'll begin
to start seeing that smoke almost puff
and get turbulent as it comes out of
that compartment because that fire
that's burning is just looking for more
air it's looking for air so it's trying
to pull all the available air into that
compartment this is the same as we have
in our house fires now you can see the
smoke is a little bit darker and denser
you can clearly see a neutral plane and
some bi-directional flow and we started
to have a little bit of fire coming out
of that compartment now as he opens up
that compartment just a crack at this
point you'll see that smoke start to
push and you'll see the bi-directional
flow in that air being drawn into that
compartment as he opens up that
compartment more we're providing more
air so we're going to have a greater
fire we have to remember is in our fire
tact tactics whatever we doing on the
building is creating a hole which is
ventilation whether we're fire tack
we're forcing entry were search or
whether a door fails or a window fails
that's providing ventilation in the past
our ventilation was that we thought of
just breaking a window or just cutting a
hole in the roof and what happened here
is he closed down that compartment he
limited the oxygen into that compartment
and actually snuffed the fire out so
same thing we like to talk about during
our fire prevention and education is
when there's an oven fire they just we
tell our occupant to us shut the oven
door and the fire would go out we just
did the same thing here in a wood
structure we just controlled the amount
of air and we actually choked that fire
out
so just by controlling the openings
affects the fire behavior so at this
point in the drill you want to let this
compartment get going again you want to
really start heating that OS and be up
and shortly we're going to open up
compartment three and we're going to
remove the door that goes from four
which is lower right to three to the
lower right so you see we opened up
three but we don't have a lot of smoke
pushing out of there but now as he takes
opens up the door between the lower
right and lower left you're going to see
a change in the fire behavior you're
going to see this lower left become an
outlet only when we stay outlet that's
just where the fire is exhausting out of
that compartment
you don't see a lot of air you don't see
a lot of bi-directional
slow or neutral plane if you take a look
at compartment 3 that compartment is the
SM bi-directional flow you have an
exhaust port but also in the lower part
of that compartment you see the intake
or the inlet of the fresh air that's
traveling across to the lower left
compartment to feed that fire if we were
to shutdown compartment three completely
and lower left we could again choke this
fire out just by limiting the amount of
air as he closes this compartment and we
shut down lower left and you opens that
up just a little bit you're going to
start seeing that smoke puff and you see
it really starving and looking for that
air source so we open up lower left a
little bit more give it the air that it
needs as you can see very little air
allowed that compartment to almost flash
all over like a ventilation induced
flashover so we're going to open up the
lower left and get that compartment
going again and we can open up three
that close down lower left strictly by
controlling where the fire is getting
its air source from we can control where
the fire goes to so we can control our
buildings by playing with the openings
you see over here on the lower left you
just open and closing that compartment
and we're clearly showing you a neutral
plane there some bi-directional flow and
you're going to see that as gases or the
smoke the unburned products of
combustion that fuel start lighting off
remember there's no fuel lower right
that is strictly the smoke that's the
gases that's beginning to flame over and
it's night in the lower right hand
compartment you'd see lower left is
still burning we have plenty of plenty
of heat in that compartment and now over
to the right we're getting the heat the
fuel and the oxygen that we need to have
ignition
you'll also notice if you look up
towards the top or the ridgeline of this
house you start having increased smoke
production at multiple levels or
multiple floors to this house the same
way you would with the standard
two-story wood wood frame private
dwelling you're going to start having
smoke migrate to the entire house
along with the heat and decreasing the
amount of oxygen on all levels of the
house when you do this drill it's always
good to have a water sprayer from a
garden hose or two and a half can
pressurized water extinguisher available
because you want this drill to go on as
long as you can so if you keep wetting
the exterior of the box you can keep
that compartment and that box intact as
much as you can what do you see now the
partners they're just controlling the
openings allowing air in or allowing air
out we saw a little ventilation induced
flash over there see compartment three
we have the smoke is a lot darker it's a
lot denser so we're creating a lot more
heat within this box now he's going to
close up three and we're going to start
moving up to the second floor and we're
going to open up number two I see as we
add the opens that we don't we have some
decent smoke and we have that
bi-directional flow and you can see the
building's start really pushing and
pulling and really looking for more
oxygen
he's going to reach in and he's going to
remove the hole in the floor that
simulating a door and you're going to
see things change a little bit what
we're going to do is we're going to
actually draw the fire up into that
compartment because what's the fire
always going to do it's going to travel
to the source of oxygen and you just
clearly saw that we just had a add a
little phenomena there where it grabbed
the oxygen and it flashed a little bit
and standing here you can actually
almost feel a little pressure wave so we
can start showing the differences are
talking differences between flashover
and backtrack as we close the lower left
lower left compartment we'll start
seeing that we have fire that has moved
all the way up into the top right here's
your water sprayer if you want it for
that outside of that farm if necessary
now we have good fire going in the
entire bottom left compartment that's
migrated to the bottom right and now
you're starting to see an increase of
heat you're starting to see that smoke
become a little bit more turbulent a
little bit darker we still can clearly
see a neutral plane there we have that
bi-directional flow if he opens up
number two just a crack at this point
which is the bottom left we're going to
open up bottom left you're going to see
a change in that opening you see the bus
the smokes increase of speed so now
watch as he closes the lower left will
see the smoke it's still present but the
smoke slows because it doesn't have his
have a an oxygen source below that level
as he opens up no bottom left you see
that smoke increase in pressure increase
in velocity and it's also increasing in
heat so that would be similar to a
two-story house at the window let's go
or you perform horizontal ventilation on
the floor above the fire as we keep
playing with these openings those gases
will excite the more air the hotter the
fire gets for a long time we were always
taught that ventilation equals cooling
ventilation doesn't equal cooling water
equals cooling so ventilation will
increase your heat release rates and
will increase your opportunity or
chances of flashover or backups without
water application
you see the more air or less air that
they provide to this box really changes
the fire behavior so as you see as we
plot we supply more air into into this
environment the fire that we are
increasing the temperatures we're
increasing the products of um convert
unburned combustion which is more fuel
and the fire is lighting off in the
smoke as you'll see as he opens up
bottom left again we're going to see
this smoke in the top right begin to
light off and that's just because we're
increasing the heat even though we're
ventilating we're increasing the heat
and that smoke will begin lighting off
they say we've provided a lot of air
below the fire and also above the fire
so it's getting really turbulent it's
getting very dense and you can see that
upper right doesn't have a neutral plane
that's strictly an outlet your new your
Inlet is your bottom left you can see
the smoke and the heat getting drawn
right in there now we can shut those
down we can cool the outside of the box
with the water what I want to do is we
want to simulate roof operations so when
the small-scale fire behavior prop we
also want to show that the the positive
and negative effects of roof ventilation
we have to slide trays or to slide
trades built into this prop we have one
at the roof or at the peak so that we
can open that up and it shows what
performing roof ventilation or cutting
the hole the roof actually does but the
important note to our students is that
just cutting the hole in the roof is
enough we always need to push down and
break down the sheetrock so we have
another slide tray that we're going to
open now to simulate break and open the
sheetrock and as we do that you can see
the velocity and density of the smoke
increase and without water application
we will have far that comes out of this
roof we have to this is important point
to show to our students that vertical
ventilation is positive but it's only
positive when we have a coordinated fire
ground and we utilize that with fire
attack at the same time the speed of
this drill depends on the speed of
materials and how quickly the box burns
we're just going to open up a couple
more compart
to show you we've lost the integrity of
the box we have a hole in the back of
the box we may not be to show you too
much more fire behavior because we're
just adding too much here but we're
going to go ahead and open up a couple
compartments and you guys can get and
play with those openings see if we can
get some flash overs to occur all right
close them all up what I want you to do
is open up all four at the same time so
as you can see it at this point we've
lost the integrity of the box we have
some collapse of the second floor floor
and you can see the more holes that we
put in the building the more air that we
supply the bigger the fire grows the
increase of the heat so again this drill
or this training could be utilized to
show fire behavior you can talk about
fire attack you could talk about search
and rescue you talk about vent and to
isolate search as well as horizontal and
vertical ventilation alright so we just
had a good demonstration of fire
behavior and want to thank you guys for
showing up today
PJ Norwood Sean Gray fire engine in
training minutes
you
you
[Music]
5.0 / 5 (0 votes)