Making Traffic Lights with Arduino Uno - Beginner Level (algorithm, coding, circuit design)

Prakhar Gupta
10 Jun 202112:21

Summary

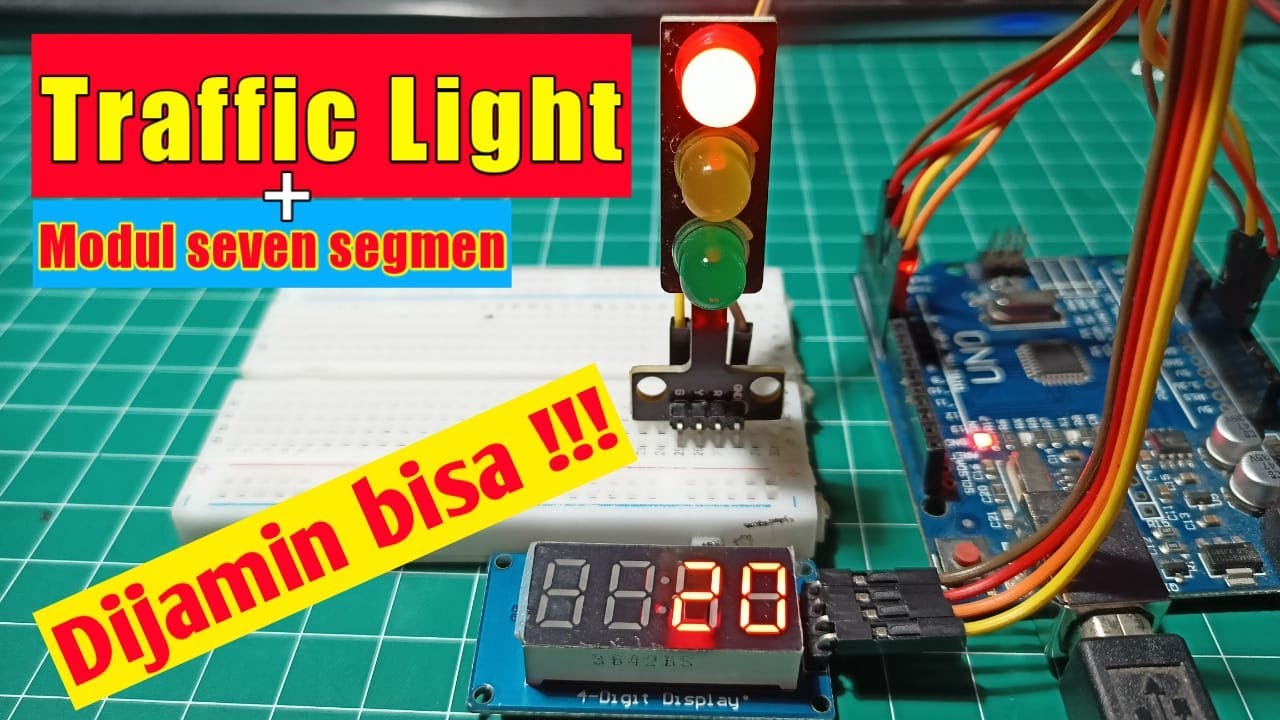
TLDRIn this instructional video, the host guides viewers through building a traffic light system using an Arduino kit. The project involves programming LEDs to mimic a traffic light sequence: red for 3 seconds, yellow for 1 second, followed by green for 3 seconds and a green light blink pattern. The video outlines the components needed, including LEDs, resistors, jumper wires, a breadboard, and an Arduino Uno. The host demonstrates the setup and coding process, encouraging viewers to subscribe for more educational content.

Takeaways

  • 😀 The video is a tutorial on how to create a traffic light using an Arduino kit.
  • 🔧 The presenter has ordered an Arduino kit, which includes a jacket and a simple traffic light project.
  • 📹 The audience is encouraged to subscribe to the channel for more similar content.
  • 🚦 The project involves creating a traffic light with red, yellow, and green LEDs following a specific algorithm.
  • ⏱ The traffic light sequence includes red for 3 seconds, yellow for 1 second, both off, green for 3 seconds, and a green light blink for 0.5 seconds three times.
  • 🔌 The components required for the project are three LEDs, jumper wires, 100-ohm resistors, a breadboard, and an Arduino Uno microcontroller.
  • 🔩 The LEDs are connected to the breadboard with the anode on the right side and resistors to limit the current.
  • 🔋 The power supply is set up with a 4-cell unit, each cell providing 1.5 volts.
  • 📝 The Arduino code involves setting digital pins 8, 10, and 12 as outputs and controlling the LEDs according to the traffic light algorithm.
  • 💻 The presenter demonstrates the code compilation and upload process to the Arduino board.
  • 🎥 The final demonstration shows the traffic light functioning as expected, with the LEDs lighting up in sequence and blinking as programmed.

Q & A

  • What is the main project discussed in the video?

    -The main project discussed in the video is creating a traffic light using an Arduino kit.

  • What are the colors of the LEDs used in the traffic light project?

    -The colors of the LEDs used in the project are red, yellow, and green.

  • How long does the red light stay on according to the algorithm?

    -According to the algorithm, the red light stays on for 3 seconds.

  • What is the duration for which the yellow light is kept on?

    -The yellow light is kept on for 1 second.

  • How many times does the green light blink, and for how long each time?

    -The green light blinks three times, each for half a second.

  • What are the components required for the traffic light project?

    -The components required for the project are three LEDs, jumper wires, 100 ohm resistors, a breadboard, and an Arduino Uno microcontroller.

  • Which pins on the Arduino Uno are used for the red, yellow, and green LEDs?

    -The pins used for the red, yellow, and green LEDs are 8, 10, and 12 respectively.

  • What is the purpose of the resistors in the circuit?

    -The resistors are used to limit the current flowing through the LEDs, preventing them from drawing too much power and getting damaged.

  • How does the video describe the process of coding for the traffic light project?

    -The video describes the coding process by explaining the use of the 'setup' and 'loop' functions, digital write commands for the LEDs, and the timing for each light state.

  • What is the final step shown in the video after uploading the code?

    -The final step shown in the video is resetting the Arduino and observing the traffic light functioning as per the programmed algorithm.

  • How does the video encourage viewers to engage with the content?

    -The video encourages viewers to subscribe to the channel, like the video, and leave comments for further interaction.

Outlines

00:00

🛠️ Arduino Traffic Light Project Introduction

The video script introduces an Arduino project where the creator has ordered an Arduino kit to build a traffic light. The creator invites viewers to subscribe and like the channel if they find the content useful. The project involves using LEDs to simulate a traffic light with a sequence of red, yellow, and green lights, including a blinking green light. The script outlines the algorithm for the traffic light operation, which includes durations for each light state. The required components for the project are listed, such as three LEDs, jumper wires, resistors, a breadboard, and an Arduino Uno microcontroller. The script also describes the initial setup for the project, including connecting the LEDs to the Arduino pins.

05:01

🔌 Building the Traffic Light Circuit

This paragraph details the process of building the traffic light circuit. The LEDs are placed on the breadboard with their anodes on the right side. Resistors are connected to limit the current through the LEDs. The script explains the connections for the red, yellow, and green LEDs to the Arduino's digital pins 8, 10, and 12, respectively. The power supply is connected to the breadboard, and the script mentions checking the circuit for correctness. The video also includes a brief demonstration of the LEDs lighting up and switching off, indicating the successful setup of the circuit.

10:03

💻 Programming the Arduino for Traffic Light Operation

The final paragraph focuses on the coding aspect of the project. The script describes the process of writing and uploading the code to the Arduino. The code is written in C language, and the video creator mentions their experience with C and C++, suggesting that programming the Arduino was straightforward for them. The code involves setting the digital pins to high and low states to control the LEDs, following the traffic light sequence. The video concludes with a successful demonstration of the traffic light operation, including the blinking green light, and a reminder for viewers to subscribe to the channel and leave comments and likes.

Mindmap

Keywords

💡Arduino

Arduino is an open-source electronics platform based on easy-to-use hardware and software. It is widely used for building projects that interact with the physical world. In the video, the creator mentions ordering an Arduino kit, which is the central component for the traffic light project, indicating its importance in the video's theme of electronics and programming.

💡Traffic Light

A traffic light is a signaling device positioned at road intersections and pedestrian crossings to control flows of traffic. In the context of the video, the creator is building a model traffic light using an Arduino kit to demonstrate the basics of electronics and programming. The script describes the algorithm for the traffic light's operation, such as the sequence of red, yellow, and green lights.

💡Algorithm

An algorithm is a set of rules or steps used to solve a problem or perform a computation. In the video, the creator discusses the algorithm for the traffic light, which dictates the timing and sequence of the lights. The algorithm is crucial for understanding how the traffic light operates, as it outlines the process of switching between red, yellow, and green lights.

💡LED

LED stands for Light Emitting Diode, a semiconductor light source that emits light when an electric current passes through it. The script mentions using three LEDs to represent the red, yellow, and green lights of the traffic light. LEDs are chosen for their efficiency and longevity, and they are central to the visual aspect of the project.

💡Resistor

A resistor is a passive component in an electrical circuit that opposes the flow of current. In the script, the creator specifies using 100-ohm resistors for the LEDs to limit the current and prevent them from burning out. Resistors are essential in electronic circuits to ensure the correct amount of current flows through components.

💡Breadboard

A breadboard is a device used to build and test electronic circuits without the need for soldering. It allows for easy experimentation and modification of circuits. The video script mentions using a breadboard to secure the connections between the Arduino, LEDs, and resistors, highlighting its role in the prototyping process of the traffic light project.

💡Microcontroller

A microcontroller is a small computer on a single integrated circuit that contains a processor core, memory, and programmable input/output peripherals. The Arduino Uno, mentioned in the script, is a type of microcontroller used in the project to control the LEDs. It is the brain of the traffic light system, executing the algorithm to manage the light sequence.

💡Coding

Coding, in the context of the video, refers to writing computer programs, specifically in C language for the Arduino. The script describes the process of coding the traffic light's behavior, including the timing for the red, yellow, and green lights, and the blinking pattern. Coding is the means by which the creator gives instructions to the Arduino to operate the traffic light.

💡Digital Write

Digital write is a function in Arduino programming used to set the state of a digital pin, either high (5 volts) to turn something on or low (0 volts) to turn it off. In the script, the creator uses digital write to control the LEDs, specifying the pin numbers and the state (high or low) to implement the traffic light sequence.

💡Delay

Delay in programming is a function that pauses the program for a specified amount of time, measured in milliseconds. The script mentions using delay to control the duration for which each light stays on or off, such as three seconds for red and one second for yellow. Delay is essential for timing the traffic light's operation.

💡Blink

Blink, in the context of the video, refers to the rapid alternation between on and off states of the green LED to signal a transition or caution. The script describes a blinking pattern where the green light turns on for half a second and off for half a second, repeating this three times. Blinking is a common feature of traffic lights to alert drivers of an impending change.

Highlights

Introduction of the project to create a traffic light using an Arduino kit.

Request for viewers to subscribe and like the channel for more similar content.

Explanation of the algorithm for the traffic light's sequence: red, yellow, green, and blinking green.

Duration of each light's state: red for 3 seconds, yellow for 1 second, green for 3 seconds, and blinking green for 0.5 seconds three times.

List of components required for the project: LEDs, jumper wires, resistors, a breadboard, and an Arduino Uno microcontroller.

Description of the setup for the LEDs and resistors on the breadboard.

Coding setup using pin numbers 8, 10, and 12 for red, yellow, and green lights respectively.

Explanation of the loop function in the code for the traffic light sequence.

Demonstration of the code's logic for switching on and off the LEDs with specific delays.

Instructions on connecting the LEDs to the Arduino board and power supply.

Verification of the circuit connections using a power unit made of four cells.

Compilation and upload of the code to the Arduino board.

Observation of the traffic light functioning in real-time after code upload.

Emphasis on the simplicity of the project once the electronic and circuit parts are understood.

Comment on the ease of programming in C language for Arduino, especially for those familiar with C and C++.

Final request for viewers to subscribe, comment, and like the video for more content.

Transcripts

play00:00

hey guys i hope you're doing well and as

play00:02

i told you in my last video

play00:04

i ordered a arduino kit for myself

play00:07

or a br jacket and a simple traffic

play00:10

light but

play00:11

so as i'll show you how to make a

play00:13

traffic light if you are also

play00:28

so let's begin the project that we are

play00:31

doing

play00:31

is traffic lights

play00:38

and i would just request if you haven't

play00:40

subscribed to the channel

play00:42

then please subscribe and like

play00:46

in case you understand the video so

play00:48

first of all i will discuss the

play00:50

algorithm

play00:54

algorithmic simple past

play00:57

led red yellow and green

play01:02

so we'll start with a red light

play01:06

on red for

play01:10

3 seconds then we will say on yellow

play01:14

for one second then we'll say off

play01:18

yellow and red

play01:23

then we will say on

play01:26

green light for

play01:29

three seconds then we will off

play01:32

green and then we will blink

play01:36

the green light on green for say half

play01:39

second

play01:41

then again we will off the green light

play01:44

again on green

play01:50

for half second

play01:54

of green

play01:57

for half second

play02:01

and again on green for

play02:06

half second so hamara a pally will start

play02:09

to a green

play02:10

then first time blink here then second

play02:13

time blink here

play02:14

and then third time blinky and then we

play02:16

will off all the lights so all this

play02:22

duration is point five seconds

play02:28

so it's quite simple

play02:33

red yellow green

play02:37

the three leds red yellow green we will

play02:40

switch on this for three seconds

play02:42

we will switch on this for one second

play02:44

then both will be

play02:46

off then green for three seconds

play02:49

then 0.5 second blink

play02:52

three times and if you talk about the

play02:57

components that we require so just

play03:00

writing the components

play03:04

obviously three led

play03:07

then we need jumper wire

play03:12

male to male then resistors

play03:18

i am taking 100 ohm so you need three

play03:20

pieces of resistors

play03:22

and the

play03:26

breadboard i want to go solder less

play03:33

and fifth our arduino

play03:36

uno microcontroller

play03:39

so these are the things that we require

play03:42

so let's begin

play03:44

the

play04:02

you can see both the points they are

play04:04

mail to mail

play04:05

so this is all that we require and

play04:08

obviously the breadboard to secure the

play04:10

connections

play04:12

update coding

play04:19

and second is the loop component the

play04:22

setup component may

play04:23

i will use pin number 8 10 and 12

play04:27

for red yellow and green and also all

play04:30

these three pins will have a function of

play04:32

output now coming to

play04:35

the loop function so first of all the

play04:37

algorithm says that we have to switch on

play04:40

the red for three seconds so i'm writing

play04:43

on port 8 a state of high that is 5

play04:46

volts

play04:47

with a delay of 3 seconds so it is 3 000

play04:49

milliseconds

play04:51

then i am writing a state of high on

play04:53

port 10

play04:54

that is yellow color high and for one

play04:57

second

play04:58

then i am switching off both so it is

play05:01

digital right

play05:02

digital right port 8 and 10 straight low

play05:05

that is 0 volt

play05:06

so this will switch off the red and the

play05:09

yellow led

play05:11

after that we have to switch on the

play05:12

green led so

play05:14

on the port 12 the state will become

play05:16

high for

play05:17

three seconds it will switch on the

play05:19

green light

play05:21

then we will switch off the green light

play05:23

again

play05:24

say port 12 and state low

play05:28

and now the blinking part so i can

play05:31

mention here

play05:36

blink

play05:39

so for the blinking it's

play05:43

digital right first of all high state

play05:46

it is off c so now we will switch it on

play05:49

for half second

play05:50

off for half second again on

play05:53

for half second and again off

play05:57

for half second and same with the third

play05:59

loop

play06:00

so this completes the coding part

play06:04

and yes again i will request you to

play06:06

subscribe to the channel

play06:07

to receive such videos and now let's

play06:10

make connections

play06:11

and see how it will function

play06:13

subsequently breadboard latex

play06:17

red yellow and green

play06:28

so i am placing all the three leds

play06:34

red

play06:42

yellow and the green one

play06:58

so if you can see all the three leds are

play07:00

placed and i have purposely

play07:02

put the anode on the right side

play07:06

now i need to fix resistors so

play07:10

breadboard me sorry connections same

play07:12

okay so these all are joined together

play07:15

so i'll just use one and it will go till

play07:18

the negative

play07:24

so these two rails are for the power

play07:28

supply

play07:30

same for the yellow one

play07:40

and now the green one

play08:07

i hope you can see this

play08:10

ground pin pin number 12 pin number 10

play08:13

and pin number eight

play08:17

also i am connecting three jumper wires

play08:39

so yeah three connections

play08:44

now generally a plus circuit pallet

play08:46

checked out so i have this power unit

play08:48

it's made

play08:49

four cells in and all of them are like

play08:50

one and half volts

play08:52

so i am connecting the positive to the

play08:53

positive and negative to the negative

play08:55

just to verify

play08:59

[Music]

play09:06

subcore

play09:20

green on port number 12

play09:26

and your red hair was report number

play09:28

eight

play09:30

so these are the connections on the

play09:32

arduino side

play09:35

i have computer gaza we have inserted

play09:37

that

play09:39

and now we'll see

play09:51

[Music]

play09:58

leds will blink and they will switch off

play10:02

and switch on code test kaneki

play10:07

so this is the code

play10:12

scope i'll go to the port and it is on

play10:15

port 14 so let's see okay it's from

play10:19

com13 so i'll put it on calm 14 because

play10:22

13 kara issue per timer

play10:31

now we'll see port com14 it's

play10:33

automatically selected so we have

play10:35

selected the right one

play10:36

now i will compile the code

play10:40

and it is saying that done compiling

play10:42

everything is correct

play10:44

and now we will upload the code

play10:49

this thing uploading and done uploading

play10:52

so now this is the code now i am

play10:55

resetting the code once

play10:57

this is the reset button

play11:01

so red light wonderful for three seconds

play11:04

now yellow fantastic and green

play11:07

and it should blink now one two

play11:10

three red for three seconds

play11:15

one second and green

play11:28

so you just saw that it's quite simple

play11:30

once you understand

play11:32

the electronic part and the circuit part

play11:35

then it becomes quite easy and japori

play11:36

programming its

play11:38

programming in c language and i have

play11:40

done lot of coding in c and c

play11:42

plus plus so it was not an issue and

play11:44

then coding

play11:46

for them also it's quite easy so the

play11:48

syntax is quite easy to understand that

play11:50

digital write

play11:51

and digital right because we are using

play11:53

the digital pins

play11:55

see digital and this is how the arduino

play11:58

works

play11:59

so please subscribe to the channel put

play12:01

your comments

play12:02

likes and bye

play12:20

you

Rate This

5.0 / 5 (0 votes)

Related Tags
ArduinoDIYTraffic LightLEDCircuitCodingEducationalProjectMicrocontrollerElectronicsTutorial