HX711 with a Four Wire Load Cell and Arduino | Step by Step Guide.
Summary
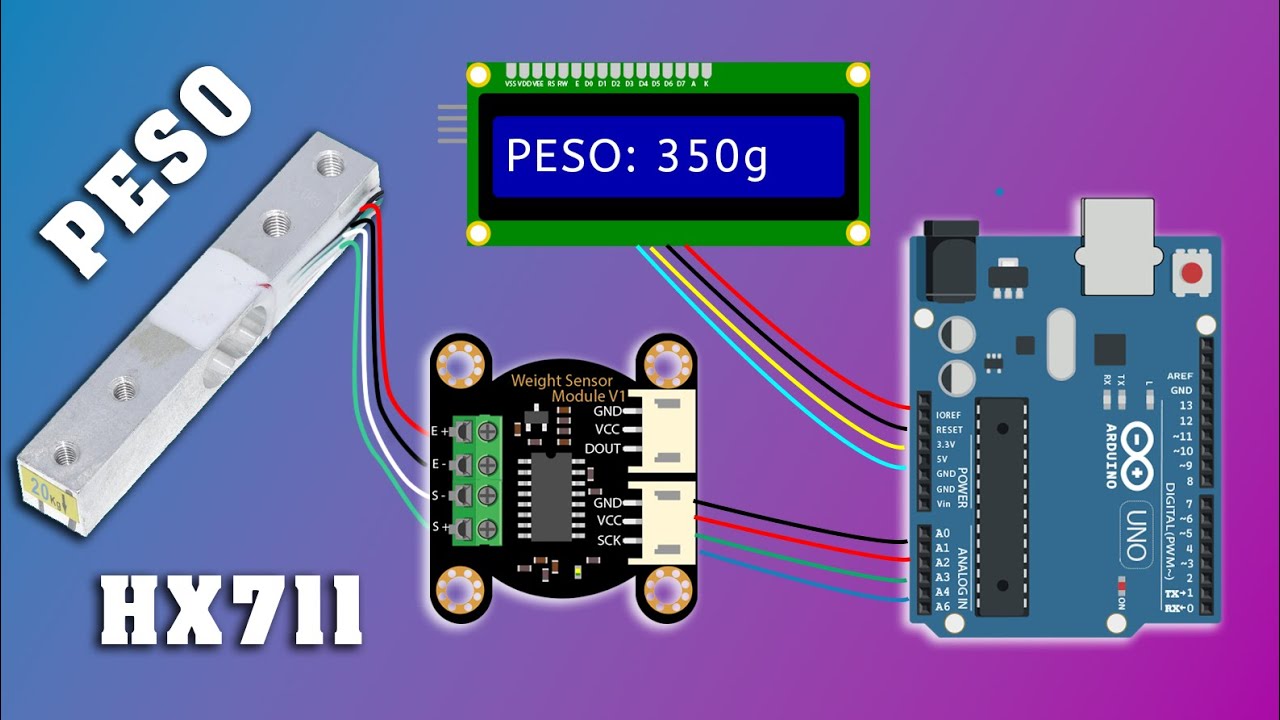
TLDRIn this tutorial, you'll learn how to create a simple scale using a four-wire load cell, an HX711 amplifier module, and an Arduino. The video covers how to connect the load cell, test the wiring, and calibrate the scale using the HX711 module. A crucial part of the setup involves measuring tiny voltage differences from the Wheatstone bridge inside the load cell, which is amplified by the HX711 module for accurate readings. The tutorial also provides a guide on how to implement the calibration process and save the values to EEPROM, ensuring your scale remains accurate even after restarting the system.
Takeaways
- 😀 Learn how to create a simple scale by connecting a four-wire load cell to an HX711 amplifier module and reading weight values with an Arduino.
- 😀 Load cells come in different weight ratings, from one kilogram to hundreds of kilograms, and are typically metal blocks with holes drilled into them.
- 😀 This tutorial uses a 20kg load cell, as opposed to the 50kg load cells typically used in bathroom scales with three wires.
- 😀 The main difference between a four-wire load cell and a three-wire load cell is that the four-wire load cell has a full Wheatstone bridge embedded.
- 😀 Four strain gauges are glued onto the load cell, and applying force changes the resistance in pairs, generating a measurable voltage difference.
- 😀 The voltage difference generated by the load cell is small, so an HX711 amplifier is required to make the signal readable by Arduino.
- 😀 The load cell needs to be installed in a frame that allows deformation when force is applied, which can be created using wooden planks or 3D printed parts.
- 😀 Crimping the DuPont connectors to the wires of the load cell makes it easier to connect and disconnect without resoldering each time.
- 😀 Verifying the wiring and checking the resistance values of the load cell is essential for proper connection to the HX711 module.
- 😀 After setting up the hardware, the Arduino code uses the 'HX711_ADC' library for calibration and to read the values from the load cell.
- 😀 Once calibrated, the system can be used for accurate weight measurements, and the calibration data can be saved to EEPROM to retain settings after power cycling.
Q & A
What is the main purpose of using a load cell in this tutorial?
-The main purpose of using a load cell in this tutorial is to measure weight by detecting changes in resistance when force is applied to the load cell.
What is the key difference between a four-wire load cell and a three-wire load cell?
-The key difference is that a four-wire load cell includes a full Wheatstone bridge embedded into it, while a three-wire load cell only contains a half-bridge.
Why is it necessary to use an HX711 amplifier module with a load cell?
-The HX711 amplifier module is needed because the voltage change produced by the load cell is very small, and the HX711 amplifies this signal to make it readable by an Arduino.
How do the strain gauges on the load cell work to detect weight?
-The strain gauges on the load cell detect weight by changing their resistance when they are compressed or stretched. This creates a voltage difference in the Wheatstone bridge, which can be measured.
What should be done before connecting the load cell to the amplifier module?
-Before connecting the load cell to the amplifier, you should verify the wiring by measuring the resistance between different wire pairs to ensure correct connections.
How does the choice of which wires to connect to the HX711 module affect the measurement?
-The choice of which wires to connect to the power (E+ and E-) and measurement (A+ and A-) inputs doesn't affect the functionality, but it affects the calibration constant in the software, which may need adjustment.
Why is it important to choose the correct baud rate in the Arduino terminal?
-It is important to select the correct baud rate (57.6 kbps in this case) because using the wrong rate will result in garbled or unreadable data in the terminal.
What is the purpose of saving the calibration value to the EEPROM?
-Saving the calibration value to the EEPROM ensures that the scale does not need to be recalibrated every time it is powered on, which improves convenience and accuracy.
How can you enhance the scale by adding a screen?
-You can enhance the scale by connecting a screen to the Arduino to display the weight readings, making it a fully functional digital scale.
What are the advantages of using a crimping tool for wiring in this tutorial?
-Using a crimping tool provides a more reliable and reusable connection for the wires, allowing you to easily plug and unplug cables for experiments without needing to resolder every time.
Outlines

This section is available to paid users only. Please upgrade to access this part.
Upgrade NowMindmap

This section is available to paid users only. Please upgrade to access this part.
Upgrade NowKeywords

This section is available to paid users only. Please upgrade to access this part.
Upgrade NowHighlights

This section is available to paid users only. Please upgrade to access this part.
Upgrade NowTranscripts

This section is available to paid users only. Please upgrade to access this part.
Upgrade NowBrowse More Related Video
TODO sobre EL SENSOR de PESO con MODULO HX711 , Peso EXACTO con arduno || Tutorial

Membuat LAMPU LED Menyala dengan Perintah Suara - Arduino Project Indonesia

DIY Automatic Door System with Ultrasonic Sensor & Servo Motor! 🚪🤖 (Live Demo)

How to Blink an LED with Arduino (Lesson #2)
How to EASY make the COMPLEX UI | Roblox

Waste Wizard: Crafting a Smart Dustbin using Arduino UNO I Robo Army I Arduino Basic
5.0 / 5 (0 votes)