cara pasang kabel terminal colokan||dan saklar 3 pin
Summary
TLDRThis video tutorial guides viewers through the process of wiring a three-terminal plug, switch, and socket. The step-by-step instructions start with assembling the plug, followed by wiring the switch and socket terminals. Key points include proper soldering techniques, cable management, and safety tips. The video emphasizes the importance of using the correct materials, like thick copper wires, and testing the installation after completion. The tutorial is designed to be clear and simple, making it accessible for DIY enthusiasts looking to work with electrical components safely and effectively.
Takeaways
- 😀 Always ensure you have the right tools and materials for the job, including a screwdriver, soldering iron, and appropriate cables.
- 😀 When installing the terminal plug, begin by securing the plug and making sure it’s properly positioned before tightening the screws.
- 😀 Properly identify the ground terminal and ensure it is connected correctly to prevent potential electrical hazards.
- 😀 For soldering, cut the wires to the appropriate length to ensure a secure connection between the plug and switch.
- 😀 If you don't have a soldering iron, you can twist and tape the wires, but soldering is recommended for a more secure connection.
- 😀 Test the switch before installation to confirm which pin corresponds to the line, ground, and neutral wires.
- 😀 Pay attention to the wire colors and connections when installing the switch to avoid mistakes in wiring.
- 😀 Make sure to tighten all screws and ensure the plug and switch are securely mounted to avoid loose connections.
- 😀 Once all connections are made, close the casing properly to prevent exposure to electrical components.
- 😀 Always double-check the installation by testing the plug and switch with a power source to ensure everything works as intended.
- 😀 Use cables with appropriate gauge (e.g., 2x1.5mm) for durability and to avoid wire damage under stress or pulling.
Q & A
What are the essential materials needed for this installation?
-The essential materials include a 3-terminal socket plug, a switch, copper wiring (preferably 1.5mm²), screws, terminal fittings, a soldering iron (if available), and electrical tape.
How do you start the installation process?
-Begin by preparing the socket plug. Unscrew it to expose the wiring terminals, then twist the wires into place, making sure the live and neutral wires are connected securely.
What should be done with the ground wire during installation?
-If required, the ground wire should be securely attached to the terminal as part of the setup, ensuring proper grounding for safety.
Can the switch be tested before the full installation?
-Yes, you should test the switch terminals using a tester to identify the correct pins before connecting any wires.
What is the purpose of soldering the wires?
-Soldering helps ensure a strong, reliable electrical connection between the wires and the terminals, preventing them from coming loose during use.
What should you do if a soldering iron is not available?
-If a soldering iron is not available, you can twist the wires together securely and insulate them with electrical tape to ensure a safe connection.
How should the wires be connected to the switch?
-After identifying the correct terminals on the switch, one wire should be connected to the pin for the live current, while the other can be attached to the ground or neutral terminal, depending on the setup.
What is the importance of testing the installation after assembly?
-Testing ensures that the socket and switch are functioning correctly, providing power to devices safely and confirming the installation is successful.
How can you ensure the wiring is secure and safe?
-Make sure all connections are tightly fastened with screws, soldered properly, or secured with electrical tape. Double-check that no exposed wires are touching and that everything is insulated.
Why is it recommended to use thicker cables for certain installations?
-Thicker cables are recommended for heavy-duty applications to handle higher electrical loads, reducing the risk of overheating and wire damage.
Outlines

This section is available to paid users only. Please upgrade to access this part.
Upgrade NowMindmap

This section is available to paid users only. Please upgrade to access this part.
Upgrade NowKeywords

This section is available to paid users only. Please upgrade to access this part.
Upgrade NowHighlights

This section is available to paid users only. Please upgrade to access this part.
Upgrade NowTranscripts

This section is available to paid users only. Please upgrade to access this part.
Upgrade NowBrowse More Related Video

Three phase motor forward and reverse circuit with Latch ON || Chain Hoist basic understanding

How to Configure Console Password on Cisco Switch
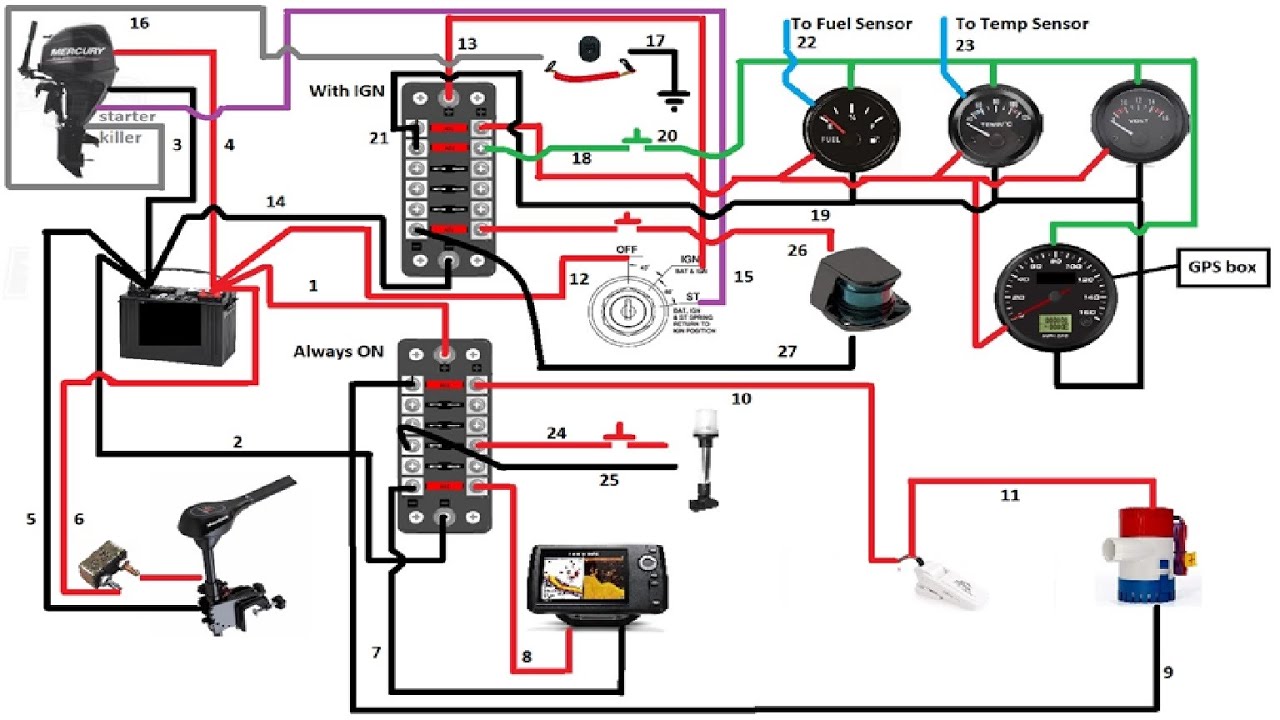
Boat electronic wiring diagram

VACUM CLEANER | PROJEK P5 REKAYASA TEKNOLOGI | KELOMPOK 2 XI-B
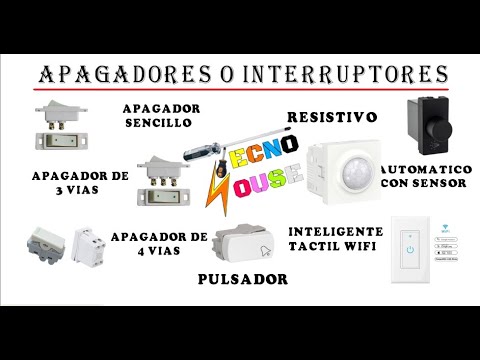
APAGADOR O INTERRUPTOR ELÉCTRICO / CAPITULO 3

KENAPA TIDAK DARI DULU TAU CARA INI ‼️ Modifikasi Stop Kontak Jadi Super Canggih
5.0 / 5 (0 votes)