Cara memasang Kerah Koko Atau Kerah Shanghai Cara Paling Mudah
Summary
TLDRIn this tutorial video, the presenter demonstrates a step-by-step guide to attaching a Koko collar to a shirt, focusing on the neckline area. The process involves creating guidelines for precise stitching, aligning the collar with the neckline, and sewing carefully to ensure a neat finish. The video emphasizes tips for beginners, like securing the collar with pins to avoid slipping and ensuring the stitching is clean and aligned. After the collar is stitched, the final adjustments and the removal of temporary stitching are explained. The tutorial is designed to be easy to follow, with the presenter offering helpful advice throughout the process.
Takeaways
- 😀 Step 1: Draw a guideline on the fabric to ensure precise collar attachment, making sure the line is marked on the upper fold of the fabric.
- 😀 Step 2: Fold the fabric and mark the middle point using a notch to help align the collar properly during installation.
- 😀 Step 3: Align the collar's edge with the shirt’s neck opening (kerung leher) and secure it with pins to prevent shifting while sewing.
- 😀 Step 4: Start sewing the collar from the inside, aligning the seams of the collar with the neck opening of the shirt.
- 😀 Step 5: Use a backstitch at the beginning and end of the sewing process to secure the stitches and prevent unraveling.
- 😀 Step 6: While sewing, make sure the seams are evenly aligned to prevent any fabric puckering or misalignment.
- 😀 Step 7: Carefully avoid folds at the bottom of the fabric, ensuring a smooth and neat appearance as you sew.
- 😀 Step 8: Once the collar is sewn on, flip the fabric to the outside, and then sew along the collar’s edge to secure it in place.
- 😀 Step 9: Make sure the collar is evenly stitched and the seam is not visible from the outside, giving a professional finish.
- 😀 Step 10: After finishing the collar, remove any basting stitches that were used for temporary alignment to complete the collar installation.
Q & A
What is the main focus of the tutorial?
-The main focus of the tutorial is teaching viewers how to attach a Koko collar to a shirt, including all the necessary steps from marking the fabric to finishing the collar.
Why is a red line marked on the fabric before sewing?
-The red line is marked as a guide to help the person sewing stay on track and ensure that the collar is attached correctly and evenly.
What should be done after marking the fabric with a red line?
-After marking the fabric, the next step is to align and pin the collar in place, making sure that the collar’s edges match the shirt’s neckline.
How do you identify the center of both the shirt’s neckline and the collar?
-The center of both the shirt’s neckline and the collar can be identified by making small snips or notches at the midpoint of each, which helps in aligning them during the sewing process.
What is the purpose of pinning the collar to the shirt?
-Pinning the collar to the shirt ensures that it stays in place and does not shift during the sewing process, leading to a more accurate and neat final result.
What is the significance of starting the stitching from the inside of the shirt?
-Starting the stitching from the inside of the shirt helps to maintain a clean and neat appearance on the outside, with the seam hidden and properly secured.
Why is it important to keep the seams aligned while sewing?
-Keeping the seams aligned ensures that the collar and the shirt’s neckline are properly joined, avoiding any mismatched or uneven stitching that could make the collar appear unprofessional.
What should be done after finishing the sewing process?
-After finishing the sewing process, the shirt should be turned inside out to check the position of the collar, and any loose or extra fabric should be tucked into the collar for a neat finish.
What is the final step in attaching the collar to the shirt?
-The final step is to stitch along the edge of the collar to secure the seam allowances and make sure the collar is firmly attached and looks neat.
What is the significance of removing the temporary stitching?
-Removing the temporary stitching ensures that no unwanted marks or threads remain on the shirt, leaving a clean and professional finish to the collar.
Outlines

This section is available to paid users only. Please upgrade to access this part.
Upgrade NowMindmap

This section is available to paid users only. Please upgrade to access this part.
Upgrade NowKeywords

This section is available to paid users only. Please upgrade to access this part.
Upgrade NowHighlights

This section is available to paid users only. Please upgrade to access this part.
Upgrade NowTranscripts

This section is available to paid users only. Please upgrade to access this part.
Upgrade NowBrowse More Related Video

How to sew this stylish halter neck dress with a rope

PASANG KERAH BLAZER/JAS || VERSI MUDAH.metode tanem

Membuat Desain Tipografi Simpel

4K Try On Haul 2025 __ Transparent No bra See Through __ Curve Plus size Ideas Fashion amazon trends
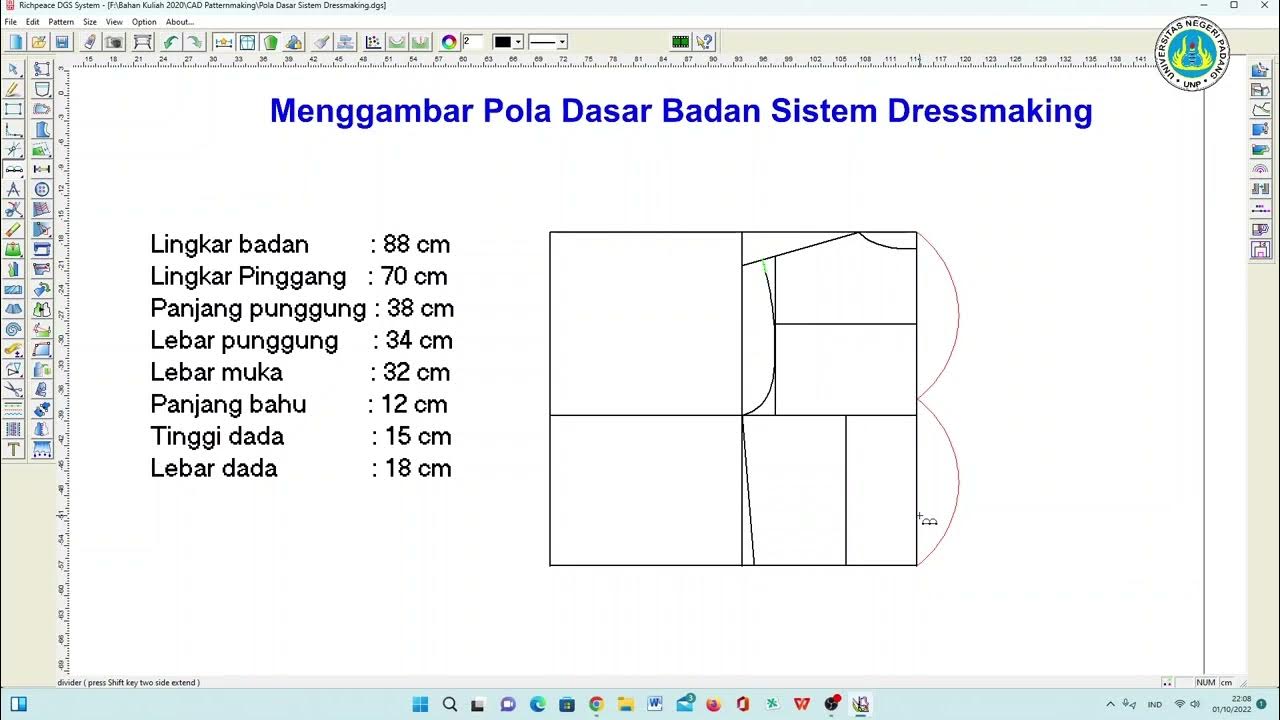
Cara Membuat Pola Dasar Badan Dressmaking dengan Richpeace

AHD CCTV camera installation step by step setup guide from beginning to end.
5.0 / 5 (0 votes)