Transparent FDM 3D Prints are Clearly Stronger!
Summary
TLDRIn this video, Stefan explores how to print transparent parts using FDM (filament-based) 3D printers. He shares his experience with various materials like PETG and PCTG, focusing on settings that improve transparency and strength. Key parameters like extrusion multiplier, print speed, and cooling are tested for optimal results. Stefan also compares the strength of transparent prints against standard ones, revealing impressive layer adhesion and enhanced mechanical properties. While the process is slow, it offers a unique way to achieve clear, durable prints without the need for resin printing.
Takeaways
- 😀 Transparent FDM 3D prints can be achieved with the right parameters, resulting in stronger and clearer parts compared to standard prints.
- 😀 Using a specific extrusion multiplier, temperature, part cooling, and printing speed are critical for achieving transparency and strength in PETG prints.
- 😀 While resin printers can produce transparent parts, FDM printers with proper settings offer a more accessible and long-lasting solution for clear prints.
- 😀 Drying filament is essential for achieving better transparency, as moisture in the filament can cause issues like microbubbles during printing.
- 😀 Printing clear parts with FDM printers is slower, especially with thick-walled parts, as the low speeds and small layers contribute to long print times.
- 😀 The extrusion multiplier directly affects the clarity of prints, with higher multipliers (around 102%) resulting in clearer parts by filling in voids and cracks.
- 😀 The ideal extrusion temperature for PETG was found to be around 220°C, as higher temperatures can lead to issues like microbubbles and yellowing.
- 😀 The infill pattern plays a crucial role in transparency, with aligned rectilinear infill (at a 0° angle) helping reduce pores and improve part clarity.
- 😀 Print cooling should be minimized (0%) for the clearest prints, but a bit of cooling can improve part quality for overhangs and bridges.
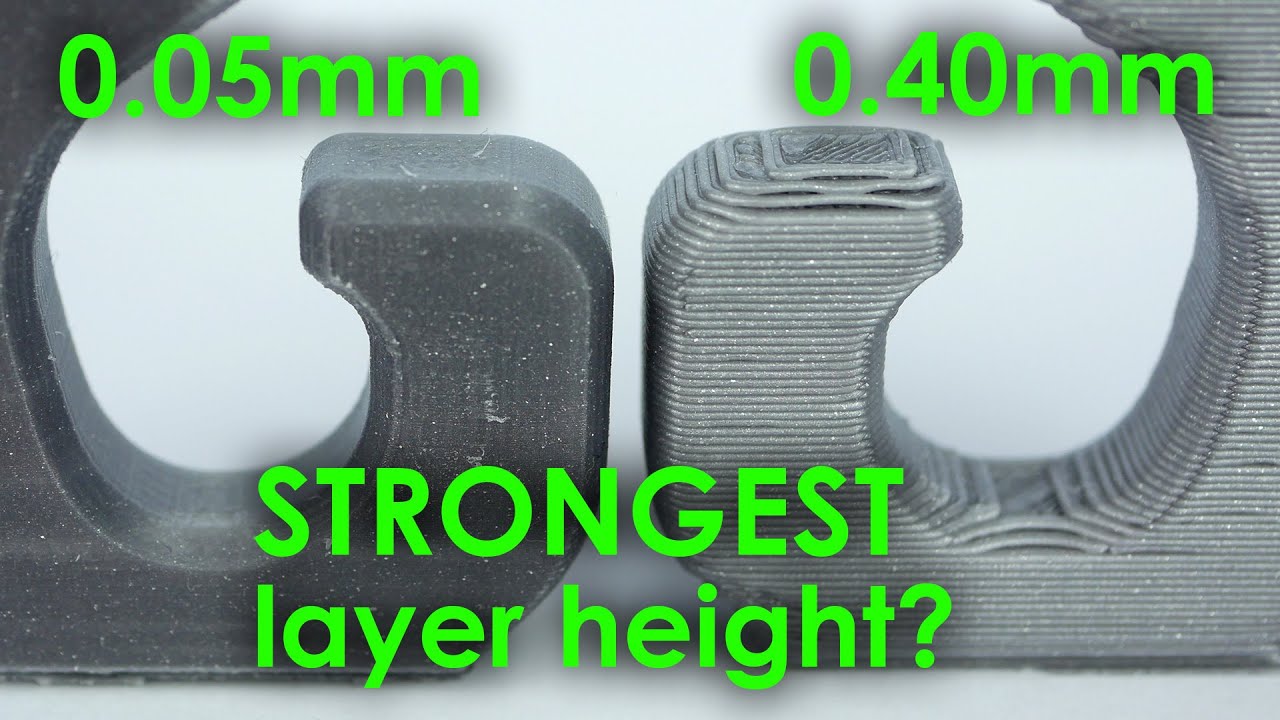
- 😀 Parts printed with the optimized transparent parameters showed significantly improved strength, including a remarkable 93% layer adhesion on larger parts.
Q & A
Why do the parts printed using clear filament often not appear transparent?
-Parts printed with clear filament often appear milky or whitish because the layers in FDM 3D printing do not bond perfectly. There are voids and interfaces between extrusions where light refracts and diffuses, causing the parts to look less transparent.
What are the main parameters that affect the clarity of transparent FDM prints?
-The key parameters that influence the clarity of transparent FDM prints include the extrusion multiplier, extrusion temperature, part cooling, and printing speed. Other factors like layer height, infill pattern, and nozzle size may also play a role.
How did Rygar1432's settings improve the clarity of prints compared to typical FDM prints?
-Rygar1432's settings improved the clarity of prints by using specific parameters like higher extrusion multipliers, aligned rectilinear infill at a 0° angle, and reduced part cooling, which helped eliminate voids and bond the layers better for a more transparent result.
What impact did part cooling have on the clarity and strength of the prints?
-Part cooling significantly affected both clarity and strength. Without cooling, parts were clearer but more prone to defects in overhangs and bridges. With cooling, the parts were more structurally sound but slightly less clear. For the clearest parts, cooling should be turned off.
What filament worked best for achieving transparent parts, and why?
-Freshly dried PCTG filament produced the best results in terms of clarity, but PETG was also a viable option. The key was drying the filament before printing, as moisture can cause microbubbles that reduce transparency.
Why is it important to use aligned rectilinear infill for transparent prints?
-Aligned rectilinear infill, where the lines run in a parallel direction, helped minimize voids between layers and ensured that the extrusions bonded more effectively. This is crucial for achieving the desired transparency.
How did the extrusion multiplier affect the quality of the prints?
-Increasing the extrusion multiplier improved the clarity of the prints by ensuring that the filament filled in the gaps and voids between extrusions. However, excessive extrusion led to over-extrusion, swelling, and rough top surfaces, which diminished print quality.
What role did the printing speed play in achieving clear prints?
-Printing at slower speeds, such as 15 mm/s, led to better clarity by reducing microbubbles caused by filament staying too long in the melt zone. Higher speeds (above 15 mm/s) resulted in slightly less clear prints due to the formation of microbubbles.
How did the strength of the transparent prints compare to regular prints?
-Transparent prints achieved significantly higher strength than standard prints, especially in terms of layer adhesion. For example, horizontal transparent samples were about 30% stronger than regular ones, with layer adhesion reaching up to 93% in some cases.
What are the limitations of printing transparent parts using FDM, and how can they be overcome?
-The main limitations are the slow print speed and the challenges in printing complex geometries with clear finishes. These can be mitigated by adjusting parameters like extrusion multiplier, cooling, and print speed for each material, as well as ensuring filament is properly dried to avoid microbubbles.
Outlines

This section is available to paid users only. Please upgrade to access this part.
Upgrade NowMindmap

This section is available to paid users only. Please upgrade to access this part.
Upgrade NowKeywords

This section is available to paid users only. Please upgrade to access this part.
Upgrade NowHighlights

This section is available to paid users only. Please upgrade to access this part.
Upgrade NowTranscripts

This section is available to paid users only. Please upgrade to access this part.
Upgrade Now

5.0 / 5 (0 votes)