Wiring Switches
Summary
TLDRIn this detailed tutorial, Scotty B from Tree Scouts guides viewers through the process of wiring up two switches and attaching cover plates. He walks through every step, from labeling wires to creating pigtails, twisting wires together, and grounding the connections. Scotty emphasizes safety, proper wire stripping, and grounding techniques while demonstrating minimalist tools for the job. The video offers helpful tips for ensuring a clean finish, including how to align switches, secure wiring, and troubleshoot any mistakes along the way. Ideal for beginners and DIY enthusiasts, this video simplifies a seemingly complex task into easy-to-follow steps.
Takeaways
- 😀 Label wires properly to avoid painting over them and ensure clarity during installation.
- 😀 Use minimalist tools like wire strippers, utility knives, and screwdrivers for wiring tasks.
- 😀 When stripping wires, make sure to cut carefully to avoid damaging the ground or neutral wires.
- 😀 Pigtails can be created using scrap wire to connect multiple wires to a single terminal, saving on materials.
- 😀 Always ensure the correct wire lengths are stripped based on whether they are inserted into a terminal or wrapped around a screw.
- 😀 Ground wires must be twisted tightly together and securely attached to the switch to ensure safety.
- 😀 When connecting wires to switches, remember to match the correct wire to the intended terminal (e.g., heat on top, fan on the bottom).
- 😀 Use wire nuts to secure the connections, ensuring all wires are twisted properly to avoid loose connections.
- 😀 Double-check the position of wires inside the electrical box, ensuring they don’t interfere with each other or come into contact with the ground wire.
- 😀 Pay attention to details like level alignment for switches and cover plates to ensure a neat, professional finish.
- 😀 Start with simple wiring tasks and gradually take on more complex projects as your skills improve.
Q & A
Why is it important to label wires before starting the wiring process?
-Labeling wires helps to avoid confusion and ensures that each wire is connected correctly to the right component. It also prevents mistakes, especially when multiple wires look similar, such as the scon, heat fan light, and power lines.
What is the purpose of the pigtails in this wiring project?
-Pigtails are short lengths of wire that allow you to connect multiple wires together. They help make secure and organized connections, especially when dealing with a power supply line that needs to connect to multiple switches or components.
What is the recommended method for stripping wires in this tutorial?
-The recommended method is to use a utility knife to carefully strip about 3/4 inch of insulation off the wire. For this project, a wire stripper could also be used, but the tutorial suggests using a knife for simplicity and control.
What should you do if you're not sure whether the power is running to the wires?
-If you're unsure, always check the breaker and ensure no electricity is running to the wires before starting. This is important for safety purposes when working with electrical systems.
Why does the speaker prefer to use a utility knife instead of a wire stripper for this job?
-The speaker finds it more convenient to use a utility knife because it provides more control over the stripping process. The wire stripper could be used, but the tutorial shows that a knife works just as effectively for this specific project.
What mistake does the speaker make regarding the number of pigtails needed?
-The speaker initially planned to make four pigtails but later realized only two were needed. This is because the wires in question were already connected, so the extra pigtails were unnecessary.
How do you correctly attach the ground wire to the switch?
-The ground wire should be looped around the screw terminal in such a way that, when the screw is tightened, it pulls the wire tight against the terminal. This ensures a secure connection. The wire should be looped in the direction that tightens when the screw is turned.
What is the significance of ensuring that the ground wire does not touch the black wire?
-It’s important to prevent the ground wire from touching the black wire, as this could cause a short circuit. Keeping the wires separated helps maintain a safe and functional electrical connection.
What is the difference between a standard switch and a three-way switch, as mentioned in the tutorial?
-A standard switch only controls one light or device from one location, while a three-way switch allows control from two different locations. The tutorial briefly mentions a three-way switch, but the main focus is on how to wire standard switches.
What is the final step to complete the switch installation, and why is it important?
-The final step is to install the cover plate. It’s important to ensure that the cover plate is level and properly aligned to give a professional finish. Additionally, checking the plate alignment helps prevent any misalignment or unevenness in the installation.
Outlines

This section is available to paid users only. Please upgrade to access this part.
Upgrade NowMindmap

This section is available to paid users only. Please upgrade to access this part.
Upgrade NowKeywords

This section is available to paid users only. Please upgrade to access this part.
Upgrade NowHighlights

This section is available to paid users only. Please upgrade to access this part.
Upgrade NowTranscripts

This section is available to paid users only. Please upgrade to access this part.
Upgrade NowBrowse More Related Video
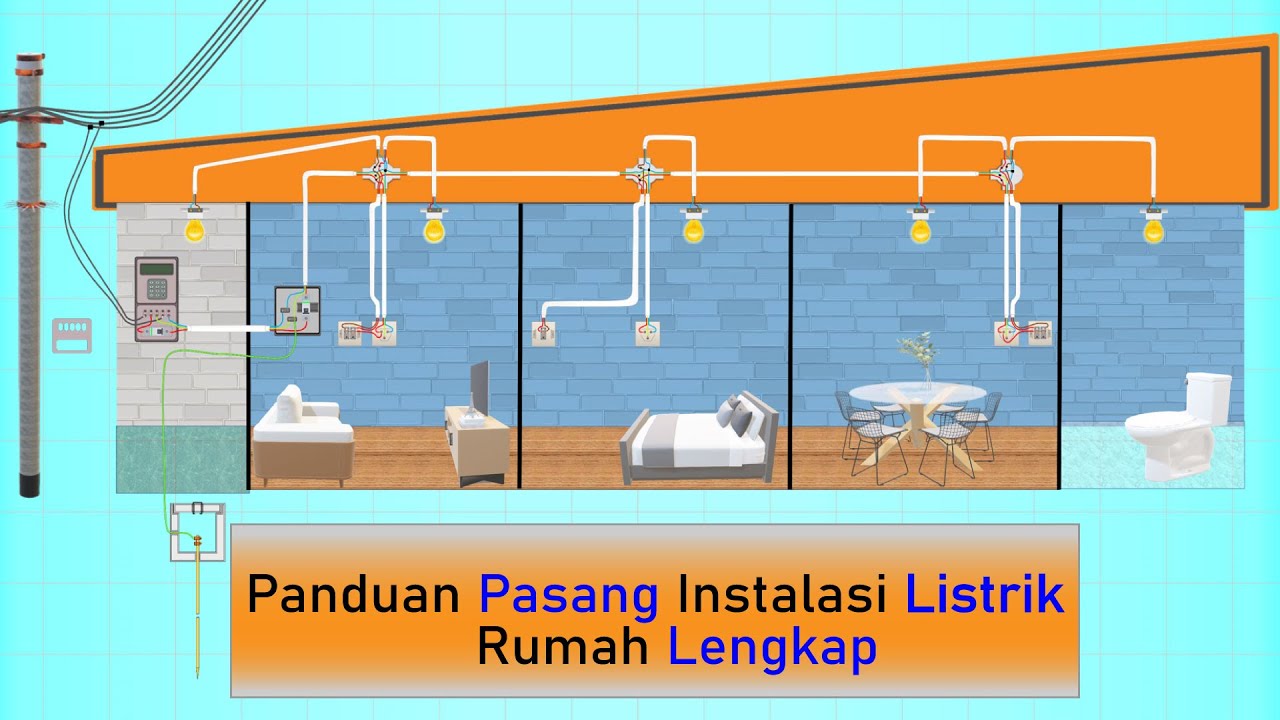
(Req) Simulasi Pemasangan Instalasi Listrik Rumah
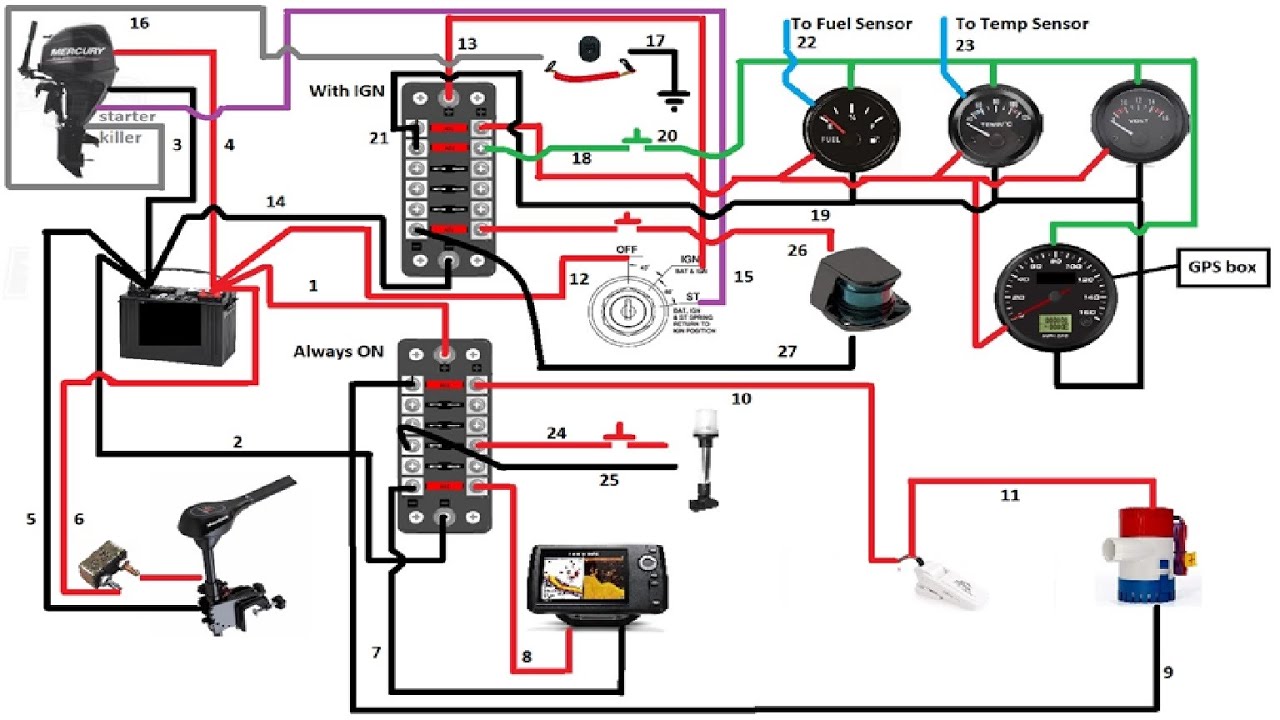
Boat electronic wiring diagram

Cara Merakit Kincir Air Mini pembangkit listrik tenaga air dari Tutup Botol (MGM250B)

How to Configure Static Routing 2 Router Base CLI in Cisco Packet Tracer

Simulasi Lampu Lalu Lintas Menggunakan Arduino UNO di Wokwi

Godot 4 Crash Course #4 - Adding Meteors
5.0 / 5 (0 votes)