BetaFPV Meteor75 Pro: perfect tiny whoop for FPV beginners or IGOW rippers!

Colibri FPV
21 Jun 202312:33

Summary

TLDRJason在他的频道上介绍了BetaFPV Meteor 75 Pro,这是BetaFPV Meteor 75的升级版。这款无人机拥有45毫米的大型螺旋桨,配备1S动力系统,使其易于在室内飞行和控制,同时也能在较小的室外空间飞行。Meteor 75 Pro的特点是更大、更强,包括更大的框架、螺旋桨、电池,并且续航时间更长。包装内包括备用螺旋桨、螺丝刀、螺丝、550毫安时LiPo电池、BetaFPV BT 2.0连接器、额外的零件袋、USB-C电缆和BetaFPV知识库的快速响应(QR)码。无人机本身已安装了另一块1S 550毫安时电池。Jason特别提到了其轻量化设计,仅重31.1克,具有极高的推重比,使其飞行性能出色,且在坠机时更易生存。相机是BetaFPV的CO3,具有1200 TVL分辨率、2.1毫米镜头和160度视场。框架和顶篷都非常坚固,可以承受一些坠机。螺旋桨为45毫米三叶设计,为其1S四轴飞行器提供了巨大的卖点,因为更大的螺旋桨在需要时提供更多推力,同时在低速时更容易控制无人机,从而延长飞行时间。Jason还提到了其350毫瓦的VTX,足以应对室内或小范围室外飞行。他还讨论了BetaFPV的BT 2.0连接器的优势,尽管需要从PH2转换为BT 2.0连接器。最后,Jason提到了这款无人机的两个缺点:顶篷设计使得改变相机角度不太方便,以及它不是数字版本。但他强调,模拟版本更轻、更便宜,更适合初学者。

Takeaways

  • 🚁 BetaFPV Meteor 75 Pro是BetaFPV Meteor 75的升级版,尺寸更大,更强大。
  • 📏 虽然名为'75 Pro',实际尺寸约为81毫米。
  • 📦 包装盒内包括螺丝刀、螺丝、备用螺旋桨、两块550毫安时的LiPo电池等。
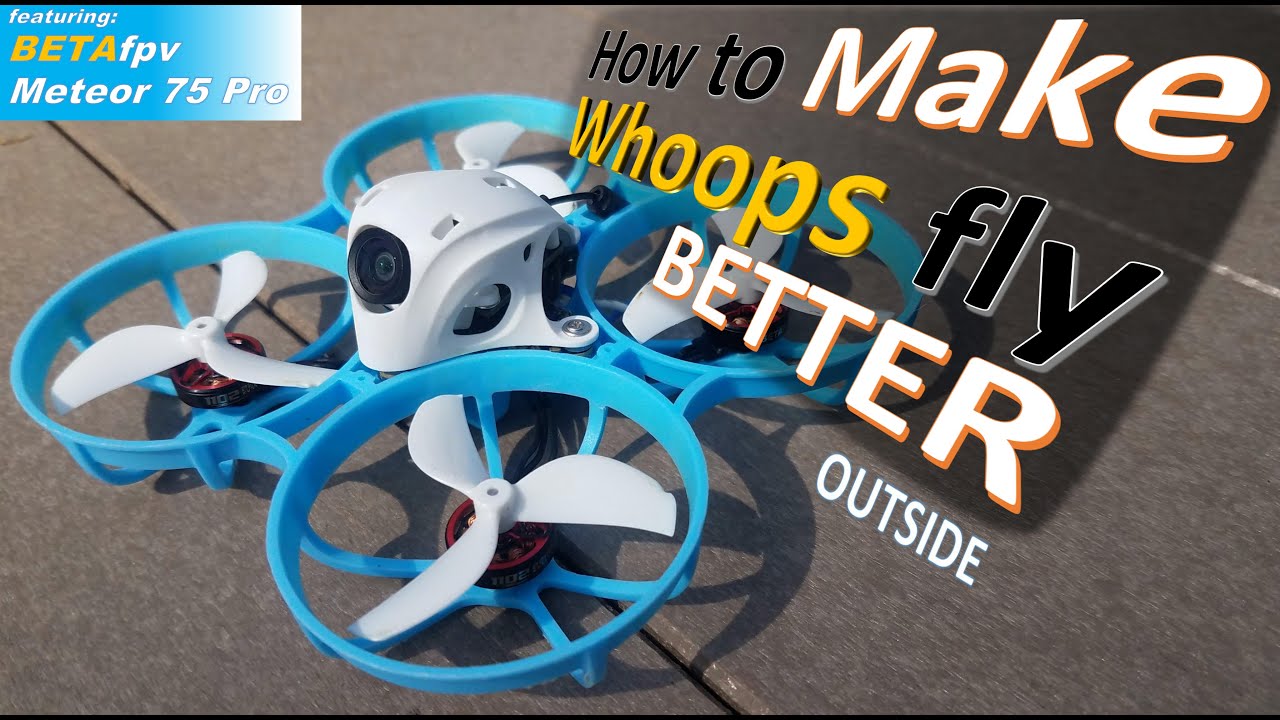
  • 🎨 设计采用典型的Beta fpv蓝白配色方案,外观吸引人。
  • 🔌 BetaFPV Meteor 75 Pro提供模拟和数字版本,支持多种接收器选项。
  • ✈️ 该无人机非常轻盈,重量仅为31.1克,适合室内和较小的室外空间飞行。
  • 🔧 具有串行基础的集成ELRS接收器,方便通过Wi-Fi进行更新。
  • 🔄 更大的45毫米螺旋桨提供更高的推力和更长的飞行时间,非常适合初学者。
  • 🔋 随附的电池充电器可同时充电两块电池,还可测试电池电压。
  • 📹 搭载1200 tvl摄像头,提供160度的视野,拍摄效果良好。

Q & A

  • BetaFPV Meteor 75 Pro是BetaFPV Meteor 75的升级版,它有哪些显著的改进?

    -BetaFPV Meteor 75 Pro的显著改进包括更大的45毫米螺旋桨、更大的框架、更大的电池,以及更长时间的飞行能力。

  • Meteor 75 Pro的尺寸是多少,它的名字中的'75'代表什么?

    -Meteor 75 Pro的实际尺寸约为81毫米,所以它更像是'Meteor 80'。名字中的'75'并不直接代表尺寸,而是暗示了它与Meteor 75的关联,而'Pro'则表示了其升级特性。

  • Meteor 75 Pro的包装盒里包含了哪些物品?

    -包装盒内包含一些螺旋桨、螺丝刀、螺丝、带有BetaFPV BT 2.0连接器的550毫安时LiPo电池、一些零件(包括电池连接器和顶篷的一些部件)、USB-C电缆、BetaFPV卡以及带有QR码的知识库链接。

  • Meteor 75 Pro有哪些版本,它们之间有何不同?

    -Meteor 75 Pro有模拟和数字版本,可搭配Walksnail或HD Zero数字系统。用户可以选择带有ELRS、FRsky或Crossfire接收器的版本。FRsky和ELRS接收器内置于一体化飞行控制器板中,而Crossfire是一个带有外部天线的外部接收器。

  • 为什么Jason认为带有内置ELRS接收器的模拟版本的Meteor 75 Pro对大多数人来说是最实用的选择?

    -因为ELRS接收器将提供足够的范围,并且模拟VTX对于小型无人机来说已经足够好。数字VTX虽然更好,但成本会超过整个无人机的价格,因此模拟版本更经济实惠,适合初学者或那些想要一个多用途小型无人机的人。

  • Meteor 75 Pro的重量是多少,它为何被认为对初学者友好?

    -Meteor 75 Pro的重量为31.1克,非常轻,特别是考虑到它使用的是45毫米的螺旋桨。轻重量意味着它在碰撞中的存活率更高,对初学者来说更易于控制和学习。

  • BetaFPV的CO3相机有哪些特性,它对无人机的飞行体验有何影响?

    -CO3相机是一个1200电视线的模拟相机,具有2.1毫米镜头和160度的视野。这个相机虽然重量只有一半克,但考虑到它的轻量,它提供了良好的图像质量,对飞行体验有积极影响。

  • Meteor 75 Pro使用的电机是什么型号,它们是如何连接到飞行控制器的?

    -Meteor 75 Pro使用的是BetaFPV的1102 22 000 KV电机,这些电机使用插头直接插入飞行控制器,这意味着如果电机烧毁,更换起来会非常容易,不需要焊接。

  • Meteor 75 Pro的电池和充电器有何特点?

    -Meteor 75 Pro配有两个1S 550毫安时的BetaFPV LiPo电池和一个电池充电器。这个充电器可以同时为两个电池充电,并且有一个测试按钮可以测试电池电压,对于1S电池来说非常有用。

  • BetaFPV的BT 2.0连接器有哪些优点和缺点?

    -BT 2.0连接器使用小型香蕉插头代替PH2连接器上的针脚,因此可以更有效地将电池的电流传输到电调,从而实现更长时间和更高效的飞行。但它们非常小,可能会导致连接时的困难,并且如果用户已经拥有其他类型的1S电池,可能需要更换连接器。

  • Jason提到了Meteor 75 Pro的两个缺点,它们是什么?

    -第一个缺点是顶篷的设计使得改变相机角度不太方便,需要拆除顶篷。第二个缺点是它不是数字版本,虽然这也意味着它更轻、更便宜,对初学者更友好。

  • Jason对Meteor 75 Pro的整体评价是什么,他推荐这款无人机吗?

    -Jason对Meteor 75 Pro的整体评价非常积极。他认为这是一个非常多功能的小型无人机,适合室内外飞行,对初学者友好,性价比高,因此他推荐这款无人机。

Outlines

00:00

🚁 BetaFPV Meteor 75 Pro 无人机介绍

Jason 在视频中介绍了 BetaFPV Meteor 75 Pro,这是 Meteor 75 的升级版,拥有更大的 45 毫米螺旋桨,保持了 1S 动力系统,使其易于在室内飞行和控制,同时也能适应小型户外空间。适合 FPV 新手和需要多功能小型无人机的飞手。Meteor 75 Pro 相较于前代产品在各方面都有所提升,包括更大的框架、螺旋桨、电池,以及更长的飞行时间。开箱内容包括备用螺旋桨、螺丝刀、螺丝、550mAh LiPo 电池、BetaFPV 卡片等。Jason 还讨论了无人机的颜色方案,以及其模拟和数字版本,包括 Walksnail 或 HD Zero 数字系统,以及 ELRS、FRsky 或 Crossfire 接收器选项。特别指出 ELRS 接收器的便利性,因为它可以通过 Wi-Fi 更新,无需重新刷写整个 Betaflight 软件。

05:04

🛸 Meteor 75 Pro 的轻量化和高性能特点

Jason 强调了 Meteor 75 Pro 的轻量化特点,仅重 31.1 克,考虑到其 45 毫米的螺旋桨,推重比非常高,这意味着无人机将飞行得非常好,并在坠机中更具生存能力。相机是 BetaFPV 的 CO3,具有 1200 TVL、2.1 毫米镜头和 160 度视野。尽管需要拆卸顶篷以更换相机角度,但顶篷的设计确保了相机角度在坠机中不会改变。无人机的框架和顶篷都非常坚固,能够承受坠机的冲击。电机采用即插即用设计,方便更换而无需焊接。螺旋桨尺寸巨大,为 1S 四轴飞行器提供了更多的推力和更好的低速控制能力,同时延长了飞行时间。Jason 还提到了 350 毫瓦 VTX 的适用性,以及随附的两个 1S 550 电池和一个双电池充电器的便利性。

10:05

🔋 Meteor 75 Pro 的电池和连接器特点

Jason 讨论了 Meteor 75 Pro 使用的 BetaFPV BT 2.0 连接器,这些连接器使用微型香蕉插头,比传统的 PH2 连接器更高效,从而提供更长、更高效的飞行。然而,由于 Jason 之前使用的是 GNB 27 连接器和其他类型的 1S 电池,他不得不更换这些连接器。BetaFPV 声称使用 550mAh 电池可以提供六分半钟的飞行时间,但 Jason 的实际飞行时间略短,他更倾向于在电池强制降落前提前降落,以延长电池的使用寿命。他还提到了购买额外电池的建议,因为 BetaFPV 提供的电池和充电器非常便利。

🏞️ Meteor 75 Pro 的室内外飞行体验

Jason 分享了他在室内外使用 Meteor 75 Pro 的飞行体验,称赞其为最多功能的小型无人机,能够适应不同的飞行环境。他赞赏 BetaFPV 对无人机的适当调整,使得开箱即飞成为可能,无需复杂的设置。他还特别提到了模拟 ELRS 版本的轻便性和成本效益,适合初学者或希望增加小型无人机库存的飞手。最后,Jason 提出了两个小缺点:顶篷设计使得更换相机角度不太方便,以及无人机不是数字版本。尽管如此,模拟版本因其轻量化、低成本和对初学者友好的特点而更具吸引力。

Mindmap

Keywords

💡BetaFPV Meteor 75 Pro

BetaFPV Meteor 75 Pro是BetaFPV公司推出的一款更新型号的无人机,它是Meteor 75的升级版。这款无人机拥有更大的45毫米螺旋桨,但仍然使用1S动力系统,意味着它易于在室内飞行和控制,同时也能在较小的室外空间飞行。它适合FPV新手或需要一款全能小型无人机的飞行爱好者。

💡1S动力系统

1S动力系统指的是使用单个电池单元(1S)作为电源的无人机动力系统。在视频中,BetaFPV Meteor 75 Pro虽然拥有较大的螺旋桨,但仍然使用1S动力系统,这使得它既适合室内飞行也适合在较小的室外空间飞行。

💡FPV

FPV是“First Person View”的缩写,意为“第一人称视角”。在无人机飞行中,FPV指的是通过无人机上的摄像头实时传输图像,使操作者能够以无人机的视角进行飞行,提供沉浸式飞行体验。视频中提到,BetaFPV Meteor 75 Pro适合FPV飞行,无论是室内还是室外。

💡ELRS接收器

ELRS代表“Easy Long Range Spreader”,是一种用于长距离无人机控制的无线电传输系统。视频中提到,BetaFPV Meteor 75 Pro的ELRS版本具有集成的接收器,可以通过Wi-Fi更新,无需刷新Betaflight软件,这为操作者提供了便利。

💡Crossfire接收器

Crossfire是一种无线电传输系统,常用于无人机的控制和视频传输。视频中提到,BetaFPV Meteor 75 Pro的数字版本可以选择配备Crossfire接收器,这可以提供额外的飞行范围,但会增加无人机的重量和成本。

💡VTX

VTX是“Video Transmitter”的缩写,意为“视频发射器”。在FPV无人机中,VTX用于将摄像头捕获的视频信号无线传输给操作者的接收器。视频中提到,BetaFPV Meteor 75 Pro配备了350毫瓦的VTX,适合室内和小型室外空间的飞行。

💡LiPo电池

LiPo电池是“Lithium Polymer battery”的缩写,意为“锂聚合物电池”。这种电池因其高能量密度、轻量和高放电率而常用于无人机。视频中提到,BetaFPV Meteor 75 Pro配备了550毫安时的LiPo电池,带有BetaFPV BT 2.0连接器。

💡BT 2.0连接器

BT 2.0连接器是BetaFPV公司设计的一种用于1S电池的连接器,它使用小型香蕉插头而不是传统的针脚,以提高电流从电池到电子速度控制器(ESC)的传输效率。视频中提到,这种连接器有助于实现更长时间和更高效的飞行。

💡CO3摄像头

CO3摄像头是BetaFPV公司生产的一款摄像头,具有1200电视线(TVL)的分辨率,2.1毫米的镜头和160度的视野。这种摄像头虽然重量轻,但提供高质量的图像,适合小型无人机使用。视频中提到,BetaFPV Meteor 75 Pro配备了CO3摄像头。

💡KV电机

KV电机是无人机电机的一种规格,KV值表示电机转速与电压之间的关系。KV值越高,电机在相同电压下的转速越快。视频中提到,BetaFPV Meteor 75 Pro使用的是BetaFPV的1102 22 000 KV电机,这些电机使用插头直接连接到飞行控制器上,便于更换。

💡可变相机角度

无人机的相机角度可以调整以适应不同的飞行条件和操作者的偏好。视频中提到,BetaFPV Meteor 75 Pro的相机角度固定在20或30度,需要拆卸顶篷并使用不同的插入件来改变角度,虽然这在飞行中不会因撞击而改变,但调整起来相对不便。

Highlights

BetaFPV Meteor 75 Pro 是 Meteor 75 的升级版,具有更大的45毫米螺旋桨,保持了1S动力系统,易于室内飞行和控制。

Meteor 75 Pro 适合初学者和需要一款多用途微型无人机的飞手,可在室内和较小的室外空间飞行。

与Emax Nanohawk相比,Meteor 75 Pro 的尺寸明显更大,尽管名称为75 Pro,实际尺寸约为81毫米。

包装内包括备用螺旋桨、螺丝刀、螺丝、550毫安时LiPo电池、BetaFPV BT 2.0连接器等。

Meteor 75 Pro 提供模拟和数字版本,支持Walksnail或HD Zero数字系统,以及ELRS、FRsky或Crossfire接收器。

模拟版本配备内置ELRS接收器,是最实用的选择,因为ELRS接收器提供了足够的范围。

ELRS版本的优点是集成的接收器基于串行而非SPI,可以通过Wi-Fi更新,无需重新刷写Betaflight软件。

数字版本除了相机、VTX和天线外,四轴飞行器基本相同,但重量会更重。

Crossfire作为数字版本的一种选择,为追求极致微型无人机的飞手提供了额外范围的选择。

Meteor 75 Pro 的模拟版本非常轻巧,重量仅为31.1克,考虑到其45毫米的螺旋桨,推重比极高。

BetaFPV CO3相机提供1200 TVL分辨率、2.1毫米镜头和160度视场角,尽管是模拟相机,但画质出色。

框架和顶篷非常坚固,能够在碰撞中幸存下来,顶篷设计固定相机角度为20或30度。

电机采用BetaFPV的1102 22 000KV,使用插头直接连接到飞行控制器,方便更换电机。

螺旋桨直径为45毫米,对于1S四轴飞行器来说非常大,提供了更大的推力和更长的飞行时间。

350毫瓦VTX对于室内或小型室外空间的飞行来说已经足够,提供了良好的范围。

包含两个1S 550毫安时BetaFPV LiPo电池和一个双电池充电器,充电器具有测试电池电压的功能。

BetaFPV的BT 2.0连接器使用微型香蕉插头,提高了电池到电调的电流传输效率。

BetaFPV声称使用550毫安时电池的飞行时间可达6.5分钟,但实际飞行时间略短。

Meteor 75 Pro 是一款非常多功能的微型无人机,适合室内和室外飞行,对初学者友好。

顶篷设计使得改变相机角度不太方便,但同时也避免了在碰撞中相机角度变化的问题。

模拟版本相比数字版本更轻巧、更经济,适合初学者或希望增加微型无人机队伍的飞手。

Transcripts

play00:00

[Music]

play00:13

Hey you guys, it's Jason welcome back to my channel.  Today I've got the BetaFPV Meteor 75 Pro on the  

play00:21

bench. The Meteor75 Pro is the update to Beta fpv's  Meteor 75. This version has huge 45 millimeter  

play00:30

props but it still has a 1s power system and  that means that it's super easy to fly and control  

play00:36

indoors but it can also fly outdoors in smaller  outdoor spaces. That makes it a great choice for  

play00:42

anyone who's just getting into fpv, or anyone who  just needs a new tiny whoop that can do it all.  

play00:48

The Meteor 75 Pro is basically a Meteor 75  but bigger and more powerful in every way  

play00:56

here's a quick size comparison between the Meteor  75 Pro and the Nanohawk from Emax. These are both  

play01:02

1s quads but just look at the size difference... it's  absolutely huge! Even though it's called the  

play01:08

"75 Pro" it's not 75 millimeters motor post to  motor post. I just measured this and it comes  

play01:13

in at about 81 millimeters, so this is really  the "Meteor 80" or something like, that but  

play01:20

the "Pro" in the 75 Pro refers to the upgrades.  The frame is larger, the props are larger, the  

play01:28

battery's larger, and it flies longer. Here's  what you get in the box with your meteor 75 Pro:  

play01:35

a bag with some props, screwdriver some screws,  a 550 milliamp LiPo battery with a beta fpv BT  

play01:45

2.0 connector. Looks like there's another one on  the Drone, you get two in total. Another bag with  

play01:49

some parts, looks like a battery connector,  and some pieces for the canopy. A USBC cable for  

play01:54

that battery charger, a Beta fpv card with a QR  code sending you to their knowledge base.  

play02:00

Last but not least, the drone itself with another 1s 550  milliamp battery already installed. I have to say  

play02:07

I am loving that color scheme, it's the typical  Beta fpv blue and white, but in this case it  

play02:14

looks very very nice, I really like it. The meteor  75 Pro comes in both analog and digital versions,  

play02:21

with Walksnail or HD Zero digital systems.  You can get it with ELRS, FRsky or Crossfire  

play02:27

receivers. The FRsky and ELRS receivers are built  right into the all-in-one flight controller board  

play02:33

but the crossfire is an external receiver with an  external antenna. I have the analog version with  

play02:39

the built-in ELRS receiver which I think is going  to be the most practical option for most people  

play02:44

because the ELRS receiver will give you all the  range you will ever need with this quad and the  

play02:50

analog VTX is perfectly fine for a tiny whoop.  Of course a digital VTX would be nice, but that  

play02:57

will more than double the cost. This entire drone  is about the cost of just the digital VTX system,  

play03:03

so for a tiny whoop and the type of flying that I  like to do with tiny whoops, this is an affordable  

play03:10

option and of course it's a great option for  people just getting started in fpv. Another very  

play03:16

cool feature about the ELRS version of this quad  is that the integrated receiver is serial based,  

play03:22

not SPI based. In the past with integrated  receivers, we had to reflash all the betaflight  

play03:29

software just to update the ELRS receiver, but with  this board you can just update the elrs receiver  

play03:36

over Wi-Fi like you normally would, as if it  were an external receiver, and that's a huge plus.  

play03:43

If you are interested in one of the digital  versions, keep in mind the quad is basically  

play03:47

the same, except of course the camera, the VTX, and the  antenna, and therefore the weight, will be a little  

play03:53

bit more with the digital version, and the color  scheme. It's cool to have Crossfire as an option  

play03:58

if you're after the ultimate tiny whoop, especially  for one of the digital versions where the extra  

play04:03

range you're going to get out of that digital  system might justify the extra cost and weight of  

play04:09

installing an external Crossfire receiver on there.  I actually have a crossfire receiver installed on  

play04:14

this 65 millimeter tiny whoop, but to be honest  it's complete overkill, you're never going to get  

play04:20

that much range out of that [25mw] VTX anyway, so having  a long range receiver is a little bit silly but  

play04:26

then again this tiny whoop came out before ELRS  was really a thing now that we have the option  

play04:32

of ELRS I don't think Crossfire on a tiny whoop  really makes all that much sense, but hey, if you  

play04:38

have Crossfire, you want to fly Crossfire on a  tiny whoop, more power to you! I do run Crossfire  

play04:43

on all of my larger quads when I really want the  extra confidence and the extra range, and I'm using  

play04:48

this external ELRS module from Betafpv it works  great; it's power switchable from 100, 250 to 500  

play04:57

milliwatts, which is a ton of range for ELRS, with  just the push of this button right here and it's  

play05:03

something like $40 on Amazon so it's very  affordable. The coolest thing about this quad, and  

play05:09

the real selling point for me, specifically  the analog version, is how lightweight it is.  

play05:15

It comes in at 31.1 grams on my scale, and that's  incredibly lightweight if you consider that it's  

play05:22

spinning 45 millimeter props, so the thrust to  weight ratio is insanely high, which means it's  

play05:29

going to fly super well, and it also means it's  going to be more survivable in crashes. The camera is  

play05:36

Betafpv's CO3, which is a 1200 tvl camera with a  2.1 millimeter lens and a 160 degree field of view.  

play05:45

Now analog cameras have really come a long way  over the years and this one looks great, especially  

play05:51

considering it only weighs a gram and a half. The  canopy and the frame both seem super strong and  

play05:57

they will definitely survive some crashes. The  design of the canopy holds the camera at a set  

play06:02

angle of either 20 or 30 degrees, that means that  changing your camera angle requires disassembling  

play06:08

the canopy and using a different insert, but on  the plus side, that camera angle won't change  

play06:14

when you crash like it will with other tiny whoops.  The camera angle that it ships with is just fine  

play06:19

for my flying style I mostly fly indoors and I  haven't had any need to change it the motors are  

play06:26

beta fpvs 1102 22 000 KV and they use plugs to  plug right into the flight controller what that  

play06:34

means is that if you burn out a motor swapping  it out will be real easy no soldering is required  

play06:40

the props are 45 millimeters and have three blades  to put in perspective how huge those are for a 1s  

play06:47

quad just look at the props on this Emax nanohawk  the difference is huge considering they're both  

play06:53

using 1s batteries those huge 45 millimeter props  is really the biggest selling feature of this  

play06:59

drone because the larger props are going to give  you more thrust when you need it while at the same  

play07:05

time making it easier to control the drone at low  speeds and giving you longer flight times which  

play07:11

is why I think this is a great drone for beginners  or anyone who's looking for a versatile tiny whoop  

play07:16

that can be flown both indoors and Outdoors  it has a 350 milliwatt VTX which should be  

play07:23

more than enough for flying indoors or smaller  outdoor spaces to put that into perspective my  

play07:28

65 millimeter tiny whoops both have 25 milliwatt  vtx's so a 350 milliwatt VTX is going to give us  

play07:36

some pretty nice range for a tiny whoop you get  two 1s 550 beta fpv LiPO batteries and a cool  

play07:45

little battery charger this charger is actually  pretty useful it will charge two batteries at the  

play07:51

same time and one of these where it says test  will test your battery voltage which is super  

play07:56

useful for 1s batteries you can never remember  if you charge them up or not and of course it's  

play08:01

USBC these charges have come a long way from these  little USB things we used to get with tiny whoops  

play08:07

keep in mind though that this battery charger  will charge you one as batteries up to 4.3 volts  

play08:12

not 4.2 volts so when we're talking about flight  times and performance beta fpv is assuming that  

play08:19

you're over charging your batteries to 4.3 volts  naturally everything in this kit comes with beta  

play08:25

fpv's BT 2.0 connectors now the thing about  these connectors is on one hand these are the  

play08:32

best 1s connectors on the market arguably they use  miniature banana plugs instead of pins like like  

play08:39

the PH2 connectors and so they transfer the amps  from your battery to your ESC more efficiently  

play08:46

which means longer more efficient flights the  problem that I have with these connectors is that  

play08:54

both of my other 65 millimeter tiny whoops they  use gnb 27 connectors I have a pile of old 1s  

play09:02

batteries with PH2 connectors I already had these  race day quad 525 milliamp batteries which happen  

play09:09

to fit the battery tray perfectly and so I wanted  to use them because I'd rather have six batteries  

play09:14

than just the two that come with the quad but I  did have to switch the connectors from PH2 over  

play09:19

to the BT 2.0 connectors I picked up a pack of  connectors on Amazon they're real inexpensive and  

play09:25

I went ahead and soldered on these new connectors  and they're working great now that I've done that  

play09:31

I'm really happy with them but I will mention that  those connectors are tiny you might want to just  

play09:36

pick up a pack of extra batteries beta fpv has  them and they're also available on Amazon I'll put  

play09:42

a link in the description below beta fpv claims  six and a half minutes with these 550 milliamp  

play09:49

batteries I'm not seeing quite that much flight  time but then again I also don't fly my batteries  

play09:54

down to the point where the Drone will be forced  to land I much prefer to land a little bit sooner  

play10:00

and take care of my batteries a little bit more  get a few more Cycles out of them before I need  

play10:05

to replace them I'm seeing closer to five minutes  of flight time indoors and a little less than that  

play10:11

when I fly Outdoors because I'm a little heavier  on the throttle I am loving the 45 millimeter  

play10:17

props on the 1s power system because it means I  can fly it indoors and I can take it outdoors and  

play10:22

fly it around the park with my kids and it's just  a ton of fun it's probably the most versatile tiny  

play10:28

whoop that I've ever seen I really appreciate the  beta fpv has tuned this quad properly and so when  

play10:36

you open up the box you just bind it to your radio  and you're off the fly you don't really need to  

play10:41

do much as far as setup goes I also really like  the analog elrs version specifically because it's  

play10:49

lighter weight than the digital version and it's  extremely cost effective which makes it great for  

play10:54

beginners or if you just want another tiny whoop  in your Fleet and you want something that can do  

play10:59

it all this is a great option all right you guys  it wouldn't be a fair review if I didn't point out  

play11:07

um any disadvantages or flaws that I found in this  drone and I can really only think of two things  

play11:12

first of all the design of the canopy means it's  difficult to change the camera angle that means if  

play11:18

you want to fly indoors um a little bit slower  with less camera angle and then go to the park  

play11:24

and fly Outdoors faster with more camera angle  it's a little bit inconvenient to have to remove  

play11:29

the canopy in order to change the camera angle  but the flip side of that is your camera angle  

play11:35

isn't going to get changed inadvertently when you  crash like it does on other tiny whoops the other  

play11:42

disadvantage that I can think of is just that it's  not digital but like I mentioned the fact that  

play11:48

it's analog makes it lighter weight cheaper and  a little bit more beginner friendly because that  

play11:54

that entry level price point is a little bit more  comfortable for some people all right you guys let  

play11:59

me know what you think of a 1s tiny whoop with 45  millimeter props is this a home run or a swing and  

play12:07

a miss for beta fpv thanks a lot for watching and  I'll see you guys in the next one foreign [Music]

Rate This

5.0 / 5 (0 votes)

Related Tags
FPV无人机BetaFPVMeteor 75 Pro轻量级室内飞行户外飞行新手友好高性价比1S电源45毫米螺旋桨产品测评
Do you need a summary in English?