How to Install Windows 10 From USB Flash Drive! (Complete Tutorial)
Summary
TLDRThis instructional video offers a step-by-step guide on how to format and perform a clean installation of Windows 10 on your PC, which is also applicable to other Windows versions. It covers downloading the Windows 10 ISO file, creating a bootable USB drive using Rufus, setting the boot device in BIOS, and partitioning the hard drive. The guide then walks through the Windows 10 installation process, including formatting the PC, and setting up Windows for the first time. It concludes with tips for partitioning and a reminder to subscribe for more tech content.
Takeaways
- 💻 **Windows 10 Installation Guide**: The video provides a comprehensive guide for installing or reinstalling Windows 10 on a PC.
- 🌐 **ISO File Download**: It's essential to download the official Windows 10 ISO file from Microsoft's website for a clean installation.
- 🔧 **System Compatibility**: Ensure the downloaded ISO matches the system architecture (32-bit or 64-bit) to avoid compatibility issues.
- 📂 **ISO File Versatility**: The ISO file is preferred over a USB drive for its flexibility in creating various installation media.
- 💾 **USB DVD Creation**: Use software like Rufus to create a bootable USB drive (USB DVD) for the installation process.
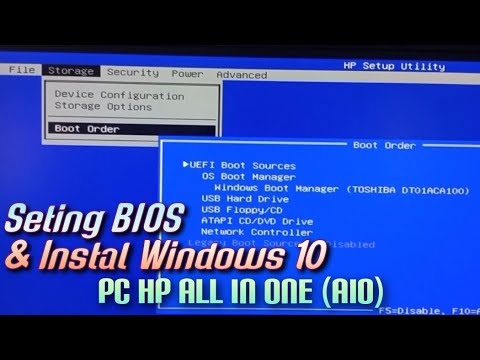
- 🔑 **BIOS/UEFI Access**: Accessing the BIOS/UEFI to change boot order is crucial for booting from the USB DVD.
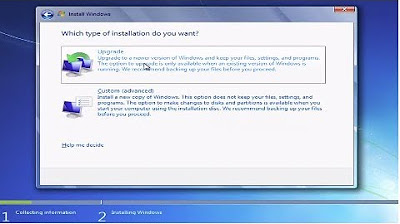
- 🔄 **Partition Management**: The video demonstrates how to delete, create, and split partitions during the installation process.
- 🚫 **Warning on Data Loss**: It's critical to back up data before modifying partitions as it will erase all data on the partition.
- ⏱️ **Time Estimate**: The video provides a download time estimate for the ISO file and the duration of the installation process.
- 🔄 **Multiple Restarts**: Be prepared for multiple automatic restarts during the installation as part of the setup process.
- 🔧 **Final Setup**: After installation, follow the on-screen instructions to input a product key, customize settings, and create a username for the first use.
Q & A
What is the main topic of the video?
-The main topic of the video is how to format and perform a clean install of Windows 10 on a PC.
Is the guide only applicable to Windows 10?
-While the guide focuses on Windows 10, it can also be used for installing or reinstalling other Windows operating systems like Windows XP, 7, 8, and 8.1.
What is the first step in the process as described in the video?
-The first step is to download the official Windows 10 ISO file to your PC.
Why is the ISO file preferred over a USB flash drive for creating installation media?
-The ISO file is preferred because it is versatile and can be used to create various types of installation media like DVDs, USB DVDs, or saved for later installations without needing to download a new ISO each time.
What is the minimum size required for the flash drive to create a USB DVD?
-A flash drive with a capacity of at least 8 GB is required to create a USB DVD.
Which software is recommended to create a bootable Windows 10 setup on a USB drive?
-The software recommended is 'Rufus'.
How does one determine if their system is 32-bit or 64-bit?
-One can determine the system architecture by right-clicking on 'My Computer' or 'This PC', choosing 'Properties', and checking the system type which will indicate if it's a 32-bit or 64-bit based processor.
What is the purpose of the system reserved partition?
-The system reserved partition is invisible in the Windows interface and is used by the system itself, typically for boot and storage purposes.
Why might it be necessary to delete and recreate the system reserved partition during the installation?
-It might be necessary to delete and recreate the system reserved partition to ensure it has enough space (at least 500 MB for Windows 10) and to prevent boot issues that might arise from an old partition created for a previous version of Windows.
What should you ensure before starting the Windows 10 installation process?
-Before starting the installation, ensure you are connected to a stable power source and have at least 90% battery life to prevent malfunctions due to power failures during the installation.
What are the steps to set up Windows for the first time after installation?
-After installation, you are prompted to enter a product key (if available), customize settings, create a username, and optionally set a password. Then, you will go through some loading screens and welcome messages before reaching the Windows desktop.
Outlines
💻 Installing Windows 10 from Scratch
The paragraph provides a step-by-step guide on how to format and clean install Windows 10 on a PC. It covers downloading the official Windows 10 ISO file, using the Media Creation Tool, selecting language, edition, and system architecture, and choosing between creating an ISO file or a USB flash drive. The importance of knowing whether the system is 32-bit or 64-bit is emphasized, and instructions are given on how to check this. The process includes downloading the ISO file, which varies in size depending on the system architecture, and then moving on to create installation media.
🔧 Creating Bootable USB DVD with Rufus
The second paragraph details the process of creating a bootable USB DVD using the Windows 10 ISO file. It explains the use of Rufus software, selecting the correct file system (NTFS), and choosing the ISO file to create a bootable drive. The paragraph also covers the steps to boot from the USB DVD, including entering the BIOS/UEFI menu, navigating to the boot options, and setting the USB Storage Device as the first boot device. It advises on the importance of a stable power source during the installation process to prevent any system malfunctions.
🛠 Formatting and Partitioning Hard Drive
This paragraph explains how to format the hard drive and create or split partitions during the Windows 10 installation process. It provides instructions on deleting existing partitions, creating new ones, and adjusting their sizes. The importance of a system reserved partition for Windows 10 is highlighted, and the process of deleting and re-creating it is outlined. The paragraph concludes with the steps to select the desired partition for installing Windows 10 and initiating the installation process.
🌐 Completing Windows 10 Installation and Initial Setup
The final paragraph describes the final steps of the Windows 10 installation process, including entering the product key (if available), accepting the license terms, and choosing the installation type. It covers the partitioning process in detail, explaining how to delete and create partitions, and the significance of the system reserved partition. The paragraph also guides through the initial setup process after the installation, such as entering a product key, customizing settings, creating a username, and setting a password. The video concludes with a thank you to the viewers and a call to action for likes and subscriptions.
Mindmap
Keywords
💡Format
💡Clean Install
💡Windows 10 ISO
💡Media Creation Tool
💡System Architecture
💡USB DVD
💡Rufus
💡BIOS
💡Partition
💡Product Key
💡Express Settings
Highlights
Introduction to formatting and clean installing Windows 10 on a PC
Guide applicable for various Windows OS including XP, 7, 8, 8.1, and 10
Disclaimer: Follow instructions at your own risk, no responsibility for loss or damage
Step 1: Download the official Windows 10 ISO file
Using the Media Creation Tool to download Windows 10
Customizing language, system architecture, and edition during installation
Checking system architecture (32-bit or 64-bit) before proceeding
Advantages of choosing ISO file over USB for installation media
Downloading the Windows 10 ISO file, size varies for 32-bit and 64-bit versions
Step 2: Creating installation media using a USB flash drive
Using Rufus software to create a bootable Windows 10 USB drive
Backup warning before creating the USB DVD
Step 3: Choosing the boot device in BIOS/UEFI
Accessing BIOS/UEFI to set USB as the first boot device
Differences in BIOS/UEFI interfaces depending on the motherboard manufacturer
Step 4: Installing Windows 10 by formatting the PC
Ensuring a stable power source during installation
Entering the product key or skipping to activate Windows later
Choosing 'Custom: Install Windows only' during setup
Managing disk partitions during installation
Deleting and creating partitions, including the system reserved partition
Step 5: Setting up Windows for the first time
Entering the product key and customizing Windows settings
Creating a username and password for the new Windows installation
Completion of the Windows 10 installation process
Final thoughts and a call to action for viewers to subscribe and like the video
Transcripts
What’s going on guys, today I’m gonna show you, how to format and clean install
windows 10 on your pc, This will work for most of the windows OS newer or older, So
if you are planning to install or reinstall any windows operating system such as Windows
XP, 7, 8, 8.1 and 10, You can use this video as a guide. And only follow my instructions,
visual or verbal on this video at your own risk, we will not be held responsible for
any loss or damage.
So lets beings.
Step number 1, Download Windows 10 In this step, we gonna be shown you how to
download the official Windows 10 ISO file to your PC for us to later burning it to a
DVD or make a USB DVD with it. If you have the installation media already, you can probably
skip the step, or go to this site, the link will be in the video description. And download
this media creation tool. Once you have done that, open the file. And you will see a window
like this, now click on accept, choose “Create installation media for another pc, click next.
Now it will show you some options to select your preferred language, your system architecture,
and edition. By default it is checked as the “Use recommended options for this pc”,
what I recommend is, uncheck this box and edit the information as you prefer, because
if you are planning to install the windows on another device the auto-suggests may not
helpful to you, because it is the only auto detecting the particular machine that you
run the tool on to give you that recommendation, so if the destination PC’s specifications
are different from this PC’s specifications, you can’t get the right version. So let’s
choose a language, edition of Windows 10, and finally the system architecture. If you
are not sure whether your system is a 32bit or 64bit based architecture, You can always
check that by right clicking on “My computer or This PC” on that particular computer,
now choose properties from the right-click menu! and there you will find your system
architecture, You can see my system type is 64-bit Operating system and x64 based processor,
if yours is a 32 bit based one, you will see 32 bit based Operating system and x86 based
processor. Once you have found that, came back here and choose the right one. Now click
next and choose the option ISO file, the reason why I’m choosing the ISO file over the USB
flash drive, because of its versatility. If I have an ISO I can create pretty much any
installation media I wish, such as DVD, USB DVD, or even I can save the ISO file for later
installations on a new PC. So I don’t have to download a new ISO file each time. And
once it gets downloaded hopefully we will make a USB DVD with it. So hit next and choose
a download location then click save. Now it will download the Windows 10 ISO file,
it would be approximately 2.73 GB if you are downloading the 32bit version and for the
64-bit version the size would be much higher, approximately 3.25 GB's.
Anyway let's wait Until it downloads.
As you can see at last it’s finished the
download, with a 4 Mbps connection It took me about nearly 2 hours, so I suggest you
compare it with yours to get a download time estimate if you are interested. Now we are
moving to next Phase.
Step number 2, create installation media. As I mentioned earlier with this Windows 10
ISO file, you can make several types of installation media, which all contain the exact same copy
of windows. But we are not going to burn this ISO file to A DVD, because not every computer
has one these days, but we are going to make a USB DVD, meaning a flash drive that contains
a bootable windows 10 setup. Because most of the computers have nowadays comes with
a USB port. So I think it would be the right choice for the time, on the other hand burning
CDs are Hard, time-consuming, Costly compared to making a simple USB DVD with your Flash
drive. So without further ado, we gonna make the USB DVD. For that all you gonna to need
is a flash drive that had a capacity of up to 8 GB, And a software called “Rufus”
which you can free download from the video description, so I suggest you go there download,
and launch Rufus, Now connect your flash drive, and In most case the Rufus will auto-detect
your flash drive, if it’s not you can go here and do it manually. Now I suggest you
don’t mess up with any of these settings, but you have to do a little something, which
is making sure you have selected the right “file system” type “NTFS”. Now go
down here and click on this image selection icon, now browser and locate the Windows 10
ISO file that we have just downloaded, now click open, then click start, Now it will
ask you something like, continuing with this operation will erase the data in your flash drive,
hope you backed up the important files from your flash drive if any. So let’s click
ok. And it will start the process. It may take a while, so let’s give it some time.
And yes, it’s just finished the process, now your flash drive is becoming a USB DVD.
So let’s install the OS, on as much PC’s as you want, So plug it into the computer
that we want to install the windows on. and restart or turn off the computer.
Now you can see my pc is complete went off. So let’s begin the next Phase.
Step Number 3, choose the boot device in Bios So as soon as it powered on again or restarted
when you see your motherboard logo or brand logo, Hit the bios key on your keyboard. let
me freeze it for a second, for some PC’s the bios key would be F12, for some it’s
“Delete”, and for me it’s F2, Maybe yours is F2 as well. So I suggest you find
your bios key first, by simply try hitting each one of them while you are booting up,
or simply Google it! And once you hit the bios key, you will boot into your bios menu
aka UEFI bios Utility. In bios you can’t use your mouse to interact, instead, you have
to use your keyboard. To navigate through bios use “arrow keys”,
for choosing an option use “enter”, to go back, use “backspace”, to quit from
the bios use “escape”, as well as to save and exit you can use the F10 key. So first
you gonna need to find the boot menu and then find the boot device property or something
sounds familiar, for me, it’s legacy boot. All the bios are different from each other
depending on their motherboard manufacturer, now you are seeing the bios of a Dell laptop.
Which don’t have the option called “Boot device property”, but you will see the option
if you are using a desktop or some other laptops? So make your first boot device as “USB Storage
device” from the boot device properties. If you are using a Windows DVD to install,
I suggest you choose “DVD Drive”. And once you have done that, Save and exit by
pressing the 10 key. For most of the PC’s they have only need to do this step, but for
some device like this Dell laptop, it had an option called “boot manager” So we
can hit F12 to get to the boot manager from the bootup screen. If you have the boot device
property in your Bios, you can skip this one. Now simply choose “USB Storage Device”
and it will ask you “Press any key to boot from USB. And that’s what we are looking
for. Not matter you have used the bios or boot manager, you will see this screen asking
you to Press any key to boot from USB or DVD So press some random key on your keyboard
and it will boot up the windows installation setup.
So it’s time for us to jump to the next Phase.
Step number 4, Install Windows 10 by formatting your PC
As you can see we have just booted up into the windows 10 installation setup, So let
me walk you through. Before that make sure you are plugged in and connected to a stable
power source as well as Make sure that you have at least 90% battery left on the device.
Force shutdown or any power failure while installing the OS will cause your pc malfunctioning,
we don’t want that to happen, so watch it closely and understand the steps before proceeding.
On the windows setup screen we have to first need to choose a language to install, then
choose your “time and currency format”, and finally the “keyboard or input method”,
for me all the default would be fine. So let’s go ahead and hit the next, Now click Install
now, and it will start the installation setup, Now it is asking you to enter the product
key to activate windows, If you have one, use it here, or you can do it later, in case
if you don’t have. Now it will show you the Microsoft terms and
condition to use their software, so scroll down and check the “I accept the license
terms” box. Now click next, from here choose “Custom: Install Windows only” Option.
And it will bring you to the disk partition. Which will help you to create, split and
delete certain local disks. Now for this PC there is already a partition going on, it
got a 1 TB Hard drive installed, and it’s mainly split between in to two partitions,
which had 150 GB on Partion 2 and Seven hundred and eighty-one GB on Partition 3, which is
approximately one TB, and you may notice that there is the other
partition which had a capcity of only 100 MB, which is the partition number 1, for your
information it is not a normal partition like 2 and 3, it is system reserved partition,
meaning it is invisible on the windows 10 interface, you could not see it in your “this
pc or my computer” but it’s there in the memory invisibly only for the system itself,
it uses the balance unallocated space to create you system drive and install the operating
system. So let’s continue with the process. I have to give you a few more tips on this
to make you an expert on windows formatting and disk partition. So, first of all, I’m
gonna show you how to split an already created partition, and please beware that doing this
on the windows setup will definitely clear any data on the particular partition,
so if you have anything there I suggest you back it up, before doing this. Anyway, let’s
do it. We are going to split this Seven hundred and
eighty-one GB Partition into two partitions, which is holding a capacity of one hundred
ninety-five and five hundred eighty-five Gbs. So select the partition you want, now came
down here to the tool and click on “Delete” It will delete that particular partition and
turn it into Unallocated Space, So you have to click the unallocated space which is the
same Seven hundred and eighty-one GB and click on new from here,
Now edit the disk size for your new partition, which we prefer to do as one hundred ninety-five
GBs for one, the size showed is here is in MB, so the seven hundred ninety-nine thousand
nine hundred ninety-nine MB is equal to Seven hundred and eighty-one GB, so we need a one
hundred ninety-five GB so I’m gonna type two hundred thousand, If you have any doubt
about the conversion, I suggest to Google “GB to MB” and it
will show you an online GB to MB Converter. So once you have edited the value of the new
partition, click apply and it will create the partition, Now you can see it’s created
a new partition of one hundred ninety-five GB, Now to create the second partition, from
the leftover unallocated space, you have to choose it again, and do that same, click on
new, edit the value. For this time I’m gonna leave it as it is because I want the rest
of the unallocated file size into one partition, it would be approximately five hundred eighty-five
Gigs. If you want you can create more partitions with that, but I prefer to hold on to a big
one rather than creating multiple small partitions. It is your personal choice; you can customize
it as the way you want. So whatever it is, that’s how you can delete, create or split
a partition. Now we gonna quickly delete a partition including
the system reserved one and re-create it, because this old system reserved partition
was created for Windows 7 which only needs 100 MB, but for the Windows 10
but for the Windows 10 it would be needed, much higher.
at least 500 MB, as well as the old one, may keep bugging you when your booting
up, like it may false recognize that the old OS and it will ask you to choose between the
old and new OS’s each time, even if the old one was completely erased. So delete the
system reserved partition with some other main partition and create a new partition
with that unallocated space which will automatically create the new system reserved partition and
hope that makes sense. Now you are all good to go, choose the partition that you wish
to install the windows 10 on, now hit next and it will install the windows 10 on it,
and it would be your C drive or Local disk C. As you can see it’s installing the windows.
It will go through several different steps before it gets installed, and your system
will get restarted automatically several times, while this process happening, so I want you
to do nothing at this point, it may take a while, so sit back and relax until it does.
So we have just finished the windows installation and it took me about 16 minutes.
So it’s time to jump on to the final Phase.
Step Number 5: Setting Up your Windows for the First time!
As you can see we have just finished installing the windows 10 on this pc, and now let’s
set it up for the first time. It is asking you to enter your product key for this particular
edition if you have one enter it here, or you can enter it later by buying one online,
and you can activate it once we set up everything. So let’s do it later. Now we will get to
this windows, which is allows you to edit the settings for your windows. Like you can
enable or disable, things like speech, typing, inking, location, and so on
You can either choose the Customize settings option, to edit the settings by yourself,
or use the recommend settings by choosing, “Use Express Settings Option”, Now after
a few seconds, it will ask you to create a Username for your PC, and if you want you
can type in a password as well, to protect your PC. Enter a password, type it again,
And type a password hint if you want. Click next, and that’s it, now after a few minutes
of loading screens, and some welcome messages, it will start your windows desktop,
So that’s how you can Format and clean install windows 10 on your pc, Thank you so much for
watching, as I mention you can use this to install or reinstall any other Windows OS’s,
So keep it in mind! If you like what you just so leave a thumbs-up,
wanna watch more subscribe to our channel. This video is requested by one of our loyal
subscribers, Mr. Sachin Yadav. I personally thank him for such an awesome idea, your support
means a lot to me, keep it up. As always this is your host Amal Rafi,
See you around! 😍
Browse More Related Video
How to Create a Windows 10 Installation USB with Rufus (Tutorial)
How to Create a Rufus Bootable USB for Windows 10 in 5 Minutes!
Windows 10 Clean Install Guide | The ENTIRE process | How to Install Windows 10
How to Create a Windows 11 Installation USB (Rufus Beginners Guide)
Begini Cara Install Windows 10 Menggunakan VirtualBox | install windows 10 on virtualbox
How To Install Windows 10 From USB (2022)
5.0 / 5 (0 votes)