The Entina Tina2S 3D Printer is so tiny! #3DPrinting #Entina #Tina2S #Polymaker
Summary
TLDRPhil在视频中介绍了一款由Antina提供的超小型3D打印机Tina 2s。他展示了开箱过程,打印机外观小巧精致,组装简单。Phil还介绍了随机附带的配件,如迷你线材卷、工具包、清洁针和micro SD卡等。打印机功能包括自动床平校、Wi-Fi连接和加热床。Phil尝试了不同的材料和模型进行打印,包括使用Poly Maker和Sunlu品牌的线材。他还提到了打印机的优缺点,如价格亲民、适合青少年使用,但打印速度慢,电源开关设计不便,且线材卷轴容量有限。
Takeaways
- 📦 视频中Phil展示了一款来自Antina的小型3D打印机Tina 2s。
- 🔨 组装过程非常简单,仅需移除一些塑料片和胶带,以及安装挤出机的管子。
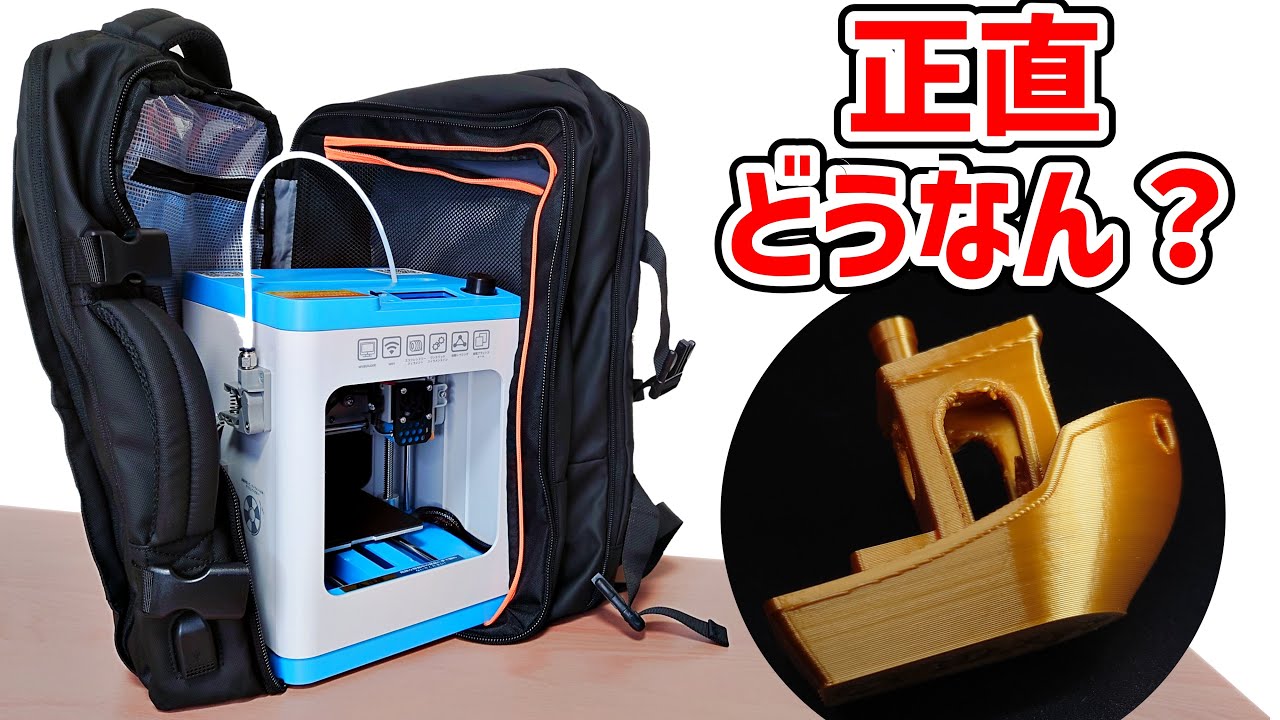
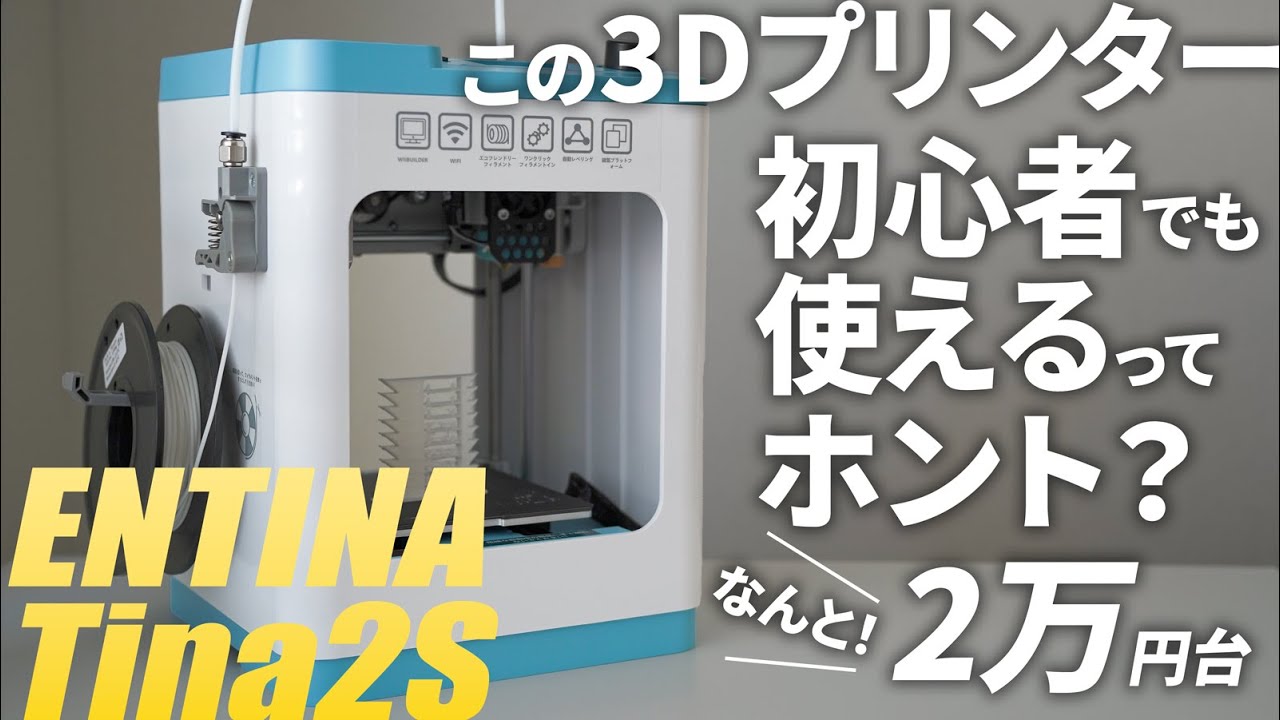
- 🎨 Tina 2s的打印尺寸为100x100x105毫米,适合打印小型模型。
- 🔌 电源线带有独立的电源开关,这是一个不常见的设计。
- 📂 包装内包含了一个微型线轴、电源线、样品打印件、手机支架、书签、钥匙链、胶水、工具包、额外的喷嘴、清洁针以及一个带有预切片模型的micro SD卡。
- 🖨️ 打印机具备自动床平功能,并且可以通过Wi-Fi连接到手机应用程序。
- 🐸 Phil使用不同的材料打印了多个模型,包括一个灵活的小恐龙、一只青蛙和一个船模型。
- 🌐 通过Antina的应用程序,用户可以浏览和打印多种免费模型。
- 🔧 打印机的切片软件虽然易于使用,但功能较为基础,如果需要更多高级功能,可以配合Cura软件使用。
- 💰 Tina 2s的价格相对便宜,适合初学者或对小型打印机有兴趣的用户。
Q & A
视频中提到的3D打印机品牌和型号是什么?
-视频中提到的3D打印机品牌是Anycubic,型号是Tina 2s。
Tina 2s 3D打印机的打印尺寸是多少?
-Tina 2s 3D打印机的打印尺寸是100x100x105毫米。
视频中提到的3D打印机有哪些特点?
-Tina 2s 3D打印机的特点包括自动床平准、加热床、Wi-Fi连接以及易于使用的切片软件。
视频中提到了哪些随打印机附带的配件?
-随打印机附带的配件包括迷你线轴、电源线、免费样品打印件、手机支架、书签、钥匙链、胶水、工具袋、额外的喷嘴、清洁针、micro SD卡、USB micro SD卡读卡器以及USB 3到USB Type-C适配器。
视频中提到的micro SD卡中包含了什么内容?
-micro SD卡中包含了使用说明书、视频教程、一些预切片的模型文件。
视频中提到的3D打印材料有哪些?
-视频中提到的3D打印材料包括随机器附带的线材、Polymaker的PolyTerra线材、Polysonic蓝色线材以及Polymaker的Starlight Comet线材。
视频中提到的3D打印机的售价是多少?
-视频中提到的3D打印机在亚马逊的售价是179美元。
视频中提到的3D打印机有哪些优点和缺点?
-优点包括外观可爱、功能丰富、易于使用、价格低廉。缺点包括打印速度慢、电源开关设计在电源线上不方便、切片软件功能基础、小线轴架不适合常规大小线轴、电源插头占用空间大。
视频中提到的3D打印机是否支持Cura软件?
-是的,视频中提到最新的Cura软件版本支持Tina 2s 3D打印机。
视频中提到的3D打印机是否适合儿童使用?
-视频中建议这款3D打印机更适合青少年使用,因为机器的移动部件可能会对年幼儿童构成安全风险。
Outlines
📦 开箱体验:Tina 2S 3D打印机
视频作者Phil展示并拆箱了一款来自Antina的迷你3D打印机Tina 2S。他详细描述了打印机的外观、小巧设计以及安装过程。安装十分简单,仅需拆掉塑料件和胶带。配件包括一个小型线轴、一些工具、备用喷嘴、和其他小物件,如钥匙扣、支架等。此外,他还介绍了打印机的磁性打印板和电源开关等细节。
🖨️ 打印机的首次使用与打印过程
Phil开始介绍如何设置和使用Tina 2S。他插入了打印机附带的TF卡并选择了几个预设的打印模型,包括一艘船、一只青蛙等。打印机具备自动床调平功能,且打印时间约为1小时18分钟。Phil展示了打印完成的恐龙模型,并描述了喷嘴加热和喷丝过程,整个使用体验平稳顺利。
🎨 PCBWay 赞助商及多材料打印体验
在打印了一系列不同的模型后,Phil介绍了赞助商PCBWay,他们提供包括多种材料的3D打印服务。除了常规塑料材料,PCBWay还支持彩色打印、树脂打印和金属打印。随后,Phil展示了他使用不同材料打印的模型,包括青蛙、船、和他最喜欢的紫色星光流星色彩的灭霸雕像。他还分享了Tina 2S的切片软件体验,虽然功能基础,但非常易用。
👍 Tina 2S的优缺点分析
Phil总结了Tina 2S的优缺点。优点包括其小巧可爱、自动床调平、Wi-Fi功能和价格实惠(179美元)。他认为这款打印机适合青少年使用,但警告小孩不要使用,因前后都没有保护。缺点包括打印速度较慢、电源开关设计不便、基础的切片软件以及小型线轴托架的局限性。他还建议购买额外的线轴托架来适配更大尺寸的线轴。最后,Phil鼓励观众留言提问并关注他的频道。
Mindmap
Keywords
💡3D打印机
💡自动床面平整
💡Wi-Fi连接
💡切片软件
💡耗材
💡打印速度
💡模型
💡热床
💡耗材卷轴
💡PCBWay
Highlights
Unboxing a tiny 3D printer from Antina, the Tina 2s.
Printer comes well-packed and assembly is simple with minimal steps.
The spool holder is designed for mini spools, which might not fit standard larger spools.
Includes unique free sample prints like a phone stand, bookmark, and keychain.
Build plate dimensions: 100x100x105 mm, significantly smaller compared to regular-sized build plates.
Features auto bed leveling and a magnetic build plate for easier printing.
The power switch is located on the power cord, which is an uncommon design.
Printer includes pre-sliced models on the SD card for easy printing out of the box.
First test print is a flexible dinosaur model that came out well.
Multiple filaments used for prints, with good quality results.
Tina 2s supports Wi-Fi connectivity, allowing access to models through an app.
Slicer software is easy to use but limited in advanced features.
Printer is compatible with Cura slicer software for more advanced functionality.
One downside: the printer is quite slow, with some prints taking several hours.
Overall verdict: great for teens and hobbyists, affordable at $179, but has limitations like speed and small build plate size.
Transcripts
hey what's up guys it's Phil and this is
3D Japan and I'm looking at this uh box
here which turns out to be a very tiny
3D printer uh from antina thank you to
them for sending it uh this is the Tina
2s uh let's open it up get to get it out
we'll run the intro see what's
inside all right it's the next day and I
got everything out of the box I'm so
excited to play with this uh it was very
well
packed look how cute and tiny it is and
it's very attractive looking nice white
and green um but okay let's see what
everything in the Box was oh uh as far
as assembly there was basically there
was this little piece of plastic that
was around the lead screw coupler just
had to take that off uh there was two
pieces of tape inside wrapped around to
take them off and then this tube uh came
out and went into the extruder and that
was the entire
setup so um what else we have in the box
we have uh mini spool which is
interesting because there's a spool
holder on the side
here that will just about fit this
little spool it will not fit a big siiz
spool we'll see what we can do with
that okay uh we have power
cords we got something I've never seen
with a printer before we got free sample
prints we've got a a phone
stand and yep it says Ana 3D we got a
bookmark and a little keychain
that's really
cute and then when our accessories bag
let's see what we've got
here got a tube of glue
stick have a little baggie with some
tools and an extra
nozzle this bag has a little needle for
cleaning the nozzle if it gets
clogged and we
have a micro SD card uh I believe that
has the manual some videos or at least a
video
and uh some sample models or sample
pre-sliced models ready to
go uh we have a uh
USB micro SD card reader it's always
handy and then we
have looks to be a USB 3 to USB type-c
adapter and that's
it so I wanted to show you this is the
build plate the uh work area for this
printer is 100x 100x 105 if I'm not
mistaken
so here is a regular size build plate
plate for one of these two printers over
here this one takes up about a quarter
of the
space so it is
tiny but can pop that in
there and it is
magnetic it's easier when you can see
what you're
doing but oh there's another interesting
thing is the power
cord uh actually has the power switch on
the cord I've never seen that with a
printer done before um but yeah so let's
get it turned on and I'll maybe I'll
start with uh the models that are on
that SD card and we'll see what it
does okay we got this turned
on and it seems to be homing right now
you can't see the screen here but I'm
going to try and find something to
print oh first we have to set it up
English step one load filament
oh okay I already did
that heating nozzle please
wait okay just about done it's not too
fast but it didn't take too long
either pretty
average okay insert filament already
done
that filament
Purge oh there it goes it's coming
out okay it is purging quite a
bit still says to
wait ah it finally
stopped that is a lot to
purge okay continue There was actually a
purge more
option he insert the TF card or micro SD
card I've already done
that next print from
TF okay we have ship
rabbit
terrasaur
hand uh
frog
fishbone and that's
it they're
all between an hour and an hour and a
half oh the ship is an hour and 48
minutes I see this
terrasaur
okay right and
print take this little bit of filament
out of there
now it has automatic bed leveling I
assume it's going to do that
[Music]
now
yep okay the nozzle's heating back
up and we're almost there
here we
go okay the print has started
all right so we'll take a look at it
when it's
done okay we're just about
finished okay we're done that took 1
hour and 18 minutes even though it said
it would be 1 hour and 17 pretty close
[Music]
and we're presenting
[Music]
forward and we're done let's get this
out that is a flex plate though there's
not a lot of flex to
it see if we can get this off
it's probably better once it's cooled
down
okay can we get you off of the
raft
there there we go little uh flexible
dinosaur that's a lot of
fun okay so now let's uh go and try some
different materials and print a whole
lot of
things okay so I've been printing a
bunch of different things as you can see
using a bunch of different filaments but
suppose you want to print uh something
that's in a different kind of filament
that's where today's sponsor PCB way
comes in they're mainly known for making
circuit boards pcbs printed circuit
boards but they can also do 3D printing
for you and they can do all kinds of
different materials uh whether it be
filament like this with all different
colors or
multicolor they can even do full
color or they can print in resin or an
even metal different types of metal and
all you have to do is upload your model
to them pick what you want and they'll
print it and ship it to you so be sure
to check out
pcb.com or I'll have a link down in the
description
below okay so let's talk about these
prints uh first one yeah you already saw
this the little pterodactyl or whatever
it is flying dinosaur uh flexy it's
really cool and bendy and that was
really fun that you know came on the SD
card and that was of course done with
the uh filament that came with the
machine set that
away okay uh next things I printed uh
were little
frog uh that was also very
cute and let me see that was printed
with this uh polym
maker I think this is actually
polysonic uh blue yeah it's polysonic
blue it's actually intended for faster
printers okay and next the one that said
ship is of course a Beni um it came out
pretty well it's got kind of a weird
Mark in the front
the
bow um but otherwise it came out really
well there's no stringing on it at all I
haven't measured it or anything but it
looks very
nice and that was uh printed in this uh
poly maker uh poly Terra uh part of
their Seasons collection is this is
winter and so next up I went for I was
looking in their app it does have
Wi-Fi uh and it connects to their app
and you can browse a ton of free models
and I noticed when I clicked on them
they each had uh different printers that
were
available and of course many of them
would say the Tina 2s and so I clicked
on a bust of doctor strange and it said
Tina 2s so I went to print it and it
gave an error saying it was too big for
the build plate so I'm not sure what's
going on there but I forgot about that
one and I clicked on a bus of Thanos
instead and that one printed out just
fine and it looks really good it's very
good
detail and this is printed in my current
favorite filament this is poly makers uh
Starlight Comet it's called and it's
really cool it looks different from
different angles like purple and green
kind of
silvery just really cool F I'm going to
put him right in
front so then I was trying out their
slicer and their slicer is um it's very
easy to use but it's also quite basic
like it'll do what you really needed to
do but if you want all the extra
features and stuff you won't find them
in there uh so I went on printables and
I was looking for things to print on
there and I found this uh tennis
ball and this one was printed in some
sunl yellow
filament and I think it came out pretty
good there's couple of lines on there I
did have to support it with supports
underneath one thing about their slicer
that's nice is you can paint supports on
wherever you want
uh but yeah this this came out really
well I had only supports on the bottom
uh nothing on the top and it came out
perfectly uh then I was looking at the
latest version of cura and I realized
that this machine is listed in there so
you can add this machine to Cura I think
it's
5.8 and I found this cool canister with
a lid
and this is about the biggest thing that
I could fit in this printer uh I did
have to scale this down a little bit to
about
80% but I was able to print the canister
and then do a separate print for the
lid
and this took about 12 hours plus
another I think 3 hours for the lid
so yeah that's not a fact fast printer
in fact let me see I have a list here of
some pros and cons okay let's start with
the pros um bro it's it's really cute
it's it was really funny actually
watching it print and just watching
everything I'm used to seeing on a
bigger printer except in
miniature um uh it does have lots of
features such as the auto bed leveling
and the Heat bed and the Wi-Fi that's I
would not expect something like that
from a small printer like
this
um I also wrote down that I think this
would be good for teens maybe not
smaller kids because there is no front
on the front or the back uh
so you know small fingers can get caught
inside the moving parts or get burned by
the very hot part s so uh for older kids
like teenagers I think this would be
great it's really fun and it looks nice
you can keep it in a
bedroom it's also not very
loud I wrote down that it's very easy to
use uh including the uh the software
that the slicer that it comes with is
very easy to
use um and I mentioned mention that it
works with
Cura and it has Wi-Fi with the app
another Pro is the price at least right
now on Amazon is
$179 which is really
cheap okay a few
cons uh as I mentioned it is very slow
like I said that canister took like 12
hours uh some things like T took like
three or four hours
uh one other thing I don't like is uh
the power switch being on the cord here
uh right now it's plugged in under my
table and I was doing all my printing in
front of the table so that meant every
time I wanted to turn it on or off I had
to walk all the way around here and get
down underneath to switch the switch on
and off uh so I really would think it
would be better if there was a switch on
the side here near where the power plug
is a con I mentioned was the slicer is
very basic however you can use the
latest Cura if you want more
features uh oh uh the spool
holder um again it has uh this very
small spool holder on here which is
great for these little ones but who who
uses these um so you'll have to get if
you want to use regular size 1 kilogram
spools you'll have to get something to
hold it and conveniently I have this uh
holder from sunlu that I reviewed in a
previous
video and that worked out really well uh
there are also uh spools uh spool
holders that you can print and you just
take uh bearings from a skateboard wheel
and you can buy these bearings like a
whole pack of them for like7 or
$8 and yeah and just print them uh pop
the bearings in and it'll hold your
spool finally the last thing is again
with the cord the plug that it uses is
big and it actually takes up two outlets
on my power strip so I had to unplug
this printer so that I would have room
for this plug okay so that's all my
thoughts on this machine it is again
really cute I I just love even looking
at
it but uh yeah if you have any questions
leave them down below uh or any comments
um please like And subscribe I will have
a link to this down in the description
below and I will see you next
time for
Browse More Related Video
Weefun Tina2S 3D printer. Small, but perfectly formed!
3D printing made easy with the Tina2 PLUS from WEEFUN!!
格安でコンパクトな3DプリンターTina 2Sをレビュー!【ENTINA】
Free Tinkercad Filament Adapter & Generic PLA Entina Tina2 Plus Tips
Tina 2S kids 3D printer. Better than the toybox. ENTINA 3D printer
Easily Setup the Entina Tina2 Plus & First Print in Minutes #3dprinter
5.0 / 5 (0 votes)