HHO Generator - Water to Fuel Converter
Summary
TLDRThis script details a DIY project to create a hydroxy generator, transforming water into a highly explosive gas using electricity. The process involves crafting stainless steel plates, assembling acrylic and ABS components, and using potassium hydroxide as a catalyst. The result is a system producing OxyHydrogen gas, capable of generating thousands of liters of fuel from a small amount of water, showcasing a potentially powerful and sustainable energy source.
Takeaways
- 🔧 The project involves building a generator that converts water into a highly explosive gas, hydroxy gas, using electricity.
- 🛠️ Materials needed include stainless steel, ABS cleanout fittings, poly tubing, and acrylic tubing, along with other hardware.
- ⚙️ Stainless steel plates are cut to specific sizes using a hydraulic punch and then sanded to increase surface area for efficiency.
- 🔩 The assembly process involves attaching various fittings and tubing with silicone caulking and ABS cement for a watertight seal.
- 💦 The generator is filled with a mixture of distilled water and potassium hydroxide, which acts as a catalyst for the production of hydroxy gas.
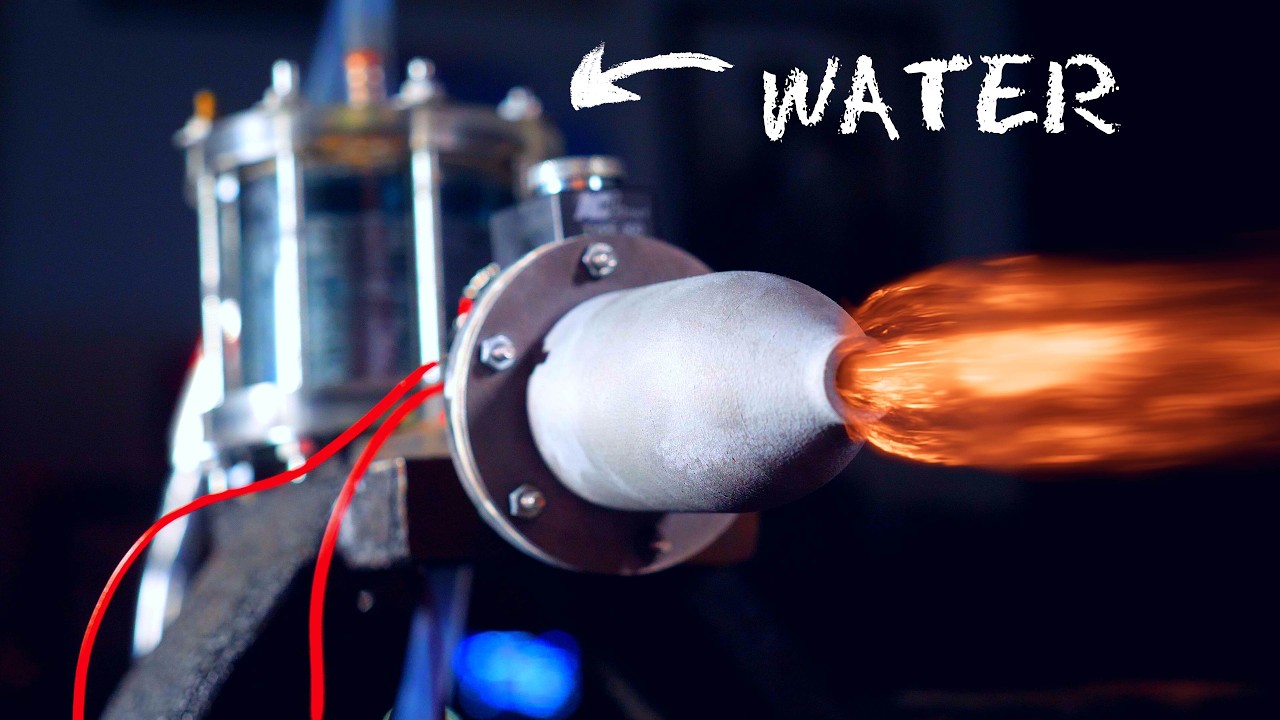
- 🔬 The process of creating hydroxy gas involves a chemical reaction that turns water back into a fuel source, which can then be converted back into water.
- 🛡️ Safety measures such as using protective gear and working in a well-ventilated area are implied throughout the project.
- 🔬 The script describes a DIY approach to creating a fuel source from one of the most abundant materials on earth, highlighting the potential of water as a renewable resource.
- 🔌 The generator is designed to be connected to a power source, such as car batteries, to initiate the conversion process.
- 💨 The end product, hydroxy gas, is described as an extremely powerful fuel that can produce a significant amount of energy.
- 🌐 The video script is from a project shared on 'www.thekingofrandom.com', suggesting a community interest in innovative and practical DIY projects.
Q & A
What is the primary material used in the project described in the script?
-The primary material used in the project is stainless steel, specifically 20 gauge stainless steel.
What is the purpose of the generator built in the project?
-The purpose of the generator is to convert water into a highly explosive gas, specifically OxyHydrogen gas, using electricity.
What are the dimensions of the stainless steel plates mentioned in the script?
-The dimensions of the stainless steel plates are 12 plates measuring 3" x 6", 4 plates at 1 1/2" x 6", and three connector bands that are 6", 4 1/2", and 3 1/4".
Why is the protective layer peeled from the plates and the surface sanded?
-The protective layer is peeled from the plates to reveal the attractive surface, which is then sanded to create scuff marks that increase the surface area on the plates and improve the efficiency of the generator.
What is used to smooth down the jagged edges around the holes in the plates?
-A belt sander is used to smooth down the jagged edges around the holes in the plates.
What materials are used to create the bubbler and how are they connected?
-The bubbler is created using 4" ABS cleanout fittings, 3/8" poly tubing, and scrap acrylic tubing. The connections are made using silicone caulking and ABS cement.
How does the script describe the process of attaching the acrylic tubing to the clean out adaptor?
-The process involves applying silicone caulking around the outer base and inside of the clean out adaptor, then tapping the tubing into place with a rubber hammer and cleaning up the excess silicone with a paper towel.
What is the role of the 1/4" 90-degree elbow in the bubbler assembly?
-The 1/4" 90-degree elbow is attached to the cap of the bubbler and is used to connect the bubbler to the acrylic tubing, creating a sealed and professional-looking assembly.
What is the significance of the swivel elbow used in the generator plates assembly?
-The swivel elbow, which allows 360-degree rotation, is used for convenience in the assembly of the generator plates, providing flexibility in the positioning of the components.
How is the generator connected to the 4" plug and what materials are used for this connection?
-The generator is connected to the 4" plug using 5/16" x 2" stainless steel bolts, nuts, and 1/4" washers with one side being stainless steel and the other rubber.
What is the final product of the project and how does it function?
-The final product is a hydroxy generator that produces OxyHydrogen gas. It runs on 2 car batteries and produces about 5 liters of gas per minute, which, when used, turns back into water.
Outlines
🔧 Fabricating the Hydrogen Generator Components
The script begins with a project to create a hydrogen generator using stainless steel from a local fabrication company. The process involves cutting precise holes in steel plates using a hydraulic punch, resulting in various-sized plates and connector bands. The edges are smoothed with a belt sander, and materials like ABS cleanout fittings and poly tubing are gathered. The stainless steel plates are sanded to increase surface area for efficiency. Acrylic tubing is cut and assembled with silicone caulking and ABS cement. The script also details the creation of a bubbler with fittings and caps, and the assembly of the generator plates with bolts, washers, and nuts, ensuring a snug fit and secure connections.
🔌 Completing the Hydrogen Generator Assembly
This paragraph continues the construction of the hydrogen generator by detailing the assembly of the plates into the generator's core. It includes the stacking of plates with washers and nuts, and the attachment of a connector strap. The process of securing the plates and the final touches like trimming bolt ends and tightening nuts is described. The script also covers the creation of a clip for the bubbler using acrylic rods and the setup of the generator with distilled water and potassium hydroxide as a catalyst. The final steps involve attaching the generator to the casing, preparing the gas production system, and highlighting the potential of the produced OxyHydrogen gas as a powerful and renewable fuel source.
Mindmap
Keywords
💡Hydroxy Generator
💡Explosive Gas
💡Stainless Steel
💡Catalyst
💡ABS Cleanout Fittings
💡Acrylic Tubing
💡Sanding
💡Silicone Caulking
💡One-Way Check Valve
💡Potassium Hydroxide
💡OxyHydrogen Gas
Highlights
Building a generator that converts water into a highly explosive gas using electricity.
Utilizing stainless steel from a local fabrication company for the project.
Cutting precise holes in stainless steel plates with a hydraulic punch.
Sanding the plates to increase surface area and generator efficiency.
Using 4" ABS cleanout fittings and poly tubing for the project assembly.
Creating custom-sized acrylic tubing for the generator components.
Applying silicone caulking for secure and watertight connections.
Constructing a bubbler with 90-degree elbows and trap adaptors for a professional finish.
Securing the generator plates with nylon bolts, washers, and stainless steel jam nuts.
Bending connector bands to form the generator's structure.
Stacking generator plates with precise order for optimal performance.
Attaching the generator plates to the 4" plug with stainless steel bolts and washers.
Creating a custom clip to secure the bubbler to the generator body.
Using leftover materials to craft support rods for the bubbler clips.
Preparing the generator with distilled water and potassium hydroxide as a catalyst.
Filtering the fluid into the casing for a clean and efficient reaction.
Assembling the final generator system with careful component placement.
The generator produces OxyHydrogen gas, which turns back into water after use.
The potential of the hydroxy generator as a sustainable fuel source.
The project's educational value and its presentation on www.thekingofrandom.com.
Transcripts
Can you make water explode? Well, maybe not water per-se, but with a simple technique,
we can turn one of the most abundant materials on earth, into a highly explosive gas. In
this project we're building a generator that uses electricity to convert this, into this.
For this project we're going to need some stainless steel. I'm at a local fabrication
company, and not only do they have plenty of scrap metal to choose from, they're even
willing to help me cut it to custom sizes. A job that would have taken me hours with
a pair of tin snips and a hack saw, only takes a matter of minutes with their equipment.
This is 20 gauge stainless steel, and this hydraulic punch is being used to cut precise
holes in the tops and bottoms of the plates. When finished, I have 12 plates measuring
3" x 6", 4 plates at 1 1/2" x 6", and three 1" connector bands that are 6", 4 1/2", and
3 1/4". A belt sander is perfect for smoothing down the jagged edges around the hole, and
now it's time to head home and get to work. We'll need these 4" ABS cleanout fittings,
3/8" poly tubing, as well as some scrap 4" and 2" acrylic tubing I found at a plastics
company. When I peel the protective layer from the plates, it reveals a beautiful and
attractive surface. But that's not what we want for this project. Instead, we'll need
to hunt down some sandpaper. This is 100 grit, and I'll place 2 plates in a diamond shape,
and sand from top to bottom, then rotate 90 degrees, and repeat. These scuff marks will
increase the surface area on the plates and increase the efficiency of the generator.
Ok, I've finished off both sides of the plates and you can see the criss-cross pattern etched
into the metal. The 1 1/2" plates are sanded as well, but the 3 connector bands are not.
Alright, it's time to cut this acrylic tubing to size, so I'm using a chop saw to trim this
edge smooth, then I'll measure 7", and cut nice and slowly so that I don't chip the plastic.
As the blade cuts, the friction also helps heat the plastic, leaving a fairly clear edge.
After I've cut 5" of the 2" tubing, it's time to make some connections. With some gentle
persuasion, I've managed to fit the large acrylic tube into the clean out adaptor, but
before we push them together, let's add a liberal amount of clear silicone caulking
all around the outer base. This will also go on the inside being very careful not to get
any silicone on the threads. Now we can use a rubber hammer to tap the tubing all the
way into place, and clean up the excess silicone. Paper towel works well, and in a few minutes,
it's all cleaned up. We can flip this over, and repeat the process of attaching, caulking
this part, and this part, tapping into place, and cleaning up the excess. While I'm in the
mood for cleaning, I'll use my adhesive remover to assist in clearing off the UPC stickers,
then give everything one final wipe down. I'm going to seal the bottom with a 4" ABS
clean-out plug and some ABS cement. The gooey black cement is applied to the threads of
both parts, and then I'll use this piece of scrap wood from my "Solar Scorcher Frame"
project to help screw it in tight. The excess is removed, and we can let it sit here to
cure. While that's drying, let's get to work on making the bubbler. I want to attach this
1/4" 90 degree elbow to the cap, so when the stickers are removed, I'll grab my 1/2 drill
bit, and a tap. The hole is drilled in the center, then tapped at 18 thread, just before
adding pipe tape to the elbow adaptor, and screwing into place. When that's tight, and
I've repeated the exact same process with the other cap, I'm happy to see they fit snug
onto my acrylic tubing. It looks unfinished though, so I'm going to use these top pieces
from 2 trap adaptors to slide onto the tubing first, and now when I add the cap, they screw
together giving this piece a clean professional look. Ok now it's time to work on the generator
plates. Similar to the bubbler caps, I'm drilling a 1/2" hole into the top of the 4" clean-out
plug. When that's tapped to 18 thread, we can add pipe tape to a 3/8" swivel elbow and
screw that into place. You can see this swivels 360 degrees, and that's mostly for convenience.
Using a 5/16" drill bit, I'll make holes on either side of the cap, and these will be
for attaching the generator plates. I cut this hole a little close to the edge, but
no problem. My belt sander easily rounded the edges, and now it's a perfect fit. Next,
I'll mark the two smaller bands at about 2 3/4", and use my bench vise and a rubber hammer
to bend them to 90 angles. The 6" piece is marked at 1 3/4" and 4 1/4", then bent into
a "U" shape. A 5/16" course thread nylon bolt is cut into two pieces 4" long. I'll get some
nylon washers ready, and add two stainless steel jam nuts, to the end of each bolt. The
bolts are fitted with two of the connector straps, and one of the smaller plates, then
a plastic washer is added on each bolt. These washers are 3/4" diameter, and about 0.06"
thick. Another 1 1/2" plate is added, and secured with a nut on each bolt, and now the
big plates can go on. I'm stacking these in the order of plate, washers, plate, nuts,
and repeating until I've got a total of 8 plates in place. This is the center of the
generator, and the other connector strap is added at the top and secured with another
nut. I'll add one more nut to the bottom to compensate for the gap, and then get back
to my routine of adding plate, washers, plate, nuts, until I run out of big plates. The two
smaller plates are added last, and now all we need to do is trim down the bolt ends to
about 1/2" so we can snap the bottom connector into place, add a nut, and tighten. The other
bolt also gets a finishing nut, and then is trimmed down, and now we just need to turn
the generator around and move these screws so that we can tighten the inner ones. The
generator plates are done, and looking very nice, so let's connect them up to the 4" plug.
To do that, I'll add a nut to a 5/16" x 2" stainless steel bolt and push them through
the hole in the right connector strap. This 1/4" washer is stainless steel on one side,
and rubber on the other, and I'll push that down the bolt with the rubber side up. That's
all repeated on the left side, and now the cap is placed over the bolts. Two more washers
are added, this time with rubber side down, and secured with another nut. Using an allen
wrench, the nut is tightened securely, and then a few more nuts and metal washers are
added to the posts for convenience. This piece is finished. I'm really happy with it, and
when I dry-fit it into the casing and screw it into position, I'm starting to get excited.
We're going to need a way to secure the bubbler to the side, so using some leftovers from
the 2" pipe, I'll very carefully cut two 3/4" thick circles, then use a wood 2x4 to hold
the piece flat while I trim off the top. What I've done is created a clip for our bubbler
and you can see it clips easily onto the tube and holds firmly in place. The other circle
is cut, and a belt sander used to match the pieces as closely as possible. I've got some
left over acrylic rod from my "Fire Piston" project, and I'll cut off 2 pieces about 1
1/2" long. I'll use some acrylic glue to secure the clips to the connector rods, and after
2 minutes they're firm, but will still take over 2 days to fully cure. While those are
setting, I'll use scissors to cut my poly tube at 20", and another piece at 2". The
2" piece connects to a one-way check valve, and gets inserted into the swivel elbow. This
will prevent anything from flowing back into the generator. The 20" tube goes on the other
end of the valve, and then connects to one of the bubbler elbows. It looks like we're
ready to attach the clips to the body, so let's use the bubbler body as a form for spacing
the clips, and with the generator on it's side, find where it balances. That looks good
there, so acrylic glue is added to the clips and replaced on the body. When it sets, I'll
use a little more glue in the gaps, and remove the bubbler to let it cure. In the mean time,
we can ready 6 cups of distilled water, and some flakes of potassium hydroxide. 4 Teaspoons
of flakes will act as a catalyst to help the electricity flow, so when they're stirred
in, we can open the generator body, and attach a coffee filter to filter the fluid into the
super cleaned casing. The filter is removed and thread tape is added to the cap, then
the generator plates are slowly inserted into the solution, and screwed in water tight.
To finish up, we can remove the top cap from the bubbler, add some water, and screw it
back together. The remainder of the poly tube is attached to the bubbler elbow, and there
it is! A sexy looking hydroxy generator! This system produces an extremely powerful OxyHydrogen
gas. Running on 2 car batteries, it will make about 5 liters per minute, and when the gas
is used, it simply turns back into water. The amount of water already in this system
is enough to produce thousands and thousands of liters of fuel. Some people say this is
the fuel of the future. Whether or not that's true, the amount of power in the gas, is humbling.
Well there's how to build a simple water/fuel converter. If you liked this project, perhaps
you'll like some of my others. Check them out at www.thekingofrandom.com
5.0 / 5 (0 votes)