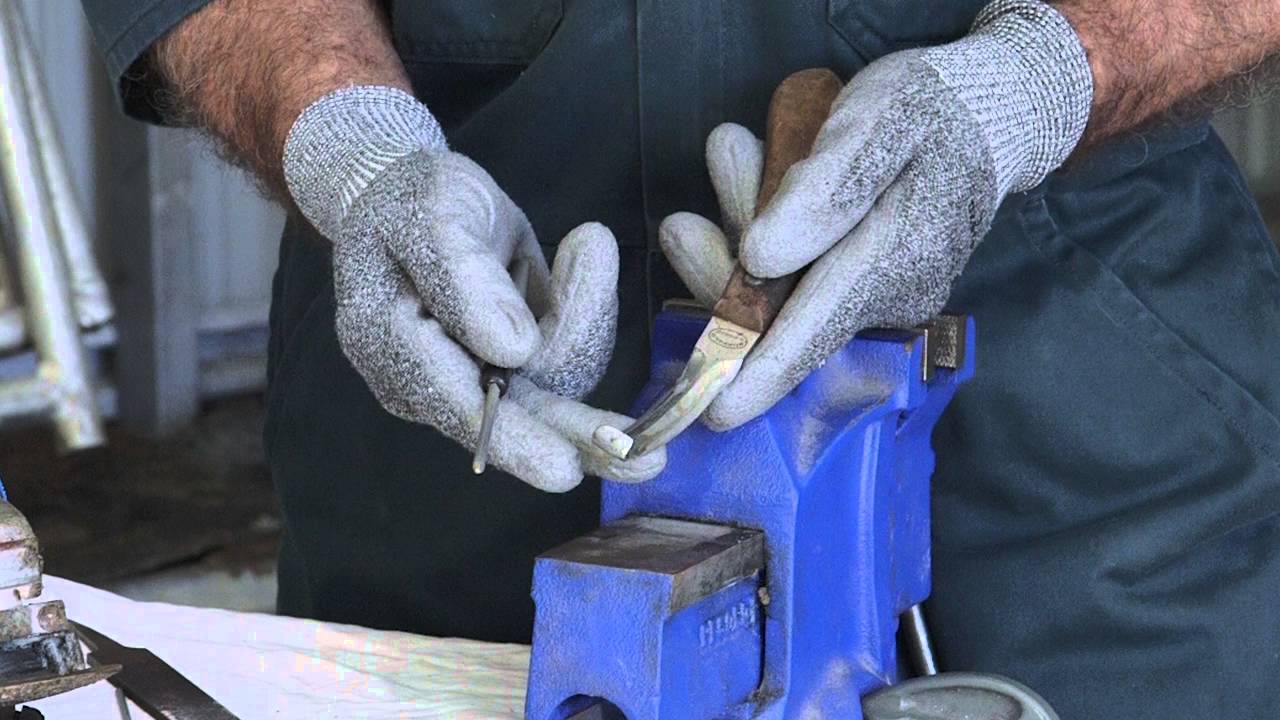
Sharpen Your Stanley Spokeshave Blade
Summary
TLDRIn this video, the host demonstrates how to sharpen a Stanley 151 spoke shave blade, a flat blade used for non-wooden spokes. Techniques include using a marker to flatten the blade, honing the bevel with a specific grip, and progressing through various grits of stones. The video also covers adjusting the blade on the Stanley 151 and using a homemade jig for sharpening with a Tormac.
Takeaways
- 🔪 The video is about sharpening a Stanley 151 spoke shave blade, which is a flat blade used for non-wooden spoke shaves.
- 📏 The first step is to flatten the back of the blade using a rough stone, such as a 300-grit stone, to remove all marks and achieve a shiny surface.
- ⏱️ Flattening the back can take up to 5 minutes or even half an hour if the blade is severely out of flatness.
- 📏 For the bevel part, the presenter uses a marker to mark the blade and then sharpens it using a specific grip, with the thumbnail acting as a guide.
- 👍 A proper grip is crucial to avoid over-tilting the blade while sharpening, ensuring a consistent bevel.
- 🔍 The presenter suggests using progressively finer grits, starting from 300 grit and moving up to 1000 grit, then to 6000 grit, to refine the bevel.
- 💧 A 15,000-grit ceramic stone is recommended for achieving a glassy smooth finish, which the presenter found to make a significant difference.
- 🛠️ The presenter demonstrates how to adjust the blade on a Stanley 151 using an adjustable wheel, ensuring the blade protrudes just enough for proper shaving.
- 🔍 Checking the sole of the plane for any hollow or unevenness is important for achieving a consistent shave, and the presenter shows how to flatten the sole using a marker and a rough stone.
- 🛠️ The video also covers how to sharpen the blade using a jig, specifically with a Tormac or similar tool, by creating a simple jig with a bar and a block of wood.
- 🎥 The presenter mentions that the next video will discuss different types of spoke shaves and will reveal their favorite type.
Q & A
What is the purpose of the video?
-The purpose of the video is to demonstrate how to sharpen a Stanley 151 spoke shave blade, which is a flat blade used for modern non-wooden spoke shaves.
What is a common issue with using jigs for sharpening the Stanley 151 blade?
-A common issue is that jigs are often designed for blades that protrude more, which may not accommodate the shorter blades of the Stanley 151.
What is the first step in sharpening the blade as shown in the video?
-The first step is to flatten out the back of the blade using a rough stone, such as a 300-grit stone.
Why is it important to flatten the blade before sharpening the bevel?
-Flattening the blade ensures that the entire length of the blade is even and ready for the bevel to be sharpened properly, preventing uneven sharpening.
What technique is used to determine the bevel angle when sharpening the blade?
-The video demonstrates using the thumbnail as a wedge to eyeball the bevel angle, ensuring that the blade is held at the correct angle against the sharpening stone.
Why is it recommended to not use the very end part of the blade when sharpening?
-The very end part of the blade is typically not used because it may be more difficult to sharpen evenly, and the rest of the blade is usually sufficient for the intended use.
What is the significance of using different grits of stones in the sharpening process?
-Using different grits of stones helps to progressively refine the sharpening process, starting with a rough grit to shape the bevel and finishing with a finer grit to polish and refine the edge.
What is the purpose of using a 15,000-grit stone or ceramic stone in the sharpening process?
-A 15,000-grit stone or ceramic stone is used to achieve a very fine and smooth edge, almost like glass, which can make a significant difference in the sharpness and performance of the blade.
How can the blade be adjusted on the Stanley 151 spoke shave?
-The blade can be adjusted by loosening the screw, positioning the blade so that it protrudes just enough, and then tightening the screw to secure it in place.
What is the purpose of the jig shown in the video for sharpening tools like the Torx or a miter trimmer?
-The jig is used to hold the tool at a consistent angle against the sharpening stone, ensuring a precise and even sharpening process without the need for expensive commercial jigs.
What additional tip is given for sharpening carving gouges using the same technique?
-The video suggests using the same sharpening technique and jig setup to sharpen carving gouges, using the handle of the tool as a reference for the bevel angle.
Outlines
🔪 Sharpening a Stanley 151 Spoke Shave Blade
The speaker begins by introducing the process of sharpening a Stanley 151 spoke shave blade, which is a flat blade used for modern non-wooden spoke shaves. They discuss the challenges of using jigs designed for longer blades and mention a jig by Leave Valy that can accommodate shorter blades. The speaker then demonstrates their personal technique for sharpening, starting with flattening the back of the blade using a 300-grit stone. They emphasize the importance of removing all marks and achieving a shiny surface. The process is paused for about 5 minutes, and upon returning, they continue with the bevel part, marking it with a marker and using a specific grip with the thumbnail as a guide. The speaker also discusses the importance of not over-tilting the blade and moves on to finer grits, such as 300-grit and 1000-grit, eventually finishing with a 6000-grit stone.
📏 Adjusting the Blade and Using a Jig
In this paragraph, the speaker discusses the next steps in sharpening the blade, focusing on the bevel and the use of a high-grit ceramic stone. They mention a friend's recommendation of a 15,000-grit ceramic stone, which they find surprisingly effective. The speaker then moves on to adjusting the blade on the Stanley 151, explaining how to set it up properly and test it for shaving. They note the importance of achieving a thin shaving and address potential issues like hollow ground or unevenness in the sole. The speaker also demonstrates how to use a jig, specifically one made with a Tormac or a knockoff version, to sharpen the blade. They highlight the value of using a jig for sharpening various tools and even suggest using it for sharpening carving gouges.
🛠️ Final Adjustments and Testing the Blade
The speaker concludes the video script by detailing the final adjustments and testing of the Stanley 151 blade. They discuss the importance of flattening the entire length of the throat and the sides, noting that while extra work could be done, it might not be necessary for their typical use on rounded surfaces. The speaker then shows how to use a jig for sharpening, specifically one made with a bar and a block of wood glued onto it. They demonstrate the process of setting up the jig and using it to sharpen the blade, emphasizing the need for consistency in the holes for effective sharpening. The speaker also mentions the versatility of such jigs for sharpening different tools and ends the video by teasing the next video, which will discuss various types of spoke shaves and their personal favorite.
Mindmap
Keywords
💡Spoke shave blade
💡Stanley 151
💡Flat blade
💡Bevel
💡Grit
💡Jig
💡Throat
💡Hollow ground
💡Leather strap
💡Tormac
💡Carving gouges
Highlights
Introduction to sharpening a Stanley 151 flat blade for a modern non-wooden spoke shave.
Problems with jigs accommodating shorter blades and a solution involving a jig from Lee Valley.
Technique to flatten the back of the blade using a 300-grit stone.
Using a rougher stone to remove marks and achieve a shiny surface on the blade's tip.
The importance of spending time to ensure the blade is fully flat before moving on.
Marking the bevel with a marker and using a specific grip to maintain the correct angle.
Using the thumbnail as a guide to ensure the bevel is correctly formed.
Progressing to finer grits, starting with 300-grit and moving up to 1000-grit.
Using a 6000-grit stone to further refine the bevel and achieve a glassy smooth finish.
Discussion on the benefits of a 15,000-grit ceramic stone for achieving an ultra-smooth edge.
Demonstration of how to adjust the blade on a Stanley 151 spoke shave.
Testing the sharpness of the blade and the need to adjust the protrusion for optimal shaving.
Addressing the issue of hollow ground blades and the need to flatten the sole for even shaving.
Using a marker to identify high spots on the sole of the blade.
Flattening the sole on a rough stone to ensure evenness and better shaving performance.
Concerns about widening the throat of the blade during sharpening and how to avoid it.
Final adjustments and testing the blade's sharpness after sharpening.
Introduction to a jig setup for sharpening on a Torx or similar tool.
Using a homemade jig with a block of wood and a Torx bar for sharpening.
Demonstration of sharpening a blade using the homemade jig and achieving a solid bevel.
Additional tip on using the jig as a fence for sharpening carving gouges.
Conclusion and teaser for the next video discussing different types of spoke shaves.
Transcripts
hey folks I just want to show you how I
sharpen a Spoke shave blade this is a
Stanley 151 so this is a a flat blade
for a more modern non-wooden spoke shave
so one of the problems is when you have
these jigs um these are Made for More of
the blade protruding out uh so there is
a jig I think leave valy sells one that
can accommodate these shorter blades so
this is a leftover blade that um we're g
to try to sharpen so I'll show you the
technique that I personally
use all right the first thing I do is we
want to flatten out this back so marker
is your
friend so get the roughest stone that
you have this is 300 GD I do have one
that's even rougher but let's see I just
hold it up like
this so that's going to take a while so
I'm going to grab my rougher Stone
all right so this is even
rougher so you want the marks to be gone
on the entire length of by the tip of
the blade so we have it shiny just in
this section right
now so we'll pause that it's going to
take probably 5 minutes maybe to get
this done so I'll pause that and come
come back
okay so about 5 minutes into this you
could spend a half hour if it's really
badly out of flatness so all the marks
are gone I have a little bit at the very
edge here that uh I could keep going on
but I think I'll just leave it like that
for
now now for
the bevel part of it I'll take a marker
here
mark we'll mark
that and it's a little wet
but so the key here the difference you
could you could just try to guess and
feel where that bevel is supposed to be
you could do that but some of these
blades are 1/16th of an inch this one
happens to be 3/16 the 1/16 are really
hard to find that um and then you could
try to just drag it back on your stone
but what I find to work better is
I I hold it with a specific grip and I'm
actually using my thumbnail uh as kind
of the the wedge so I'll put it in here
so so you can see the i i eyeball the
bevel right so there's the there's the
bevel then I put my thumb in there yes
your thumbnail might get worn out so
you're getting married or whatever and
you need perfect fingernails so I use
that as a rough guy you don't have to
have your thumb there you can just kind
of eyeball it so I just go back and
forth like
this so there's no way I'm going to over
tilt because I got my fingers over
overlapping so they are hitting the
stone and my thumbnail is kind of just
it's not really hitting it it's very
close to hitting it but I know if I hit
it then then I'm too
shallow so we got that all cleaned up
and we'll just move on to the next grit
I'll use 300 grit
here so you don't really need a
jig do the
back for this you could do it flat as
well it's not a big deal one handed
two-handed you don't need to get the
whole
blade just the the end part of
it so I I do have a little bit more to
go here but uh right on that very end
most of it's fine I typically don't use
that very end part
anyway so let's move on to a th I mean
you can keep put on a TV show and keep
keep going at it now we're at Thousand
grit same grip here
so I got my thumbnail to 1,00 grit right
now then we'll go
to I don't have a diamond stone I have a
6000 grid
here do the same thing
just kind of eyeballing
it you could feel the bevel on this
one have my finger over the whole length
of the blade right
here so a friend of mine uh was showing
me his shooting board and his um he
needed so little effort so he told me he
uses this 15,000 Grit stff Stone ceramic
stone I think they're on Amazon 20 25
bucks I didn't believe that it would
make a difference I thought a leather
STP at this point would be fine this
thing feels glassy smooth almost so I
put a little water on it but for me it
seems to it does make a
difference so we're just siding down
again see the shine there's a the center
of but you could see is there's a little
bit of a yeah definitely was Hollow
ground and I'll show you how I'll if you
stick around I'll show you if you have a
wheel like a tormac or one of the
knockoff versions oh shoot that was bad
um we have to plan that down but
uh you can
um I'll show you a jig for
that okay so that's
it so let me let me put that in the
Smoke shave we'll see how it works after
that I'll show you this fancy jig not
really fancy very cheap jig you can set
up with a tormac okay back to the
stanley1 this has the adjustable wheels
on it so you don't need a hammer to
adjust it there are other versions where
you need to tap it a little with the
hammer so let's set that in
place very Loosely we'll get it so it's
just kind
of just so it's kind of holding think I
got to tighten that a little more there
we go
and we want it
protruding just
enough so I like to get it where
nothing's coming out
first and we'll tighten that up we'll
give it a little
test so here I'm kind of screwing around
and fiddling with it to try to get the
exact shaving but not too
successful huh
wow so so sometimes if you get a really
thick shaving you can only get thick
shavings then you got to look and see
maybe
this there's a hollow or something on
the
sole see I'd like to get a thinner
shaving in that so it could be that this
this whole sole needs to be regr cuz
when I when I go forward just a little
bit the only way to get a shaving is if
I make the blade stick out further it
doesn't look like it's sticking out a
lot but I think so the next thing we're
going to do is
uh take this sole it's a flat bottom
sole you could see so we'll take the
blade out put some marker on there and
see if um see if that'll
help all right so we put some markers
marker marks on here and now I'm just
going to see what's going on my guess is
there's going to be some sort of
hollow so not too bad but I want I'm
going to flatten this whole thing out
maybe one side is worse than the other
so we'll we'll go back to the rougher
Stone and I'll get back to you on
that yeah so you can see it's a little
off here it's this is all a high spot
right now and if we had the blade in
there we'd have to skew it uh and it
might you might be able to compensate
but if there's any unevenness you can't
so we're going to flatten this whole
thing down and I'm pretty sure we'll get
a better cut with it
[Music]
so making progress so yeah so if I left
it like this the blade would have to
stick out further here and I would think
it would dig in um in order to to get
this to cut so or you'd have to have
actually more blades sticking out
unevenly so let's continue with that
I've been at it for about 3
minutes one of the concerns is when
you're whenever you're doing something
like this will the throat widen in some
cases it will um especially like on a
wooden plane some of the wooden planes
you'll notice that their the throat is
actually made
parallel the the walls of the throat are
made parallel for a while just for that
purpose I don't think we'll see a great
difference cuz I'm not taking much metal
off
here but we're almost
there ideally you probably want to get
the whole thing removed get it smooth so
I'll work on that come back you know
we've covered the entire length of the
throat there's a little bit here on the
sides I could keep going that little bit
extra is going to be a lot more work um
I don't think I don't use this plane
typically on a totally flat surface it
might help to have all these Ed um all
these at the same level if you're using
on a flat surface but I'm typically
using on a rounded surfaces and I'm not
referencing off of these SIDS so we'll
leave it like that and see how it
works okay so I've played around with it
probably about 10 different moves back
and
forth and I'm pretty pleased with the
Shaving fairly
thin and that's it so that's how we
adjust the or sharpen the blade and
adjust it on this Stanley 151 now let me
show you this jig on if you have one of
these Torx how to uh sharpen on a
jig so let me show you I got a torch
here and they make knockoff varieties of
these so there's a bar here we're going
to use this bar with a block of wood
glued onto it um and that's going to be
our jig so when I made
this you want to make sure that the
holes are consistent so the I put the
holes right on the end of those holes
there so you can see so we'll put that
we'll screw that
in and we'll go to the we'll go to The
Jig so this only works this specific jig
works for the1 the one with the holes in
it let's go over the
tormac so I'm just eyeballing right
here and it looks to me that I have it
right I did a little dry run here or wet
[Music]
run that's pretty close I could go in a
little
more let's try that that might be even
better so this feels very solid
nothing's moving I should get a very
nice
bevel they're almost done we're going to
come in a pair
more and I'll have to do the back side
as well but this is just showing you
that you can use this jig you can uh
make a jig like this for a lot of
different tools you don't have to buy
the expensive jigs from torac I have
this of a miter trimmer one of those big
Guillotine things I have a jig TI for
the very awkward blade for that just use
this as a as a
fence in fact while I'm talking about
this I'll throwing a little
extra and that is you can use this fence
for your carving
gouges I'm not going to do it but um use
the fence this helps so much with
sharpening carving gouges just eyeball
the bevel like that and just use the
handle so that uh that handle is your
reference just give it slight turns like
this depending on type of gouge that you
have here's a more prominent one so you
can see but you just find the right
bevel angle adjust it and then you're
good all you got to do is rotate it and
for me that's a great way and you switch
over to the to the leather strap and you
got a nice sharp chisel in a matter of a
minute or two so
so these are very valuable tools Stanley
151 or any of the Stanley spoke shapes
uh look for my next video we'll talk
about all the different types of spoke
shaves that are out there this actually
is not my favorite spoke shave I'll show
you my favorite one on the next video
Посмотреть больше похожих видео
The Truth About Lawnmower Blade Sharpening: Test Results Exposed!
20 Oscillating Multi-Tool Tips for Beginners
TWO SIMPLE AND RELIABLE BOTTLE CUTTERS!!!!!!
Do these 5 things to make your miter saw better
KNIFE Like a Razor ! Sharpen Your Knife In 1 Minute With This Tool
Обзор на основание Ma Long! DHS Hurricane Long 5 (w968)
5.0 / 5 (0 votes)