Servo Motors, how do they work?

The Engineering Mindset
23 Jan 202215:11

Summary

TLDRThis video tutorial explores the intricacies of servo motors, crucial in precision engineering for their ability to convert electrical energy into mechanical movement with exact control. It delves into the differences between closed and open loop servos, explains torque ratings, and demonstrates how to program a servo using an Arduino and a potentiometer. The video also highlights a sponsor, Private Internet Access, offering a VPN service for online privacy and security.

Takeaways

  • 😀 A servo motor is utilized in precision engineering for its ability to convert electrical energy into mechanical energy with precise control.
  • 🛠️ Servo motors are often found in robotics, automation, and remote control cars due to their capacity for exact positioning.
  • 🔁 Unlike a standard DC motor, a servo motor does not rotate continuously; it receives signals that dictate the extent of its rotation, typically within a 180-degree range.
  • 🔁 There are two types of servo motors: closed-loop (with a physical stop at 180 degrees) and open-loop (capable of 360-degree rotation), with the closed-loop type being more common for its superior control.
  • ⚖️ The torque of a servo motor is indicated by a weight value, which represents the force it can apply to a lever, commonly measured in kilogram centimeters or ounce inches.
  • 🔌 The servo motor's performance is influenced by the voltage supplied, with higher voltages leading to increased torque and faster rotation speeds.
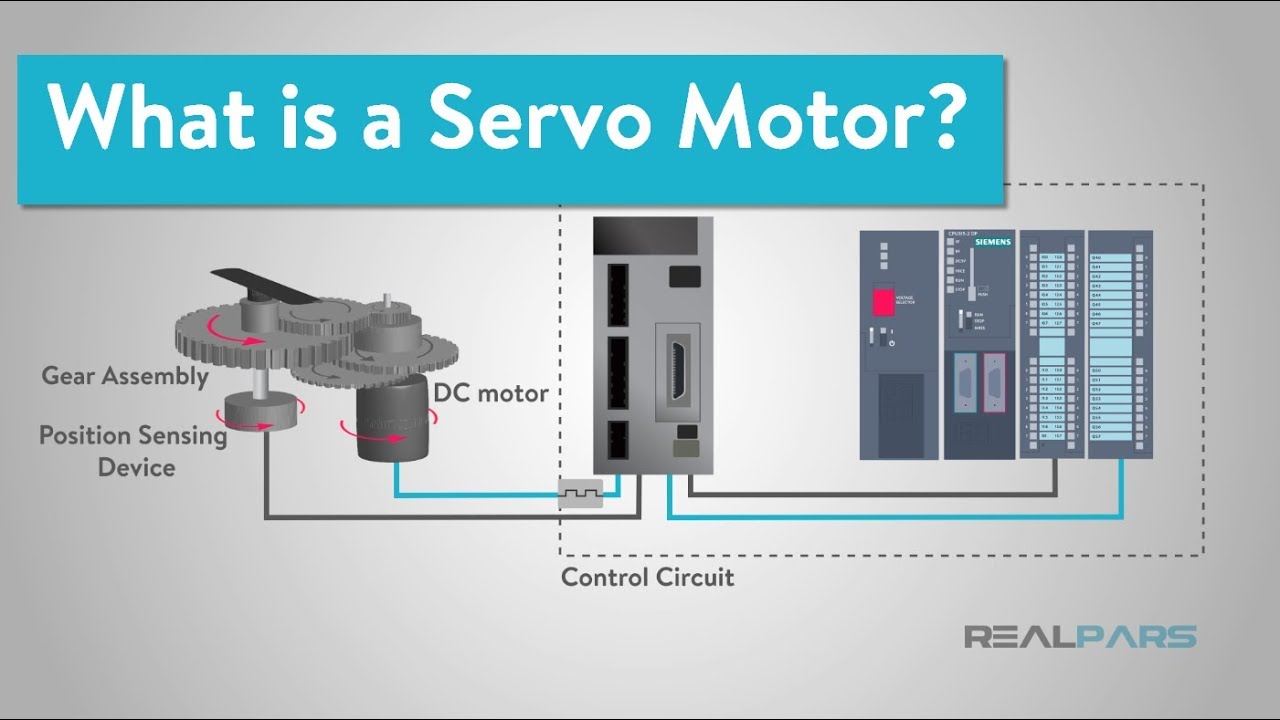
  • 🔍 The internal components of a servo motor include a DC motor, gears, bearings, and a potentiometer, which work together to achieve the desired torque and speed conversion.
  • 💻 A controller sends pulse width modulation signals to the servo motor to specify its position, with the pulse width determining the extent of the motor's rotation.
  • 🔄 The potentiometer within the servo motor provides feedback on its position by changing resistance as it rotates, which the circuit board uses to ensure the motor is in the correct position.
  • 🛠️ The tutorial demonstrates how to program an Arduino to control a servo motor using a potentiometer, showcasing a practical application of servo motors in interactive projects.

Q & A

  • What is a servo motor and where is it commonly used?

    -A servo motor is a type of motor used in precision engineering applications that converts electrical energy into mechanical energy. It is commonly used in robotics, automation, and the steering of remote control cars.

  • How does a servo motor achieve precise control?

    -A servo motor achieves precise control through the use of internal electronics and mechanical gears. It receives signals that tell the motor exactly how far to rotate, typically within a range of 180 degrees, but can be smaller or larger depending on the model.

  • What is the difference between closed loop and open loop servo motors?

    -Closed loop servo motors have a pin inside to physically stop the motor from rotating further, providing the best control and are more commonly used. Open loop servo motors can rotate a full 360 degrees without such a physical stop and are less common.

  • What does the weight value on the side of a servo motor represent?

    -The weight value on the side of a servo motor represents the torque of the motor, or how much force it can apply. It is measured in kilogram centimeters or ounce inches.

  • How does the voltage affect the performance of a servo motor?

    -The higher the voltage applied to a servo motor, the higher the torque and the stronger the motor will perform. However, there are limits, and the motor will stall if it exceeds these limits.

  • What is the relationship between the voltage and the speed of a servo motor?

    -The higher the voltage applied to a servo motor, the faster it will rotate. The speed is measured in seconds taken per 60 degrees of rotation.

  • What are the main components inside a servo motor?

    -Inside a servo motor, there are gears, bearings, a DC motor, and a circuit board. The gears are part of a compound gear train that converts high-speed low torque into low-speed high torque.

  • How does a potentiometer work in a servo motor?

    -A potentiometer in a servo motor acts as a variable resistor. As the final gear rotates, it rotates the potentiometer, changing the resistance. The circuit board reads this change to know the position of the output.

  • What is pulse width modulation and how is it used in controlling a servo motor?

    -Pulse width modulation (PWM) is a method of encoding information in the width of pulses of voltage sent down a wire. In servo motors, the width of the pulse determines the position of the motor, with wider pulses moving it to one extreme and narrower pulses to the other.

  • How can an Arduino be used to control a servo motor?

    -An Arduino can be used to control a servo motor by sending it PWM signals through one of its digital pins. The Arduino can be programmed to read an input, like a potentiometer, and send the appropriate PWM signal to the servo motor to control its position.

  • What is the purpose of the comparator in the servo motor's circuit board?

    -The comparator in the servo motor's circuit board compares the voltage from the potentiometer to the voltage of the controller signal. If there is a difference, it sends a signal to the motor to turn until the difference is minimized, ensuring the motor is in the correct position.

Outlines

00:00

🤖 Introduction to Servo Motors

This paragraph introduces servo motors, emphasizing their use in precision engineering applications. It explains that servo motors combine internal electronics and mechanical gears to achieve precise control. The video, sponsored by Private Internet Access, offers a special deal for a three-year subscription with additional months at a discounted rate. The script also mentions that servo motors convert electrical energy into mechanical energy and are controlled by a controller to achieve specific positions. They are commonly used in robotics, automation, and remote control cars. Unlike DC motors, servo motors do not rotate continuously but receive signals that dictate the extent of their rotation, typically around 180 degrees. The paragraph distinguishes between closed-loop and open-loop servo motors, with closed-loop being more common due to better control. It also discusses the torque rating of servo motors, measured in kilogram centimeters or ounce inches, and how it relates to the force the motor can apply at different distances from the shaft.

05:02

🔩 Inside a Servo Motor

This paragraph delves into the internal components and workings of a servo motor. It describes the gear train, which includes a series of interconnected gears that transform the high-speed, low-torque output of the DC motor into a low-speed, high-torque output suitable for precise control. The paragraph provides an example of gear ratios and their impact on torque and speed. It also explains the role of the potentiometer in providing feedback on the motor's position to the circuit board. The script covers how a controller sends a pulse width modulation (PWM) signal to the servo motor, which determines its position. The PWM signal's width corresponds to the motor's rotation, allowing for precise control. The video also discusses how changes in the power supply voltage affect the motor's performance and how the motor's operating current is influenced by the load and voltage. The paragraph concludes with an invitation for viewers to share their thoughts on where they have seen servo motors used and potential applications.

10:07

🛠 Controlling Servo Motors with Arduino

The final paragraph focuses on how to program an Arduino to control a servo motor using a potentiometer. It outlines the materials needed for the project, including an Arduino, breadboard, servo motor, potentiometer, wires, and a power supply. The script provides a step-by-step guide on how to connect the components, from the power supply to the Arduino and the potentiometer to the servo motor. It then explains how to write and upload code to the Arduino to read the potentiometer's analog input and convert it into a signal that the servo motor can understand. The code snippet provided sets up the servo library, creates a servo object, and maps the potentiometer's analog input to a range of servo positions. The paragraph concludes with an invitation to view more advanced circuits and to follow the channel on various social media platforms for continued learning.

Mindmap

Keywords

💡Servo Motor

A servo motor is a rotary actuator that allows for precise control of angular position. In the context of the video, it is used in precision engineering applications, converting electrical energy into mechanical energy. The video explains how servo motors are controlled by signals that dictate the exact degree of rotation, typically within a 180-degree range. They are commonly found in robotics, automation, and remote control cars, highlighting their versatility and precision.

💡Precision Engineering

Precision engineering refers to the discipline of designing and manufacturing components with high accuracy and tight tolerances. The video emphasizes the use of servo motors in this field due to their ability to achieve exact control over movement. This is crucial for applications where minute adjustments can significantly affect the outcome, such as in robotics or automated assembly lines.

💡Pulse Width Modulation (PWM)

PWM is a technique used to encode information in the width of a series of pulses. In the video, PWM is used to control the position of a servo motor. The controller sends a signal to the motor, and the width of the pulse within this signal determines the extent of the motor's rotation. This method allows for precise control over the motor's movement, as demonstrated by the video's discussion of how varying pulse widths can direct the motor to different positions.

💡Torque

Torque is a measure of the force that can cause rotation about an axis. In the video, the torque rating of a servo motor is mentioned as a key specification, indicating the amount of force it can apply. The script uses the example of a motor rated for 25 kg, explaining how this rating translates to the force it can support at different distances from the shaft, which is crucial for understanding the motor's capabilities and applications.

💡Closed Loop Control

Closed loop control is a type of control system that uses feedback to regulate the controlled process. The video describes closed loop servo motors, which have a mechanism to stop the motor from rotating beyond a certain point. This feature allows for more accurate control compared to open loop motors, which can rotate a full 360 degrees without such restrictions. The video focuses on closed loop servo motors due to their superior control capabilities.

💡Potentiometer

A potentiometer is a type of resistor with a sliding or rotating contact that forms an adjustable voltage divider. In the video, a potentiometer is used to provide feedback on the position of the servo motor's output gear. As the gear rotates, it turns the potentiometer, changing its resistance, which the circuit board reads to determine the motor's position. This component is integral to the servo motor's ability to maintain a specific position until a new signal is received.

💡Arduino

Arduino is an open-source electronics platform based on easy-to-use hardware and software. The video includes a tutorial on how to program an Arduino to control a servo motor using a potentiometer. Arduino serves as the controller in this setup, allowing users to write custom code to dictate the motor's behavior, demonstrating the flexibility and accessibility of this platform for electronics projects.

💡Gear Train

A gear train is a mechanical system of gears that transmits power from one gear to another. The video explains that inside a servo motor, there is a compound gear train that converts the high rotational speed and low torque of the DC motor into a low speed but high torque output. This conversion is essential for the motor's ability to provide precise control over position and movement.

💡Voltage

Voltage is the electric potential difference between two points. The video discusses how the voltage applied to a servo motor affects its performance. Higher voltage increases the motor's torque and speed, but there are limits beyond which the motor can stall. The operating current of the motor also depends on the load and the voltage, with the motor consuming more power when it is moving rather than when it is holding a position.

💡H Bridge Circuit

An H bridge circuit is an electronic circuit that enables a voltage to be applied across a load in either direction. In the context of the video, an H bridge circuit is used in the servo motor's internal circuit board to control the direction of the DC motor, allowing it to rotate clockwise or counterclockwise to achieve the desired position. This is a crucial component for the motor's precise positioning capabilities.

Highlights

A servo motor is used in precision engineering applications and features internal electronics and mechanical gears for precise control.

The video is sponsored by Private Internet Access, offering a VPN service with a special discount.

Servo motors convert electrical energy into mechanical energy for precise control in various applications like robotics and remote control cars.

Servo motors are controlled by a controller that sends signals to determine the motor's position.

Servo motors are different from DC motors as they do not rotate instantly but follow signals that dictate the rotation extent.

Closed-loop servo motors are more common and provide better control, usually rotating only 180 degrees.

The torque rating on a servo motor indicates the force it can apply, measured in kilogram centimetres or ounce inches.

The voltage applied to a servo motor affects its torque and performance, with higher voltage leading to stronger performance.

Servo motors have an operating current that depends on the load and voltage, consuming more power when moving.

The physical size of a servo motor is related to its torque rating, requiring larger gears and a more substantial electrical motor for higher torque.

Inside a servo motor, a compound gear train is used to convert high-speed low torque into low-speed high torque.

A potentiometer inside the servo motor provides feedback on its position by changing resistance as the output gear rotates.

A pulse width modulation (PWM) signal from a controller determines the servo motor's position by varying the pulse width.

The servo motor's circuit board uses a comparator and a motor driver with an H bridge circuit to control the motor's rotation and direction.

The potentiometer acts as a voltage divider, changing the voltage proportionally to the servo arm's position.

An Arduino can be programmed to control a servo motor using a potentiometer, allowing for precise manual control.

The tutorial provides a step-by-step guide on how to connect an Arduino with a servo motor and potentiometer for control.

The Arduino code provided in the video allows for reading the potentiometer's position and mapping it to the servo motor's movement.

Transcripts

play00:00

This is a servo motor.

play00:02

It's used in precision engineering applications

play00:05

and it uses internal electronics

play00:07

as well as mechanical gears to achieve precise control.

play00:11

So we're going to learn how they work and also how to programme one.

play00:16

In this video, which is sponsored by Private Internet Access,

play00:19

you can get a three year subscription with four extra months for free

play00:24

for only $1.98 per month using the link in the video description.

play00:29

Their VPN service helps safeguard your online Privacy and can protect up to ten devices at a time

play00:36

to let you browse the web with increased anonymity.

play00:39

It works with all major streaming services

play00:41

and it runs on Windows, Mac, Android, iOS and even Linux.

play00:45

They offer a 30 day money back guarantee, so do check them out.

play00:50

I'll leave a link for you in the video description down below.

play00:55

A servo motor looks something like this.

play00:58

It converts electrical energy into mechanical energy.

play01:02

This type of motor is used for precise control

play01:05

and we can connect different attachments to achieve this.

play01:09

We control the position of a servomotor by using a controller.

play01:13

So we often find it used in robotics and automation

play01:17

and even for the steering of remote control cars.

play01:21

Usually when we connect a DC motor to a power supply, it just rotates constantly.

play01:27

But a servo motor is different.

play01:29

These will not instantly rotate.

play01:32

Instead, these are sent signals which tell the motor exactly how far to rotate.

play01:38

Typically the motor will rotate just 180 degrees,

play01:42

but we can get smaller or larger values.

play01:45

These are closed loop type.

play01:48

There's usually a pin inside to physically stop the motor rotating further.

play01:53

Some servo Motors will not have this

play01:55

and are able to rotate the fall of 360 degrees.

play02:00

These ones are known as open loop type.

play02:03

Closed loop provides the best control and these are more commonly used.

play02:07

So we will focus on this type in this video.

play02:10

On the side of the servo motor, we usually find a weight value.

play02:16

This is not the weight of the motor,

play02:18

it represents the torque of the motor or how much force it can apply.

play02:23

This small motor has a rating of 9 grams.

play02:27

This larger one has a rating of 25 kilograms.

play02:31

This is how much force the servo motor can apply to a lever.

play02:35

We normally find this measured in kilogram centimetres or ounce inches.

play02:40

What does this mean?

play02:42

Well, for example, this servo motor is rated for 25 kg.

play02:47

So at 1cm from the shaft it can support 25 kg.

play02:53

But at 2cm it can only support 12.5kg

play02:58

and at 3cm it can only support 6.25 kg

play03:03

we can find more information on the data sheet.

play03:06

In this example.

play03:07

We see it can be connected to a supply of between 4.8 and 7.2 volts.

play03:12

The higher the voltage applied,

play03:15

the higher the torque will be, so the stronger the motor will perform.

play03:20

But as we can see,

play03:21

the motor has limits and it will stall if it exceeds these limits.

play03:26

When the motor stalls, we can see the current dramatically increases.

play03:31

The operating current depends on the load applied as well as the voltage.

play03:37

The motor consumes more power when moving.

play03:40

It uses very little to hold its position.

play03:43

The higher the voltage applied, the faster the motor will rotate.

play03:47

We measure this rotation in seconds taken per 60 degrees of rotation.

play03:52

The physical size of the servo motor increases with the torque rating.

play03:58

That's because it needs larger gears and a larger electrical motor.

play04:01

To achieve this, let's look inside one

play04:04

to see the main parts and understand how it works.

play04:08

By the way, we have also covered stepper Motors and DC Motors.

play04:11

Previously do check them out links down below.

play04:17

When we look at a servo motor,

play04:19

we see the main housing with the electrical connections entering the side.

play04:24

In this case, the red wire is the positive voltage wire, the Brown wire is the ground

play04:29

and the Orange wire is the pulse width modulation signal wire.

play04:34

These colours do vary by manufacturer.

play04:36

On the top we find a small splined gear.

play04:40

We can connect various attachments to this to make use of the rotation.

play04:44

Inside the unit we first find a number of gears

play04:48

and these are supported by some bearings.

play04:51

On one side we have the output and on the other side we have the input.

play04:56

The input is connected to a DC motor which will drive the gears.

play05:01

This setup is known as a compound gear train.

play05:05

The gears are arranged in this way to ensure a compact design.

play05:09

The motor has a high rotational speed but a low torque,

play05:13

so the gears help convert this into a low speed but high torque output.

play05:18

In this example, there is an eleven tooth pinion gear on the motor.

play05:23

This connects to a 61 tooth gear which is directly joined to a twelve tooth gear.

play05:29

This connects to a 48 tooth gear which is directly connected to a 13 tooth gear.

play05:35

This connects to a 47 tooth gear which is joined to a 13 tooth gear

play05:40

and this connects to the final gear which has 42 teeth.

play05:44

So for this example,

play05:46

using some arbitrary numbers, if the input was 259 rpm with 1 Nm of torque,

play05:55

then the output would be 1 rpm but 259 Nm of torque.

play06:01

Therefore, we have converted high speed low torque into low speed high torque.

play06:07

There are losses which I've purposely ignored for this example.

play06:11

We have covered how to calculate this in our previous video on gear trains.

play06:16

Do check that out links down below.

play06:18

The DC motor is connected to a small circuit board inside the unit.

play06:23

This controls the rotation of the motor as well as the direction of rotation.

play06:28

Also connected to the circuit board is a potentiometer.

play06:32

This connects to the output gear of the servo.

play06:36

This is just a variable resistor.

play06:38

As the final gear rotates, it rotates the potentiometer

play06:42

which changes the resistance and the circuit board reads this to know the position of the output.

play06:48

Let's see how this works.

play06:50

But first, where have you seen these Motors use or what would you use them for?

play06:54

Let me know in the comments section down below.

play06:59

A controller sends a signal to the servo motor

play07:03

which determines which position it should rotate to.

play07:07

The controller could be something like an Arduino or even a simple servo tester.

play07:13

This is a pulse width modulation signal,

play07:15

which means it sends pulses of voltage down the wire.

play07:19

The width of the pulse can be varied.

play07:22

It's similar to if we pressed a switch to turn the light on and off.

play07:26

The longer we press the switch, the longer the pulse of electricity.

play07:31

These pulses are sent every 20 milliseconds,

play07:35

so we have around 50 pulses per second or 50 Hz.

play07:39

We can use an oscilloscope to see these pulses.

play07:43

For example, this is the signal sent by an Arduino.

play07:46

And this is the signal sent from the servo tester.

play07:51

The width of the pulse determines the position of the servo.

play07:55

If we send a wide pulse, the servo moves to the left.

play08:00

If we send a small pulse, it rotates to the right.

play08:04

We can move to any position between these two points

play08:08

by simply changing the width of the pulse.

play08:11

As long as the pulse remains the same, the motor will hold its position.

play08:16

As soon as there is a change, the servo motor moves.

play08:20

We can see here that when I rotate the dial on the servo tester,

play08:24

it's changing the width of the pulse

play08:26

and the servo Motor's position changes to align with this signal.

play08:31

As I increase the voltage for the power supply, the height of the pulse also changes,

play08:37

but the position of the motor remains the same.

play08:41

If we use an Arduino board,

play08:43

we can run a programme to control the position,

play08:46

or we can even use a potentiometer to control the position manually ourselves.

play08:52

We will learn how to build this later on in the video.

play08:55

The signal enters the Servo's circuit board and is converted to a voltage.

play09:00

It passes through a comparator and then to a motor driver.

play09:05

The motor driver controls the rotation of the DC motor.

play09:09

It uses an internal H bridge circuit to control the direction of rotation,

play09:14

either clockwise or counterclockwise to get to the required position.

play09:19

This rotation causes the gears to rotate,

play09:22

which causes the final gear and servo arm to also rotate.

play09:28

Connected to the final gear is the potentiometer.

play09:32

You might recognise a potentiometer to look more like this.

play09:36

They essentially work exactly the same.

play09:39

The resistance increases and decreases

play09:42

between a minimum and a maximum value as the arm is rotated.

play09:47

You can see here that the multimeter is

play09:49

measuring the resistance and when I turn the shaft, the resistance changes.

play09:53

This acts as a voltage divider.

play09:56

If we apply a voltage across the potentiometer, for example 5 volts,

play10:01

we can then measure the change in voltage due to the varying resistance.

play10:06

This change is proportional to its position.

play10:09

When the arm is turned fully to the left, the voltage is 5 volts.

play10:14

At the centre it is 2.5 volts

play10:17

and when turned fully to the right it is 0 volt.

play10:21

The potentiometer is also connected to the comparator in the internal circuit board

play10:27

and the voltage is monitored to provide feedback.

play10:31

We know that the resistance changes between a minimum and a maximum value

play10:36

as the potentiometer dial is turned,

play10:38

so the comparator is going to compare

play10:41

the voltage of the potentiometer to the voltage of the controller signal.

play10:46

If there is a difference,

play10:47

then the motor will turn until the difference is close to zero.

play10:52

Then the servo knows it is in the correct position,

play10:55

so it will wait there until there is another change.

play10:59

We will learn how to control a servo motor in just a moment,

play11:03

but I just want to remind you to check out our sponsor private internet access

play11:07

using the link below where our viewers can get a three year subscription

play11:11

with four extra months for free for just $1.98 per month.

play11:15

With this, you can enjoy safer internet access across ten devices.

play11:20

Click the link in the video description down below.

play11:25

We're going to learn how to programme an Arduino

play11:28

to control a servo using a potentiometer.

play11:32

For this project you'll need an Arduino, a breadboard, a servo motor,

play11:37

a potentiometer, some wires and a power supply.

play11:41

First, connect a wire from the five volt port

play11:44

to the positive rail of the breadboard.

play11:48

Then connect another wire from the ground Port to the ground rail.

play11:53

Now connect from the 5 volts rail to the left side of the potentiometer.

play11:59

Then connect the right side to the ground rail.

play12:03

Then connect the centre pin to Port A0.

play12:07

Next, connect from the five volt rail to the servo motor.

play12:12

Then connect the ground wire to the servo

play12:16

and finally connect the signal wire to Port 9 of the Arduino.

play12:21

The circuit should look something like this.

play12:24

So now we need to connect the Arduino to our PC so we can write the code.

play12:29

You can download my Arduino code for free links down below for that.

play12:34

The basic code is very easy.

play12:36

We just type this at the top.

play12:38

This tells the Arduino that we are using commands from the Pre-made Servo library.

play12:44

Then we need to create an object.

play12:47

Basically we declare the name of the servo so that we can tell it what to do.

play12:52

I will call this servo1.

play12:54

Then we tell the Arduino which of its pins is connected to the servo motor.

play12:59

In our case we have pin 9.

play13:02

So we type that.

play13:03

Now as we are using an external potentiometer as an input device

play13:07

to control the servo motor, we will need to declare this also.

play13:12

So we type this

play13:13

which just lets the Arduino know which Port it will receive a signal on.

play13:18

Then we type this line of code in.

play13:21

This just links the name Servo to the pin which we have also declared.

play13:26

Next we type this code in

play13:28

this is saying that we need to read the value from the analogue input

play13:32

of the potentiometer which is connected to Port A0

play13:37

the Arduino reads the voltage through this pin

play13:40

but it doesn't understand voltage because this is an analogue signal Port

play13:45

so it will generate a number between zero and 1023 depending on the voltage.

play13:52

When the potentiometer is all the way to the left

play13:56

it receives the full voltage so it is 1023.

play14:00

When it is turned all the way to the right

play14:03

it is at 0 volt so we read zero. The value changes as we turn the dial.

play14:09

The servo doesn't understand these numbers though

play14:12

it wants to know a rotational degree between zero and 180 degrees.

play14:18

So this is creating a map or conversion scale

play14:21

to say that if the signal is zero then the position is zero degrees.

play14:26

If the signal is 1023 then the position should be 180 degrees.

play14:32

The final line just sends the information to the servo

play14:35

it writes to the servo to let it know what to do.

play14:39

So then we send the code to the Arduino

play14:42

and shortly after we will be able to control the servo position with the potentiometer.

play14:47

Once you understand this you can make more advanced circuits.

play14:52

Check out one of the videos on screen now

play14:54

to continue learning about engineering

play14:56

and I'll catch you there for the next lesson

play14:59

don't forget to follow us on Facebook, Twitter, Instagram LinkedIn TikTok and TheEngineeringMindset.com.

Rate This

5.0 / 5 (0 votes)

Связанные теги
Servo MotorsPrecision EngineeringAutomationRoboticsControl SystemsElectronicsMechanical GearsArduino ProgrammingGear TrainsRemote Control
Вам нужно краткое изложение на английском?