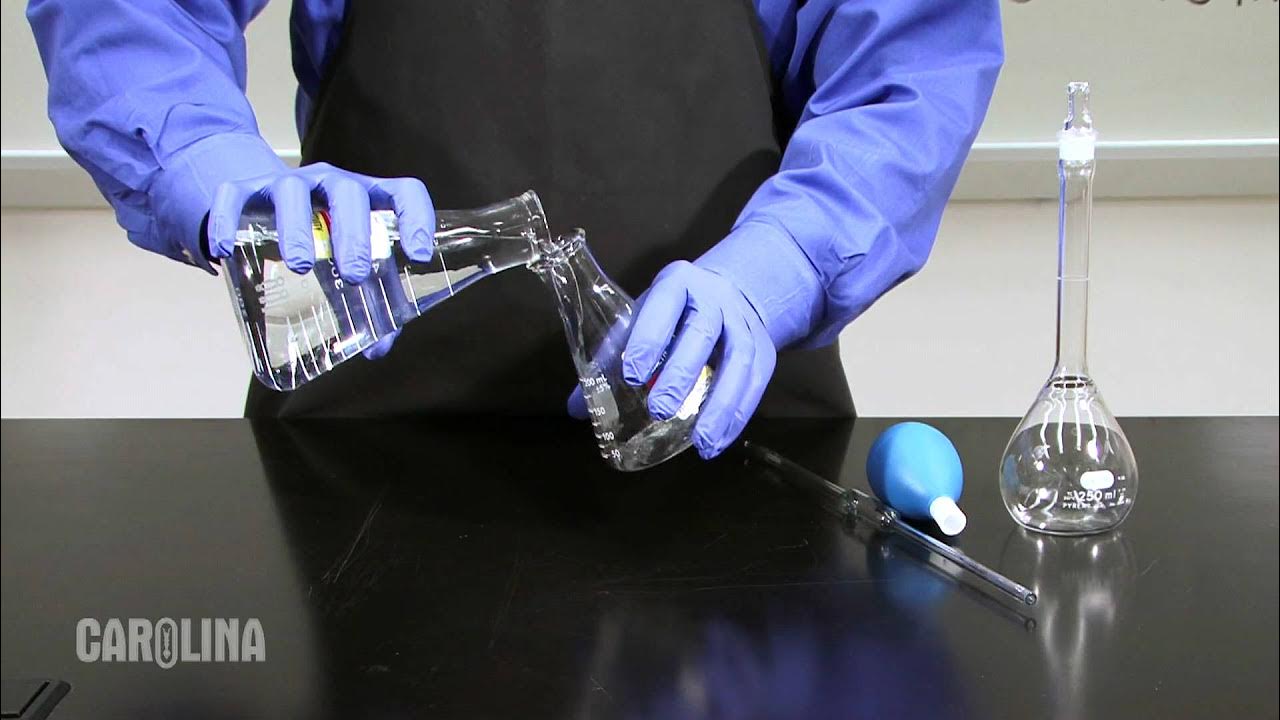
Setting up and Performing a Titration
Summary
TLDRThis video, presented by Jared Hyman, an assistant professor of chemistry, provides a detailed guide on the proper technique for performing a titration. It covers essential equipment, such as burettes, pipettes, and Erlenmeyer flasks, and highlights the step-by-step process to accurately determine the concentration of an unknown solution by using a titrant. Key tips include preparing the burette, ensuring precise volume readings, and correctly identifying the endpoint using indicators. The video also emphasizes practicing titrations and using triplicate measurements for accurate results.
Takeaways
- 🧪 The purpose of titration is to determine the concentration of an unknown solution (analyte) by adding a chemical with a known concentration (titrant).
- 🔬 Titration requires key equipment such as a burette, ring stand, burette clamp, Erlenmeyer flask, volumetric pipette, pipette bulb, wash bottle, and an indicator.
- 🧯 A burette is used to add titrant to the analyte and has a stopcock to regulate the flow of liquid.
- 🔍 It is important to read the burette volume from the bottom of the meniscus at eye level for accuracy.
- 📊 Record the volume to the nearest hundredth of a milliliter for precise measurement.
- 🌡️ The first titration is often an estimate to get a rough idea of the titrant volume needed.
- ⚠️ When nearing the endpoint, titrant should be added slowly to avoid passing the endpoint.
- 🔄 The desired endpoint is indicated by a faint, pale color in the analyte, not a deep or dark color.
- 📋 Titrations are usually performed in triplicate, and the average volume of titrant is used for calculations.
- 🧫 The second video in the series will explain how to determine the concentration of an unknown acid using a known base.
Q & A
What is the purpose of titration?
-The purpose of titration is to quantitatively determine the concentration of an unknown solution, commonly called the analyte, by adding a known volume of a chemical with a known concentration (the titrant) until the endpoint is reached.
What equipment is included in Carolina's complete burette assembly kit?
-Carolina's complete burette assembly kit includes a burette, a ring stand, and a burette clamp.
Why is a burette used in titration, and how is it designed?
-A burette is used to add titrant in a controlled manner during titration. It is a long, narrow, graduated tube with a stopcock to regulate the flow of liquid. The markings on the burette are reversed, with the lowest numbers at the top and the highest at the bottom.
Why is an Erlenmeyer flask recommended for titrations?
-An Erlenmeyer flask is recommended for titrations because its shape allows for more vigorous swirling than other glassware like beakers, which helps mix the solution thoroughly while minimizing spill hazards.
What is the role of the indicator in a titration?
-The indicator is added to the analyte to signal the endpoint of the titration. It changes color when the chemical reaction between the titrant and analyte is complete.
What precautions should be taken when preparing the burette for titration?
-Before titration, the burette should be rinsed with deionized water and then with a small amount of titrant. It's important to check for air bubbles, ensure the liquid doesn't stick to the walls, and mount the burette vertically for accurate measurements.
Why is it unnecessary to fill the burette exactly to the zero mark?
-It is unnecessary to fill the burette exactly to the zero mark as long as there is sufficient titrant to complete the titration. The starting volume is recorded, and the titration is based on the volume dispensed rather than the initial level.
How should the volume be read from the burette?
-The volume should be read from the bottom of the meniscus at eye level. It is important to record the volume to the nearest hundredth of a milliliter, estimating one decimal place beyond the smallest graduation.
Why is the first titration considered an estimate?
-The first titration is considered an estimate because it helps to determine the approximate volume of titrant needed. This allows for more precise adjustments in subsequent titrations to avoid surpassing the endpoint.
What is the desired appearance of the analyte at the endpoint of titration?
-At the endpoint of titration, the analyte should appear as a pale, faintly colored solution. A darker color indicates an excess of titrant has been added.
Outlines
🧪 Introduction to Titration and Necessary Equipment
This section introduces the viewer to Jared Hyman, an assistant professor of chemistry at Elon University, who will demonstrate proper titration techniques using the Complete Single Burette Assembly Kit from Carolina Biological Supply Company. The purpose of titration is to measure the concentration of an unknown solution by adding a known solution (the titrant). The video will review essential equipment needed for titration, such as the burette, ring stand, burette clamp, Erlenmeyer flask, volumetric pipette, wash bottle, and other materials. Specific attention is given to the setup of the burette, including its proper positioning and the importance of using deionized water to rinse equipment before use.
⚗️ Setting Up and Performing a Titration
This section describes the procedure for preparing the burette and performing a titration. After ensuring the burette is free of air bubbles and filled with titrant, the Erlenmeyer flask is placed under the burette to allow a few milliliters of titrant to release. Key steps include recording the starting volume of the titrant and reading the concave meniscus accurately. The importance of precision, including the correct number of significant figures in measurements, is emphasized. The viewer is also guided on how to use a volumetric pipette to transfer the analyte to the flask, add an indicator, and operate the burette efficiently by swirling the flask during titrant addition. The first titration is typically an estimate, and the endpoint is determined by color change.
🎨 Refining Titration Technique to Reach the Endpoint
This paragraph explains how to refine the titration process to accurately determine the endpoint. It describes how to adjust the addition of titrant more slowly as the color change becomes visible in the analyte. The video guides the viewer through slowing down titrant addition to a drop-wise rate as the endpoint approaches. The indicator will show a faint color at the endpoint, signaling the reaction's completion. The process of adding titrant drop by drop, rinsing, swirling, and recording the final volume until the endpoint is reached is repeated if necessary. Typically, titrations are performed in triplicate, and the average titrant volume is used for calculations. Finally, viewers are encouraged to watch the second video in the series for determining the concentration of an unknown acid using a base of known concentration.
Mindmap
Keywords
💡Titration
💡Burette
💡Analyte
💡Titrant
💡Endpoint
💡Indicator
💡Meniscus
💡Volumetric Pipette
💡Stopcock
💡Erlenmeyer Flask
Highlights
Introduction to titration techniques using Carolina's complete single burette assembly kit.
Purpose of titration: determining the concentration of an unknown solution by adding a known volume of titrant.
Key equipment includes a burette, ring stand, burette clamp, Erlenmeyer flask, volumetric pipette, pipette bulb, and a wash bottle with deionized water.
Proper setup involves mounting the burette vertically and ensuring the stopcock is closed before filling with titrant.
Important laboratory practice: rinse the burette thoroughly with deionized water and titrant to avoid liquid clinging to the walls.
Explanation of how to properly read the burette by observing the meniscus at eye level and recording to the nearest hundredth of a milliliter.
Instructions for transferring the analyte to the flask using a volumetric pipette and adding an indicator.
Practice turning the burette stopcock to control the titrant flow while swirling the flask to mix the solution.
The first titration is typically an estimate to help determine the approximate volume of titrant needed.
Slow down titrant addition when the color flashes begin to appear to avoid overshooting the endpoint.
Desired endpoint is indicated by a pale, faintly colored analyte solution.
Titrations are typically performed in triplicate, and the average volume of titrant is used for final calculations.
Procedure to reach endpoint: add titrant drop-wise while swirling until a faint color persists.
Proper titration technique minimizes risk of passing the endpoint and ensures accurate results.
Follow-up video focuses on determining the concentration of an unknown acid solution using a base of known concentration.
Transcripts
[Music]
hi I'm Jared Hyman an assistant
professor of chemistry at Elon
University today we will be discussing
the proper titration technique using the
complete single burette assembly kit
available from Carolina's biological
supply company this is the first in a
two-part video series on titration the
purpose of a titration is to
quantitatively determine the
concentration of an unknown solution
commonly called the titrant
or analyte by adding a volume of a
chemical with a known concentration
called the titrant to mark the endpoint
of a titration an indicator is added to
the analyte let's review some of the
equipment that's needed for a titration
carolina's complete burette assembly
contains the basic equipment to get you
started
including a burette ring stand and a
burette clamp a burette is a long narrow
graduated tube used to add titrant it
has a stopcock
to regulate the flow of liquid notice
that the markings on the burette go from
lowest at the top to highest at the
bottom the ring stand and burette clamp
are used to mount and secure your
burette other materials you will also
need include a small funnel to help you
fill the burette a 125 milliliter
Erlenmeyer flask which works best for
titrations the shape of the flask allows
for more vigorous swirling than a beaker
or other glassware and minimizes spill
hazards a volumetric pipette and pipette
bulb to transfer a known volume of
analyte to the flask a wash bottle
filled with deionized water a beaker or
flask of titrant and of analyte
indicators selected for your reaction a
reading card to help read the meniscus
and a sheet of white paper to help
visualize the endpoint to prepare your
burette for the titration it is good
laboratory practice to rinse your
burette thoroughly with deionized water
then with a small amount of titrant
after each rinse open the stopcock to
allow the liquid to drain at the bottom
if there is a lot of liquid clinging to
the walls of the burette then thoroughly
clean your burette and
the rinse process the accuracy of this
technique is dependent on the titrant
flowing into the flask and not sticking
to the walls of the burette mount
burette in the clamp making sure it is
positioned vertically and there is
enough room to position your flask
underneath the tip check to see that the
stopcock is in the close position insert
the funnel into the top of the burette
and fill with titrant almost to the top
filling exactly to the zero mark is not
necessary but you do need sufficient
titrant to complete the reaction check
the column for air bubbles and gently
tap to free them from the sidewalls
remove the funnel place the Erlenmeyer
flask under the tip and open the
stopcock to allow a few milliliters of
titrant to flow through releasing any
trapped air rinse the tip of the burette
with water empty the liquid into a waste
container and thoroughly rinse the flask
it is not necessary to dry the flask
record your starting volume it is
important to accurately read the volume
on the burette first note that the
liquid forms a concave meniscus because
the water pulls itself up the sidewalls
of the glass you should read the volume
from the bottom of the meniscus at eye
level secondly it is important to read
your volume to the correct number of
significant figures this burette
indicates volume to the nearest point 1
milliliters with any graduated glassware
record the volume to one additional
decimal place beyond the smallest
graduation in this case record the
volume to the nearest hundredth of a
milliliter estimating the final place
use the volumetric pipette to transfer
the analyte to the flask add a few drops
of indicator to the flask and swirl
place the flask under the tip of the
burette record this volume placing a
piece of white paper under the
Erlenmeyer flask may make it easier to
detect the color change operating the
burette requires two hands one hand
turns the stopcock while the other hand
swirls the flask practice turning the
stopcock a few times to familiarize
yourself with how quickly the flow
starts and stops it is common laboratory
practice that the first titration is an
estimate open up the stopcock and allow
the titrant to enter the flask quickly
continuously swirl the flask as the
volume of titrant in the flask increases
the color of the indicator appears then
disappears as you swirl when the analyte
becomes a colored solution close the
stopcock record the final volume of the
burette subtract the initial volume from
this final volume to get the estimated
volume of titrant needed for this
titration knowing the volume that is a
little past the endpoint subtract 5
milliliters from that number to get the
amount of titrant that can be safely
added before a slower addition is
required as the estimate titration shows
a dark colored solution indicates an
excess of titrant has been added the
desired endpoint is a pale faintly
colored analyte to reduce the risk of
passing the endpoint slow down the
addition of titrant when flashes of
color begin to appear in the analyte
adjust the stopcock to slow the flow of
titrant to a drop-wise rate continue to
swirl the flask with one hand and keep
the other hand ready to close the
stopcock when you notice the indicator
taking longer to fade close the stopcock
rinse the tip of the burette with
deionized water and swirl the flask
record the final volume on the burette
if the analyte remains faintly colored
then you have reached the end point if
the analyte is still colorless then
repeat these steps add a drop rinse
swirl and record until a faint color
persists typically titrations are
performed in triplicate
use the average volume of the titrant
required to reach the end point for any
calculations you now know how to
properly perform a titration be sure to
check out the second video in this
series in that video we will go over the
proper procedure for determining the
concentration of an unknown acid
solution using a base of known
concentration Carolina has everything
you need for your chemistry lab visit us
at Carolina chemistry comm to see our
complete line of products and kits for
chemistry
[Music]
you
Посмотреть больше похожих видео
Praktikum Titrasi Asam Kuat Basa Kuat | HCl dengan NaOH
Acid-Base Titrations & Standard Solutions | A-level Chemistry | OCR, AQA, Edexcel
Proper use of a buret for a titration procedure
ALAT ALAT LABORATORIUM KIMIA DAN KEGUNAANNYA - MATERI KIMIA SMA KELAS X
PULSAR II™ ADVANCED WOUND IRRIGATION (AWI)™ WOUND DEBRIDEMENT SYSTEM Application Video
Tutorial Teknik Titrasi
5.0 / 5 (0 votes)