Guitar Pick Cutting Board

The Wood Whisperer
5 Mar 202007:10

Summary

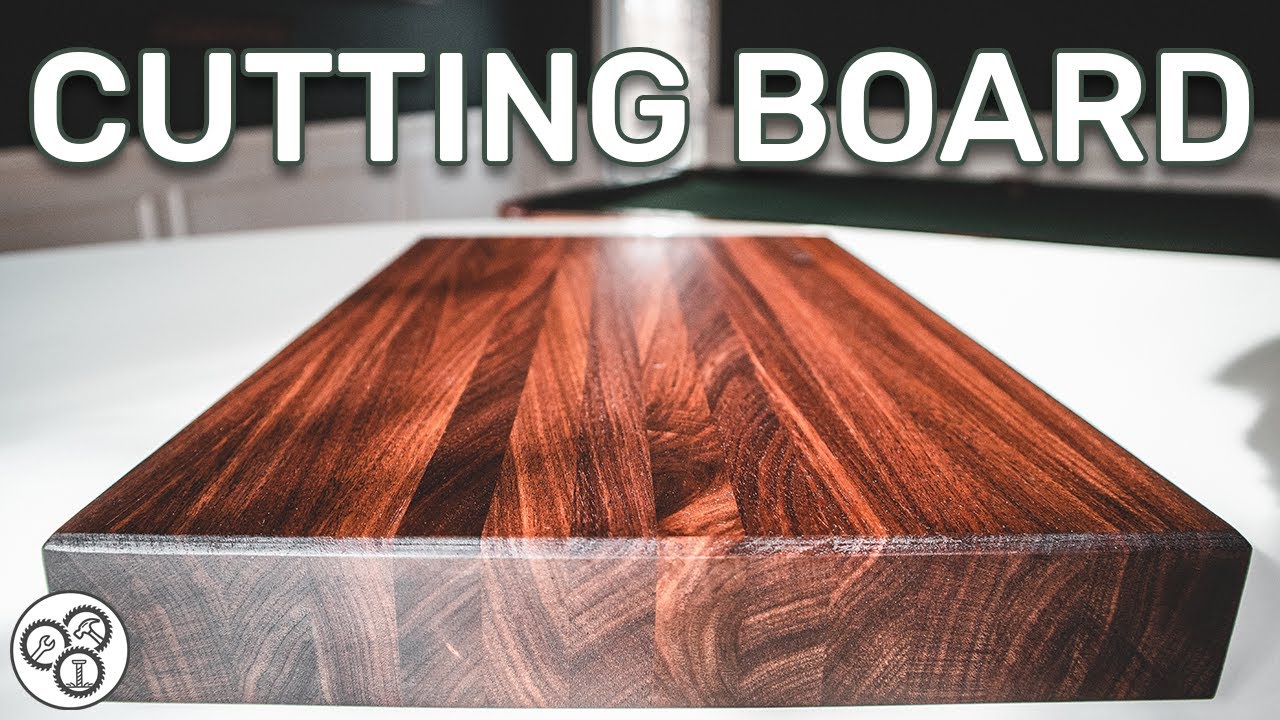
TLDRIn this woodworking video, Marc crafts a guitar pick-shaped cutting board using walnut and curly maple. He emphasizes the importance of wood grain and board stability, detailing the cutting, gluing, and sanding processes. Marc shares his experience with end grain boards and opts for a long grain design for durability. He demonstrates how to create feet for stability, raises the wood grain, and applies food-safe oil and beeswax for protection, finishing with a playful hot dog cutting scene.

Takeaways

  • 🎸 Marc, despite being a drummer, chose a guitar pick shape for his cutting board due to its triangular form without sharp corners.
  • 🛠️ He created a template from a picture of a guitar pick to achieve the desired shape for the cutting board.
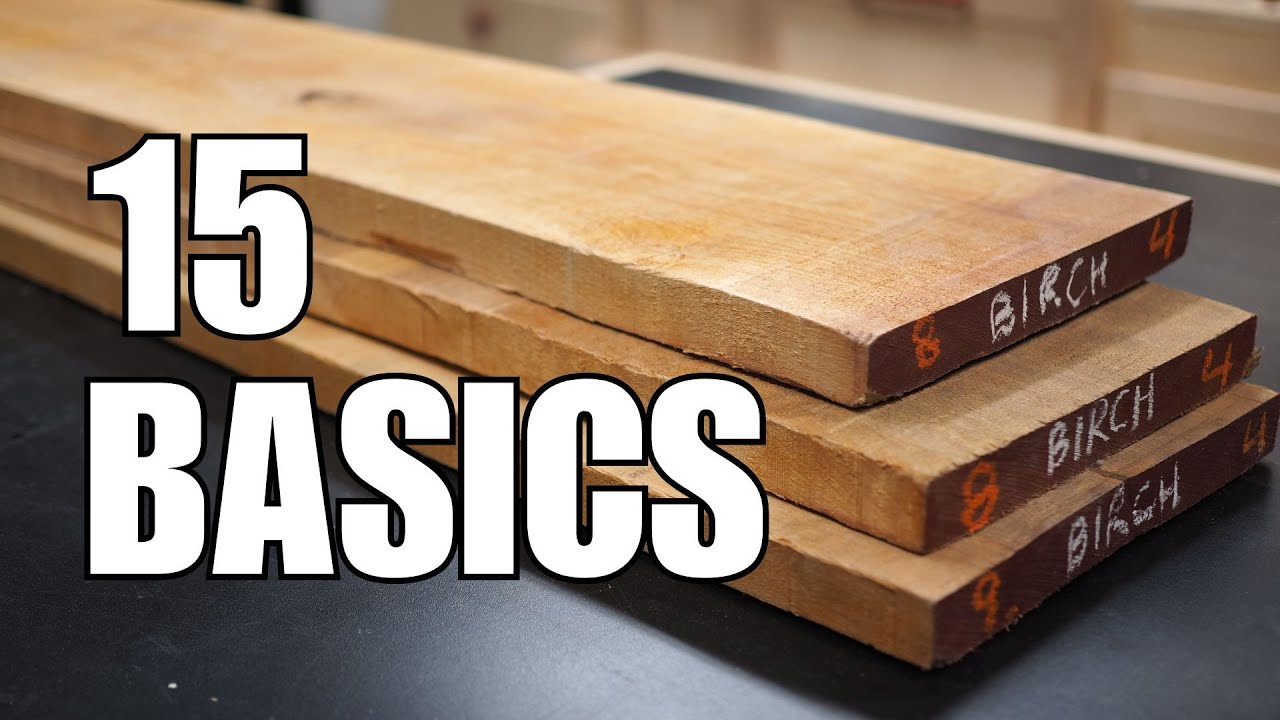
  • 🌳 High-quality lumber like walnut and curly maple was used for the cutting boards, aiming for straight grain patterns.
  • 🔩 The cutting boards were constructed with end grain oriented vertically for stability and a consistent quarter sawn face.
  • 🪵 Each wood strip was jointed and planed to ensure all faces were clean before gluing.
  • 💧 Titebond III, a waterproof and food-safe adhesive, was used to glue the strips together.
  • 🔨 Clamps with cauls were used to ensure the panel stayed flat during the drying process, saving time on sanding.
  • 📐 Marc demonstrated knowledge of end grain cutting boards, highlighting their beauty and the challenges of constructing them to last.
  • ✂️ After the glue dried, the boards were sanded and shaped using a bandsaw and disc sander.
  • 🔩 A routing template and jig were used to create the feet on the bottom of the cutting board, ensuring it sits stably on any countertop.
  • 🛡️ The final product was finished with multiple coats of food-safe oil and beeswax for protection, emphasizing the importance of maintenance.

Q & A

  • What is the primary purpose of the guitar pick cutting board Marc is discussing?

    -Marc is using a guitar pick shape for a cutting board because he wanted a triangular shape without straight edges or sharp corners, and the guitar pick provided the perfect template.

  • Why did Marc choose walnut and curly maple for the cutting boards?

    -Marc chose walnut and curly maple because he wanted the grain to be as straight as possible for the aesthetic appeal of the cutting boards, which were intended to be gifts.

  • What is the significance of the endgrain being oriented vertically on the cutting board?

    -Orienting the endgrain vertically makes the board more stable and provides a more consistent quarter sawn face facing up.

  • How does Marc ensure the panel of the cutting board stays flat during the gluing process?

    -Marc uses a set of clamps on each end of the cutting board to ensure it stays flat and doesn't require a lot of post-processing.

  • What is the advantage of using Titebond three for gluing the cutting boards?

    -Titebond three is waterproof and food safe, making it an ideal adhesive for cutting boards that will come into contact with food.

  • Why did Marc decide to make a cutting board instead of an end grain cutting board?

    -Marc chose to make a long grain cutting board because it's easier to batch out for gifts, and it doesn't have the same challenges in construction and maintenance as an end grain cutting board.

  • How does Marc create the shape of the cutting board?

    -Marc uses a template made from a picture of a guitar pick, which he then traces onto the board before cutting it out at the bandsaw.

  • What is the purpose of the underside chamfer Marc creates around the cutting board?

    -The underside chamfer gives the board a lighter look and is created using a chamfering bit.

  • How does Marc create the feet on the bottom of the cutting board?

    -Marc uses a routing template and a guide bushing with a bullnose bit to establish the shape of the foot, then removes the rest of the stock with a shop-made routing jig.

  • What is the importance of raising the grain of the wood before applying the finish?

    -Raising the grain with water swells the fibers and makes the surface rough, which is then lightly sanded smooth. This prevents the new owner from experiencing an unpleasant surprise when the board expands with use.

  • What type of oil does Marc prefer to use on the cutting boards, and why?

    -Marc prefers to use a food safe drying oil like polymerized linseed oil because it provides better protection and is more appealing than mineral oil, which does not dry.

  • What is Marc's recommendation for packaging the cutting boards if they are given as gifts or sold?

    -Marc suggests including a small jar of the finishing wax, along with a card explaining how to care for the cutting board, when to apply wax, and what not to do with it.

Outlines

00:00

🎸 Guitar Pick-Inspired Cutting Board Creation

Marc discusses creating a cutting board inspired by the shape of a guitar pick, despite being a drummer. He emphasizes the desire for a triangular shape without sharp edges. Marc explains his process of making a template from a picture of a guitar pick to achieve the desired shape. He also details the importance of relieving material on the bottom to ensure three points of contact with the countertop, ensuring stability despite potential warping. Marc shares his choice of high-quality lumber like walnut and curly maple for the project, aiming for straight grain. He outlines the steps of jointing and planing each strip, gluing them together with waterproof and food-safe Titebond III, and using clamps to ensure a flat surface. Marc also reflects on his experience with end grain cutting boards, acknowledging their beauty and challenges, and explains why he chose a long grain cutting board for this project. The process includes sanding, using a drum sander, and tracing the guitar pick shape. Marc also describes creating feet for the board using a routing template and a shop-made jig, aiming for a stable and aesthetically pleasing final product.

05:01

🛠️ Finishing the Cutting Board

Marc explains the process of finishing the cutting board, starting with sanding up to 220 grit. He then discusses the importance of raising the wood grain using water to prepare the surface for finishing and to prevent an unpleasant surprise for the user when the board gets wet. Marc opts for a food-safe drying oil, specifically polymerized linseed oil from Tried and True, over mineral oil, applying it in thin coats. After seven days of applying oil, he adds a final coat mixed with beeswax, applied with an abrasive pad and buffed off. Marc humorously suggests cutting a hot dog instead of a bell pepper or tomato to demonstrate the board's functionality. He provides recommendations for those who plan to gift or sell the boards, such as including a sample of the finishing wax and a care guide in the packaging. The guide should explain how to maintain the board, when to apply wax, and what not to do with a wood cutting board to ensure the recipient's long-term satisfaction.

Mindmap

Keywords

💡Guitar Pick Cutting Board

A guitar pick cutting board is a triangular-shaped cutting board that the speaker created, inspired by the shape of a guitar pick. Despite not playing the guitar, the speaker found the shape ideal for his needs. This board is central to the video's theme of woodworking and craftsmanship, showcasing the speaker's creativity in repurposing a musical item's shape for a functional kitchen tool.

💡Relieving Material

Relieving material refers to the process of removing wood from the bottom of the cutting board to create three points of contact with the countertop. This ensures the board sits stable even if it warps, cups, or bows. The concept is crucial for the board's functionality and longevity, demonstrating the speaker's attention to detail in woodworking.

💡Lumber

Lumber, in this context, refers to the high-quality wood materials like walnut and curly maple used for the cutting boards. The speaker's choice of lumber is significant as it not only affects the board's aesthetics but also its durability and stability. The use of lumber exemplifies the speaker's commitment to quality in his woodworking projects.

💡Endgrain

Endgrain is the orientation of the wood where the rings of the tree are visible. The speaker orients the endgrain vertically to increase the board's stability and to present a consistent quarter-sawn face. This term is key to understanding the construction technique and the speaker's knowledge of wood properties.

💡Titebond Three

Titebond Three is a waterproof and food-safe woodworking glue used by the speaker to bond the wood strips together. The use of Titebond Three is highlighted to assure viewers of the board's safety and suitability for kitchen use, reflecting the speaker's concern for both quality and practicality.

💡Drum Sander

A drum sander is a woodworking tool used to smooth surfaces. The speaker uses it to create a smooth surface on the curly maple, which tends to chip. The drum sander is an essential tool in achieving the desired finish on the cutting boards, illustrating the speaker's reliance on specialized equipment for precise woodworking.

💡End Grain Cutting Boards

End grain cutting boards are mentioned as an alternative type of cutting board where the wood grain runs vertically into the cutting surface. The speaker discusses the pros and cons of this type, noting its beauty but also its challenges in construction and maintenance. This comparison helps viewers understand the different options available in woodworking.

💡Chamfer

A chamfer is a beveled edge created by the speaker on the cutting board for a lighter look. The speaker uses a chamfering bit to create this detail, which not only enhances the board's appearance but also contributes to its functionality by preventing the board from rolling.

💡Routing Jig

A routing jig is a custom-made tool used by the speaker to create the feet on the bottom of the cutting board. The jig aids in achieving precise and consistent cuts, showcasing the speaker's ingenuity and the importance of specialized tools in complex woodworking tasks.

💡Food Safe Oil

Food safe oil, such as polymerized linseed oil, is applied by the speaker as a finish to the cutting board to protect the wood and make it suitable for food contact. The choice of oil is significant as it reflects the speaker's consideration for the board's practical use and the health of its users.

💡Grain Raising

Grain raising is a process where water is used to swell the wood fibers, preparing the surface for finishing. The speaker performs this step to ensure the wood is ready for oil application, highlighting the meticulous preparation required in woodworking to achieve a quality finish.

Highlights

Sponsorships mentioned: Powermatic and Titebond.

Guitar pick cutting board design, despite the creator being a drummer.

Use of a guitar pick shape for a cutting board due to its triangular form without sharp edges.

Creating a template from a picture of a guitar pick to achieve the desired shape.

Designing the board to have three points of contact to prevent warping and ensure stability.

Using high-quality lumber like walnut and curly maple for the cutting boards.

Laying out parts on the straightest screen to ensure the grain is as straight as possible.

Final dimensions of the cutting board should be about 16 inches long and 15 inches wide.

Endgrain is oriented vertically for stability and a consistent quarter sawn face.

Strips are jointed and planed to clean up all four faces.

Using Titebond three, a waterproof and food-safe adhesive, for gluing the strips together.

Ensuring the panel stays flat with calls on each end to reduce post-processing.

Marc's experience with end grain cutting boards and the challenges they present.

Advantages and disadvantages of end grain cutting boards.

Choosing a long grain cutting board design for批量生产 gifts.

Sanding the surface and passing the boards through the drum sander after the glue is dry.

Tracing the guitar pick shape onto the board using a template.

Cutting out the shape at the bandsaw and cleaning the edges at the disc sander.

Adding a substantial underside chamfer for a lighter look.

Creating a routing template for the corner shape of the cutting board's feet.

Using a shop-made routing jig to remove the rest of the stock for the feet.

Attaching the cutting board to the workbench with double stick tape for routing.

Using a bowl bottom bit to produce a flat surface and remove stock efficiently.

Sand the boards up to 220 grit before applying finish.

Raising the grain of the wood using water before applying finish.

Applying food safe drying oil, such as polymerized linseed oil, for protection.

Adding beeswax to the final coat of oil for added protection and shine.

Recommendations for gifting or selling the cutting boards, including care instructions.

Transcripts

play00:00

- [Marc] The Wood Whisper is sponsored

play00:01

by Powermatic and Titebond.

play00:03

So this is my guitar pick cutting board.

play00:06

Now the funny thing is I don't even play the guitar.

play00:08

I'm actually a drummer.

play00:10

But I needed this shape.

play00:11

I wanted something that was roughly triangular

play00:13

and I really didn't want straight edges

play00:15

and really sharp corners.

play00:17

So a guitar pick was the perfect shape.

play00:19

In fact, I took a picture of a guitar pick,

play00:21

blew it up and then made a template out of it

play00:23

and that got me the shape that I wanted.

play00:25

So it just happens to look like a guitar pick.

play00:28

If we relieve material on the bottom

play00:30

and leave only three feet

play00:32

that leaves three points of contact with the countertop.

play00:34

So no matter what happens with this board,

play00:36

if it decides to warp, cup, bow,

play00:39

it's always going to sit nice

play00:40

and stable on the countertop

play00:42

and that was the goal.

play00:43

Alright, so here's how I made it.

play00:44

Since these cutting boards are going to be gifts,

play00:47

I threw some really nice lumber at it,

play00:49

walnut and curly maple.

play00:51

I really want the grain to be as straight as possible.

play00:53

So we carefully lay out the parts on the straightest screen.

play00:56

(machine whirring)

play01:00

The size of the strip's really doesn't matter much

play01:02

as long as the final dimensions are about 16 inches long

play01:06

and 15 inches wide.

play01:07

The endgrain is oriented vertically

play01:09

which makes the board more stable

play01:11

and puts a more consistent quarter sawn face facing up.

play01:15

Each strip is then jointed

play01:16

and planed cleaning up all four faces.

play01:20

That curly maple really chips out a lot even

play01:22

with a helical cutter head

play01:24

so the drum sander gives me a nice smooth surface.

play01:28

The strips are then glued together using Titebond three,

play01:31

which is waterproof and food safe.

play01:33

(soft thumping sound)

play01:38

We lift it up.

play01:39

The screw up pretty straightforward,

play01:40

but using a set of calls on each end

play01:42

will go a long way toward making sure the panel stays flat

play01:45

and doesn't require a lot of post processing.

play01:48

If you make a lot of cutting boards,

play01:49

this is crucial since you could burn a lot of time

play01:52

and sandpaper, flattening these things out.

play01:55

Now I'm sure a few of you are wondering

play01:57

does Marc even know about end grain cutting boards?

play02:00

I certainly do I actually have one.

play02:02

This is the board that I made in 2006.

play02:05

In fact, I think this build

play02:06

might be the first cutting board video

play02:07

to be posted to YouTube, which is kind of nuts.

play02:10

Lets get ready and make a cutting board.

play02:19

But this has served us well for a very long time.

play02:22

But it does suffer from some problems.

play02:24

I've got some cracks here and there,

play02:25

I've got some areas where the glue joints

play02:27

are just now starting to separate.

play02:29

End grain can be beautiful,

play02:31

but it's very challenging to build.

play02:32

And it's even more challenging to build correctly so

play02:35

that it lasts a long time.

play02:36

And even then, just because it's all end grain,

play02:38

that means it's a very thirsty surface.

play02:40

So problems can happen as it absorbs a lot of water.

play02:43

So it has its advantages and its disadvantages.

play02:46

But when you're really looking to batch out

play02:48

a bunch of boards, especially for gifts,

play02:49

there's nothing wrong

play02:50

with a good quality long grain cutting board

play02:53

and that's why I went with that for this design.

play02:55

After the glue is dry.

play02:56

I sand the surface

play02:57

and then give the boards a pass through the drum sander.

play02:59

(machine whirring)

play03:01

Now I can bring over my sweet guitar pick template

play03:04

and trace out the shape.

play03:06

In some cases, I ended up with a larger blank,

play03:09

so I'll use a compass

play03:10

to make the board just a little bit bigger

play03:12

utilizing more of the material.

play03:14

The shape is then cut out at the bandsaw

play03:16

(machine whirring)

play03:21

The edges are cleaned at the disc sander.

play03:26

I'd like there to be a substantial underside chamfer

play03:28

all the way around, it gives the board a lighter look.

play03:31

So I'm gonna take several passes using a chamfering bit

play03:34

and sneak up on it.

play03:35

(machine whirring)

play03:38

The top receives a smaller simple chamfer.

play03:42

At this point, I'm kind of noodling a bit.

play03:45

I know I wanna make three feet on the bottom

play03:47

so I make a little routing template

play03:48

that mimics the corner shape

play03:50

and then I can clamp it to the corner

play03:52

and use a guide bushing and a bullnose bit

play03:54

to establish the shape of the foot.

play03:56

(machine whirring)

play04:02

To remove the rest of the stock

play04:03

I'll make a shop-made routing jig.

play04:05

Basically it's just a small version

play04:07

of one of those slab flattening jigs.

play04:09

I'll make a sturdy cradle that holds the router.

play04:12

Now the cutting board is attached

play04:13

to the workbench with double stick tape.

play04:19

Two rails are then stuck to the bench

play04:23

and the cradle spans the gap.

play04:25

I'm gonna use a bowl bottom bit since it produces

play04:27

a flat surface and removes a good amount of stack at once.

play04:30

The router is attached to the cradle

play04:32

and I'm off to saw does town

play04:34

(machine whirring)

play04:37

The real trick with this setup is being able

play04:39

to see what the heck you're doing.

play04:41

I found it best to simply hog away

play04:43

as much stack as possible in the safe zone

play04:45

in the middle and then using a flashlight

play04:48

and kneeling down I carefully sneak up on the feet.

play04:51

Doing one wasn't so bad

play04:53

but I had like seven to do

play04:54

(machine whirring)

play04:59

Now I can sand the surface smooth.

play05:01

(machine whirring)

play05:05

I sand the boards up to 220.

play05:09

Before applying finish,

play05:10

I'll raise the grain of the wood using some water.

play05:12

This is a very important process for a piece

play05:14

that'll get wet.

play05:16

The water will swell the fibers

play05:17

and make the surface really rough.

play05:19

One strike and lightly sand the surface with 320 grit

play05:22

to make it smooth again.

play05:24

Thankfully, this phenomenon only occurs once.

play05:26

So this grain raising process prevents the new owner

play05:29

of the cutting board

play05:30

from having an unpleasant surprise

play05:31

the first time they use it.

play05:33

And now it's time for the oil.

play05:35

I like to use a food safe drying oil

play05:37

such as this polymerized linseed oil

play05:39

from Tried and True.

play05:40

I know lots of people like mineral oil,

play05:42

it's just not my thing.

play05:43

An oil that actually dries is much more appealing

play05:46

and makes the most sense to me.

play05:48

Each coat is applied very thin

play05:50

You can warm this stuff up

play05:52

to make it a little bit easier

play05:53

to drive into the grain if you need to.

play05:55

All of the excess is rubbed off

play05:57

and the board is left to dry overnight.

play05:59

The more cots of oil you apply,

play06:01

the better the protection,

play06:02

but at some point you kinda need to pinch it off.

play06:04

After about seven coats over the course of seven days,

play06:07

I'll add the final coat.

play06:09

Now this time I'll melt a little bit

play06:10

of beeswax into the oil.

play06:13

This oil wax mixture

play06:14

is then applied using a white abrasive pad

play06:17

and the excess is buffed off.

play06:19

(upbeat music)

play06:20

Now this is the point

play06:21

where most people would show themselves

play06:22

cutting a fresh bell pepper

play06:24

or tomato or something

play06:25

that lets the internet know how super healthy they are.

play06:28

But not me.

play06:29

I'm gonna cut up a hot dog

play06:31

in super essential, slow motion.

play06:37

Now if you decide to give these away as gifts,

play06:39

or maybe you sell them a couple recommendations

play06:41

for you first of all,

play06:42

take a little bit of the finished with the wax in it,

play06:44

put it in a little jelly jar

play06:46

and give that as part of the package.

play06:48

Give them some of the material to reapply

play06:50

and then put a little card in there like a little gift card

play06:53

or postcard that explains how to care

play06:55

for the cutting board when to apply the wax?

play06:57

What to do?

play06:58

And most importantly,

play06:59

what not to do with a wood cutting board?

play07:01

And that will go a long way

play07:02

in making sure the recipient

play07:03

of this cutting board is gonna be happy

play07:05

with it for a long, long time.

play07:06

All right, thanks for watching everybody, take care.

Rate This

5.0 / 5 (0 votes)

Связанные теги
WoodworkingDIY ProjectCutting BoardGuitar PickWood StabilityGift IdeasTitebondPowermaticDrummer's ProjectEnd Grain
Вам нужно краткое изложение на английском?