Model Preparation
Summary
TLDREl script destaca la importancia de la orientación de piezas en impresión 3D, minimizando voladizos y asegurando soportes. Se menciona la necesidad de agujeros de drenaje en piezas SLA, y cómo el relleno y grosor de pared afectan rigidez y durabilidad. La escala de piezas es clave para adaptación y encaje, y la calidad de acabado depende del grosor de capa y procesos post-impresión como lijado y pulido. Cura y Preform, softwares de slicer, facilitan la preparación de modelos, ajuste de orientación y soportes para FDM y SLA respectivamente.
Takeaways
- 🔄 Orientar la pieza correctamente es crucial para minimizar voladizos y asegurar que el material de soporte esté en su lugar.
- 🕳️ Las piezas SLA necesitan un orificio de drenaje para evitar que la resina líquida quede atrapada dentro de la pieza.
- 🔧 La cantidad de relleno o material sólido afecta significativamente la pieza y el grosor de las paredes deseadas.
- 📏 Ajustar la escala garantiza que las piezas tengan el tamaño correcto y puedan ensamblarse adecuadamente.
- ✨ La calidad de la suavidad y el acabado se determina por el grosor del material y los procedimientos de postimpresión.
- 🔍 Con las impresoras FDM, minimizar el número de voladizos asegura que las capas se adhieran correctamente.
- 📐 En las impresoras SLA, considerar cómo se agregarán los soportes es importante, pero no tan crítico como en las FDM.
- 🏠 Para piezas huecas en SLA, debe haber un orificio de drenaje natural o modelado para evitar que la resina quede atrapada.
- 🧱 El concepto de relleno afecta la rigidez de la pieza y el consumo de material y tiempo.
- ⚖️ El grosor de las paredes afecta la resistencia, la durabilidad, la cantidad de material necesario, el tiempo de impresión y el acabado de la pieza.
Q & A
¿Por qué es importante la orientación de la pieza al preparar un modelo para imprimir?
-La orientación de la pieza es crucial para minimizar los voladizos y asegurarse de que el material de soporte esté en su lugar, lo que contribuye a un resultado de impresión exitoso.
¿Qué problema puede surgir en las piezas SLA si no se incluye un agujero de drenaje?
-Si no se incluye un agujero de drenaje en las piezas SLA, la resina líquida puede quedar atrapada dentro de la pieza, lo que puede afectar la calidad y durabilidad de la impresión.
¿Cómo afecta la cantidad de material de relleno a la impresión de una pieza?
-La cantidad de material de relleno afecta la rigidez de la pieza, así como la cantidad de material utilizado y el tiempo de impresión. Un mayor relleno proporciona mayor rigidez, pero también consume más material y tiempo.
¿Qué significa ajustar la escala de una pieza antes de imprimirla?
-Ajustar la escala de una pieza implica cambiar su tamaño para asegurarse de que las piezas encajen correctamente entre sí, especialmente si se espera que la pieza se encoja ligeramente durante el proceso de curado.
¿Por qué es crucial minimizar los voladizos al imprimir con impresoras FDM?
-Minimizar los voladizos es crucial porque asegura que las capas se adhieran correctamente entre sí y que la geometría de la pieza se construya correctamente. Voladizos mayores a 55-60 grados generalmente requieren material de soporte para evitar fallos en la impresión.
¿Qué software se mencionó en el guion para preparar modelos para impresoras FDM y SLA?
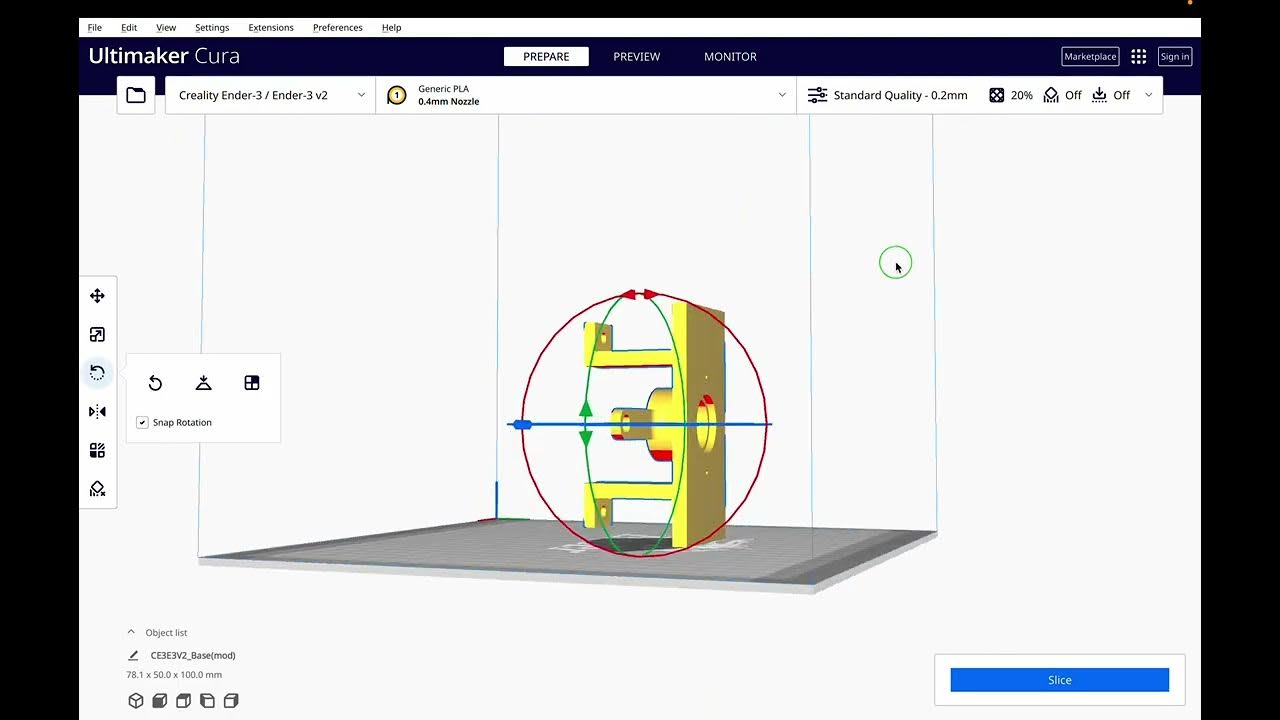
-El software mencionado para preparar modelos para impresoras FDM es Ultimaker Cura, y para impresoras SLA es Formlabs PreForm.
¿Qué ventaja ofrece la función de 'one click print' en el software PreForm de Formlabs?
-La función de 'one click print' en el software PreForm de Formlabs orienta automáticamente la pieza en el ángulo y posición óptimos, genera soportes donde sea necesario y calcula el diseño de la impresión.
¿Qué factores determinan la suavidad y calidad de acabado de una pieza impresa en 3D?
-La suavidad y calidad de acabado de una pieza impresa en 3D están determinadas por el grosor del material y cualquier procedimiento post-impresión, como el lijado, la pintura y el pulido.
¿Cómo afecta el grosor de la pared a una pieza impresa en 3D?
-El grosor de la pared afecta la resistencia y durabilidad de la pieza, la cantidad de material necesario, el tiempo de impresión y la apariencia refinada del producto final.
¿Por qué es importante ajustar la configuración para lograr la calidad de acabado deseada?
-Es importante ajustar la configuración porque las piezas impresas en 3D se crean en capas, y la altura de estas capas tiene un gran efecto en la suavidad y apariencia del acabado. Ajustar la configuración puede optimizar el tiempo de impresión y el consumo de material.
Outlines
🔧 Preparación del Modelo para Impresión
Este párrafo aborda los factores críticos a considerar antes de enviar un modelo 3D a la impresora. Destaca la importancia de la orientación de la pieza, la minimización de voladizos y la necesidad de materiales de soporte. También se menciona la inclusión de orificios de drenaje en piezas SLA, la configuración del relleno y el grosor de las paredes. Se enfatiza la importancia de ajustar la escala para garantizar el encaje adecuado de las piezas y la calidad del acabado final, influenciada por el grosor del material y los procedimientos de post-impresión.
📏 Escalado y Ajuste para Impresiones Precisas
Este párrafo se enfoca en la importancia de ajustar la escala y las dimensiones de las piezas impresas en 3D. Explica cómo los programas de corte pueden escalar el modelo para compensar la contracción durante el curado, especialmente en piezas SLA. Además, discute la necesidad de ajustar las dimensiones para asegurar un encaje adecuado entre piezas, y cómo la altura de las capas afecta la suavidad y el tiempo de impresión. Se menciona la consideración de post-acabado para lograr un acabado fino sin aumentar excesivamente el tiempo de impresión.
Mindmap
Keywords
💡Orientación de la pieza
💡Voladizos
💡Agujero de drenaje
💡Infill
💡Grosor de pared
💡Escalado
💡Altura de capa
💡Post-procesamiento
💡Impresora FDM
💡Impresora SLA
Highlights
Part orientation is one of the most critical aspects of achieving a successful print.
Minimizing overhangs on the model and making sure support material is in place is essential.
SLA parts may need to have a drain hole included to prevent liquid resin from being trapped inside the part.
The amount of infill or solid material greatly affects the part as well as the desired wall thickness.
Adjusting scaling ensures that parts are sized correctly and can fit together.
Smoothness and finish quality are determined by factors such as material thickness and post-printing procedures.
With both FDM and SLA printers, orienting the part correctly is critical to achieving good results.
Minimizing the number of overhangs on an FDM printer will ensure layers correctly adhere to one another.
Overhangs greater than 55 to 60 degrees require support material to prevent print failures.
Using software like Ultimaker's Cura helps prepare the model for printing by minimizing overhangs and optimizing part orientation.
For SLA parts, it's important to consider how supports will be added and to ensure no resin is trapped inside hollow parts.
Formlabs' PreForm software can automatically orient the part, generate supports, and calculate the layout for optimal printing.
Infill refers to the volume percentage of the part that is solid, affecting rigidity, material consumption, and print time.
Adjusting wall thickness affects the printed part's strength, durability, material use, and print time.
Scaling the part in the slicer program can account for any shrinkage during curing, ensuring proper fit for parts that need to fit together.
Layer height affects the smoothness and refined appearance of the printed part, with thinner layers producing smoother parts.
Post-finishing techniques like sanding, painting, and polishing can improve the final appearance and reduce print time and material use.
Transcripts
when preparing the model to be printed
there are several factors to take into
account before sending the file to the
printer
part orientation is one of the most
critical aspects of achieving a
successful print
which means minimizing overhangs on the
model and making sure support material
is in place
sla parts may need to have a drain hole
included that way liquid resin
isn't trapped inside the part the amount
of
in-fill or solid material also greatly
affects the part as well as the desired
wall thickness
if the part isn't entirely solid
adjusting scaling will also ensure that
parts are sized correctly
and can fit together lastly the
smoothness and finish quality
are determined by a couple factors such
as material thickness
and adding any post printing procedures
to
polish off the final design
with both fdm and sla printers
orienting the part correctly is critical
to achieving good results
with a part printed on an fdm printer
minimizing the number of overhangs will
ensure that the layers
will correctly adhere to one another and
the geometry will be built correctly
typically anything more than about 55 to
60 degrees of overhang
will require support material to keep
the layer from collapsing
this would cause a layer to disconnect
and potentially a print failure
here i'm using ultimaker's cura software
to prepare the model for printing
to orient the part i want to make sure
the overhangs are minimized
and that the footprint is as large as
possible especially if it's a flat
surface
this means i need to rotate the part so
that this face is parallel to the build
plate
then click on the lay flat button to
make sure it's laying directly on top of
the build plate
and use the move tools to position it
near the center
in this orientation notice that the
overhangs have been minimized
and the largest surface is flat against
the build plate to make the largest
footprint
with sla it's also important to consider
how supports will be added
but not as critical as with fdm there's
also one important feature of printing
sla parts if you're printing a part that
is hollow
there should be either a natural drain
hole so the part doesn't trap resin
inside or you should model one in such a
way
that resin won't be trapped in a cavity
in the part
here i'm using the formlabs preform
software
orienting a part in the software can be
a very simple process
if i click on this icon one click print
the software will automatically orient
the part to the optimal
angle and position followed by
generating supports where necessary
and calculating the layout
notice that the part isn't flat against
the build plate
if needed these three steps can be
manually adjusted to your preference
i can click on any of the icons such as
the orientation options
and make adjustments as needed this is
the same for the supports
such as adjusting the density or
adjusting the layout by dragging this
icon to position it on a different area
of the build plate
next i'd like to talk about the concept
of infill which refers to how much of
the part volume is considered to be
solid the more solid the part is the
more
rigid it will be but it will also
consume more material
and time often the infill isn't solid
material but is created using
internal structures that act like a
solid
the slicer software can automatically
incorporate this
removing the need for you to incorporate
this into the 3d model
for parts that need to function without
breaking a solid infill
is ideal if a part is non-mechanical or
doesn't have to sustain
external loads or pressures you can
reduce the infill
down to the 10 to 20 percent range to
save time
and material another key aspect to
consider is determining the parts
wall thickness the wall thickness
affects multiple aspects of the printed
part
strength and durability amount of
material needed
how long it'll take to print and how
refined the finished part will look
however keep in mind that this only
applies to parts that have less than one
hundred percent
infill most slicer programs will also
let you define the number of layers a
part will have
before it begins to create the infill in
fdm printers
wall thickness is typically set as a
multiple of the size of the extruder
nozzle opening
one of the key steps in creating a
correctly sized part is
adjusting the parts scale sometimes a
printed part
will shrink slightly as it cures
particularly for
sla printed parts to account for this
the slicer program can be used to scale
up the model by a few percent
prior to printing you don't have to
account for this in the modeling
software
in addition if you're printing parts
that fit together such as a bolt going
through a mounting hole in a part
you'll need to make sure that the part
going inside isn't too
large so scaling the parts accordingly
will help make sure the parts fit
properly together
scaling down one of the two parts will
most likely take care of it
with all these considerations in mind
it's important to adjust
settings to achieve the finish quality
you're looking for
because 3d printed parts are created in
layers
the layer height has a big effect on how
smooth and refined the finished part
appears thinner heights will produce a
smoother part
but will drastically add time to the
total print time
if a very fine finish on a part is
necessary
post finishing of the part should be
considered as a solution
since it will keep the print time and
material consumption low
this can include sanding painting and
polishing
you
Voir Plus de Vidéos Connexes
💥💥NECESITAS CONFIGURAR ESTOS AJUSTES en CURA | Tutorial software Impresión 3D en Español
TEM. 2 CAP. 9 Software impresión 3D
Mecanizado con abrasivos | | UPV
Documental - Mecanica Industrial - "Tratamientos Térmicos"
Materials
💥Que es Escariado o Rimado en Maquinado Industrial Torno paralelo💓👌#tech #tecnología🚀🔌
5.0 / 5 (0 votes)