1104LST0301 AC perawatan
Summary
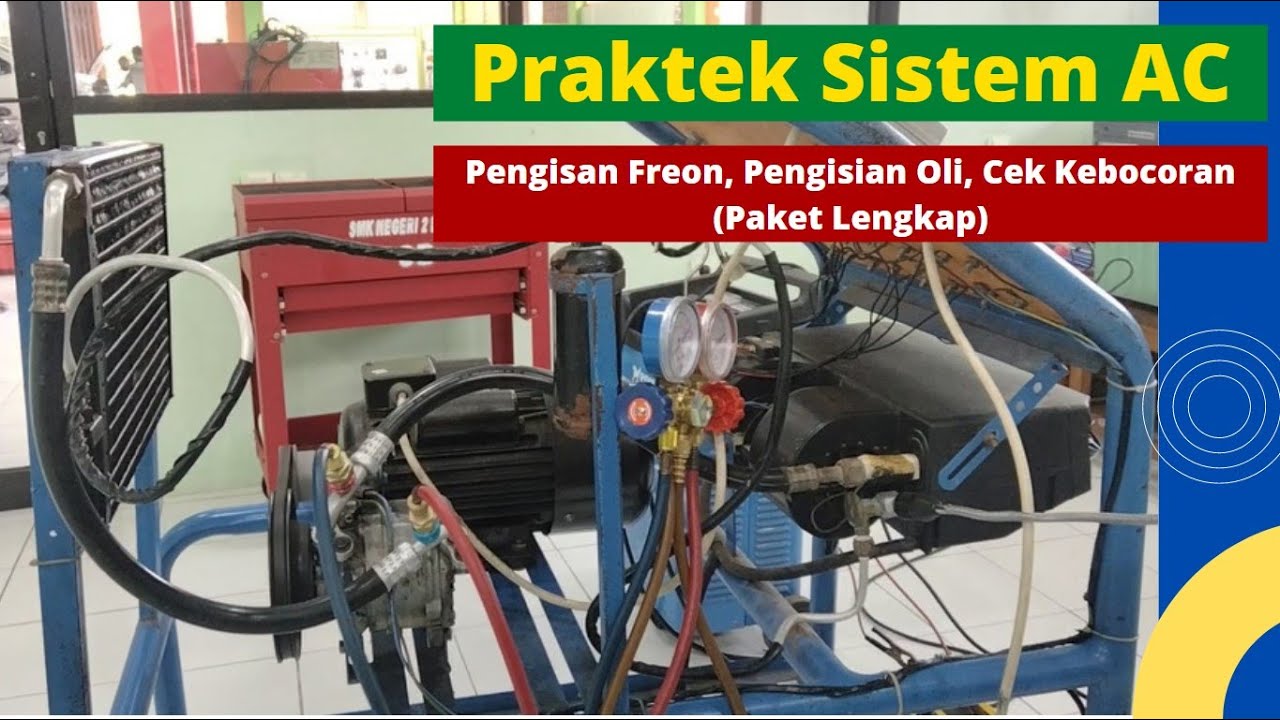
TLDRThis educational video offers a detailed, step-by-step guide on the process of evacuating, charging, and testing a vehicle’s air conditioning system, tailored for vocational school students in automotive technology. The tutorial covers the essential tools and methods involved, such as connecting and handling the refrigerant lines, using a vacuum pump, detecting leaks, and properly filling the system with refrigerant. It emphasizes key safety measures, including the correct handling of pressure gauges and refrigerants, ensuring a smooth and efficient process. The video aims to enhance both theoretical knowledge and practical skills for students in the automotive field.
Takeaways
- 😀 Always ensure the correct hose connections during refrigerant evacuation to avoid system damage.
- 😀 Open the high-pressure valve slowly to control the refrigerant flow and prevent leaks.
- 😀 The vacuum pump should run for at least 15 minutes to remove any remaining air or moisture from the system.
- 😀 Use a gas leak detector to check all connections for any refrigerant leaks before recharging the system.
- 😀 When recharging, ensure that the refrigerant cylinder is upside down to properly fill the system with liquid refrigerant.
- 😀 Follow the correct refrigerant amounts specified for the system (750-850 grams) to ensure proper functioning.
- 😀 Always close the valves tightly after completing the evacuation or recharge process to avoid leaks.
- 😀 During vacuuming, the low-pressure side should be evacuated to at least 600 mmHg to ensure proper vacuuming.
- 😀 After vacuuming, check the system pressure to confirm that no moisture or air remains inside.
- 😀 When reading the manifold pressure, ensure that the low-pressure side reads 21-28 PSI and the high-pressure side reads 206-213 PSI for proper system performance.
Q & A
What is the purpose of this instructional video?
-The video aims to educate SMK Teknik Kendaraan Ringan Otomotif students on the proper steps to evacuate, vacuum, detect leaks, and recharge the refrigerant in an automotive air conditioning system.
What tools are required to perform the procedure described in the video?
-The tools required include a manifold gauge set, refrigerant tank, vacuum pump, gas detector, and hoses for connecting the system.
What is the first step in evacuating the refrigerant from the air conditioning system?
-The first step is to connect the hoses correctly to the manifold gauge set, ensuring that the high-pressure hose goes to the high-pressure valve, and the low-pressure hose connects to the low-pressure valve.
Why is it important not to mix up the high-pressure and low-pressure hoses?
-Mixing up the hoses can lead to incorrect pressure readings, improper evacuation, and potential damage to the air conditioning system.
How can you check if the system has been fully evacuated?
-The system is considered fully evacuated when both pressure gauges show 0 kg/cm², indicating that all refrigerant has been removed.
What should you do if oil comes out during the evacuation process?
-If oil comes out, it is important to stop and check the compressor system for any issues, as the presence of oil may indicate a problem with the compressor or system leakage.
What is the purpose of vacuuming the system after evacuation?
-Vacuuming the system removes any remaining air and moisture, ensuring a clean environment for the refrigerant to work efficiently and preventing damage to the system.
How long should the vacuum pump run during the process?
-The vacuum pump should run for at least 10 minutes to reach a vacuum level of -600 mmHg, and then continue for an additional 15 minutes to reach -700 mmHg.
What tool is used to detect leaks in the air conditioning system?
-A gas detector is used to check for leaks in the air conditioning system. If a leak is detected, the gas detector will emit a sound that increases in frequency as the leak becomes larger.
How do you know when the system is properly filled with refrigerant?
-The system is properly filled when the refrigerant tank is inverted, the high-pressure valve is opened, and the refrigerant is added until the required amount (750-850 grams) is reached. This can be confirmed by the absence of bubbles in the viewing glass.
What are the normal pressure readings for the system after refrigerant charging?
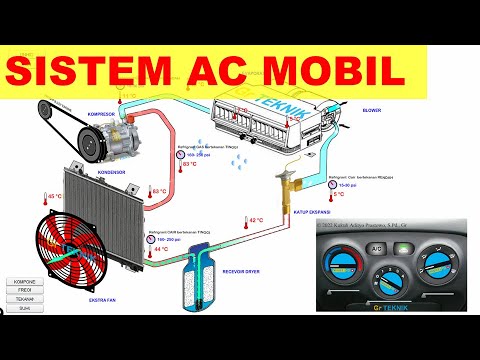
-After charging the system, the low-pressure side should read between 1.5 to 2 kg/cm² (21 to 28 PSI, or 147 to 196 KPA), while the high-pressure side should show a pressure between 14.5 to 15 kg/cm² (206 to 213 PSI, or 1422 to 1471 KPA).
What should you do if the system's pressure readings do not match the normal range?
-If the pressure readings are outside the normal range, it indicates a problem such as a blocked line or insufficient refrigerant. In this case, the system needs to be checked and repaired.
Outlines

Cette section est réservée aux utilisateurs payants. Améliorez votre compte pour accéder à cette section.
Améliorer maintenantMindmap

Cette section est réservée aux utilisateurs payants. Améliorez votre compte pour accéder à cette section.
Améliorer maintenantKeywords

Cette section est réservée aux utilisateurs payants. Améliorez votre compte pour accéder à cette section.
Améliorer maintenantHighlights

Cette section est réservée aux utilisateurs payants. Améliorez votre compte pour accéder à cette section.
Améliorer maintenantTranscripts

Cette section est réservée aux utilisateurs payants. Améliorez votre compte pour accéder à cette section.
Améliorer maintenantVoir Plus de Vidéos Connexes
Praktek Sistem AC II Cara Mengganti Refrigerant (Freon) II Cara Mengisi Oli Pada Sistem AC

S01E04 - BELAJAR ALAT UKUR CYLINDER BORE GAUGE
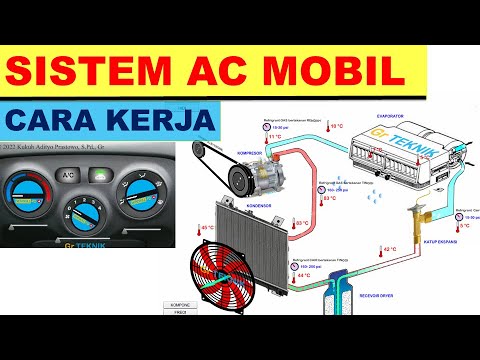
cara kerja sistem ac mobil

Aki motor tidak mau mengisi

5 STATUS Verifikasi Nilai Rapor Yang WAJIB Anda Pahami! SPMB Jatim 2026
cara kerja sistem ac mobil dengan animasi siklus refrigasi freon
5.0 / 5 (0 votes)
